How to collect SMS consent with a tap-to-text form
Learn how to set up a tap-to-text sign-up form to collect phone numbers from new prospects. With tap-to-text, site visitors can click a button in your sign-up form to automatically open their text messaging app where Klaviyo has added a message. They only need to send the message to subscribe.
In general, it’s best practice for list growth to collect SMS consent in your forms via Smart Opt-in; however, tap-to-text is an alternative SMS opt-in method option.
Tap-to-text is not available for branded sender IDs as they are unable to receive text messages. If you’re using a branded sender ID, use Smart Opt-in to collect SMS consent.
Before you begin
Before you can collect SMS consent, you must have already:
- Turned on SMS in Klaviyo
- Set up an SMS sending number for every country where you want to gather SMS subscribers
If you change sending numbers from a toll-free number or long code to a short code, you will need to edit your tap-to-text forms to use the new number.
- Created a mobile terms of service
- Updated your privacy policy
Double opt-in is recommended when collecting SMS consent, and in the US, it is required if you plan to add SMS to your abandoned cart flows.
For more information on what counts as SMS consent and best practices for collecting it, see our guide on understanding SMS consent collection.
How tap-to-text forms work
- Site visitors on mobile devices see your sign-up form telling them to click the button to sign up for SMS marketing.
- They click the button, which automatically opens their messaging app with a pre-populated message containing a subscribe keyword.
- They send the message to opt-in to your SMS marketing and automatically join whichever list that the dedicated subscribe keyword is connected to in your Klaviyo account.

Note that tap-to-text forms do not support revenue metrics.
Tap-to-text best practices
- Multi-step forms are the best option if you want to gather email and SMS consent at the same time. Use a multi-step popup that collects an email address on the first step, followed by a phone number on the second step.
- The subscribe keyword associated with your tap-to-text form can be set to single opt-in (by nature, tap-to-text already asks the recipient to take 2 separate actions: clicking the button in the form and sending the subscribe message).
- If you are sending to multiple countries, you may need to create this form, clone it, and change the sending number and targeted URLs that the form shows on. Learn more about localizing sign-up forms for multiple domains.
Create a tap-to-text sign-up form
Here, we’ll walk through how to edit an existing sign-up form so that it collects SMS consent via tap-to-text. If you’re looking to collect SMS consent from existing email subscribers, see how to create an SMS form that targets email subscribers.
Tap-to-text is also supported in Social Auto-replies, allowing customers to subscribe to SMS directly from Instagram messages using the same tap-to-text opt-in experience.
Tap-to-text blocks only show on mobile devices, so if your form is set to show on all devices (desktop and mobile), then desktop shoppers will need to type their phone numbers into a phone number input field.
Don’t already have a sign-up form? Click here to open this section for instructions.
All templates in the Klaviyo form library are pre-configured to automatically show the optimized SMS opt-in method per device type (tap-to-text on mobile devices and phone number input field on desktop). You can also configure which devices your form shows on in the Targeting and behavior tab within the form editor.
- Navigate to the Sign-up forms tab in Klaviyo’s left-hand navigation.
- Click the All Categories dropdown, then select Email & Numbers.
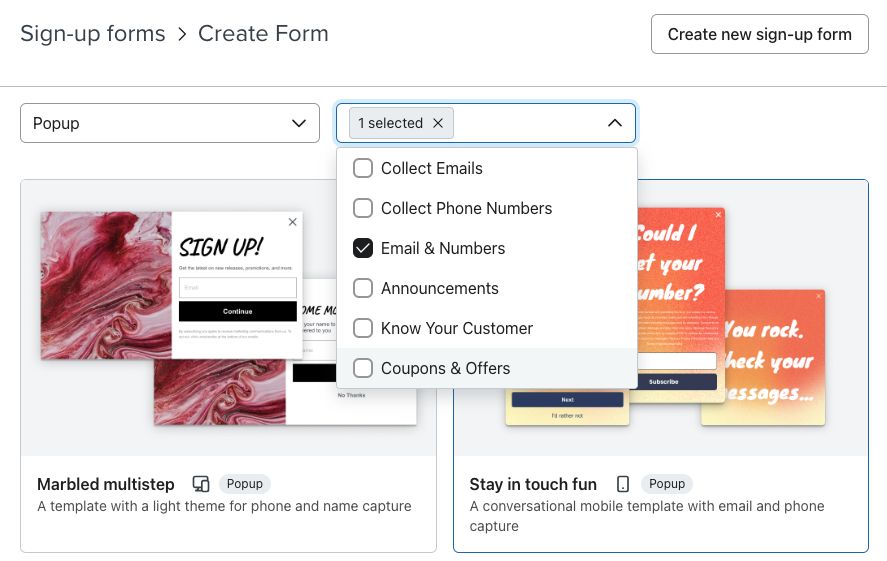
- Choose a template from the filtered options.
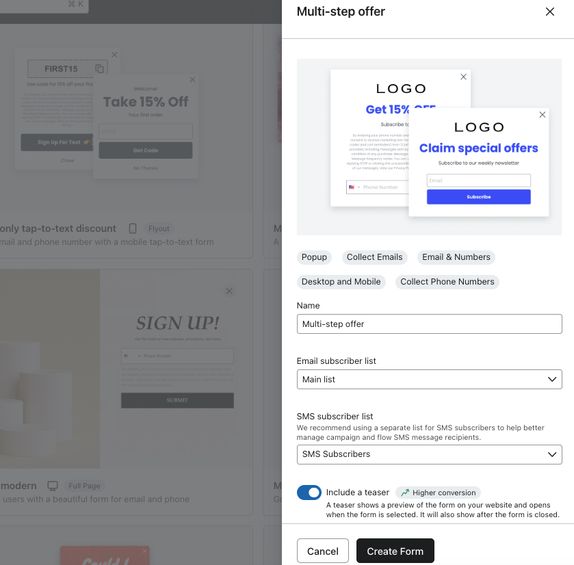
- Here, we chose a form called “Multi-step offer.” Note that, as a Klaviyo best practice, all templates in our form library that collect email and phone numbers do so across multiple steps.
- Choose separate list for your email subscribers and your SMS subscribers to submit to.
- Note that since tap-to-text inherently verifies phone numbers using a 2-step approach, you can use a list set to single opt-in for your SMS subscribers.
- Click Create form to enter the form editor.
- Navigate to the SMS Opt-in step at the top.

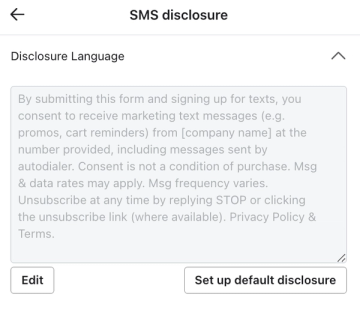
- Click on the textbox that contains your disclosure language. If needed, click Edit to replace the default language with:
- Your account name
- Link to your mobile terms of service
- Link to your privacy policy
- Click the mobile icon on the view selector in the top right corner. This shows the view that site visitors engaging with your form on a mobile device see.

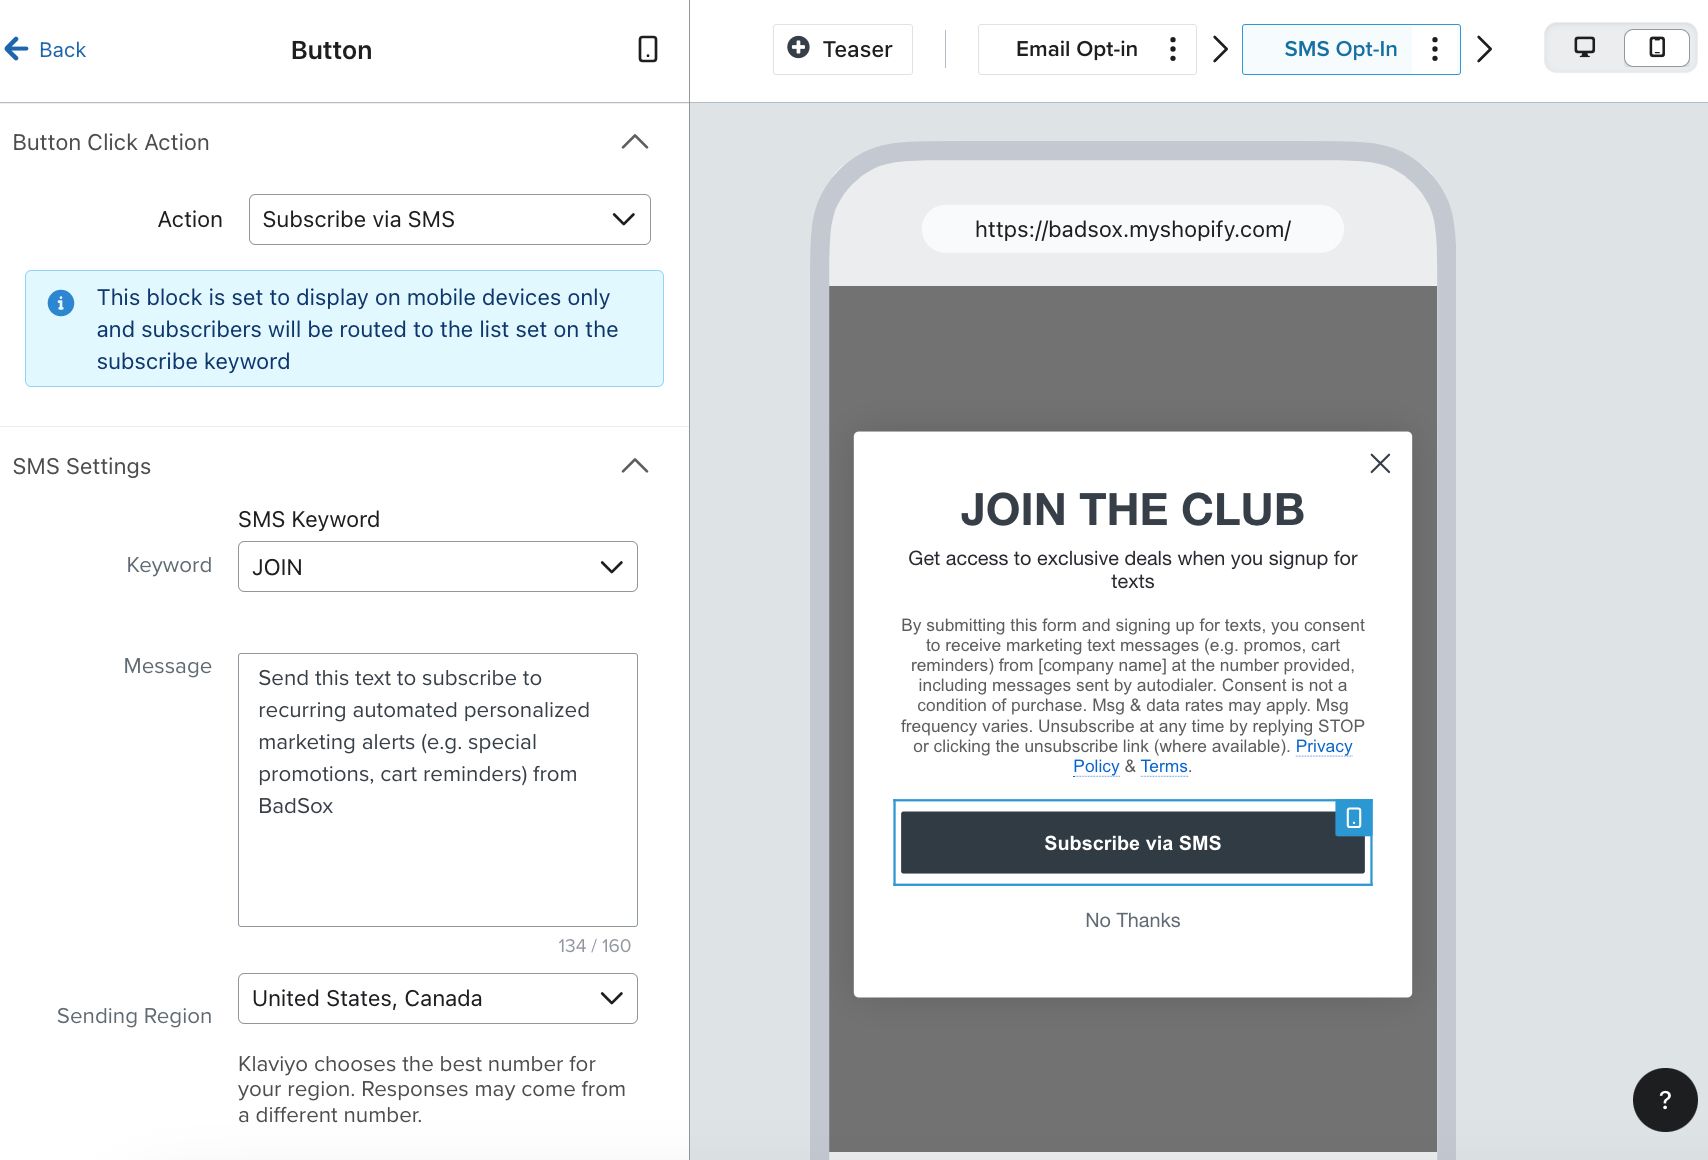
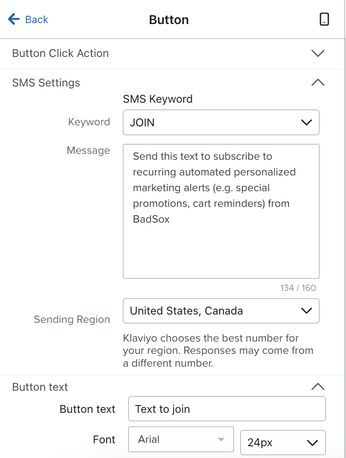
- Click on the Subscribe via SMS submit button on the preview to customize your SMS Keyword and Message.
- You can use a keyword set to single opt-in for a tap-to-text form - the tap-to-text method works similarly to double opt-in by default.
- Under Sending Region, choose the appropriate number for the region you’d like to target with the form.
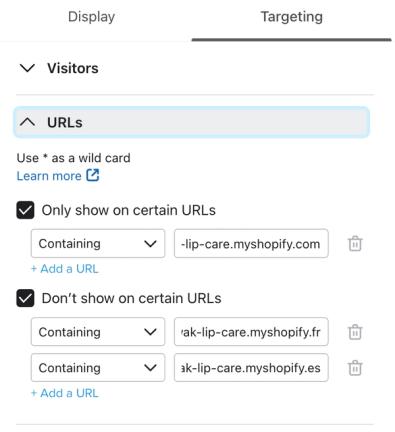
- If you have multiple sending numbers, target this form to only show on the URL for the corresponding sending region.
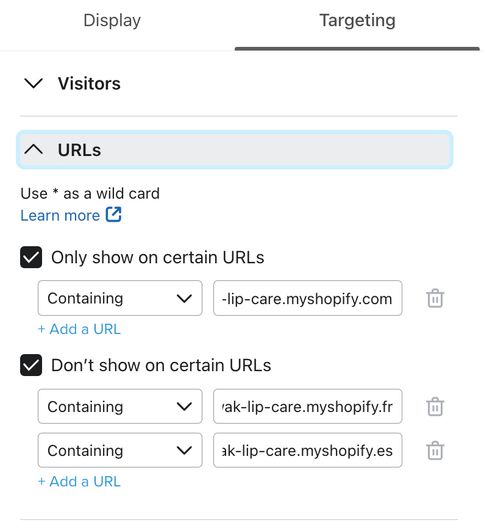
- Navigate to Back > Targeting & behavior > Targeting, then select Only show on certain URLs > Containing and input the correct domain (e.g., https://swak-lip-care.myshopify.com).
- If you have other international domains, you may also need to exclude the other domains. Click Don’t show on certain URLs, then choose Containing and enter the other regional domains (e.g., https://swak-lip-care.myshopify.fr).
- Now that your form is configured for collecting SMS consent, navigate to the Styles section of the editor to change the layout, font, and colors to better match your brand. For guidance while editing, see getting started with sign-up forms.
- Optional: click on any text in the form preview to edit the messaging (e.g., heading and call to action) to suit your form goals.
- Once you’re satisfied with your form’s design, click Publish.
- See the Next steps section for guidance on retargeting site visitors who choose not to engage with this form.
Add an SMS step to your form
You can add an SMS step to an existing, email-only sign-up form and configure it to collect phone numbers via tap-to-text.
- Navigate to the Sign-up forms tab in Klaviyo’s left-hand navigation.
- Select the 3 dots > Edit next to the existing form that you’d like to add an SMS step to.
- Click the +Step in the menu bar to add a step.

- Select SMS Opt-in > Next.
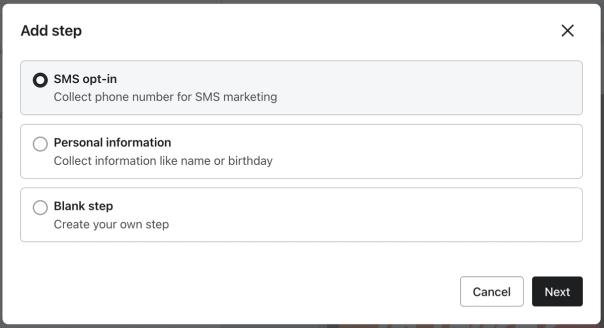
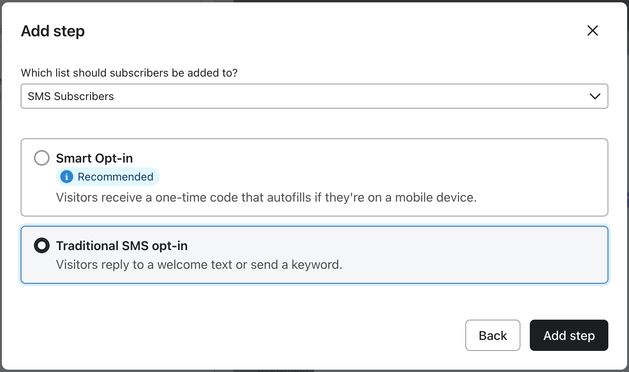
- In the dropdown, choose a list for your SMS subscribers to collect to.
- Select Traditional SMS opt-in > Add step.
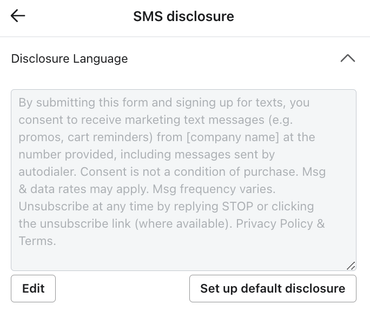
- Click on the textbox that contains your disclosure language. If needed, click Edit to replace the default language with:
- Your account name
- Link to your mobile terms of service
- Link to your privacy policy
Configure your SMS step to use tap-to-text
- On the view selector in the top right corner, make sure the desktop icon is selected. The view selector allows you to toggle between the desktop and mobile views of each step.
- Click on each of the following items in the preview and set them to show on Desktop devices only. Note that when you set a certain block to show on desktop devices only, that means it will not be visible on the mobile view.
- Phone number input field
- Submit button
Make sure that the SMS consent box is checked, and that the submit button's Action on the desktop view is set to Submit Form.
- On the view selector in the top right corner, click the mobile icon to switch to the mobile view.
- From the Add Blocks tab, click and drag a new Button into the preview.
- Set the button’s Action to Subscribe via SMS.
- Choose a Subscribe Keyword and customize your Subscribe Message.
- You can use a keyword set to single opt-in for a tap-to-text form. The tap-to-text method works similarly to double opt-in by default.
- Under Sending Region, choose the appropriate phone number for the region you’d like to target with the form.
- Under Button text, edit the text with a call to action for your shoppers (e.g., "Text to join").
- If you have multiple sending numbers, target this form to only show on the URL for the corresponding sending region.
- Navigate to Back > Targeting & behavior > Targeting, then select Only show on certain URLs > Containing and input the correct domain (e.g., https://swak-lip-care.myshopify.com).
- If you have other international domains, you may also need to exclude these. Click Don’t show on certain URLs, then choose Containing, and enter the other regional domains (e.g., https://swak-lip-care.myshopify.fr). For more guidance, see how to localize sign-up forms for multiple domains.
- Now that your form is configured for collecting SMS consent, navigate to the Styles section of the editor to change the layout, font, and colors to better match your brand.
- Optional: click on any text in the form preview to edit the messaging (e.g., heading and call to action) to suit your form goals. Keep in mind that SMS disclosure language must be included on both the desktop and mobile views.
- Once you’re satisfied with your form’s design, click Publish.
After following these steps, the dynamic blocks you configured will automatically optimize the opt-in experience for shoppers on each device, making it easy to grow your SMS list. See the Next steps section for guidance on how to test your form.
Next steps
Navigate to your website on both desktop and a mobile device to verify that your sign-up form looks and works as expected. You’ll need to make sure that you fit any targeting and behavior settings applied for the form to appear.
Now that you have a form set up to collect email and SMS consent from new prospects, it’s important to retarget your existing email subscribers to ask them if they want to sign-up for SMS. This will include anyone who closed your form after the first email step. Head to our guide on how to collect SMS consent from email subscribers for guidance on setting up a cross-channel acquisition sign-up form.
Additional resources
- Understanding SMS consent collection
Learn about SMS consent, including what counts as SMS consent, how you can collect it, and how resubscribes work. SMS consent refers to whether someone is opted in (i.e., if they have agreed to receive marketing text messages from your brand).
- Basics: mobile form design
Learn the 6 basic principles of designing sign-up forms for mobile devices.