Getting started with sign-up forms
You will learn
Learn how to create and customize sign-up forms in Klaviyo to publish on your website so you can engage shoppers, collect emails and phone numbers, and build long-lasting customer relationships.
By following a few key principles, you can have a beautiful, high-converting sign-up form live on your website in just a few minutes.
- Confirm that Klaviyo sign-up forms are enabled on your website. You can verify this in the Before you begin section below.
- Brainstorm a goal for your form.
- Create the form and customize its design to meet your goal.
- Apply targeting settings so the form appears for your desired audience.
Before you begin
Before you can publish a sign-up form on your website, integrate your website with Klaviyo. Once your integration is live, you'll need to verify that sign-up forms are enabled on your website to see the form display as intended on your site.
Best practices for sign-up forms
Unsure of what sign-up forms to create and publish? Consider this recommendation for a basic form that will help grow your audience and convert site visitors into paying customers:
- Publish a popup form on your site that's triggered to appear when a shopper is exiting the page.
- After you've followed the instructions outlined in this guide to build and design your form, see the Target your form section for instructions on how to trigger this form so that it only appears for visitors unknown to Klaviyo.
- After you've followed the instructions outlined in this guide to build and design your form, see the Target your form section for instructions on how to trigger this form so that it only appears for visitors unknown to Klaviyo.
If you plan to collect both email and SMS consent in this form, use a multi-step form to collect this information on separate steps as it's best practice for list growth. Adding a coupon block to the success step of the form to offer a promotional discount can also further incentivize visitors to opt in and encourage them to make a purchase.
Set a goal for your sign-up form
Before you start building your sign-up form, consider your goals. A form can help you connect with potential customers, learn more about your audience, convert email subscribers to SMS subscribers, and more. A simple popup that collects contact information from those who have visited your site, but never subscribed is a great place to start.
Following these 3 principles will help you design a successful sign-up form:
- Keep your style simple
When you pack too much into a single form, you distract from your form’s main goal and make it harder for a site visitor to say “yes.” Keep it simple so it’s as easy as possible for your visitors to understand and fill out your form. - Design for the total experience
It’s easy to get lost trying to find the perfect color or layout. Successful sign-up forms are about more than just a first impression. When designing your next form, consider your subscribers’ experiences before, during, and after they encounter your form. - Collect the right data
Most sign-up forms ask for your email address or phone number, but more data can help you build powerful connections with subscribers. You can also use a sign-up form to target certain audiences with an announcement or offer. In general, knowing when to ask for more, and what to ask for, will help make it a no-brainer for subscribers to tell you more about themselves.- While multi-step forms are best practice for collecting information from new subscribers, single-step forms (e.g., a form asking only for a phone number) are effective for cross-channel audience acquisition.
Once you’ve decided on a goal for your form, select Sign-up forms from Klaviyo's left navigation to start creating.
Create a basic sign-up form
This guide will give an overview of each step. Once the form is created, designed, and targeted, you can publish it to your website with just a few clicks.
To create a new sign-up form form, you have 2 options:
- Build off of form template from Klaviyo’s form library.
- Create a new sign-up form.
Build a form from the form library
The forms found in the form library are designed with best practices in mind. You can filter the options by form type or goal to find the right template, then easily edit the default designs to match your brand.
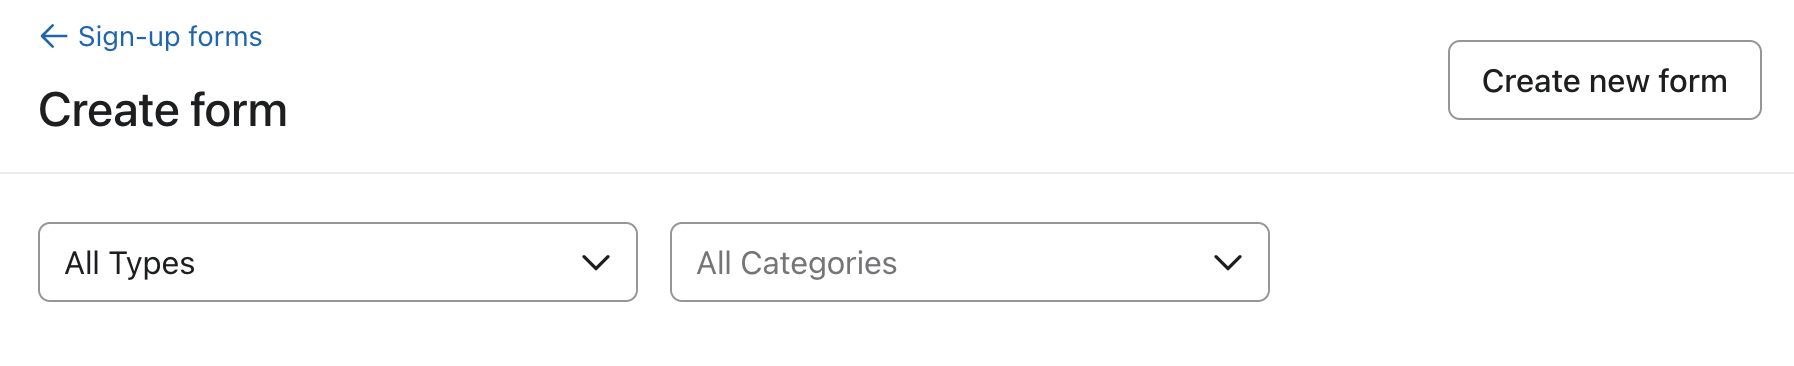
- From Klaviyo's main navigation, select Sign-up forms.
- Select Create form from the top right corner.
- Browse the library of pre-built form templates. You can also use the Types and Categories dropdowns at the top to filter for for templates by form type, goal, or both.
- Select your form template.
- On the preview modal that appears:
- Name your form
- Choose the list that your form will submit to (this is the list that shoppers who fill out this form will collect on).
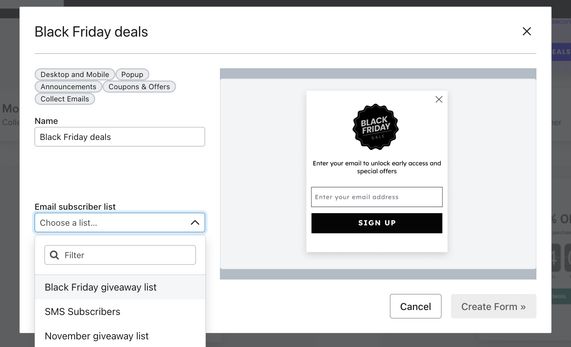
Note that if you are using a multi-step form that collects email and phone number, you can select 2 different lists. If you do not already have an SMS subscribers list, one will be created automatically when you select SMS subscribers.
- Select Create Form to enter the form editor where you can edit the content and design to fit your brand.
Create a new sign-up form
If you would prefer to start with a blank form template to customize, create a new sign-up form.
- Navigate to the Sign-up forms > Create form.
- Click Create new form in the upper right corner.

- On the details modal that appears, choose the following:
- A name for your sign-up form
- The list that new subscribers will add to
Note that you can change the list that the form submits to later by clicking on the form's submit button in the editor and selecting a different list, if you would like.
- The type of sign-up form that you'd like to use
- Option to enable data protection fields
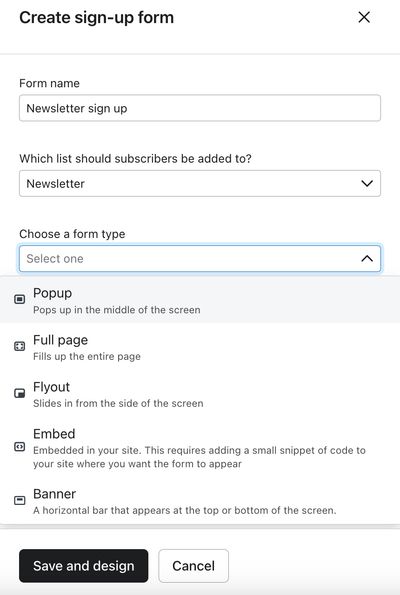
- Click Save and design to enter the form editor where you can customize your form's content and design.
Design your form
Once you've created your form, you can use the Styles section and the Add blocks section in the form editor to customize design and content in your form.
If you see a "301 Moved Permanently" error in the form editor canvas behind the preview, this typically means your website is returning an invalid domain. We suggest verifying that your domain is valid, but common reasons for this can include password protection or redirects set up for an outdated domain. This error does not indicate a problem between Klaviyo and your website and will not affect your ability to publish your form.
Style your sign-up form
In the form editor, select the Styles section. Here, you can edit:
- Form type
- Popup
Appear in the middle of the browser window. Popups are eye-catching and high converting, but potentially disruptive to a visitor's experience. - Flyout
Appear to "fly out" from the edge of the page. Flyouts are still noticeable, but they generally allow a visitor to keep browsing without having to interact with the form. - Full page
Display over the entire browser window, capturing your shoppers' full attention. These are high-converting forms since they cannot be easily overlooked; however, this also makes them more intrusive since shoppers' must interact with the form to close it. Consider using a full page form as a landing page if you want a designated opt-in page on your site. - Embed form
Embedded on a specific page or section of your site, like your footer. Embeds are helpful and easy to find for visitors who come to your site with the intention of subscribing. Add an embed form in your footer, in addition to any other popups you publish, to optimize list growth opportunities on your site. Given the placement of a footer embed form, we suggest asking for email consent only to improve the volume of opt-ins. - Banner form
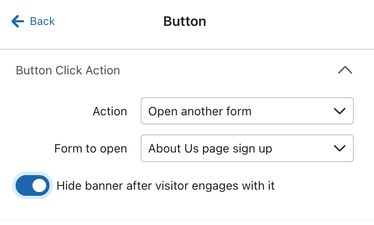
Banners appear as a horizontal bar at the top or bottom of a webpage to subtly integrate with your website’s design. They’re less intrusive than pop-ups and full-page forms, providing continuous visibility without interrupting the browsing experience. You can set the banner to scroll with the page or remain fixed, making it a more user-friendly and mobile-optimized option. With banner forms, you can either:- Add content blocks and input fields directly to the banner form, such as an email input field.
- Configure the banner so that when a user clicks on it, it opens another one of your live forms. To do so, set the button in your banner's Action to Open another form, then choose which form you want to appear when a shopper clicks on the banner. Note that this functionality is not available for embedded forms.
- Popup
- Form size
- Image content
- Background colors
- Form, text and input field styles
For a deep dive into designing sign-up forms, head to our guide on how to choose styles for a sign-up form. If you're building a sign-up form to display on mobile devices only, read our guide on mobile form design basics.
Add blocks to your sign-up form
The types of content blocks that you add to your sign-up form will be determined by the goal that you set and the information you want to collect from site visitors. To add or edit the content in a sign-up form, select the Add Blocks tab in the form editor.
There are a variety of content blocks that you can drag and drop to add to your form. These include:
Elements:
- Text block
- Button block
- Image block
- Coupon block
- SMS disclosure language block
- Countdown timer block
- Sign-up counter block
- Review quote block
Input fields:
- Email input
- Phone number input
- Radio button
- Multi checkbox
- Date input
- Dropdown
- Age gate, if you're an alcohol-related brand looking to use SMS
When you add an input field to your form, add Placeholder text to give visitors a helpful hint as to what information you're looking for. If you mark an input field as Required, the corresponding the Required text and Invalid text are also fully customizable, so you can translate these to the language of your choice, along with any other text in your sign-up form.
To learn more about each type of content blocks you can add to a form, see understanding form blocks and fields.
If you plan on asking shoppers for multiple bits of information (e.g., email, phone number, birthday, etc.) create a multi-step form by clicking + Step in the top menu bar and specifying the type of step you want to add. Multi-step forms allow you to add additional pages to your sign-up form, so visitors are not overwhelmed by too many fields on 1 step. If you are collecting emails and phone numbers, we suggest using a multi-step form as it's best practice for list growth and maintaining compliance. Disclosure language must also be present anywhere you collect SMS consent.
Adding a phone number input field will, by default, collect promotional SMS consent, allowing you to send any SMS messages. You can adjust this to collect transactional SMS consent, or both separately, but the appropriate disclosure language must be present. Learn more about SMS consent types.
Configure dynamic blocks for distinct desktop and mobile views
If your sign-up form is set to display on all devices (desktop and mobile), and you would like it to look different depending on which device someone is browsing on, you do not need to create 2 different forms. Dynamic blocks can be configured to show on some devices, but not others. This allows you to add any of the blocks listed above to your form, and specify which device the block is shown on so that you can create a distinct look for mobile shoppers compared to desktop shoppers.
For more information on using dynamic blocks to tailor your form by device type, head to our guide on using dynamic blocks in forms.
Add a form teaser
Add a teaser to your popup, flyout or full page sign-up form so visitors who close the form can reopen it if they please.
Click Teaser in the menu bar to create one for your form. From here, you'll be able to configure the teaser's style and behavior so it matches with your form. Learn more about form teasers.
Teasers are not available for banner forms.
Customize your form's success message
After you've finished designing your form's main steps, click Success in the top menu bar to view and edit the form’s success message. This Success page will appear to anyone who successfully completes the form, unless your submit button's action is set to Close form or Go to a URL upon submission, so it should match your form's design and branding.
Target your form
Select the Behaviors and Targeting tab in the form editor to configure when your form appears on your site and who it appears for. Based on your goals for your sign-up form, you can adjust the following settings:
- Display timing
- Display frequency
- Devices that your form will display on (mobile and/or desktop)
- Dismissal settings
- Targeting settings
- You can target a form based on a visitor’s location, device type, list membership, URL, UTM parameters, cart contents, etc.
Head to understanding targeting and behavior settings for a sign-up form to learn more about adjusting your form's display functionality.
For a popup that triggers when a shopper is exiting the page, the following behavior settings are a good place to start:
- Click on Targeting and behaviors.
- Under Timing, select Show based on rules > When a visitor is exiting the page.
- Under Frequency, select Show again 5 days after closing, then check the box for Don't show again after submit form or go to URL button was clicked.
- Under Devices, click All devices.both Desktop and mobile
- At the top, switch to the Targeting tab.
- Under Visitors, select Don't show to existing Klaviyo profiles.
Based on your Customer Privacy settings in Shopify, Klaviyo may not track onsite events (and thus, not apply certain types of form targeting) for visitors to your Shopify store in the EU, EEA, UK and Switzerland, unless they have provided consent.
Overall, if a visitor hasn’t consented, and would otherwise have been included per the targeting requirements, they will not see the form because they will not be identified. Targeting for these visitors will apply as follows:
- If you select “Don’t show to existing Klaviyo profiles,” the visitor will still see the form because they won’t be identified as an existing profile.
- If you select “Show to all visitors,” the visitor will see it.
- If you select "Show to any existing profile," "Show to email subscribers only," "Show to SMS subscribers only," the visitor will not see the form because they will not be identified as an existing profile, email, or SMS subscriber.
- If you select “Show to specific profiles in a list or segment,” the visitor will not see the form (even if they are otherwise in the list or segment) because they will not be identified.
- Certain custom triggers based on cookie information and user properties will not trigger due to a lack of identification.
- Targeting by location is not affected.
- Targeting to show on device type (desktop, mobile) is not affected.
Publish your form to your website
As you're building your sign-up form, you may notice form alerts populating in the bottom left corner of the editor. Clicking on the Form alerts tab will show a list of identified issues (e.g., Add text to a button) with a prompt to fix each one. If you choose to dismiss an alert, it will move to the Dismissed alerts section so you can return to it at a later time.
Once your form is ready to share, click Publish. If your form has any unresolved errors you will be prompted to fix them in the Forms alerts tab. If you've resolved all issues, and as long as you’ve integrated your site with Klaviyo (as mentioned in the Before you begin section of this article) publishing your form will set it live on your site.
If you’re publishing an embed form, there’s just 2 final steps: copy the form's embed code from the publish modal, then paste the code onto your site.
Test your sign-up form
To view and test your sign-up form, head to your website. Try using an incognito browser if your form is set to be hidden from existing Klaviyo profiles. Make sure you meet all the form’s targeting criteria. For example, if you have a form set to show after 3 seconds and when exit intent is shown, wait 3 seconds for the page to load. Then, show exit intent by quickly moving your cursor towards the “close” button for your tab (or quickly scrolling upward on mobile). Note that all criteria must be met (the time delay and exit intent, in this case) for the form to appear.
In the subsequent hours and days after your form is set live, site visitors will see it and may complete it. View your form’s results in your form analytics.
Bot protection for forms
Klaviyo automatically enables bot prevention measures, including CAPTCHA, on sign-up forms that collect email addresses, phone numbers, or feature coupon codes.
CAPTCHA requires form submitters to complete a brief task to verify that they are human and not a bot. If Klaviyo detects suspicious behavior or previous bot activity from a user's IP address, the user will be prompted to solve a CAPTCHA before submitting the form. Only users exhibiting suspicious, bot-like activity will encounter the CAPTCHA.
Forms not working due to Ad Blockers
If you or your site visitors are using ad blockers (such as AdGuard), Klaviyo forms may not function properly. Ad Blockers stops Klaviyo.JS from being loaded, which powers core form functionality such as form triggering. When blocked, forms that collect personal information (like email or phone number) will not display or submit successfully.
Please ensure to test your forms in an incognito/private browsing window without Ad Blockers enabled to confirm they work correctly.
Next steps
If your sign-up form includes an incentive for signing up (like free shipping or a discount on an order), new subscribers will expect to be able to use the offer right away. Use a welcome flow to deliver on your offer and start to build brand awareness and loyalty.
Your welcome flow should use your sign-up form’s list as the trigger, and the first email should be sent right away. You can add additional messages or reminders to use their coupon a few days later.
If you want to experiment and identify the best incentive for your audience, consider A/B testing your sign-up form offer.