How to embed a sign-up form on your website
You will learn
Learn how to add an embed sign-up form onto a specific page or location of your website (e.g., the footer), so shoppers looking to learn more about your brand can easily sign up. Embedding a sign-up form in the footer of your site to work in tandem with your other published forms is a Klaviyo best practice for optimizing list growth.
To add an embed form to your site, you’ll need to:
- Create and customize a new embed form in Klaviyo.
- Copy the form’s embed code from the publish modal.
- Paste the embed code into your site’s files.
Because pasting form code requires access to your site’s HTML and ecommerce platform, our support team is unable to offer hands-on assistance. If you don’t have a developer on your team, consider reaching out to a Klaviyo partner for assistance.
Before you begin
Before creating your sign-up form, make sure that sign-up form functionality is enabled in your Klaviyo account. This ensures that forms published in Klaviyo display properly on your site and sync all necessary data.
For embed forms to work, you’ll need:
- Sign-up form functionality enabled. This is also often referred to as “onsite tracking” installed.
- The embed code pasted on your site wherever you want the form to display.
Note that pasting the embed code is unique to embed forms. Popup, flyout, and full page forms do not require any pasting of code, and can be published directly from Klaviyo’s form builder
Effective December 06, 2024: Klaviyo has improved the way views are calculated for embed forms to more accurately measure engagement. Views for embed forms will now only be recorded when the form is visible in the user's viewport. This change may result in a noticeable change in view counts and increase in submit rates, particularly for forms embedded in a site's footer, as these will only be counted if a visitor scrolls down enough for the form to partially enter their viewport.
Add an embed form to your site
If you’re using Shopify, BigCommerce, or WooCommerce, subscribers who sign up through your platform’s embed form are automatically added to your Klaviyo list via the integration. Because of this, you do not need to replace your integration’s embed form with one from Klaviyo, though you can still create one in Klaviyo if you want subscribers to collect to a different list.
Create and customize a new embed form in Klaviyo
- Select the Sign-up forms tab from Klaviyo’s left-hand navigation.
- Select Create form. From here, you can either:
- Customize a pre-built template from the form library. Click the dropdown next to All Types, then select Embed to filter the form library to show all pre-built embed form templates.
- Begin with a blank embed form template by selecting Create new form in the top right corner.
- On the creation modal that appears:
- Name your form.
- Choose which list new subscribers will join.
- Confirm Embed as your form type.
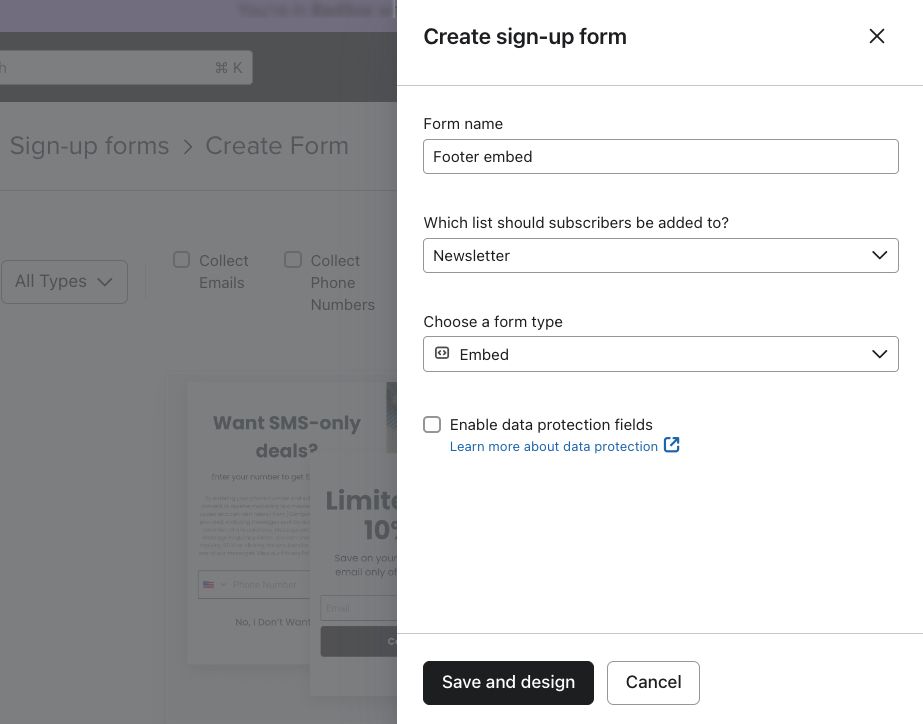
- Click Save and design.
- Use the editor to style your form and add any desired blocks or input fields. For guidance while customizing your form, see getting started with sign-up forms.
If you plan on embedding your form in the footer of your site, we recommend asking for email addresses only to improve the volume of opt-ins.
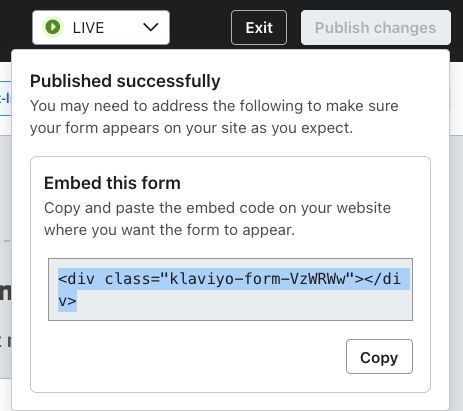
- When you’re satisfied with your form, click Publish. Note that the form will not appear on your site just yet; you must also paste the embed code on your site in order for it to be live.
- In the Published successfully modal that appears, click Copy to copy the embed code to your clipboard. This is the code you’ll need to paste in your site files in the next section of this article.
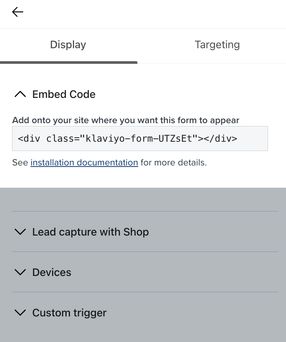
Note that a form's embed code can also be found in the Targeting & behavior tab in the form editor.
Paste the embed code on your site
After publishing your form in Klaviyo and copying the embed code, you’ll need to paste this code into your website files for the form to display. The location for pasting the code depends on where you want the form to appear (e.g., in a theme file or specific page file), and may vary based on integration.
Find the platform that you use on the list below, then head to the article linked beneath it for a more specific guide on pasting the embed code for that integration.
If you do not see your platform, see the “Other” bullet point.
- Bigcommerce
For BigCommerce, paste the embed code in your site’s files where you want it to appear. - Shopify
For Shopify, add the Klaviyo Embedded Form app to your page template and paste the form’s embed code. - Square
For Square, paste the embed code in your site’s files where you want it to appear. - WooCommerce
For WooCommerce, paste the embed code in your site’s HTML. - Other platforms
If your platform isn’t listed above, or you use a custom integration that does not natively integrate with Klaviyo, you’ll need to make sure that 2 code snippets are pasted on your site for the embed form to work:- Onsite tracking (also known as Klaviyo.js) to enable sign-up form functionality.
- Note that many platforms automatically add onsite tracking to your site when you integrate (including Wix, Prestashop, Magento 1 and 2, etc.). Check your platform’s integration settings in Klaviyo to confirm this option is selected.
- If your platform doesn’t have a native Klaviyo integration, you must add onsite tracking manually.
- Note that many platforms automatically add onsite tracking to your site when you integrate (including Wix, Prestashop, Magento 1 and 2, etc.). Check your platform’s integration settings in Klaviyo to confirm this option is selected.
- The specific form’s embed code
- Once onsite tracking is enabled, you must paste your form’s embed code into your site’s HTML/source code wherever you’d like it to appear (e.g., the footer).
- A form's embed code can be copied from the Targeting & behaviors tab within the form editor.
- Once onsite tracking is enabled, you must paste your form’s embed code into your site’s HTML/source code wherever you’d like it to appear (e.g., the footer).
- Onsite tracking (also known as Klaviyo.js) to enable sign-up form functionality.
Make sure to save any changes made to your site. If you are not comfortable editing code on your site, consider contacting a Klaviyo partner for assistance.
Next steps
Once you have published your embed form in Klaviyo, pasted its embed code onto your site, and saved your changes, head to your website and refresh the page.
The embed form should appear on your site wherever you pasted the embed code.
Troubleshooting embed forms
If your embed form is live in Klaviyo but not displaying on your site, consult the following troubleshooting tips:
- Refresh your browser cache.
- Verify that your website is properly integrated with Klaviyo, and that your site is also live.
- Confirm that you have enabled sign-up forms for your account (this is the same thing as enabling onsite tracking).
- Ensure that you saved the changes on your website after pasting the embed code.
- In Klaviyo’s sign-up form editor, navigate to the Targeting & behavior section and review the following:
- In the Display section, verify that:
- The embed code pasted on your site correctly matches the code provided by Klaviyo
- The device settings in Klaviyo correspond to the device you’re using to view the form
- In the Targeting section, verify that:
- You meet any narrowed Visitor settings
- The form is set to show on the URL you’re viewing, and includes any specified UTM parameters
- Your location fits any geo-locating set for the form
- Your cart meets any cart content requirements configured for the form
- In the Display section, verify that:
- Rerun the test on a new, incognito (“private”) browser window.
- Confirm that only 1 Klaviyo account is integrated with your site. Learn more about integrations.
Other potential reasons for form not appearing
- If you have custom CSS present on your site, this may be conflicting with Klaviyo’s onsite tracking snippet (“Klaviyo.js”) and interfering with your form. Have your developer use your browser’s developer tools to inspect the site’s code and identify the problem or contact support.
- If you’re using a single page application (“SPA”) site, your setup may be causing the form to appear intermittently. Consult your developer for assistance.
Additional resources
- How to contact support
We offer email and live chat support to customers on all paid plans.
- Troubleshooting sign-up forms
Learn troubleshooting tips for when a sign-up form in your Klaviyo account is not working as expected by reviewing common issues and solutions to these issues.
- Getting started with sign-up forms
Learn how to create and customize sign-up forms in Klaviyo to publish on your website so you can engage shoppers, collect emails and phone numbers, and build long-lasting customer relationships.