How to add an embed form to your Shopify site
You will learn
Learn how to add a Klaviyo embed form to your Shopify site. This involves creating a form in Klaviyo and then pasting its embed code into your site’s files where you want it to appear, such as in the footer.
Already using a Shopify sign-up form? If you chose to sync Shopify subscribers to Klaviyo when integrating, then any new subscribers will sync automatically.
Before you begin
Before creating the embed form in Klaviyo, you must integrate with Shopify and enable sign-up form functionality (also called "onsite tracking"). For Shopify stores, the app embed must be enabled for sign-up forms to display and sync data properly.
To verify the app embed is enabled:
- Navigate to your Shopify integration settings page.
- Scroll to the Onsite Tracking section.
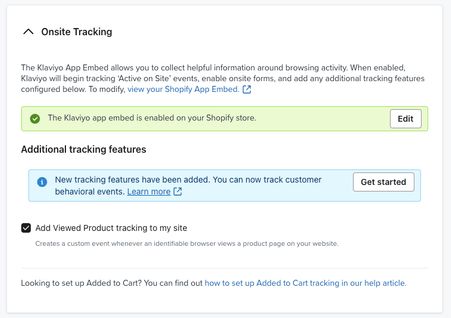
- If you see a green banner stating The Klaviyo app embed is enabled on your Shopify store, you’re all set. Continue to the next section of the article to add the embed form to your site.
- If you see a green banner stating The Klaviyo app embed is enabled on your Shopify store, you’re all set. Continue to the next section of the article to add the embed form to your site.
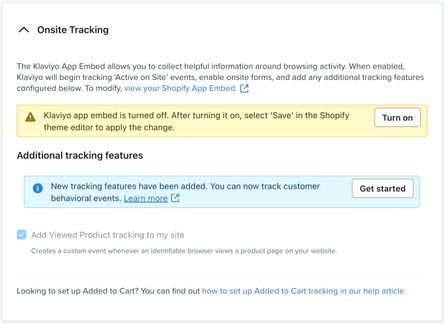
- If a yellow banner shows Klaviyo app embed is turned off. After turning it on, select ‘Save’ in the Shopify theme editor to apply the change.
- Refer to our guide on enabling Klaviyo’s app embed for Shopify before continuing on with this article.
- Refer to our guide on enabling Klaviyo’s app embed for Shopify before continuing on with this article.
The example in this article uses a Shopify 2.0 theme. Your theme may differ, which could affect the names of some files or locations of code snippets.
Add an embed form to your site
Looking to embed a form on a Shopify thank you or order status page? Shopify no longer natively supports this functionality, but you can use Klaviyo's SMS app block feature to collect SMS consent on Shopify checkout (Shopify Plus only), thank you, or order status pages.
- Create your embed form.
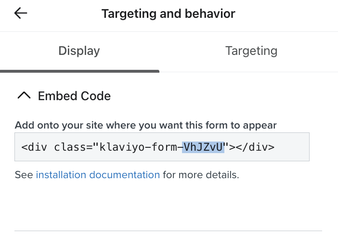
- In the form editor, select Targeting and behavior > Display.
- Under Embed Code, copy the form ID from within the code as shown below:
- Publish your form.
- Navigate to your Shopify dashboard.
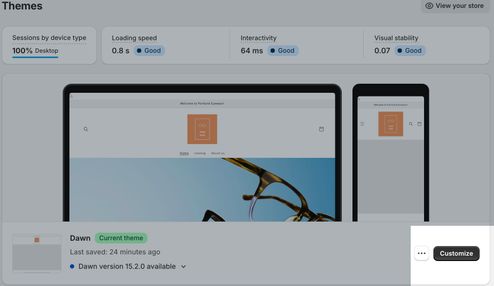
- Select Online Store > Themes.
- Click Customize.
- From the top menu bar, choose the page template where you wish to add the form (e.g., your Home page or Password page).
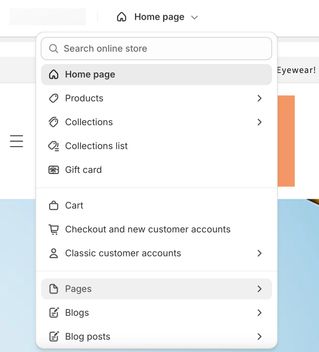
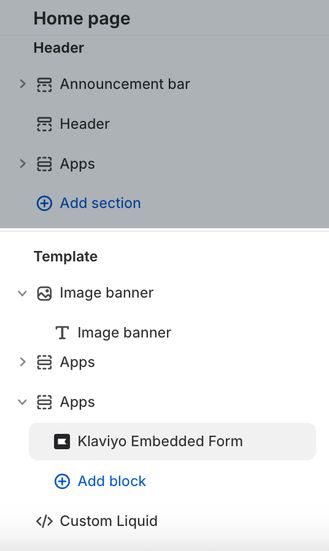
- In the left-hand menu under Apps, select Add section > Apps > Klaviyo Embedded Form.
- If you only want this form to appear on this specific page, do this in the Template section.
- If you only want this form to appear on this specific page, do this in the Template section.
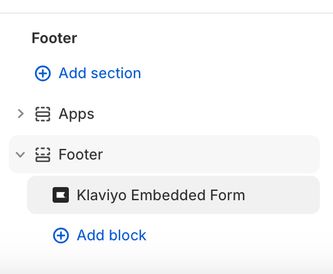
- If you want the form to persist across every page on your website, do this in the Footer section. Note that having an embed form in your site’s footer is also a Klaviyo best practice for list growth.
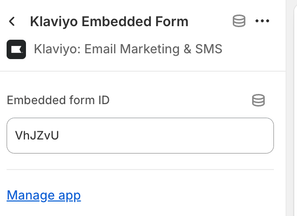
- Click on the newly created Klaviyo Embedded Form section in the left menu.
- Paste the form ID you copied from Klaviyo into the designated textbox.
- Click Save to add your embed form to the page template. Note that the embed form won’t appear in the preview until after you save.
- Optional: After saving, you can rearrange the Klaviyo Embedded Form app by clicking and dragging it within the menu.
Once you’ve pasted the embed code and saved the changes in Shopify, navigate back to your website and refresh the page. Site visitors will see your form and have the option to join your list by completing it.
If you don’t see your form, see troubleshooting embed forms.
Next steps
Next, create a welcome series flow to make an immediate impact on your new subscribers.
Additional resources
- How to manage your sign-up forms
Learn tips for managing your existing sign-up forms so you can ensure they are aesthetically pleasing and functional for customers interested in engaging with your brand.
- Getting started with Shopify
Learn how to integrate Klaviyo with Shopify in order to bring your customer profile and order data into Klaviyo and reach customers with targeted messaging. Additionally, enable Klaviyo onsite tracking and sign-up forms, and sync data from Klaviyo to Shopify.
- Getting started with sign-up forms
Learn how to create and customize sign-up forms in Klaviyo to publish on your website so you can engage shoppers, collect emails and phone numbers, and build long-lasting customer relationships.