How to collect SMS and/or Whatsapp consent on Shopify checkout pages
Only Shopify Plus customers can collect transactional consent on their checkout pages. Non-Plus customers can collect transactional consent on thank you and order status pages.
Learn how to collect SMS and/or Whatsapp consent on Shopify checkout, thank you, and order status pages and sync it to Klaviyo. You can collect both transactional and marketing consent on these pages via an app block, which you’ll set up in Klaviyo and then install in Shopify.
Before you begin
Before starting, make sure that you:
- Have either Klaviyo SMS and/or Klaviyo Whatsapp enabled
- Have integrated Klaviyo with Shopify
- Have Klaviyo onsite tracking enabled
Are you a Shopify Plus customer currently sending order updates via SMS? Please note that collecting both transactional-only consent at checkout via app block and collecting consent for SMS order updates may appear repetitive to customers; you may wish to only use one feature.
About app blocks
- You can use app blocks to collect marketing consent, transactional consent, or both for SMS and WhatsApp.
- You can create multiple app blocks and place them on different pages, including:
- For Shopify Plus only: Checkout pages (billing, shipping, and credit card info pages, and one-page checkout)
- Thank you pages
- Order status pages
- You can view and edit your app blocks in Klaviyo, though you must add or delete them within Shopify.
- You can change how your app block looks at checkout: use a checkbox instead of a sign-up button, show the heading as body text, or hide the border.
Set up your app block
Follow the instructions below to set up an app block. If you’d like to create multiple app blocks to collect different forms of consent and channels in different places, simply repeat this process. You can also install the same app block on multiple Shopify pages.
- In Klaviyo, select Audience > Growth tools.
- Next to Add an app to your Shopify page to collect subscribers, select Set up.
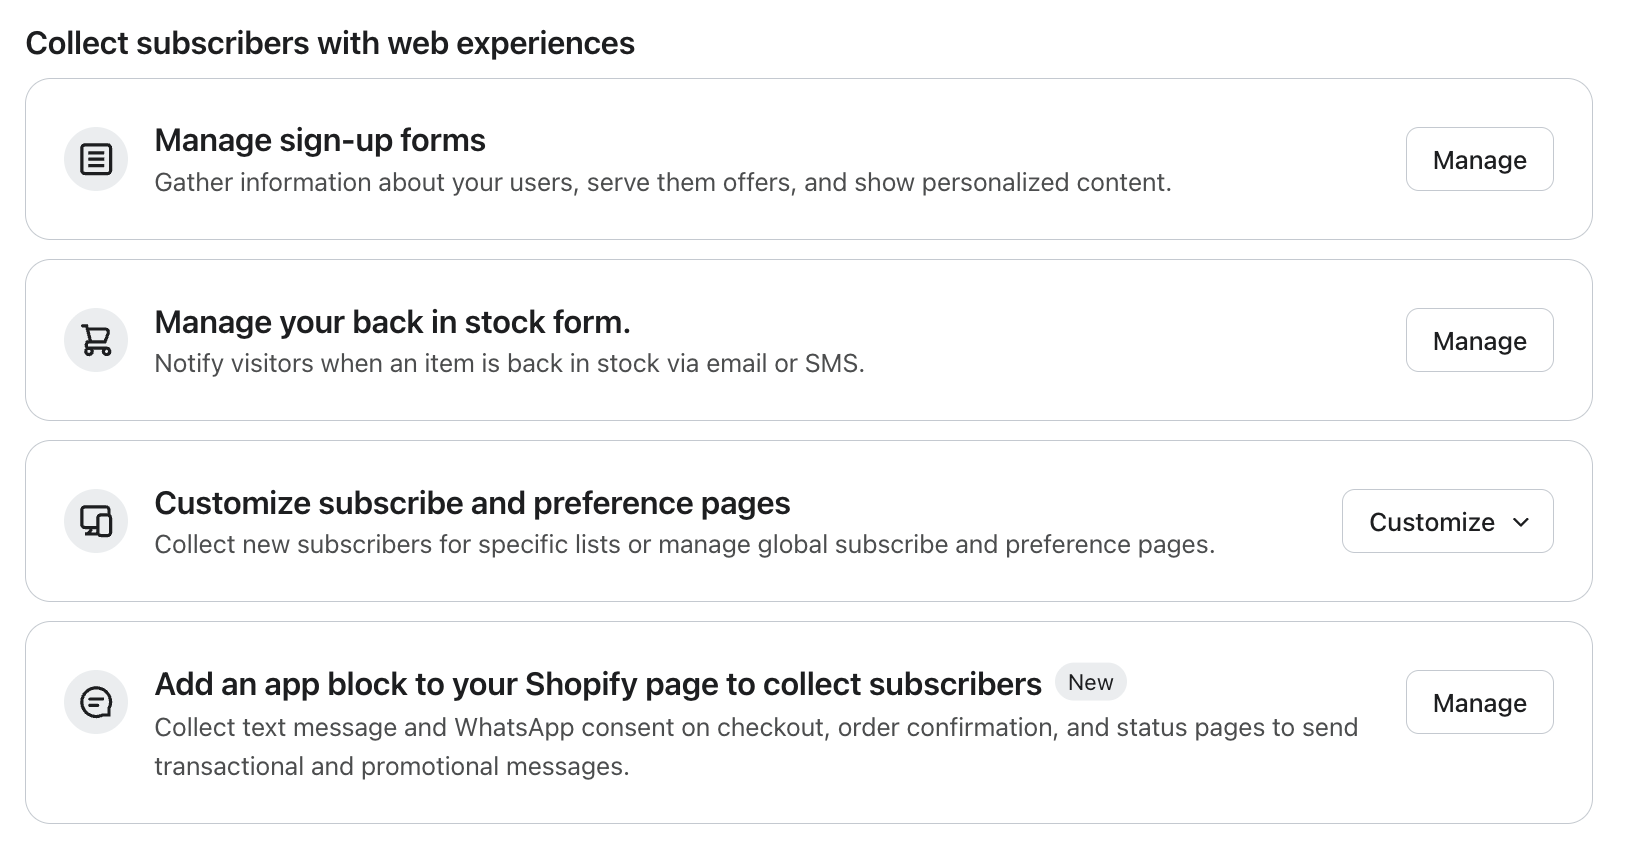
- Select the channel you’d like to collect consent for.
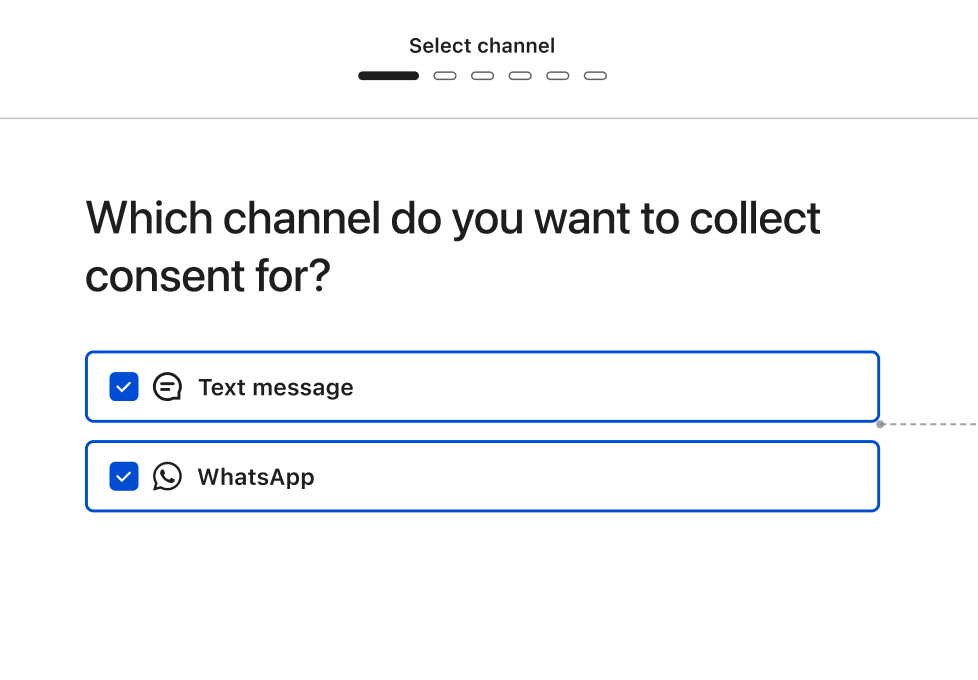
- Name your app block something descriptive, such as the page where it will live. One app block can live on multiple pages, or you can create multiple app blocks.
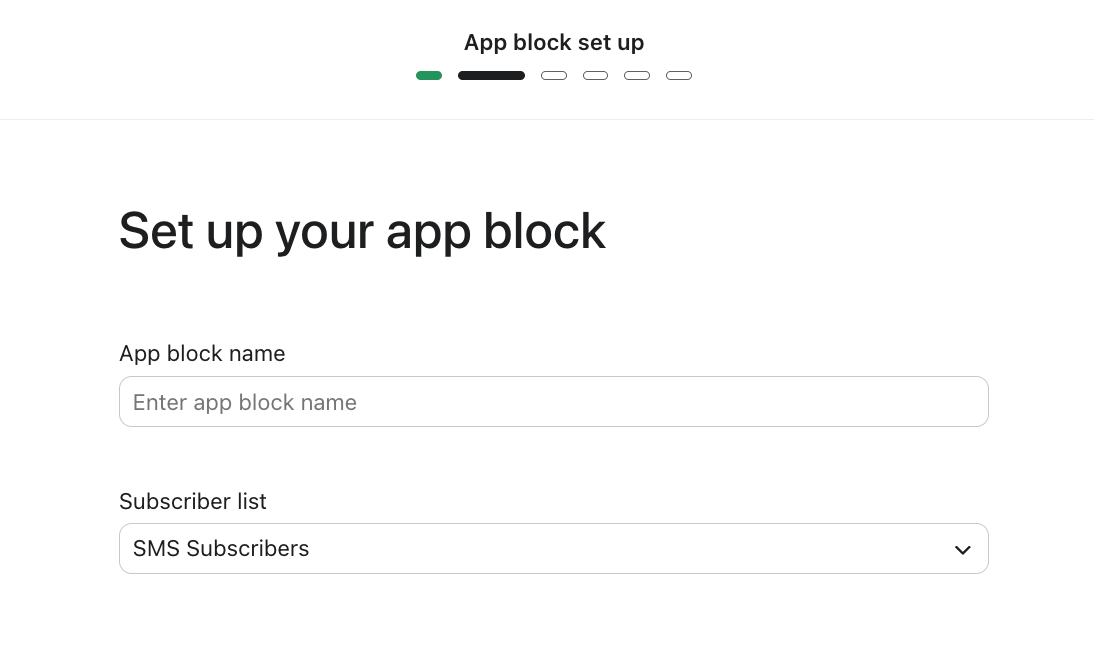
- Select the list that subscribers will sync to. Generally, you’ll want to select the same list you chose in your integration settings. Your customers will be sent double opt-in messaging in accordance with the list’s settings. Transactional-only subscribers will not receive double opt-in messaging.
- Click Next.
- Under Select a consent type, choose one of the following:
- Transactional and marketing
- Transactional with optional marketing
- Transactional only
- Collect phone number without consent
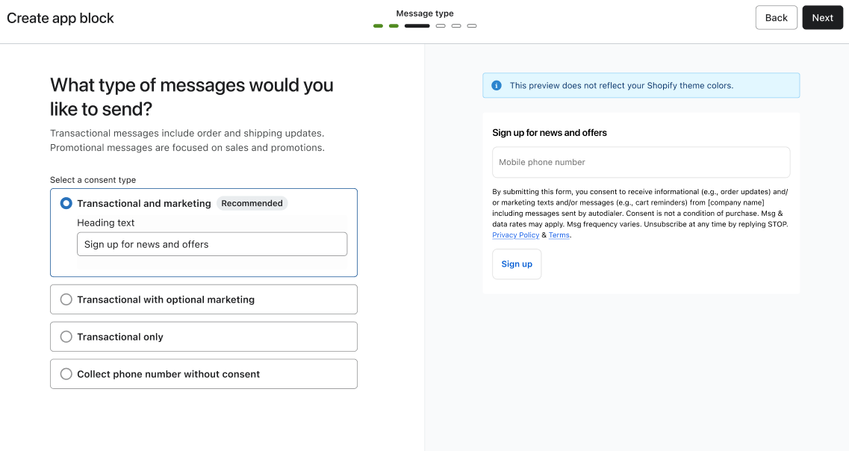
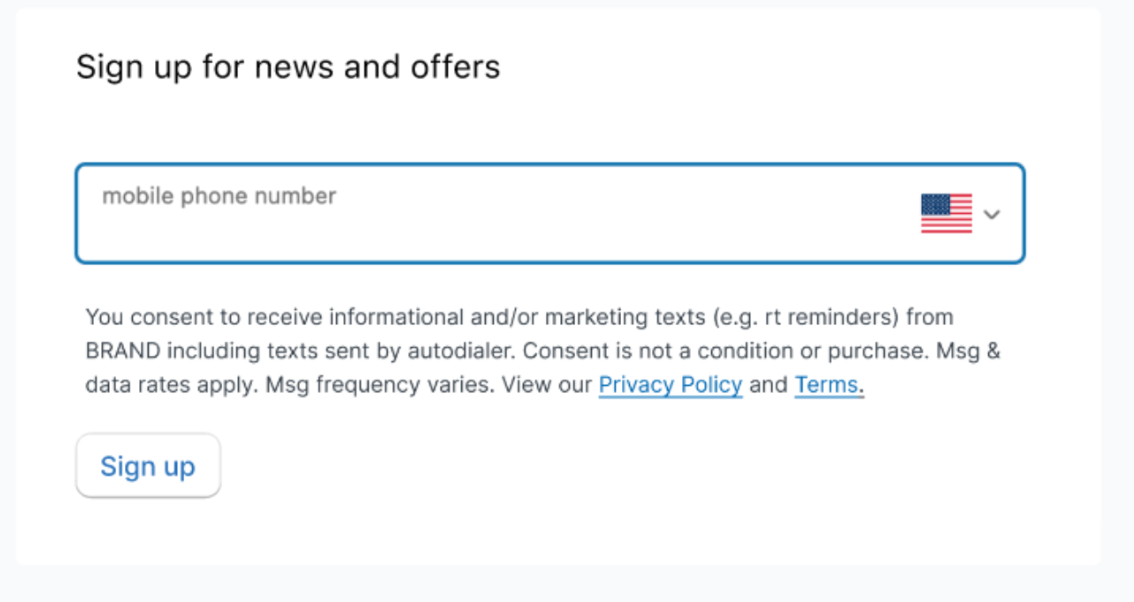
- Next, add the heading text for your app block, as shown in the image below. The heading is optional, so you can leave it blank. On the right, you’ll see a preview of what your app block will look like in Shopify. Please note that this preview will not reflect your Shopify theme colors, which the app block will inherit automatically when installed in Shopify.
- Click Next.
- Edit your disclosure text if needed. Then, click Next.
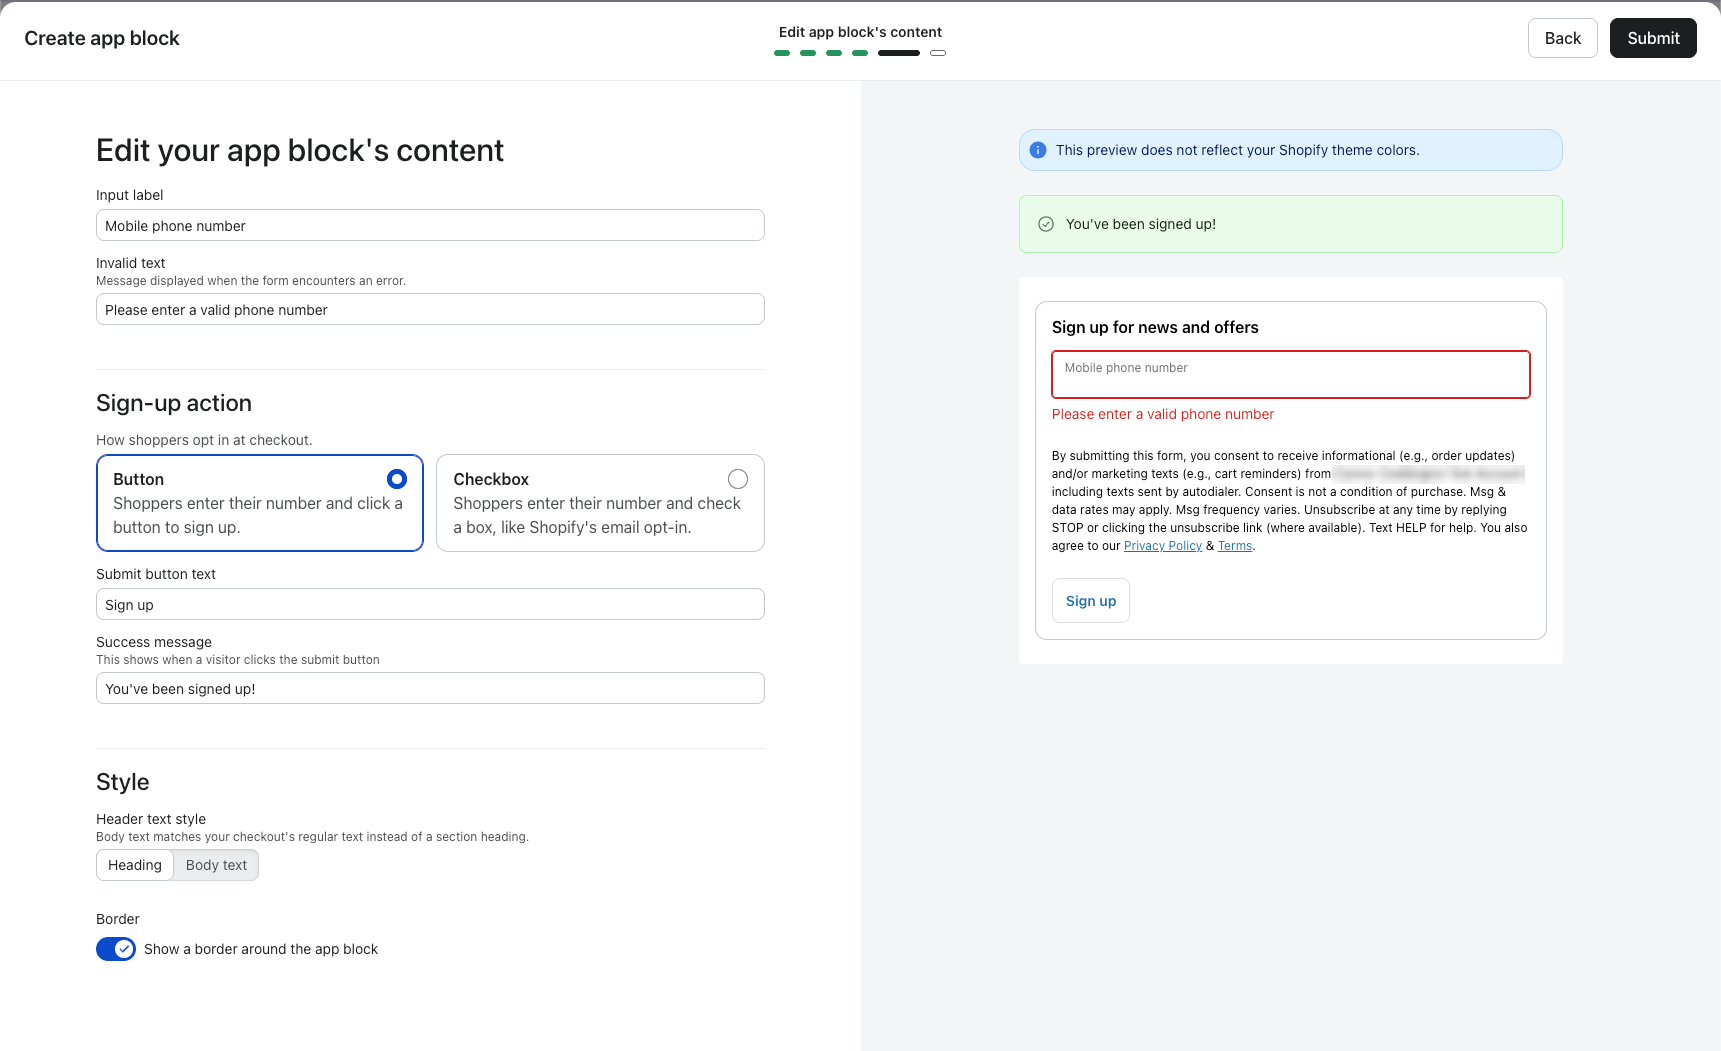
- Edit additional content for your app block. These fields are:
- Input label
The label on the phone number field. - Invalid text
Message displayed when the form encounters an error. - Sign-up action
How shoppers opt in at checkout. Choose Button to have shoppers enter their number and click a button to sign up, or Checkbox to have them enter their number and check a box, like Shopify’s email opt-in. Learn more in Use a checkbox instead of a button below. - Submit button text
The language on the submit button (e.g., “Sign up”). If you choose Checkbox, this field is called Checkbox label and sets the text next to the checkbox. - Success message
The message the user receives after submitting their phone number successfully. - Header text style
Choose Heading or Body text. Body text matches your checkout’s regular text instead of a section heading. - Border
Turn off Show a border around the app block to remove the border and inner padding, so the phone number field lines up with the other fields on your checkout.
- Input label
- When you’re finished, click Submit.
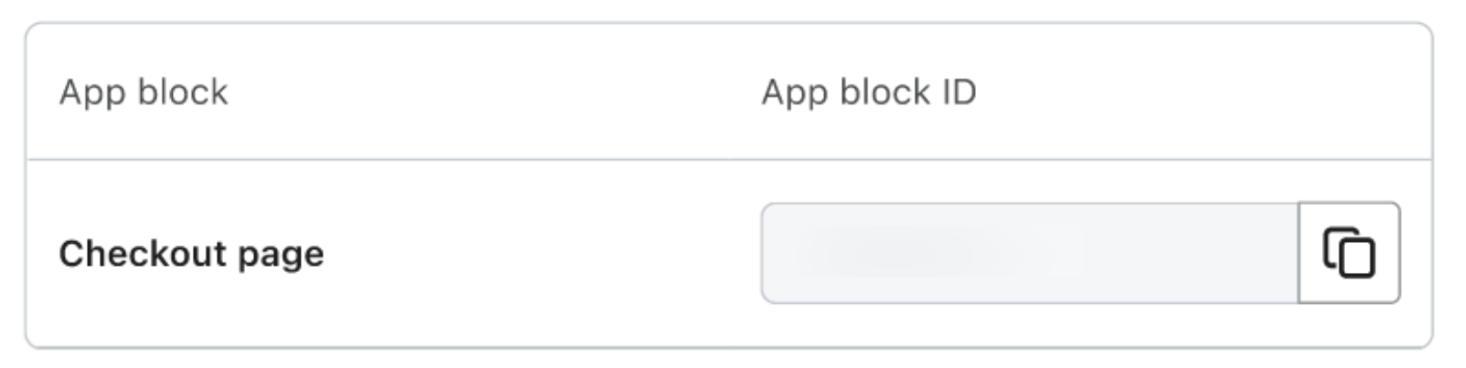
- On the next page, click the copy icon to copy the app block ID, and save it somewhere accessible.
- Now, you’re ready to disable consent collection (if needed) and then install the app block in Shopify.
Use a checkbox instead of a button
If you choose Checkbox under Sign-up action:
- The checkbox appears below your disclosure text. If your submit button text is still the default, Sign up, it changes to Send me news and offers.
- When a shopper checks the box with a valid phone number, they’re signed up right away, before they place their order. Your success message then replaces the checkbox, and the phone number field locks.
- If the phone number is missing or invalid, the shopper sees your invalid text and the box stays unchecked.
- The box can’t be checked by default, because checking it is how the shopper gives consent.
- If your disclosure text starts with “By submitting this form,” it changes to “By checking this box.” Other disclosure text isn’t changed, so if you’ve written your own, make sure it describes the checkbox.
- With the Transactional with optional marketing consent type, shoppers see two checkboxes: the optional marketing checkbox under the phone number field, and the sign-up checkbox below the disclosure. Checking the sign-up checkbox submits transactional consent, plus marketing consent if the shopper checked the marketing checkbox first.
- Checkbox isn’t available for the Collect phone number without consent consent type.
You’re responsible for making sure your checkbox label and disclosure meet the consent requirements in each region where you collect consent. If you edit the default checkbox label or disclosure, you do so at your own risk. We recommend using a list with double opt-in enabled when you use a checkbox, especially if you send SMS in the US.
Disable SMS consent collection in Shopify
Consider disabling Shopify’s native checkbox to avoid having duplicate checkboxes on your checkout page if you:
- Are a Shopify Plus customer,
- Previously collected marketing consent at checkout via the Shopify’s native checkbox, and
- Want to collect marketing consent via an SMS app block at checkout.
To do this:
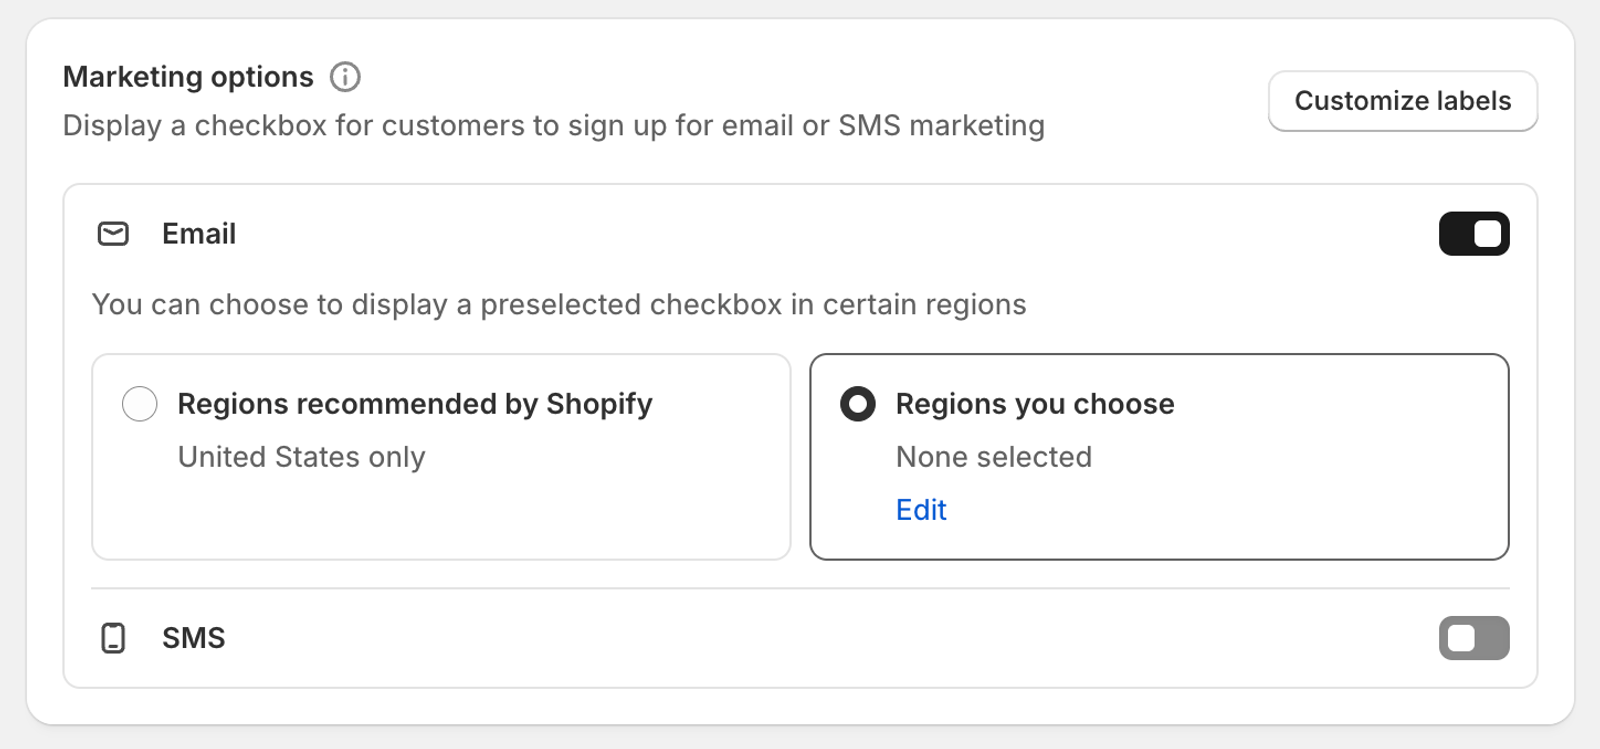
- In your Shopify admin, click Settings at the bottom of the left sidebar.
- On the Settings page, click Checkout.
- Under Marketing options, toggle off SMS.
- Click Save.
Please note that you’ll want to leave your Shopify integration setting Sync your Shopify SMS subscribers to Klaviyo checked, in order to continue syncing Shopify subscribers collected via other means (such as Shopify forms) to Klaviyo.
If you want profiles subscribed via app block to sync back to Shopify, make sure that this setting is enabled.
Managing SMS & WhatsApp Consent, Messaging, and Replies in Klaviyo
Overview: How SMS and WhatsApp work together in Klaviyo
Klaviyo treats SMS and WhatsApp as separate messaging channels that share the same underlying customer profiles and segmentation, but have their own consent, messaging behaviors, and billing rules.
At a high level:
- Profiles and segments are shared across SMS, WhatsApp, and email.
- Consent is channel-specific — someone can be opted in to SMS, WhatsApp, both, or neither.
- Billing for mobile messaging depends on the channel (SMS vs WhatsApp), country/region, and usage.
This article explains how consent is stored, how messages and replies behave, and what to consider when migrating or combining channels.
Consent basics: SMS vs WhatsApp
Consent in Klaviyo is stored on each profile and is tracked separately for SMS and WhatsApp.
- SMS consent indicates that a person has agreed to receive marketing text messages to their phone number via SMS (and, where applicable, RCS with SMS fallback).
- WhatsApp consent indicates that a person has agreed to receive marketing messages via WhatsApp using your approved WhatsApp business number.
On a profile, you’ll see:
- A phone number associated with the person.
- Channel-specific consent statuses that show whether they are subscribed or unsubscribed for SMS and/or WhatsApp.
This separation lets you send:
- SMS-only campaigns to people who have SMS consent but not WhatsApp consent.
- WhatsApp-only campaigns to people who have WhatsApp consent but not SMS consent.
- Cross-channel campaigns to people who are consented to both.
Importing and preserving existing consent
When you migrate from another ESP, CRM, or WhatsApp provider, you should preserve valid consent rather than asking customers to opt in again.
Conceptually:
- Maintain a record of how and when each person opted in for SMS and/or WhatsApp.
- When you import contacts into Klaviyo, include:
- Phone numbers (ideally with country codes),
- Consent status for SMS and/or WhatsApp, and
- Consent timestamps.
- Map those fields to Klaviyo’s consent fields for each channel during import.
If you are migrating a WhatsApp number from another provider:
- Ensure that ownership of the number is transferred and verified with Klaviyo.
- Bring over your list of opted-in WhatsApp contacts with their phone numbers and consent timestamps.
- After the migration, confirm on a few sample profiles that WhatsApp consent appears as expected.
Viewing and segmenting by SMS and WhatsApp consent
You can build segments to target or exclude people based on:
- SMS consent status,
- WhatsApp consent status,
- Country/region, and
- Subscription status for other channels (like email).
Common segment examples:
- SMS-only subscribers: consented to SMS, not consented to WhatsApp.
- WhatsApp-only subscribers: consented to WhatsApp, not consented to SMS.
- Multi-channel subscribers: consented to both SMS and WhatsApp (and optionally email).
- Unsubscribed from SMS but still on WhatsApp: SMS consent removed, WhatsApp consent still active.
These segments help you avoid sending a message on a channel where the person is not consented, while still using other channels they have opted into.
Welcome and resubscribe flows
Because SMS and WhatsApp have separate consent, your automations should account for the order in which someone opts in.
Common patterns:
- Separate welcome flows for SMS and WhatsApp, each triggered by consent being granted for that specific channel.
- A combined email + SMS welcome where:
- Email triggers as soon as someone subscribes by email, and
- SMS messages only send to people who have SMS consent by the time they reach the SMS step.
- Resubscribe flows that trigger when someone reconsents via:
- A signup form that includes SMS and/or WhatsApp checkboxes,
- Checkout opt-ins, or
- SMS/WhatsApp keywords that you configure for resubscription.
If someone grants consent on one channel first (for example, email and SMS at checkout, then WhatsApp later from a form), Klaviyo will only start sending on WhatsApp once that consent exists on the profile.
Unsubscribe, resubscribe, and number changes
When a person opts out of SMS or WhatsApp:
- Their consent status for that channel is updated on their profile.
- You should not send further marketing messages on that channel unless they reconsent.
Reconsent can happen through:
- A Klaviyo form,
- Ecommerce checkout with marketing consent, or
- Channel-specific keywords that you configure (where applicable).
If a customer changes their phone number:
- Update the phone number on their profile,
- Ensure that any new consent for that number is captured and associated with the updated profile.
Flows such as welcome or winback can be triggered or re-triggered when consent states change, depending on how you configure the flow triggers and filters.
WhatsApp messaging model and billing (high level)
WhatsApp differs from SMS in a few key ways:
- Messages often rely on approved templates, especially for marketing or notifications.
- Conversation windows and types (such as marketing vs. utility) affect how WhatsApp usage is billed.
- WhatsApp usage in Klaviyo contributes to your mobile messaging billing based on conversations sent to customers, while incoming messages from customers do not consume credits.
For a detailed breakdown of how WhatsApp credits are calculated and reported in your account, see How Klaviyo billing works.
End-to-end examples
Here are a few example scenarios to illustrate how SMS and WhatsApp work together:
- Launching SMS plus WhatsApp from scratch
- Add SMS and WhatsApp opt-in checkboxes to your forms and checkout pages with clear consent language for each channel.
- Create separate welcome flows for SMS and WhatsApp, and a combined email+SMS welcome if needed.
- Segment by channel-specific consent so each campaign is only sent where permitted.
- Migrating from another SMS and WhatsApp provider
- Export contacts with phone numbers, consent statuses, and timestamps from your old provider.
- Import them into Klaviyo and map to SMS and WhatsApp consent fields.
- Test a small campaign on each channel and verify delivery, replies (for two-way SMS), and opt-out behavior.
- Setting up two-way SMS support while using WhatsApp for marketing
- Use SMS for conversational messages and customer questions, managed via Klaviyo’s messaging workspace or a helpdesk integration.
- Use WhatsApp primarily for templated marketing or notifications where allowed.
- Keep consent for SMS and WhatsApp distinct and ensure that opting out of one does not prevent marketing on the other where the customer remains subscribed.
Troubleshooting common issues
- Customer says they opted in, but profile shows no consent
- Confirm that your integration or form is set up to sync consent to the correct channel field.
- Check for formatting mismatches in phone numbers between your external platform and Klaviyo.
- WhatsApp messages are not sending
- Verify that the profile has WhatsApp consent and a valid phone number.
- Ensure that the correct WhatsApp template is selected and approved in your account.
- SMS campaigns aren’t delivering
- Confirm that recipients have SMS consent and are within supported regions.
- Check your messaging analytics to see whether messages were sent and if any errors were reported.
By understanding how consent, messaging behavior, and billing work together for SMS and WhatsApp, you can design compliant, effective cross-channel programs in Klaviyo.
Install the app block in Shopify
- In your Shopify admin, select Online Store.
- Find your Shopify theme and click Customize.
- Select the Home page dropdown and click Checkout and customer accounts to be brought to the checkout editor.
- Select the Checkout dropdown, and then select the page where you’d like to place your app block.
- Scroll to the section where you’d like to add your app block and click + Add app block. Learn more about placing an app block.
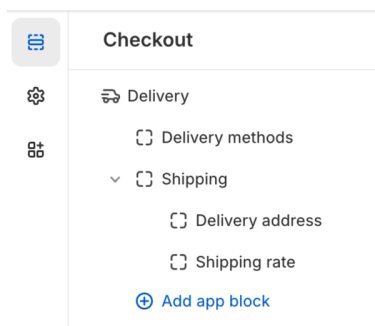
- Click the Klaviyo app block labeled Opt-in at checkout.
- Under Klaviyo App Block ID, paste the ID you saved from Klaviyo.
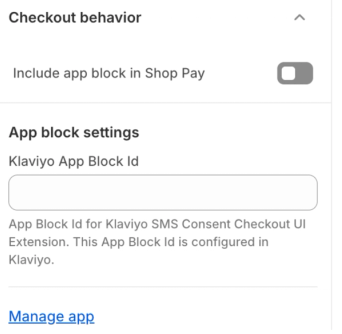
- (Optional) You can toggle on Include app block in Shop Pay if desired.
- Click Save.
- You should now see your app block live on the page you selected.
Manage your app blocks
To manage your app blocks:
- Navigate to Audience > Growth tools.
- Next to Add an app to your Shopify checkout page to collect subscribers, click Manage.
- Here, you’ll be able to view all your app blocks.
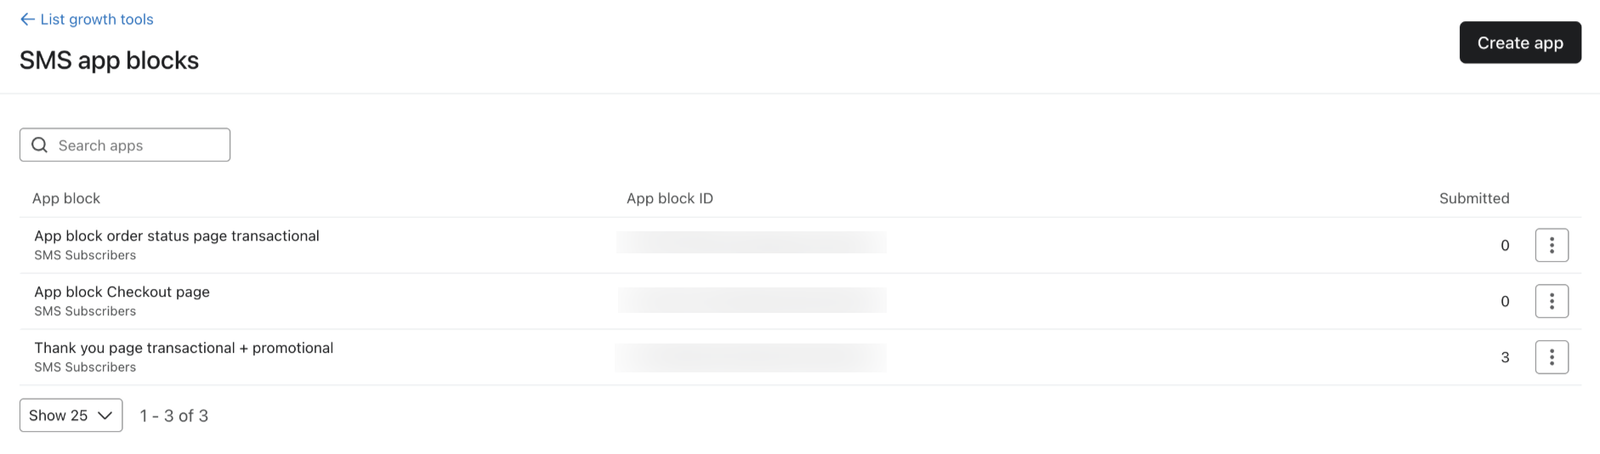
- To create a new app block, click Create app.
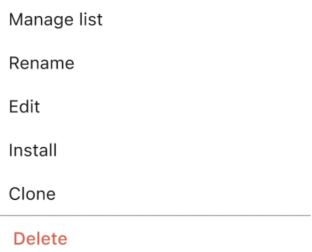
- If you click the 3 dots next to an app block, you’ll see the following options:
- Manage list
Manage the list associated with your app block - Rename
Rename your app block - Edit
Edit your app block - Install
View instructions about installing your app block in Shopify - Clone
Clone your app block - Delete
Delete your app block in Klaviyo. Please note that this will not delete it in Shopify, but it will render blank and not take up any space. You can remove your app block in Shopify by selecting it, then clicking the Trash icon.
- Manage list
Localize your app block for different Shopify Markets
If you sell in multiple regions using Shopify Markets, you can display a different version of your app block for each market. Each market uses a different Klaviyo app block ID, so customers see consent language that's appropriate for their region.
Please note that Shopify Markets must already be configured in Settings > Markets. Localization is configured per market, not per language. If a market includes multiple languages, everyone in that market sees the same version of the app block.
To create localized app blocks in Klaviyo:
- In Klaviyo, navigate to Audience > Growth tools.
- Next to your app block collection, click Manage.
- Click the three-dot menu next to your existing app block, then select Clone.
- Click the three-dot menu on the cloned app block, then select Rename. Give the app block a descriptive name, such as Opt-in at checkout (France).
- Click the three-dot menu again, then select Edit.
- Translate each text field, including the heading, body text, consent disclosure, button label, and any error messages.
- Save your changes, then click the copy icon to copy the app block ID.
- Repeat these steps for each market you want to support.
To assign localized app blocks in Shopify:
- In your Shopify admin, select Online Store.
- Find your Shopify theme, then click Customize.
- Select the Home page dropdown, then click Checkout and customer accounts.
- Select the Checkout dropdown, then open the page containing your app block.
- Use the market selector at the top of the editor to switch from Store default to the market you want to localize. Switch markets before making any changes. Any edits made while Store default is selected apply to every market.
- Select your Opt-in at checkout app block.
- Under Klaviyo App Block ID, replace the existing ID with the ID of your localized app block.
- Confirm that the modified value indicator appears next to the field. This indicates that the setting applies only to the selected market instead of inheriting the store default.
- Click Save.
- Repeat steps 5 through 9 for each additional market.
Markets that you don't customize continue to display your store default app block. We recommend using your most broadly applicable language as the default. If you update the text in a localized app block in Klaviyo later, the changes automatically appear everywhere that app block is installed, so you don't need to update Shopify again.