How to create an engaged segment of email subscribers
You will learn
Learn how to create an engaged email segment, which can help you improve your open, click, and conversion rates.
Sending to unengaged subscribers puts your sender reputation and deliverability at risk. Moreover, sending to an engaged segment is a critical part of warming your sending infrastructure when you first begin using a new email service provider.
Before you begin
Creating an engaged segment is key to a strong email marketing program and deliverability. For your regular sends, you should focus on the profiles included in your engaged segment as they are more likely to interact with your email, which gives your brand a strong sender reputation.
For large promotions (e.g., Black Friday, product release, etc.), you can consider expanding your sending lists, but for your regular campaigns, engaged sending is essential.
Create an engaged segment
- Navigate to Audience > Lists & segments, then select Create > Segment. If you have no lists or segments yet, select the Segment card.
- Name your segment, for example, Engaged email subscribers (30 days). If you’re entering the name in the Create segment panel, click Create segment to continue to the builder.
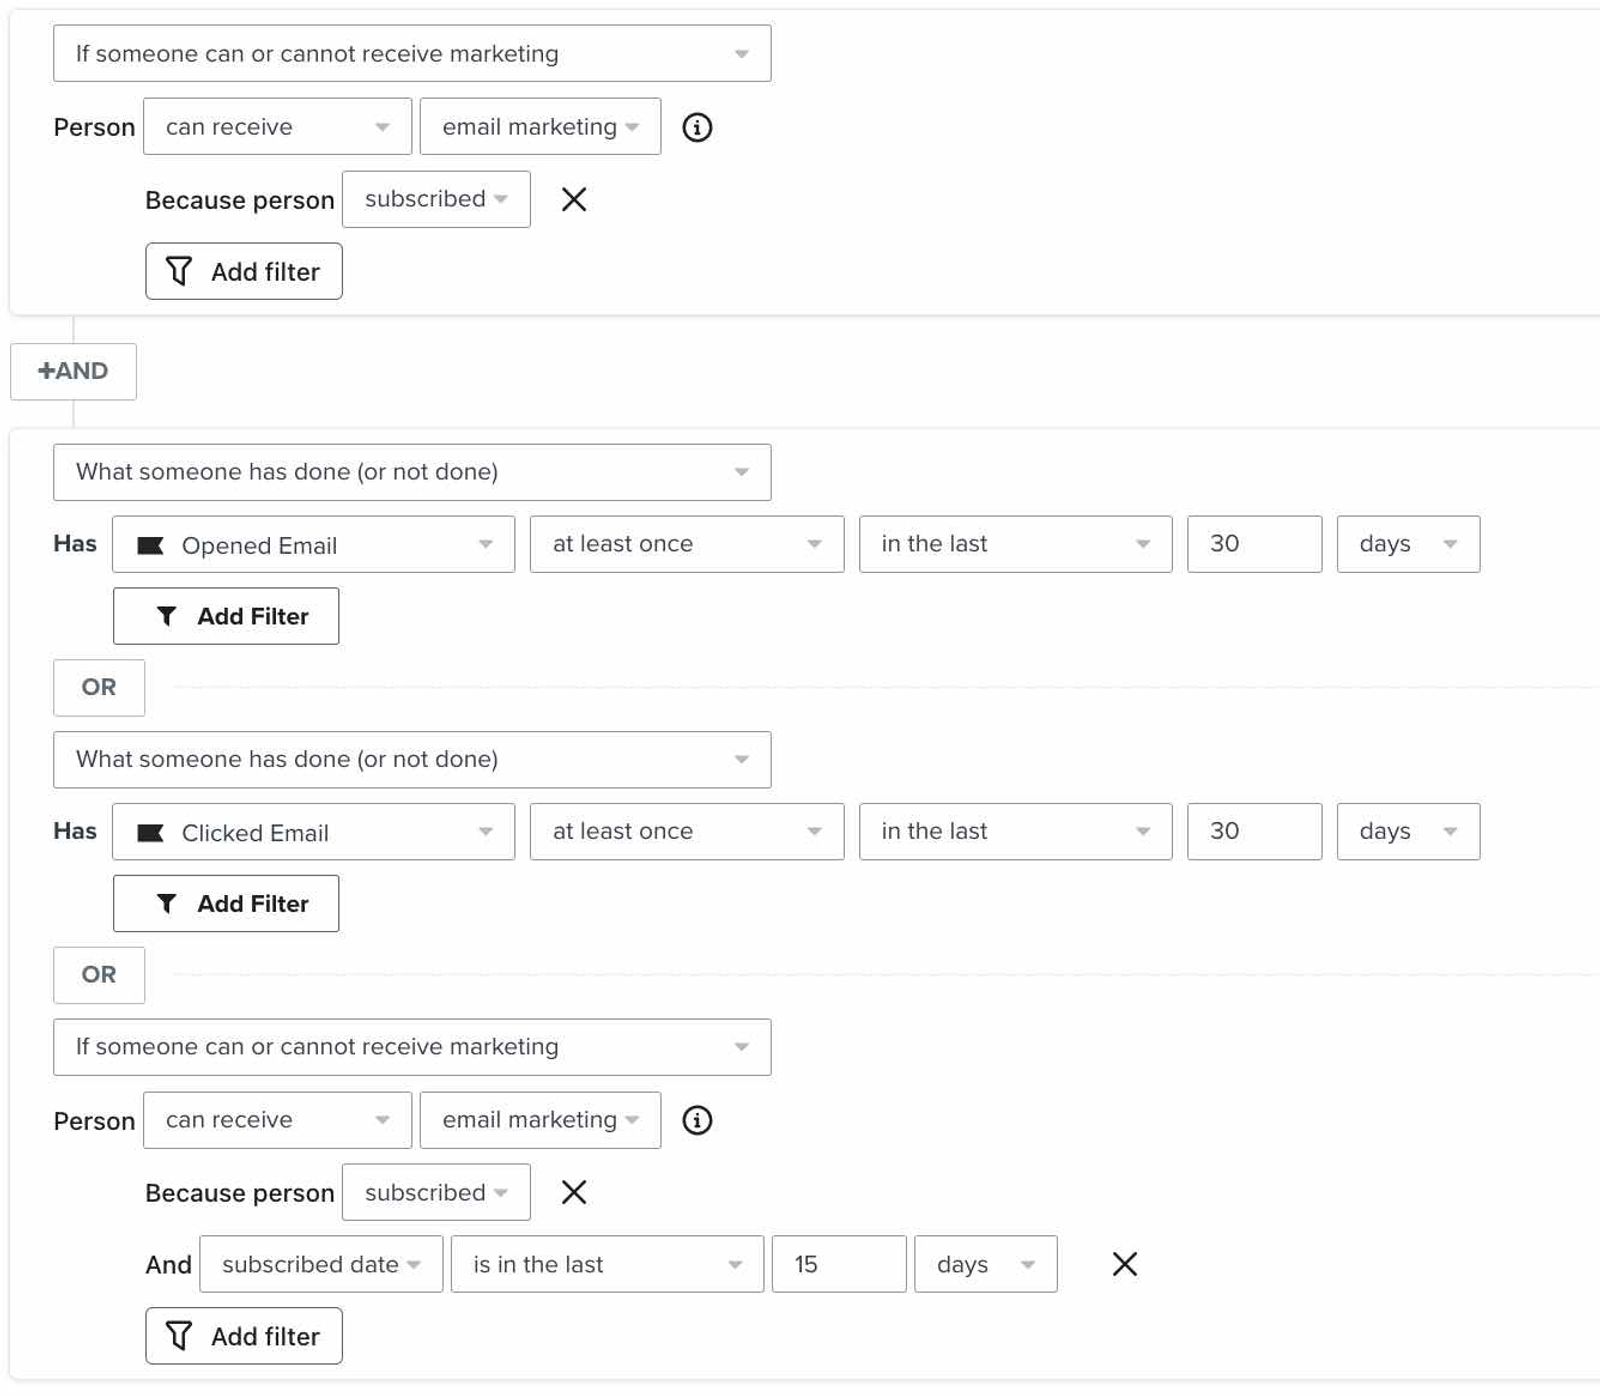
Add the following conditions. Use AND after the first condition and OR between the remaining conditions, so every member must be an email subscriber and meet at least 1 of the remaining conditions. In the subscription conditions, click Add filter and select because person > Subscribed.
- If someone can or cannot receive marketing > can receive > email marketing > because person subscribed
AND - What someone has done or not done > Opened email > at least once in the last 30 days
OR - What someone has done or not done > Clicked email > at least once in the last 30 days
OR - If someone can or cannot receive marketing > can receive > email marketing > because person subscribed > and subscribe date is in the last 15 days
Note that the final criterion, specifying if someone subscribed recently, is optional. Including this in your segment definition can ensure brand-new subscribers who haven't had a chance to open an email yet are still included in the engaged segment.
If you send infrequently, consider using a long time period (e.g., 60 days rather than 30 days).
After migrating to Klaviyo, check the subscription dates stored for your imported contacts. Historical dates can be preserved, including dates synced from Mailchimp. If older contacts were recorded as newly subscribed during migration, omit the optional recent-subscription condition until those dates fall outside the 15-day window.
If you're curious when it's best to connect conditions with AND versus OR, head to our AND vs. OR guide.
If you are migrating from an email service provider (ESP) with a Klaviyo integration, enable its open and click data sync, then add that provider’s Opened Email and Clicked Email conditions with OR alongside the Klaviyo engagement conditions. Keep the email subscription requirement connected with AND. Klaviyo has integrations for the following ESPs:
If you’re migrating from Constant Contact, follow the migration guide to import your subscribers and engagement data from CSV files. Klaviyo does not have a built-in Constant Contact integration.
With the release of iOS15, macOS Monterey, iPadOS 15, and WatchOS 8, Apple Mail Privacy Protection (MPP) changed the way that we receive open rate data on your emails by prefetching our tracking pixel. With this change, it’s important to understand that open rates will be inflated.
To exclude automatic MPP opens from this segment, click Add filter on the Klaviyo Opened Email condition and set Apple Privacy Open to False. Profiles can still qualify through a click or the optional recent-subscription condition. Learn more about identifying MPP opens in your subscriber segments.
For complete information on MPP opens, visit our iOS 15: How to Prepare for Apple’s Changes guide.
When your definition is ready, click Create segment. Klaviyo will populate the segment with profiles that meet your conditions.
Additional resources
- How to clean your email list to maintain good deliverability
You will learnLearn how to clean your email lists to avoid sending to contacts who aren’t interested in your content. This process allows you to keep in touch with the subscribers who are most engaged with your messages, so you are seen as a trusted sender with a good reputation.
- Understanding which warming process to use in Klaviyo
Learn how to choose the right warming process in Klaviyo, so you can establish a strong initial sender reputation and be viewed favorably by inbox providers.
- Understanding email deliverability
Learn about email deliverability, including the steps you can take to establish a strong sender reputation so that your emails are delivered to the inbox.
- Segment conditions reference
Learn more about segment conditions, including how to filter your conditions and more. When building segments in Klaviyo, conditions are the building blocks that you customize to either include or exclude certain sectors of your audience. In a nutshell, profiles will only appear in your dynamic segments when they meet the specific conditions you make when creating the segment.