How to migrate from another reviews provider to Klaviyo
You will learn
Learn how to migrate from a previous reviews provider to Klaviyo Reviews. This guide covers the entire migration process, from importing your data to setting up widgets, choosing a plan, and reviewing your results. Klaviyo Reviews is currently supported for those using Shopify or WooCommerce as their ecommerce platform.
Overview
If you choose to follow the in-app onboarding wizard, it will walk you through the initial steps outlined below. Skip ahead to the first step you haven’t yet completed.
If you use the onboarding wizard, select Skip step on the Request reviews step until you’re ready to switch providers. Selecting Next sets your review request flow live. Request reviews for past orders is selected by default, so import your existing reviews before using that option.
- Integrate your ecommerce platform
- Import data from your past provider
- Create reviews flows
- Test your setup
- Cut over to Klaviyo Reviews
- Implement best practices
- Review your performance
1. Integrate your ecommerce platform
Integrating with your ecommerce platform involves 2 steps:
- Connecting Klaviyo Reviews to your ecommerce platform.
- Installing reviews widgets on your site.
Before installing Klaviyo Reviews, make sure you are logged in to the correct accounts.
Connecting your store allows Klaviyo Reviews to exchange information with your store, like order activity and site traffic. If you don’t see your ecommerce platform listed below, Klaviyo Reviews is not yet available for your store.
- Install the Klaviyo Reviews app for Shopify
- For WooCommerce, make sure your store is integrated with Klaviyo. In Klaviyo, select Reviews, then Add reviews to start setup. Follow the WooCommerce widget installation instructions below.
Once you’ve connected Klaviyo Reviews, add Klaviyo Reviews widgets to your store. Widgets display reviews information to site visitors, like a product’s star rating or reviews from past customers.
Follow the widget installation instructions for your platform and theme type:
- How to install Klaviyo Reviews widgets on Shopify 2.0 themes
- How to install Klaviyo Reviews widgets on Shopify (vintage themes and headless)
- How to install Klaviyo Reviews widgets on WooCommerce
Tip: For Shopify, install these widgets on a draft theme so you have the opportunity to test them before setting them live. Note that Klaviyo cannot detect widgets on draft themes, so you may see an in-app message indicating your widgets are not yet installed until you set the draft theme live.
2. Import reviews from your past provider
Import past reviews to bring your existing customer feedback into Klaviyo. First, export data from your current platform:
If your current platform isn’t listed here, you can reference their support documentation to learn how to export your reviews.
To import your reviews to Klaviyo:
- Select Reviews from the Klaviyo sidebar.
- Navigate to the All reviews tab.
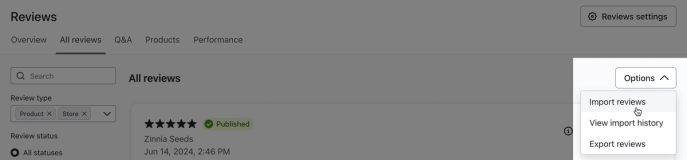
- If you already have reviews in Klaviyo, select Options.
- Select Import reviews. If you have no reviews yet, select this button directly on the All reviews tab.
- Choose your previous reviews platform from the options provided. If you don’t see your platform listed, select Other / not sure. Then select Next.
If you select Other / not sure, you must format your CSV using our sample template before proceeding.
- Select Choose file or drag and drop your CSV file into the upload tool.
- If accurate, check the box next to I confirm that the imported reviews are genuine. Only legitimate reviews may be uploaded to Klaviyo. Then select Next.
- Review the mapping of fields from your upload and make adjustments as needed.
- Select Next.
- If the Map custom questions step appears, map the questions you want to import, then select Next.
- On Import history, wait for the import to finish, then check the imported and skipped records. Resolve any errors before switching providers.
If you have trouble importing, head to our article covering how to import reviews data from another platform for more information and troubleshooting help.
3. Create reviews flows
There are 2 key review flows:
- Review request flow
Ask a recent purchaser to review a product from their order. Consider offering an incentive (e.g., 15% off, free shipping on their next order, additional loyalty points), which may increase conversions. This flow is triggered by the Ready to review event. - Review follow-up flow
We recommend offering an incentive in exchange for customer reviews. Deliver the reward once a review is submitted using a flow triggered by the Submitted review event.
If the onboarding wizard already created a review request flow, customize that flow instead of creating another. Keep your review request and review follow-up flows in Manual or Draft while you finish testing. Set them to Live when you’re ready to switch providers.
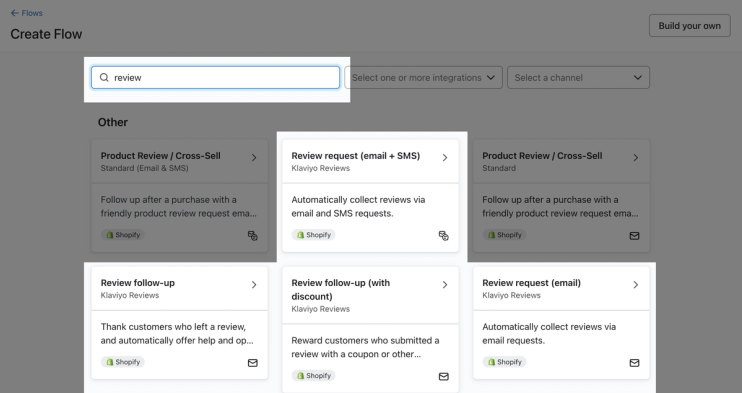
You can find templates for these flows by navigating to Flows > Create flow and searching Review in the Flow Library. All flows with the Klaviyo Reviews tags use Klaviyo Reviews metrics.
Learn how to request reviews from your customers with Klaviyo Reviews flows.
Additionally, you can create a flow to submit a customer service ticket for every negative review you receive. This helps your support team respond to issues reported in negative reviews.
4. Test your setup
To ensure you’re ready to cut over to Klaviyo Reviews, test the following:
- Check that all reviews widgets appear correctly on your site (or your draft theme if you use Shopify) and display any reviews you’ve imported.
- Preview the messages in your review request and review follow-up flows to ensure they match your branding and appear as desired.
- Confirm your review timing settings make sense for your products. For Shopify online orders, the default delay is 7 days after delivery. Check the fallback delay after fulfillment for orders without delivery tracking, and the separate timing for Shopify POS purchases. WooCommerce review request timing is based on fulfillment date.
5. Cut over to Klaviyo Reviews
Once you’ve tested everything and are ready to set Klaviyo Reviews live, follow this checklist:
- Select the right Klaviyo Reviews plan for your order volume.
- Optional: if several days or more have passed since you originally imported reviews from your previous platform, import any new reviews you’ve received since then.
- Turn off review request automations in your previous reviews platform before activating your Klaviyo review request flow.
- Turn your reviews flows from Manual or Draft to Live.
- For Shopify, publish the draft store theme where your reviews widgets are installed. For WooCommerce, make sure the widgets are visible on your live store.
- Cancel your previous reviews platform.
- Optional: request reviews from past orders if you did not do this during setup. This option is available once, within 60 days of setup. Import your existing reviews first to avoid requesting another review for an order that already has one.
6. Implement best practices
Once you’ve set up the core Klaviyo Reviews functionality, consider using advanced features:
- Ask reviewers custom questions about themselves or their experience with your brand.
- Sync your reviews to a Google Shopping feed.
- Learn how to moderate reviews.
- Create a customer service ticket when you receive a negative review.
- Highlight positive reviews in your emails.
- Use custom CSS to implement advanced styling options.
7. Review your performance
A few weeks after you begin using Klaviyo Reviews, head to Reviews > Performance to evaluate the success of your reviews program. Here, you can check your reviews collected and response rate, and see how your site visitors interact with reviews content.
Additional resources
- Best practices for collecting customer reviews
Learn some recommended best practices for enabling transparency, fairness, and compliance with certain regulations that govern collecting and managing reviews.
- How to customize the review submission page
Learn about customization options for the reviews submission page, including how to let reviewers choose an AI-generated headline for their review.
- How to respond to customer reviews
Learn how to respond to reviews left by your customers. Responses are public, so future shoppers can use this information to inform their buying decisions.
- How to feature reviews in emails with the review quote block
Learn how to feature a product review within a campaign or flow email via the Review quote block. With Klaviyo Reviews, you can use this block to feature customer testimonials and ratings to build trust in your brand and create social proof.