Getting started with analytics or overview dashboards
You will learn
Learn how to use analytics dashboards (also referred to as overview dashboards) and understand how each data card can measure performance. Once you send messages from Klaviyo, this dashboard is a place to visualize the data points and trends that matter most to your business.
Common use cases
The overview dashboard is commonly used to provide insights or answer the following questions:
- What channels are contributing to revenue most?
- Which campaigns in particular are performing the best? And how do these compare to other recently sent campaigns?
- Which flows in particular are performing the best? And how do these compare to other recent flows?
- Which of my metrics are performing the best? Which are performing the worst and need to reviewed?
- What do my SMS and email deliverability rates look like? Is there anything that needs attention?
- Where are customers falling off in my email or SMS funnels? Where I can improve?
- What forms are performing the best? What forms can be improved?
Accessing the dashboard
Navigate to Analytics > Dashboards to find an existing dashboard from the list or click Create Report to create a new one.
You will already have a pre-built dashboard (i.e., Overview dashboard) created for you. However, if you'd like to set up a new, separate dashboard, head to our guide on creating and customizing your dashboard.

At the top of the dashboard you will find the date range, your selected conversion metric, and the comparison period. Note that if you use the custom time range, the range cannot exceed 12 months and, if typed in manually, needs to be exactly formatted as shown below.
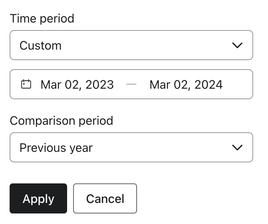
All users on your account will see the same dashboards. The last updated timestamp represents the last time any team member updated the board. Note that only 10 dashboards in total can be created.
General dashboard and card settings
Chosen conversion metrics
If you are using a revenue-based conversion metric in your dashboard (e.g., Placed Order, Started Checkout, Fulfilled Order, etc.), you will see monetary values displayed in your cards.
All other conversion metrics (e.g., Active on Site, Opened Email, Clicked Email, etc.) will show the total number of applicable conversions.
Date ranges and display in charts
Report date ranges will appear as the following:
- A date range of 30 days or under will display bars by day in the chart.
- A date range of more than 30 days will display by week.
- A date range of over 90 days will display by month.
Multichannel reporting
Some cards will show tabs at the top for email, SMS, or mobile push. You can switch between these tabs to see data for each particular channel channel data. If you are only using one marketing channel, you will only see that applicable tab.
Percentage changes
Some cards show percentage changes (positive or negative), as shown in the example below. In any of these cards Klaviyo will compare the revenue or conversion percentage change from the prior period. For example, if you are looking at the last 30 days, we will compare the revenue percentage change from the 30 days prior to your range.
Percentage changes will appear as the following:
- Green percentage
A positive percentage change will show in green. - Red percentage
A Negative percentage change will show in red.
Available data and performance cards
Below the top of your dashboard, you will see the different default data and performance cards. These cards represent different ways to view conversions, revenue, and success metrics across your account.
By default your dashboard will contain the following cards:
- Conversion summary card
- Campaign performance card
- Campaign performance detail card
- Flows performance card
- Flows performance details card
- Performance highlights card
- Email deliverability card (if you are using email as a channel)
In addition to the default cards on your dashboard, the data view library contains many pre-built cards to provide additional insights.
Head to our resource on adding additional cards to learn how to remove cards from your default dashboard and add cards from the data view library.
The additional cards that you can add include:
- Conversion by channel card
- Email funnel summary card
- SMS funnel summary card
- SMS deliverability card
- Flows volumes card
- Forms performance card
- Forms performance detail card
- Email deliverability by email domain card
- Flows conversion card
- Subscriber growth card
Default cards
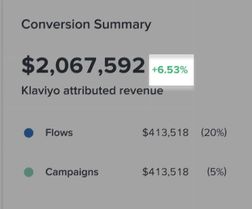
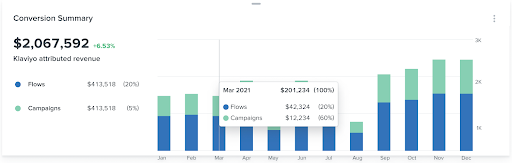
Conversion summary card
The conversion summary card provides a high-level view of your flows and campaigns, and the revenue or conversions attributed to each.
If you are using multiple channels, SMS and mobile push will be grouped into the campaign and flow numbers.
Results will show as stacked bar charts, with each color corresponding to each channel (i.e., flows are blue and campaigns are teal).
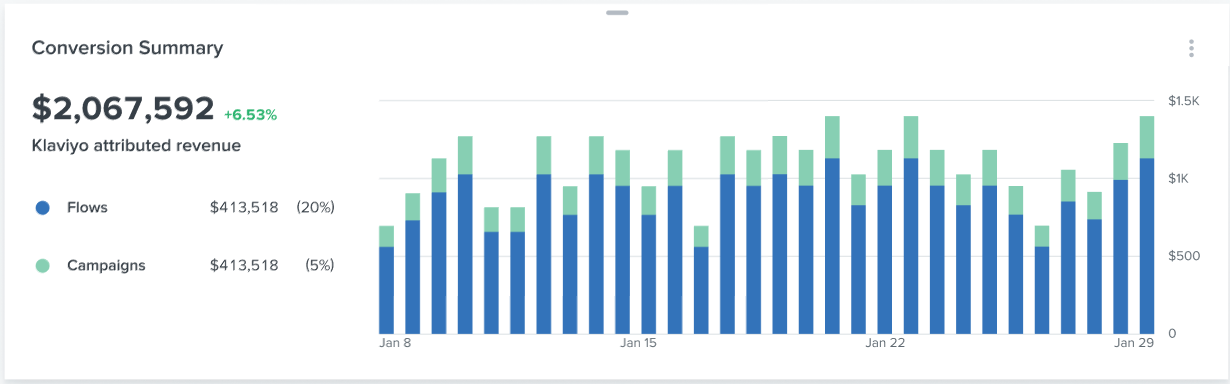
If you hover over any bars in the chart, you will see the breakdown of revenue for flows versus campaigns and the percentage attributed to each for that point in time.
Revenue will be attributed to the date the first email is sent and not the day that the placed order happened.
How we calculate your card data
- Flows
Flows data includes all live, manual, and draft flows sent in the date range you chose. - Campaign
Campaign data includes all email and SMS campaign messages sent in your date range.
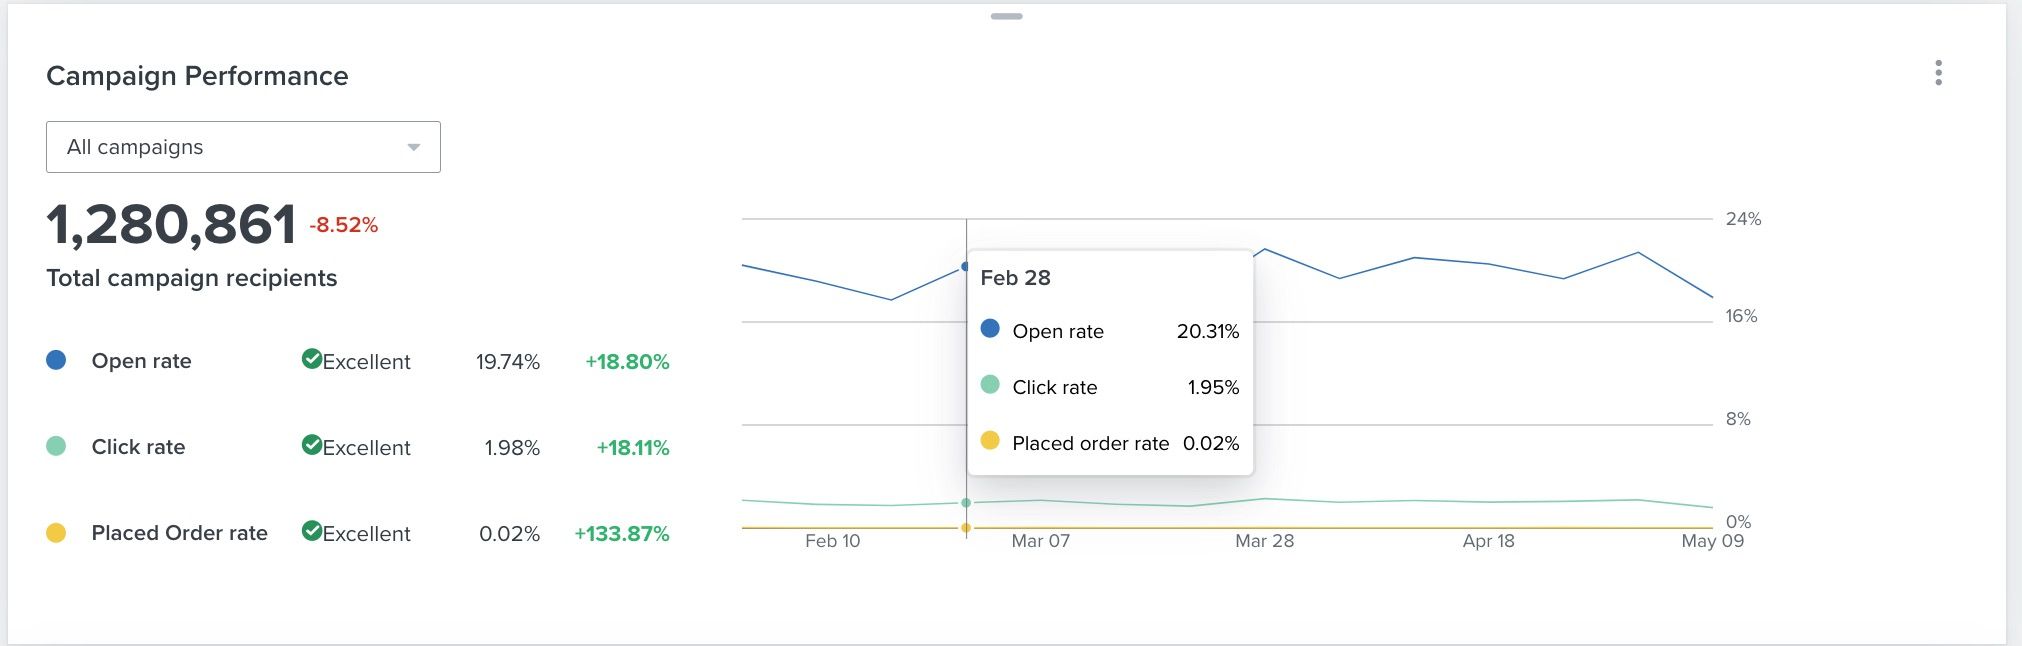
Campaign performance card
The campaign performance card helps you monitor overall campaign health by opens, clicks, and your conversion metric. You can also filter by a specific campaign to see this health on an individual level.
The tabs at the top of this card allow you to see the campaign performance data for each channel you send through (i.e., email, SMS, and mobile push)
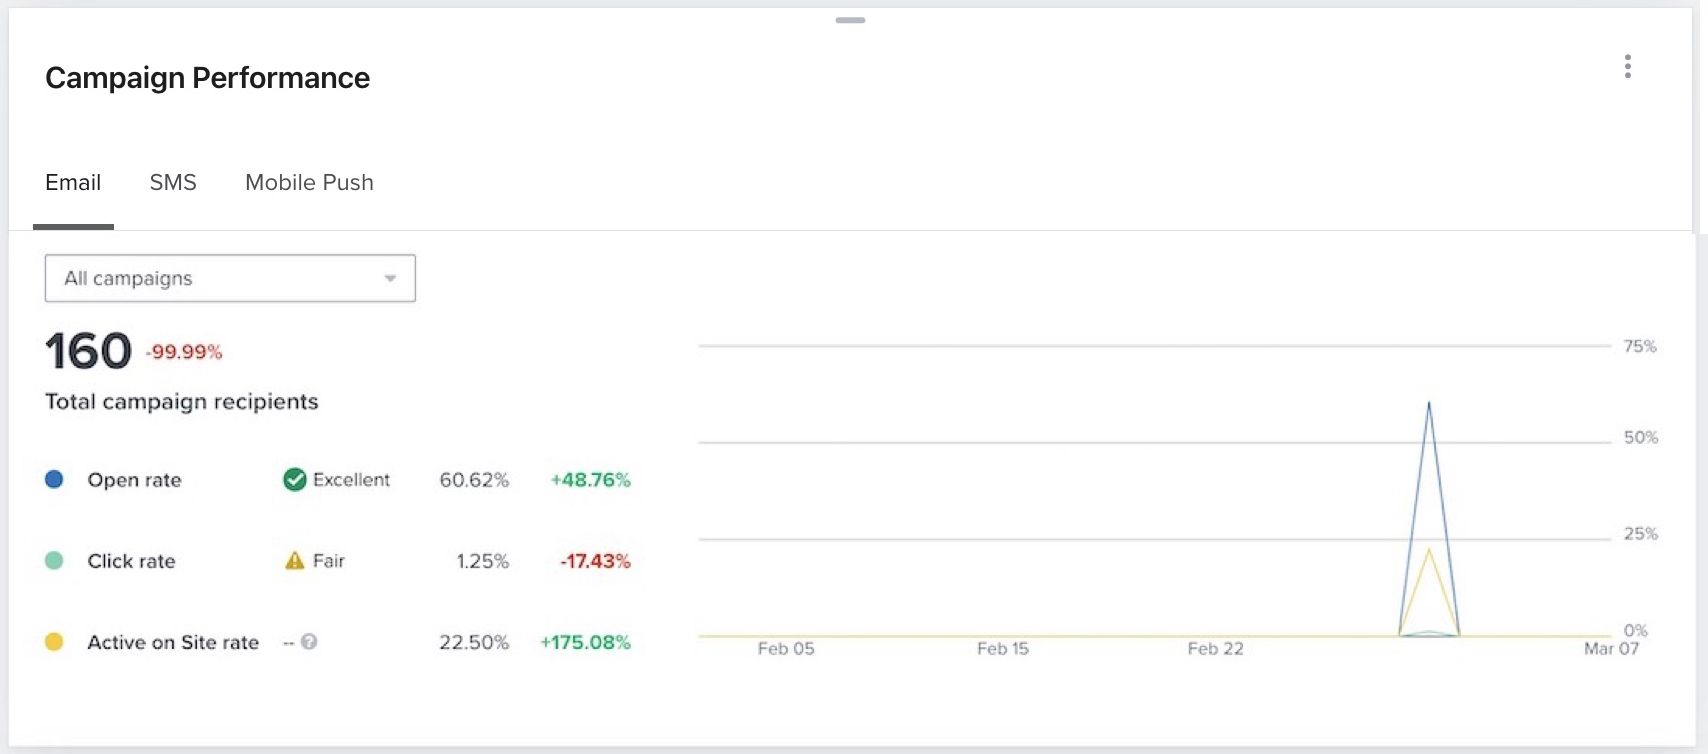
If you open the All campaigns dropdown, you can further refine your view by a specific campaign. This dropdown will show campaigns sent within the time range that you chose at the top of your dashboard.
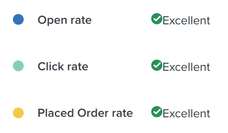
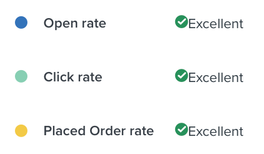
If you are viewing data for all campaigns, next to each metric, you will also see your benchmarks scoring (Excellent, Fair, or Poor) compared to similar companies. If you fall into the Fair or Poor categories, we suggest looking at that metric against individual campaigns to diagnose the issue.
By hovering over any lines in the chart, you can see the number of opens (for emails only), clicks, and conversions or revenue for that point in time
How we calculate your data:
- Open rate
This rate is the number of opened emails divided by the total number of received messages. - Click rate
This rate is the number of clicked emails divided by the number of received emails. - Placed order rate
The number of placed orders associated with a message. In other words, orders placed within the channel's attribution window divided by the number of unique recipients of that message.
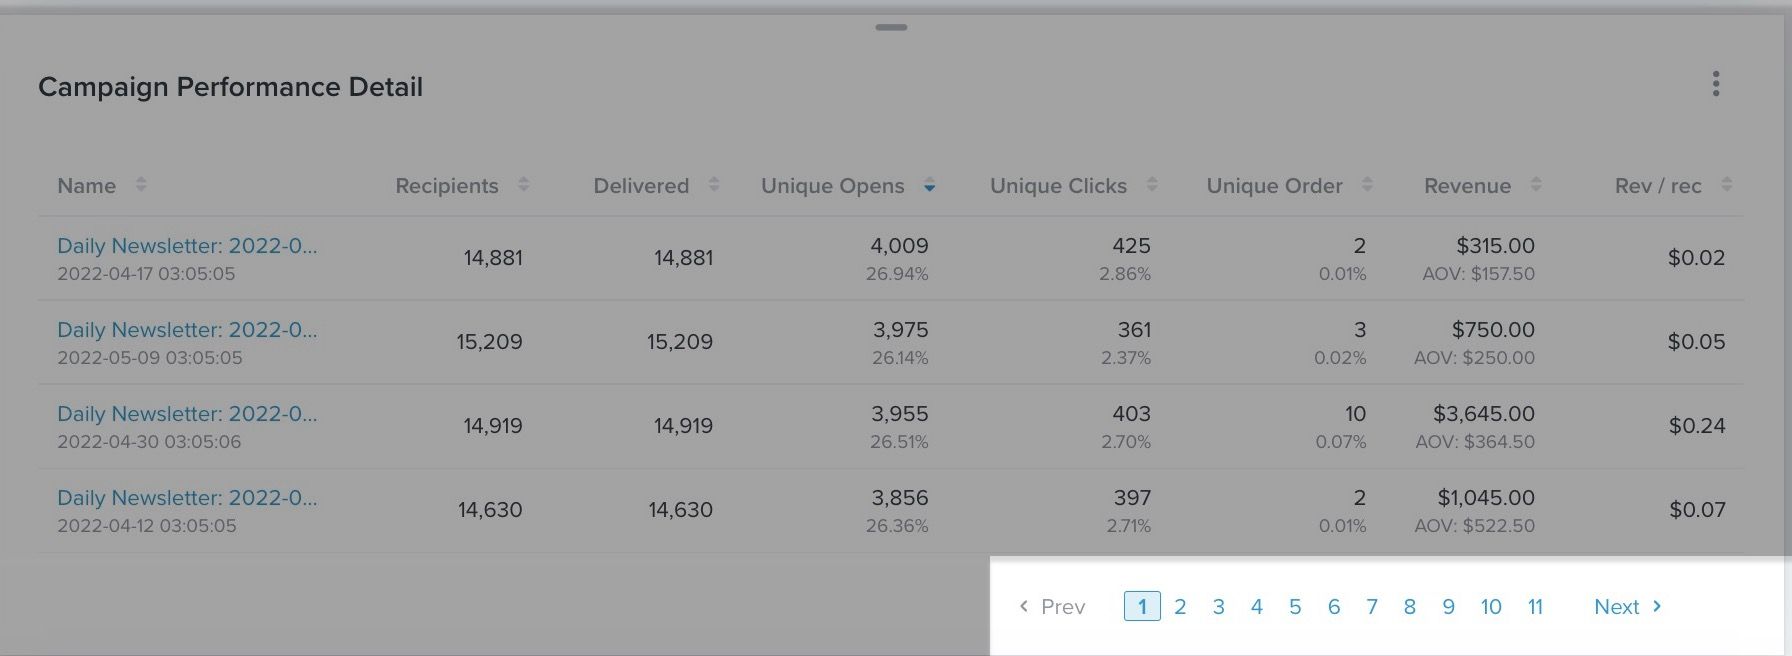
Campaign performance detail card
The campaign performance detail card helps you dive into the individual performance of each of your campaigns with a view that includes delivery, engagement, and conversion data. Here, you will be presented with a table of all recently sent campaigns within your chosen date range.
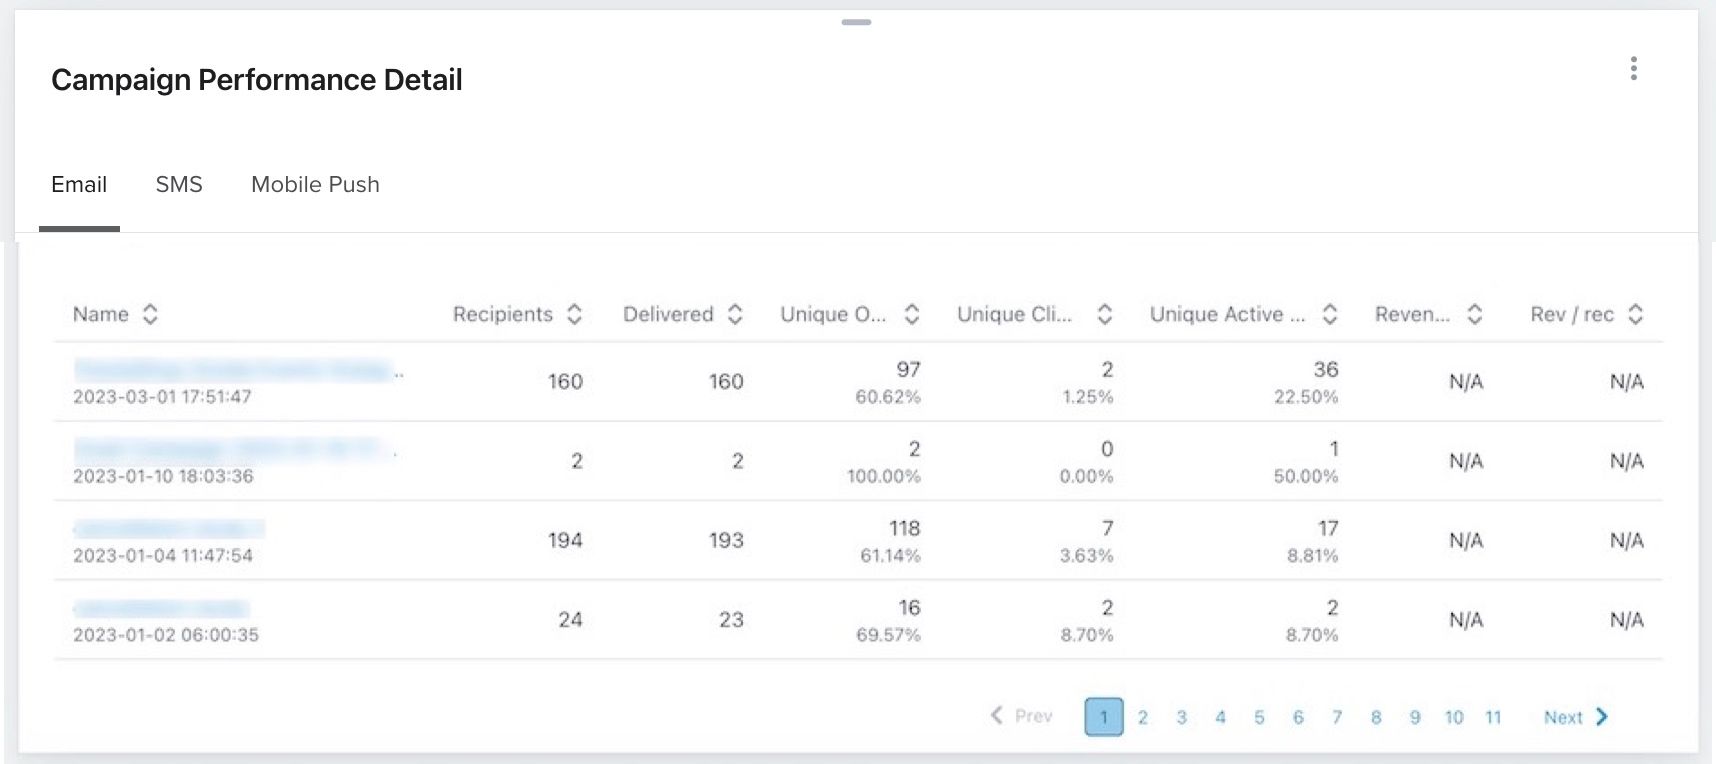
Click through the page numbers at the bottom of the table to view all applicable data for additional campaigns.
How we calculate your data:
- Recipients
This count includes the number of received emails and bounced emails. The SMS recipients count includes the number of received messages and the number that failed to deliver. - Delivered
This rate shows how many campaigns successfully reached your subscribers' inboxes. - Unique opens
The number of individuals clicking a link in your email or SMS divided by the number of recipients. Note that SMS opens cannot be detected. - Unique clicks
The number of unique individuals clicking a link in your email or SMS divided by the number of recipients. - Unique order
The rate represents the unique number of orders placed via your campaigns. - Revenue
This rate looks at revenue attributed to these conversions. - Rev/rec
This rate represents revenue generated per recipient. This is determined by the revenue generated from your campaign divided by the number of successful deliveries of that campaign.
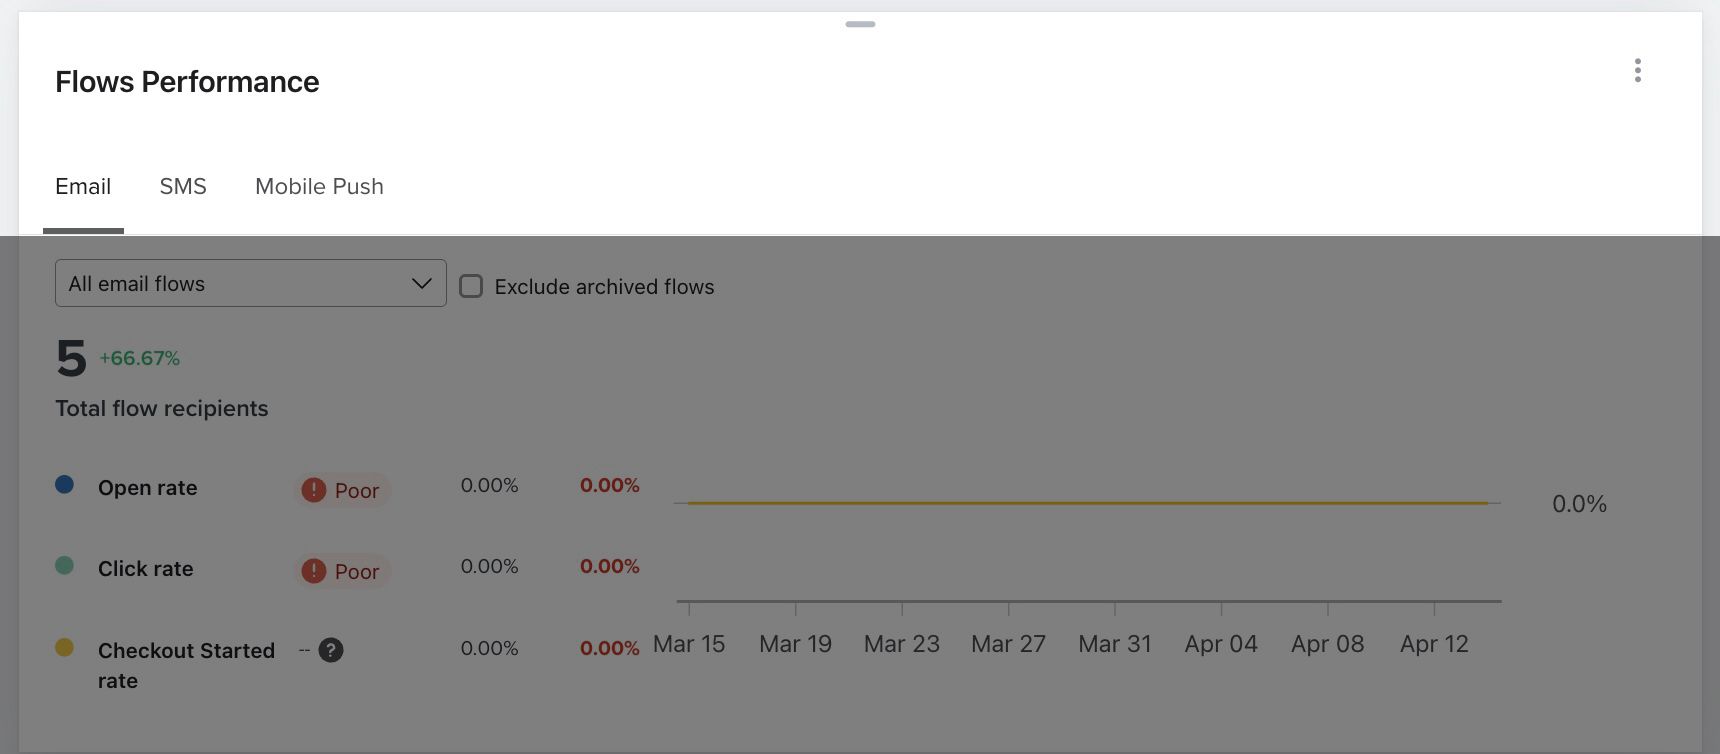
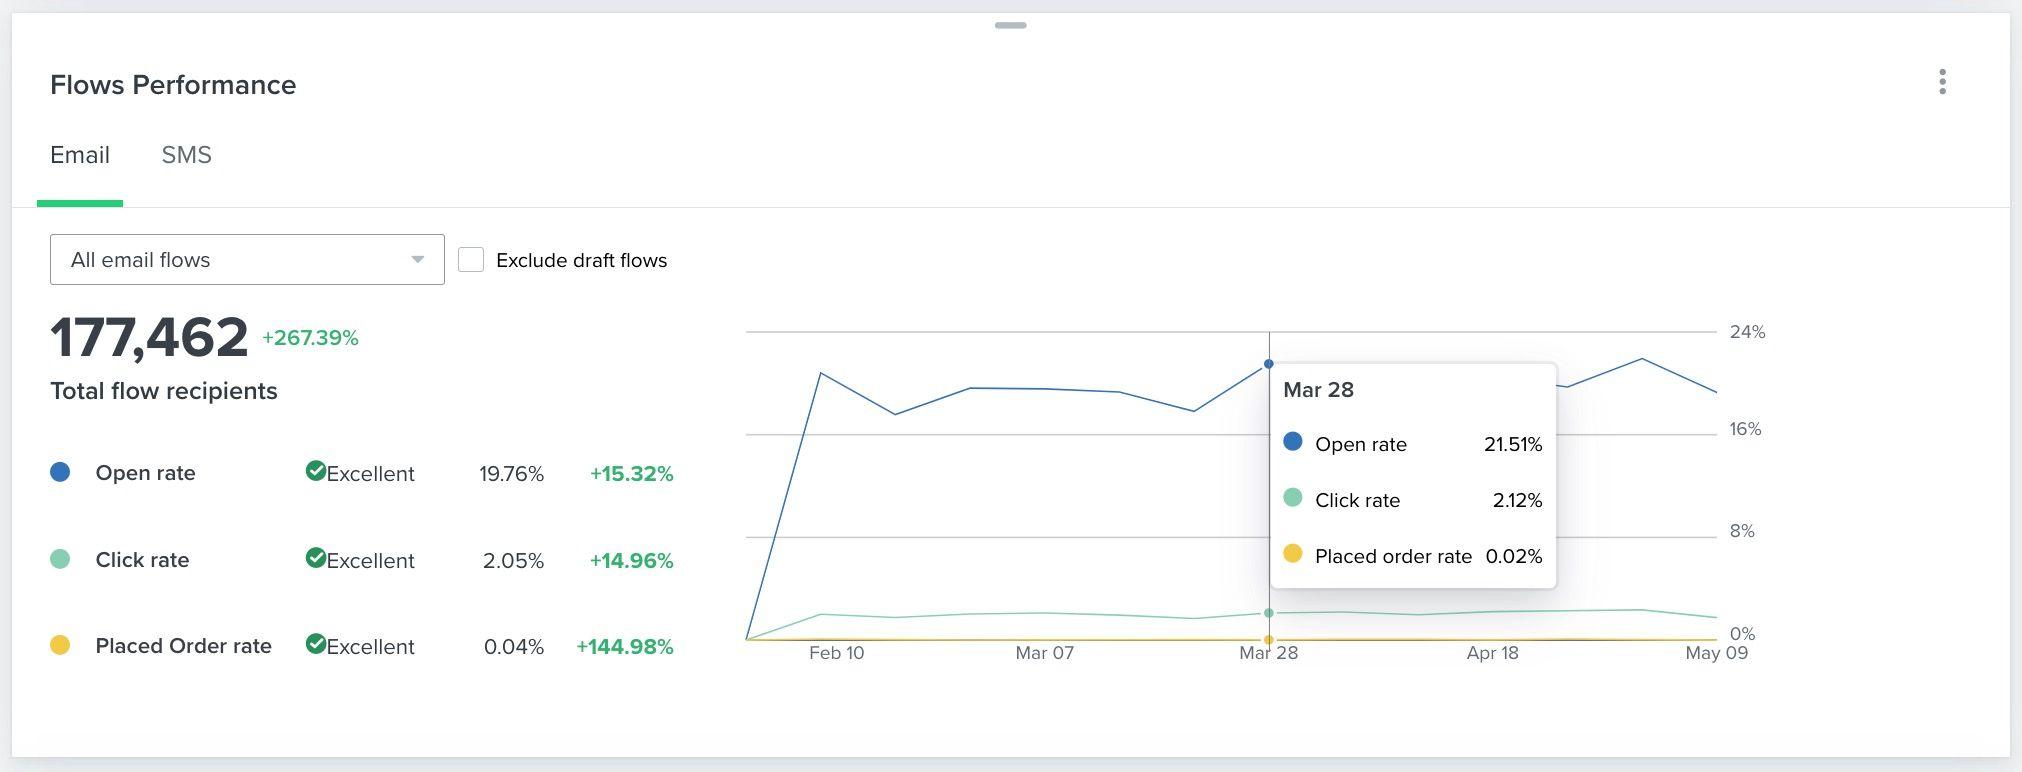
Flows performance card
The flows performance card helps you dive into individual flow performance by engagement and overall conversions. This card allows you to see flow opens, clicks, and conversions by specific channel.
The lines in blue (open rate), teal (click rate), and yellow (placed order rate) display according to the date range you chose.
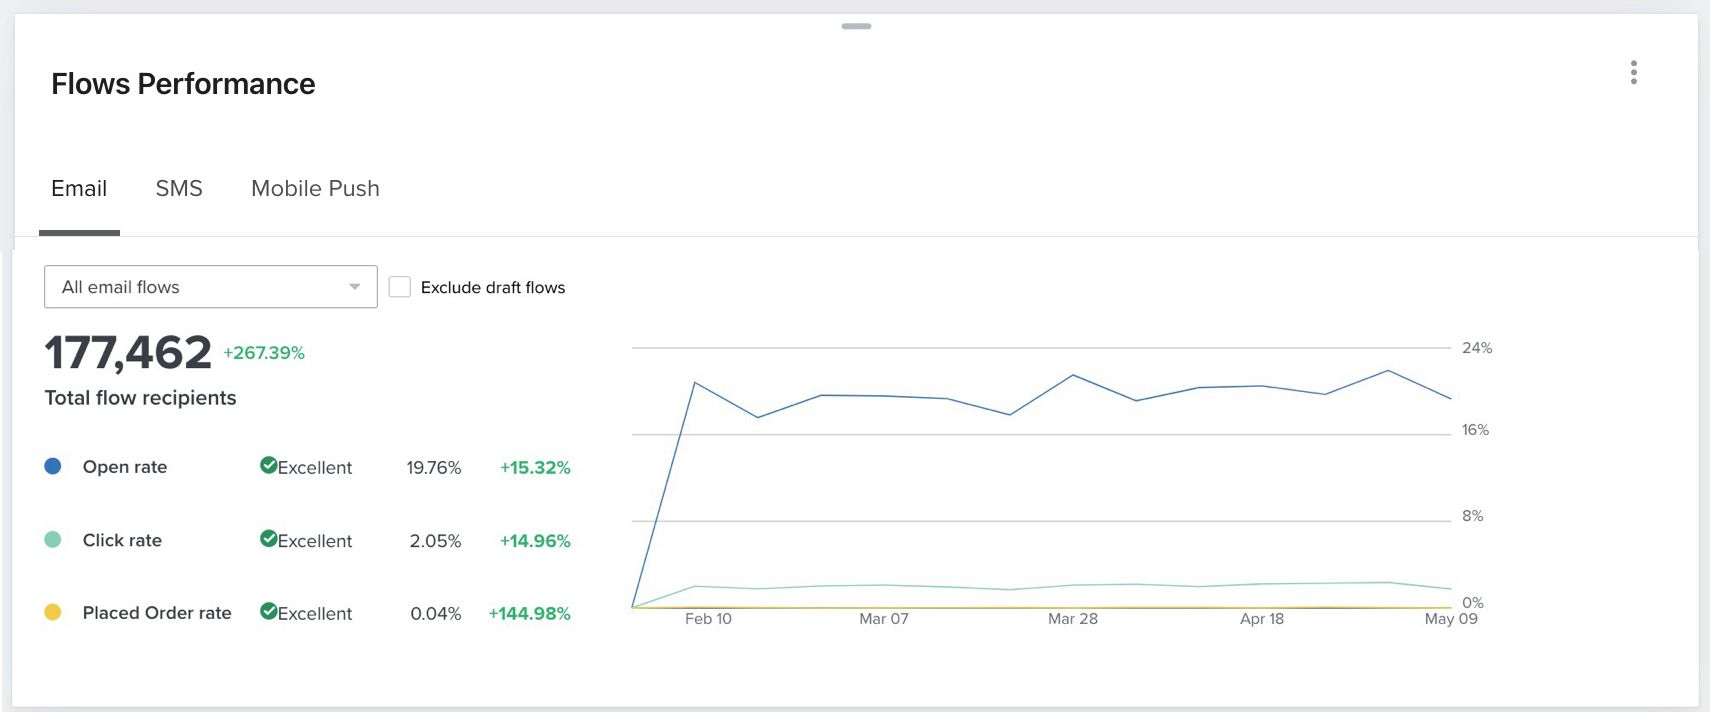
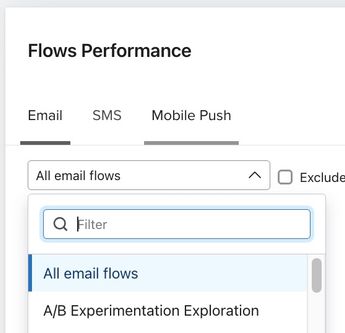
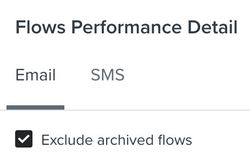
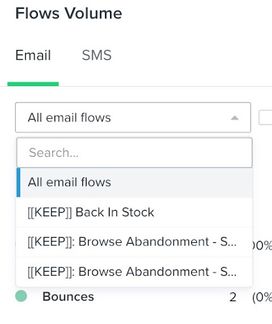
If you open the All email flows, All SMS flows, or All mobile push flows dropdown, you can further refine your view by an individual flow. You can also choose the Exclude draft flows checkbox next to this dropdown, to exclude any flows currently in draft mode from displaying in your data.
If you are looking at all of your email campaigns, next to each metric you will also see your benchmarks scoring (Excellent, Fair, or Poor) compared to similar companies. If you fall into the Fair or Poor categories, we suggest looking at that metric against individual flows to diagnose the issue.
Note that benchmarks will not show for SMS or mobile push campaigns.
By hovering over any lines in the chart, you can view the number of opens (for emails only), clicks, and conversions ore revenue for that point in time.
How we calculate your card data:
- Recipients
This count includes the number of received emails and bounced emails. The SMS recipients count includes the number of received messages and the number that failed to deliver. - Click rate
This rate is the number of clicks divided by the number of received emails. - Placed order rate
The number of placed orders associated with a message. In other words, orders placed within the channel's attribution window divided by the number of unique recipients of that message.
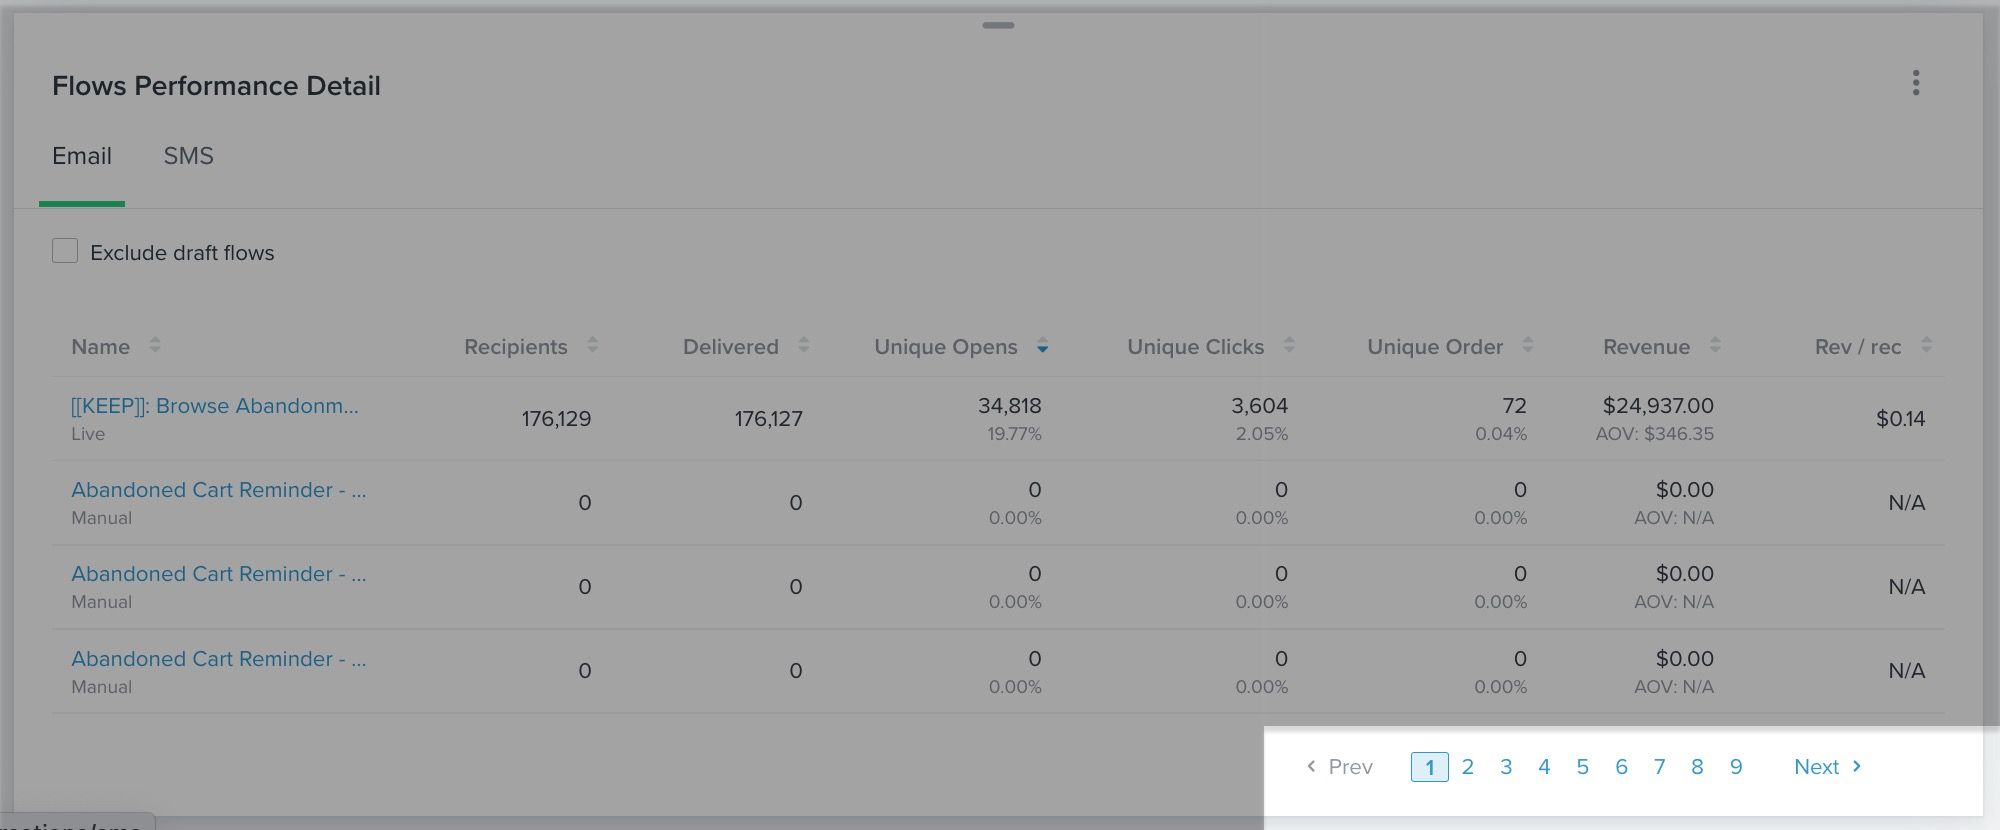
Flow performance detail card
The flow performance detail card dives into the individual performance of each of your flows with a view that includes delivery, engagement, and conversion data. Here, you can see an alphabetized table of all flows sent within your chosen date range.
The tabs at the top of this card allow you to see flow opens, clicks, and placed order rates by channel. You can use the arrows next to each data metric at top to sort your data from ascending or descending order.
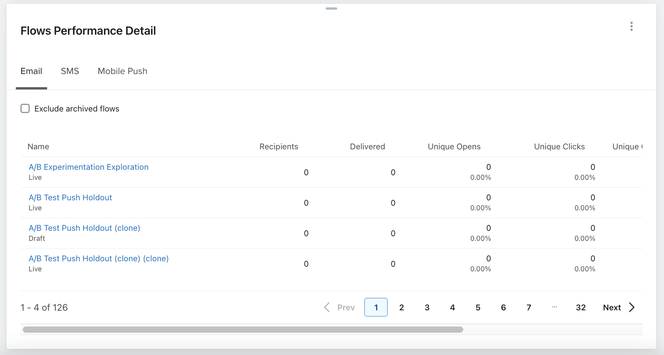
Click through the page numbers at the bottom of the table to view all applicable data for additional flows.
You can also choose the Exclude draft flows checkbox next to this dropdown to exclude any flows in draft mode from displaying in your data.
How we calculate your card data:
- Recipients
This count includes the number of received emails and bounced emails. The SMS recipients count includes the number of received messages and the number that failed to deliver. Note that this value is not unique and profiles may be counted multiple times if they enter a flow more than once. - Delivered
This rate shows how many campaigns successfully reached your subscribers' inboxes. - Unique opens
The number of individuals clicking a link in your email or SMS divided by the number of recipients. Note that SMS opens cannot be detected. - Unique order
This rate represents the unique number of orders placed via your campaigns. - Revenue
This rate looks at revenue attributed to these conversions. - Rev/rec
This rate represents the revenue generated per recipient. This is determined by the revenue generated from your campaign divided by the number of deliveries for that given campaign.
Performance highlights card
The performance highlights card provides a view of your top and bottom performing metrics to help you choose where to invest your marketing efforts.
This card only displays the data for the last month and updates on the 10th of every month.
The left-hand side of the chart lists your top metrics based on Klaviyo best practices compared to a group of your peers. The right-hand side shows your bottom performing metrics, which represent opportunity areas for your brand.
Clicking any of these metrics leads you to the corresponding benchmarks report.
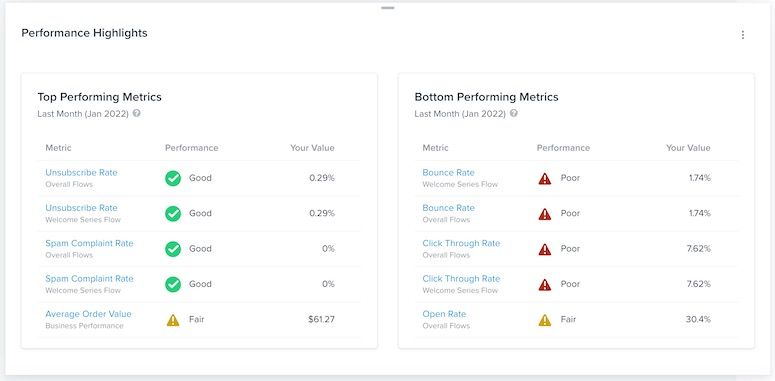
Note that if do not have enough sent data, this card may appear blank until you have sent enough emails or SMS messages for Klaviyo to determine your performance.
Email deliverability card
The email deliverability card allows you to monitor your deliverability and spot any issues related to your sender reputation. Review your bounce, spam, and unsubscribe percentage rates over your chosen date range.
Email metrics in this chart include those sent through campaigns and flows.
The lines in blue (Bounce rate), teal (Spam rate), and yellow (Unsubscribe rate) display according to the date range you chose.
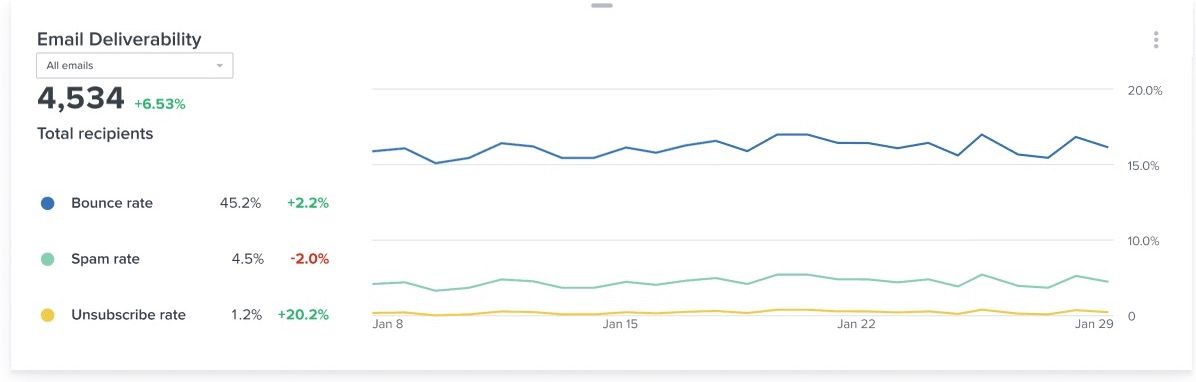
If you open the All email dropdown, you can further refine your view by all emails, flows or campaign messages.

By hovering over any lines in the chart, you can see the number of bounces, spam, and unsubscribe rates for that point in time.
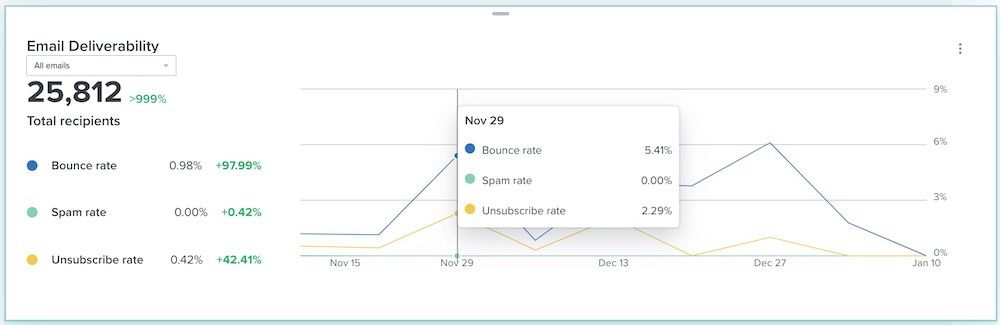
How we calculate your data:
- Bounce rate
This rate represents the number of bounced emails divided by the total number of received and bounced emails. - Spam rate
This rate represents the number of recipients who marked your email as spam divided by the total number who received the email. - Unsubscribe rate
This rate represents the number of recipients who unsubscribed divided by the total number who received the email.
Additional data library cards
Conversion by channel card
The conversion by channel card appears for all multichannel accounts (i.e., those a combination of email, SMS, and mobile push). This card provides the ability to distinguish conversions by channels, and to better understand how your various channels are driving results.
This includes all messages that were sent in your chosen date range in your account’s timezone.
Results will show as stacked bar charts, with each color corresponding to a channel (i.e., emails is blue, SMS is teal, and mobile push is yellow).
The chart will also display according to the date range you chose.
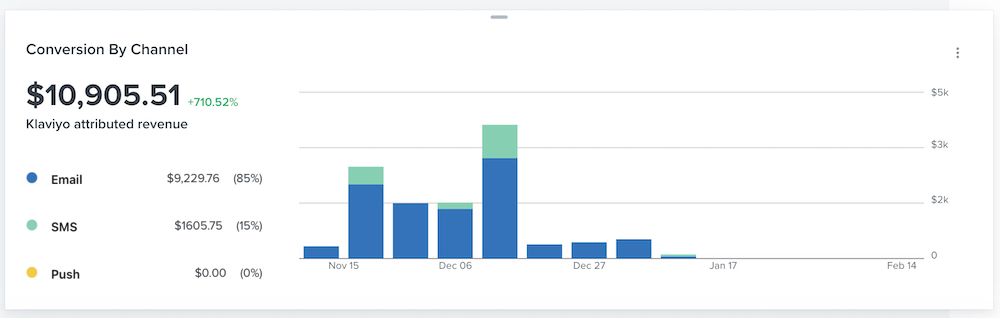
For a more detailed breakdown of a date or date range, hover over any bar in the chart to see specific revenue numbers and percentages for that point in time.
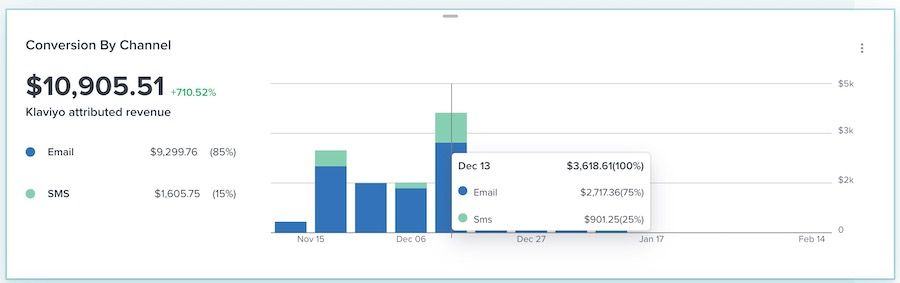
How we calculate your data:
- Conversions
If you choose a revenue-based conversion metric for your dashboard (e.g., Placed Order, Started Checkout, Ordered Product, etc.), you’ll see the sum of conversions attributed to email, SMS, or mobile push and their corresponding currency. If you choose a non-revenue conversion metric (e.g., Active on Site, Opened Email, Clicked Email, etc.), the data will only show the total count of email, SMS, and mobile push attributed conversions. For each channel, the percentage reflects the portion of your total conversions driven by that channel.
Email funnel summary card
The email funnel summary card aggregates key performance indicators (KPIs) across your emails, so you can see where subscribers are leaving the funnel. View your overall rates for delivery, opens, clicks, and conversions via bar graphs, and see where significant drop-off may be occurring.

How we calculate your data:
- Delivery rate
This rate represents the number of received emails divided by the total number of received emails and bounces. - Open rate
This rate is the number of opened emails divided by the total number of received emails. - Click rate
This rate is the number of clicks divided by the total number of received emails. - Conversion rate
This rate represents the number of conversions divided by the total number of received emails.
SMS funnel summary card
The SMS funnel summary card aggregates key performance indicators (KPIs) across your SMS messages so you can see where subscribers are leaving the funnel. View your overall rates for delivery, clicks, and conversions via bar graphs, and see where significant drop-off may be occurring.
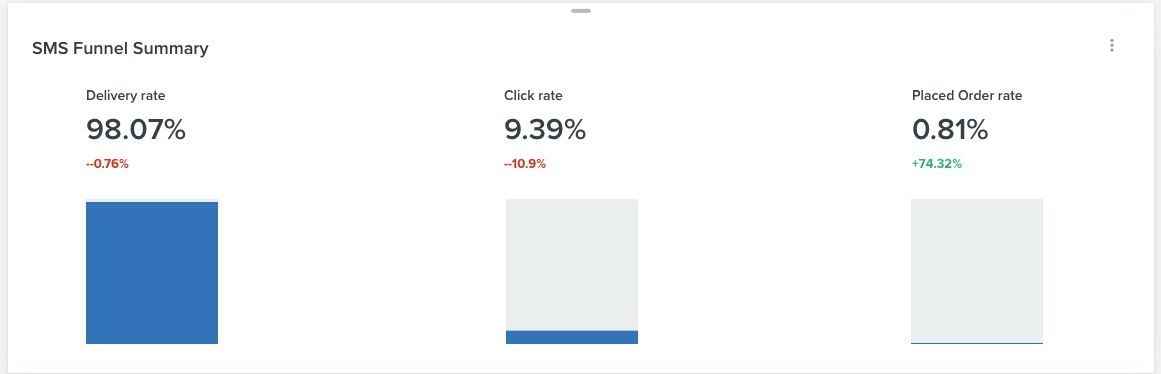
How we calculate your data:
- Delivery rate
This rate represents the number of received SMS messages divided by the total number of received messages and failed messages. - Click rate
This rate is the number of clicks divided by the total number of received SMS messages. - Conversion rate
This rate represents the number of conversions divided by the total number of received SMS messages.
Mobile push funnel summary card
The mobile push funnel summary card aggregates key performance indicators (KPIs) across your mobile push messages so you can see where subscribers are leaving the funnel. View your overall rates for delivery, opens, and conversions via bar graphs, and see where significant drop-off may be occurring.
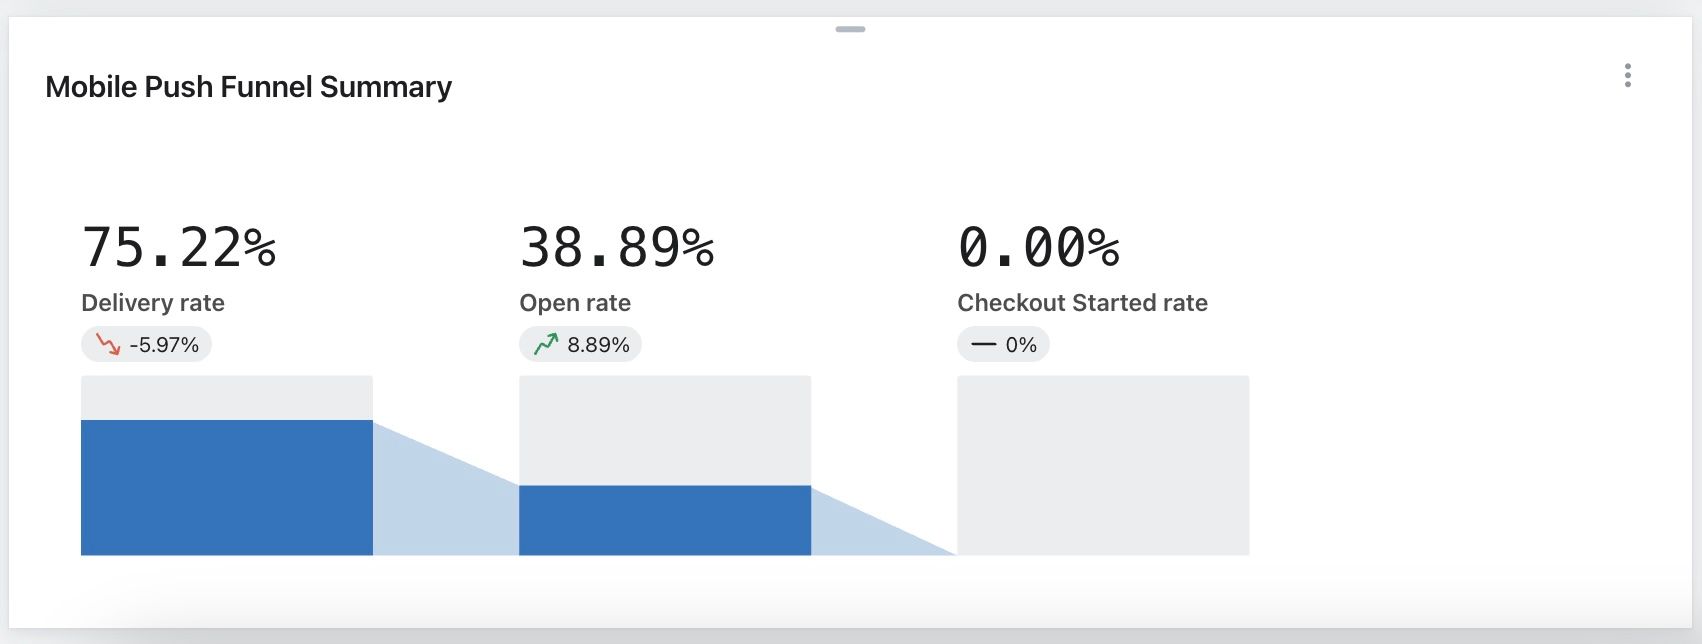
How we calculate your data:
- Delivery rate
This rate represents the number of received mobile push notifications divided by the total number of received and failed notifications. - Click rate
This rate is the number of clicks divided by the total number of received mobile push notifications. - Conversion rate
This rate represents the number of conversions divided by the total number of received mobile push notifications.
SMS deliverability card
The SMS deliverability card allows you to monitor your deliverability and spot any issues related to your sender reputation. Here, you can review your failed to deliver and unsubscribe percentage rates over your chosen date range.
SMS metrics in this chart include those sent through campaigns and flows.
The lines in blue (Failed to deliver) and teal (Unsubscribe rate) display according to the date range you chose.
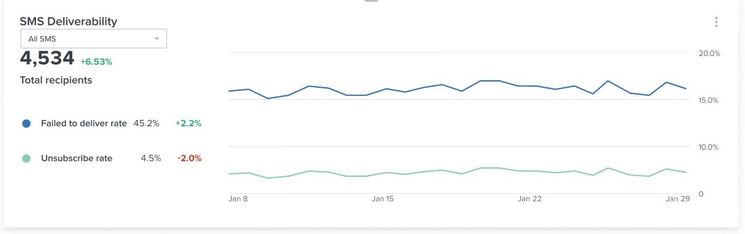
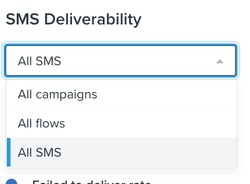
If you open the All SMS dropdown, you can further refine your view by all SMS, flows, or campaign messages.
By hovering over any lines in the chart, you will also see the number of failed to deliver messages and unsubscribe rates for that point in time.
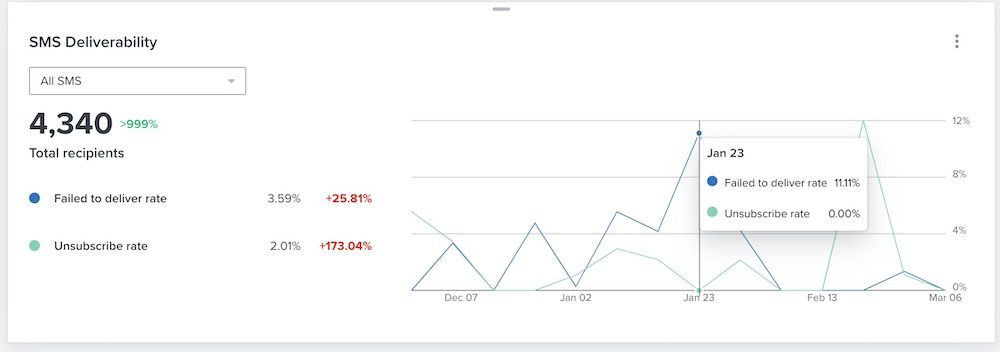
How we calculate your data:
- Failed to deliver rate
This rate represents the number of messages sent but not able to be delivered to the recipient. - Unsubscribe rate
This rate represents the number of recipients who unsubscribed divided by the total number who received the email.
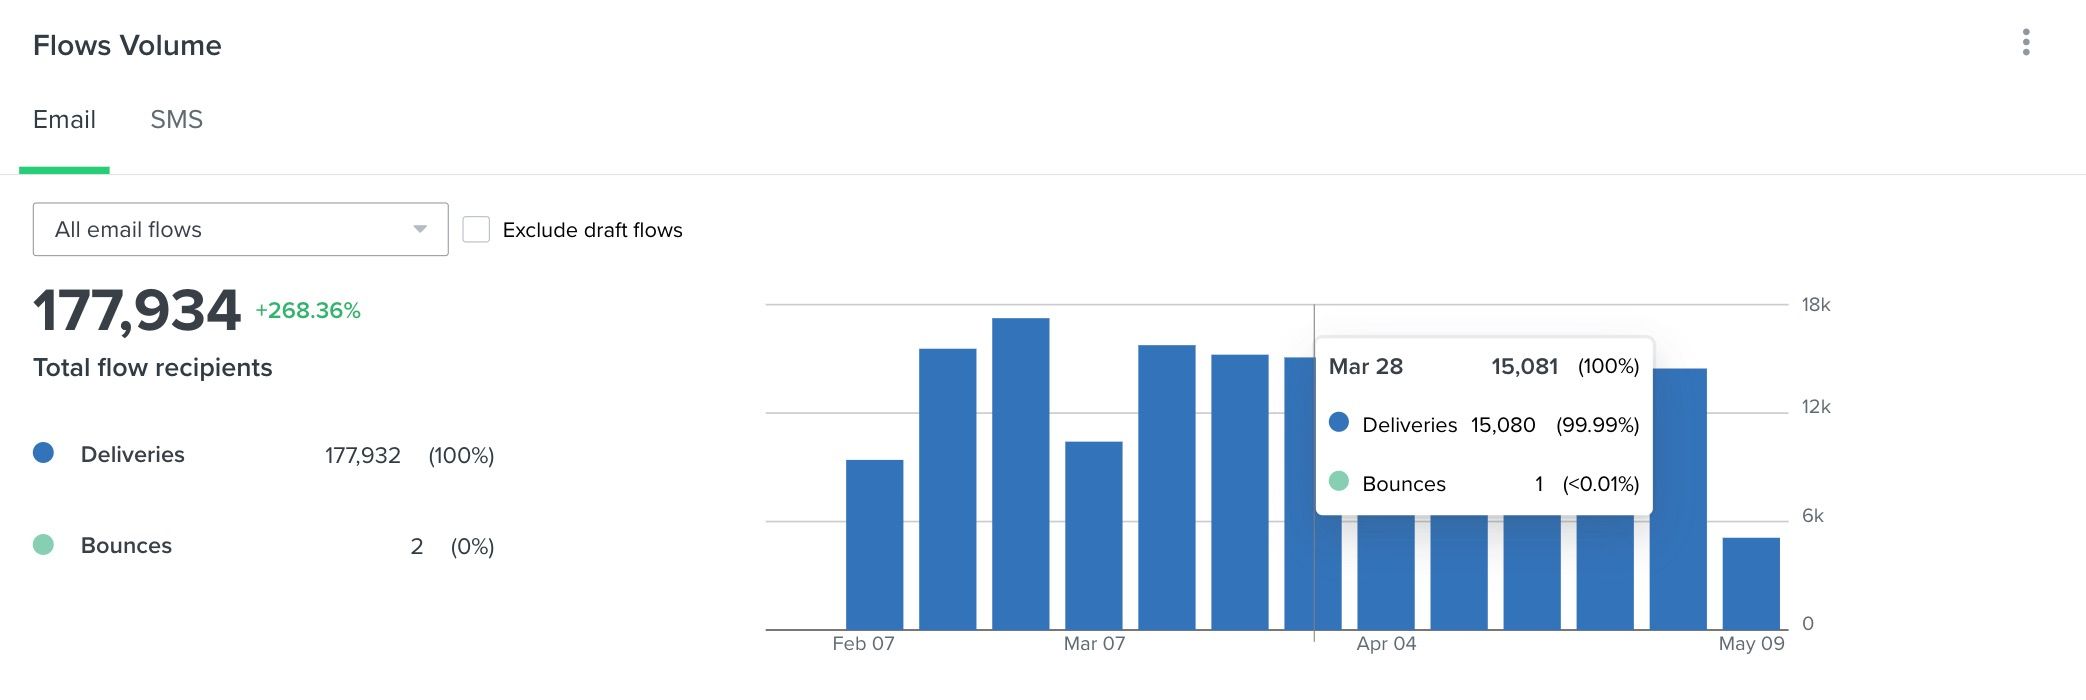
Flow volumes card
The flows volume card monitors the number of people entering your flows in real time. This allows you to see if there are any particular areas or parts of your flows that subscribers are not reaching.
Results will show as stacked bar charts, with each color corresponding to delivered flow messages (blue) and bounced flow message (teal).
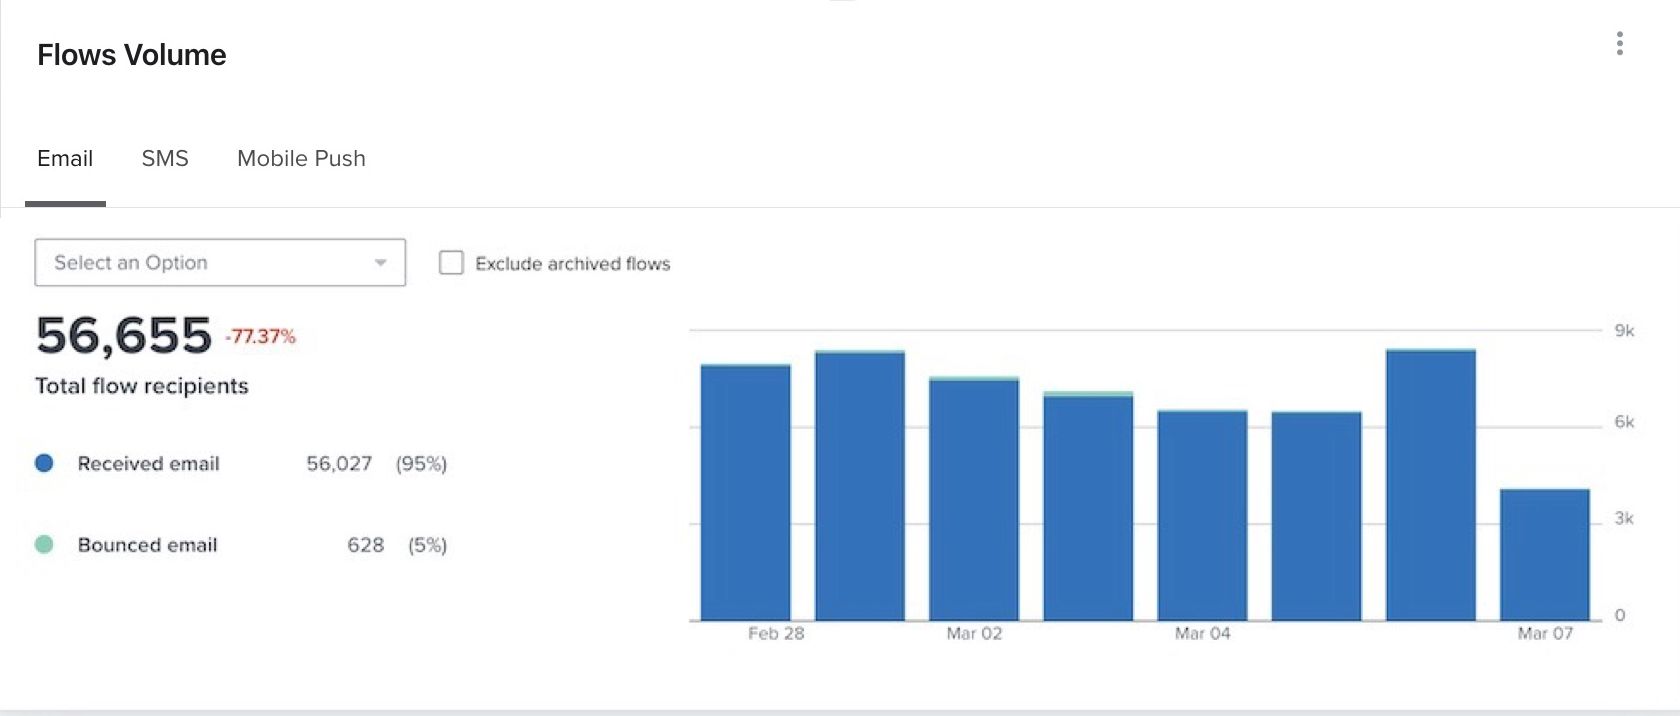
If you open the All email flows, All SMS flows, or All mobile push flowsdropdown, you can further refine your view by seeing all flows or to a specific flow. You can also click the Exclude draft flows checkbox next to this dropdown, to exclude any flows currently in draft mode from displaying in your data.
By hovering over any bars in the chart, you can see the number of deliveries and bounces per flow for that point in time.
How we calculate your data:
- Deliveries
Deliveries represent the total number of emails that reached your subscribers’ inboxes. - Bounces
Bounces represent the total number of bounced emails.
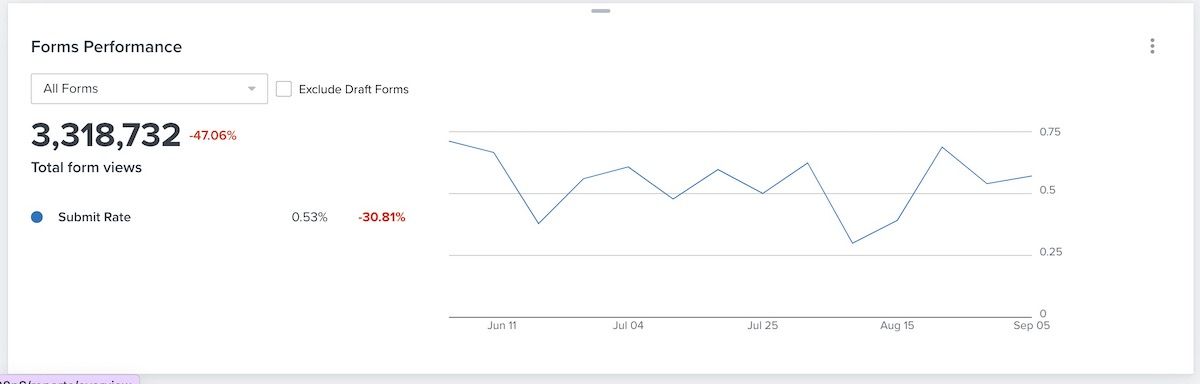
Forms performance card
The forms performance card shows how successful a specific form, or all forms, was in their view and submission rates.
This card will display your form submission rates over time via a line graph according to the date range you chose. Your total form views will appear to the left.
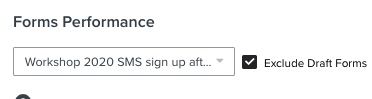
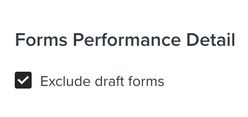
If you open the All Forms dropdown, you can further refine your view by all forms or an individual form. You can also choose the Exclude Draft Forms checkbox next to this dropdown, to exclude any forms currently in draft mode from displaying in your data.
Below this information, you can review your form submission rates, and how they compare to applicable peer groups (Excellent, Fair, or Poor). If you fall into the Fair or Poor categories, we suggest looking at that form to diagnose the issue or review ways to improve its submission rates.
Note that we can only detect peer information for popup forms. If we cannot detect a relevant peer group for an individual form, you will not see the peer group information appear.
By hovering the line chart, you can see the number of submissions per time period.
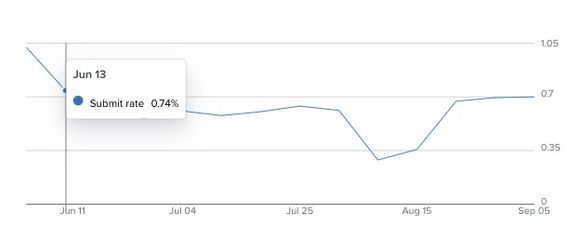
How we calculate your card data:
- Submit rate
This rate represents the number of form submissions divided by the number of views. - Views
This count represents the total number of views of your forms.
Forms performance detail card
The forms performance detail card dives into the individual performance of each of your forms with a view that includes the list associated with the form, views, total number of submissions, and submit rate. Here, you can see an alphabetized table of all forms sent within your chosen date range.
Use the arrows next to each data metric at the top to sort your data from ascending or descending order.

Click through the page numbers at the bottom of the table to view all applicable data for additional forms.
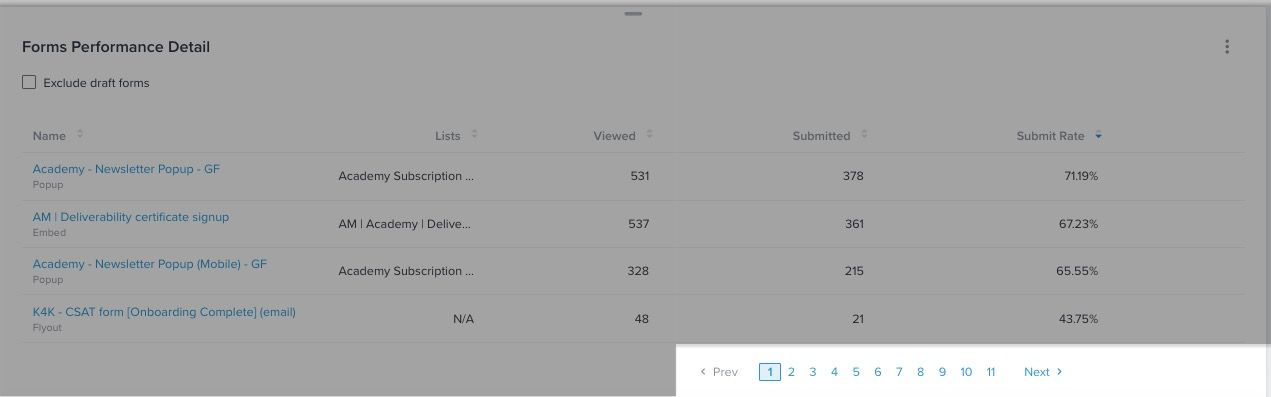
You can also choose the Exclude draft forms checkbox next to this dropdown to exclude any forms in draft mode from displaying in your data.
How we calculate your card data:
- Viewed
This count represents the total number of form views. - Submitted
This rate represents the total number of submissions divided by the total number of views.
Email deliverability by email domain card
The email deliverability by email domain card dives into the individual performance of the top 200 email domains, with a view that includes the open, click, bounce, spam, and unsubscribe rates.
Note that these rates reflect both flow messages and campaigns.
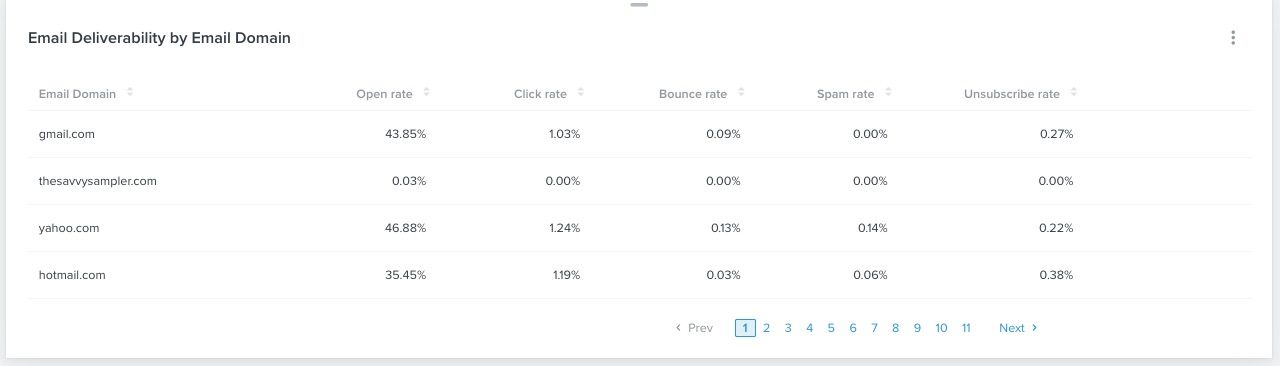
Use the arrows next to each data metric at the top to sort your data from ascending or descending order.
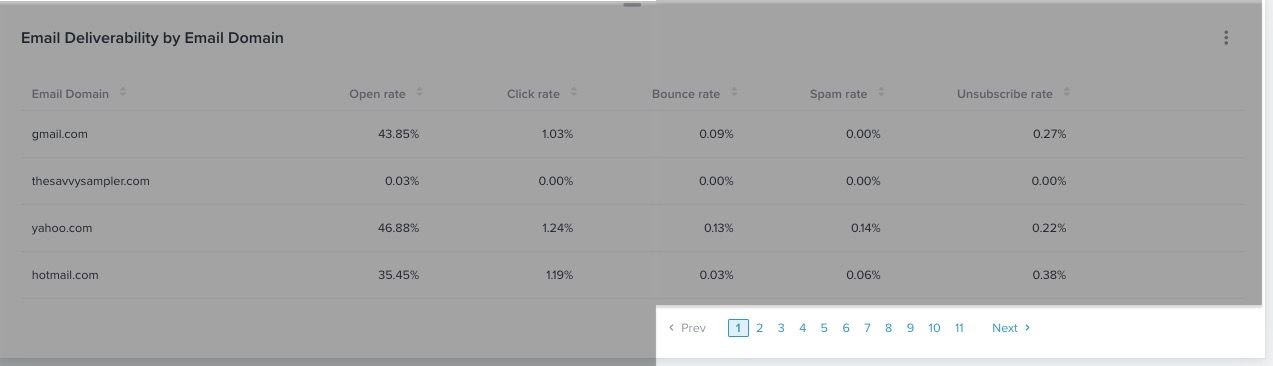
How we calculate your card data
Note that the rates below are calculated per email domain specifically.
- Open rate
This rate is the number of opened emails divided by the total number of received emails. - Click rate
This rate is the number of clicks divided by the total number of received emails. - Bounce rate
This rate represents the number of bounced emails divided by the total number of received and bounced emails. - Spam rate
This rate represents the number of recipients who marked your email as spam divided by the total number who received it. - Unsubscribe rate
This rate represents the number of recipients who unsubscribed divided by the total number who received the email.
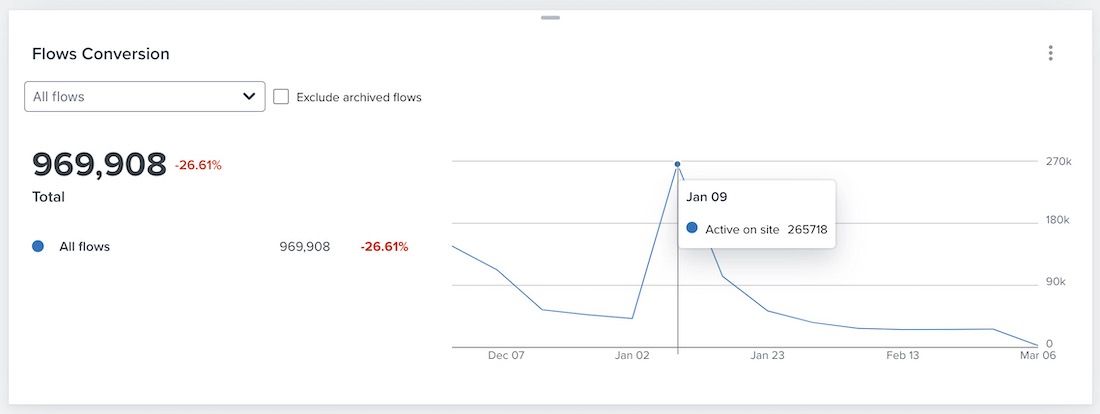
Flows conversion card
The flows conversion card provides a view of your account’s revenue attributed to flows. This card allows you to examine revenue trends in your flows’ conversions, as well as spot potential areas for improvement.
All flows view
By default, the card will show all flows as a single blue line representing revenue across all of your flows. The chart will reflect whatever time period and conversion metric that you chose for your dashboard.
The total number of conversions or revenue is reflected in the large number on the left-hand side.
Note that the conversions are attributed to the send time of your email, SMS, or mobile push flows.
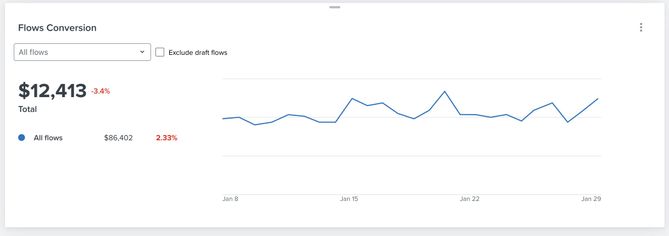
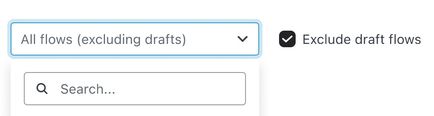
This card will include flows that are in live, manual, and draft status. However, if you wish to exclude flows that are still in draft mode, check Exclude draft flows.
Single or comparison flow view
If you would like to narrow in on a specific flow or compare flows, you can compare up to 5 flows’ performance against one another. In the All flows dropdown, you can either search for a specific flow by name or click on a specific flow from the list itself.
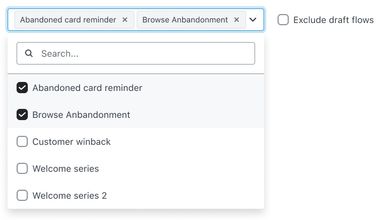
Once you have selected the flows you wish to compare, they will appear individually as blue, teal, or yellow lines, as shown in the example below. Like above in the single view, your total number of conversions or revenue and percentage change will also be present on the left-hand side.
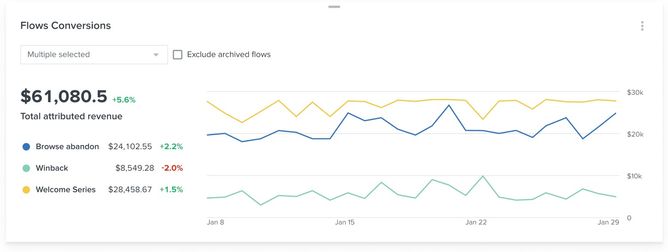
Note that if you uncheck all of your individual flows selections, you will revert to the All flows aggregated graph view.
By hovering over any of the flows lines, either in All flows mode or one of your individual flows, you will see the revenue attributed for that time period.
How we calculate your card data:
- Total attributed revenue
This number is generated by using your total revenue (both for email and SMS) during the period you chose. If you choose a conversion metric for your dashboard that does not have a monetary value associated with it, we will use the number of conversions instead.
Note that the conversion window will be based on the send date of the flow’s message itself.
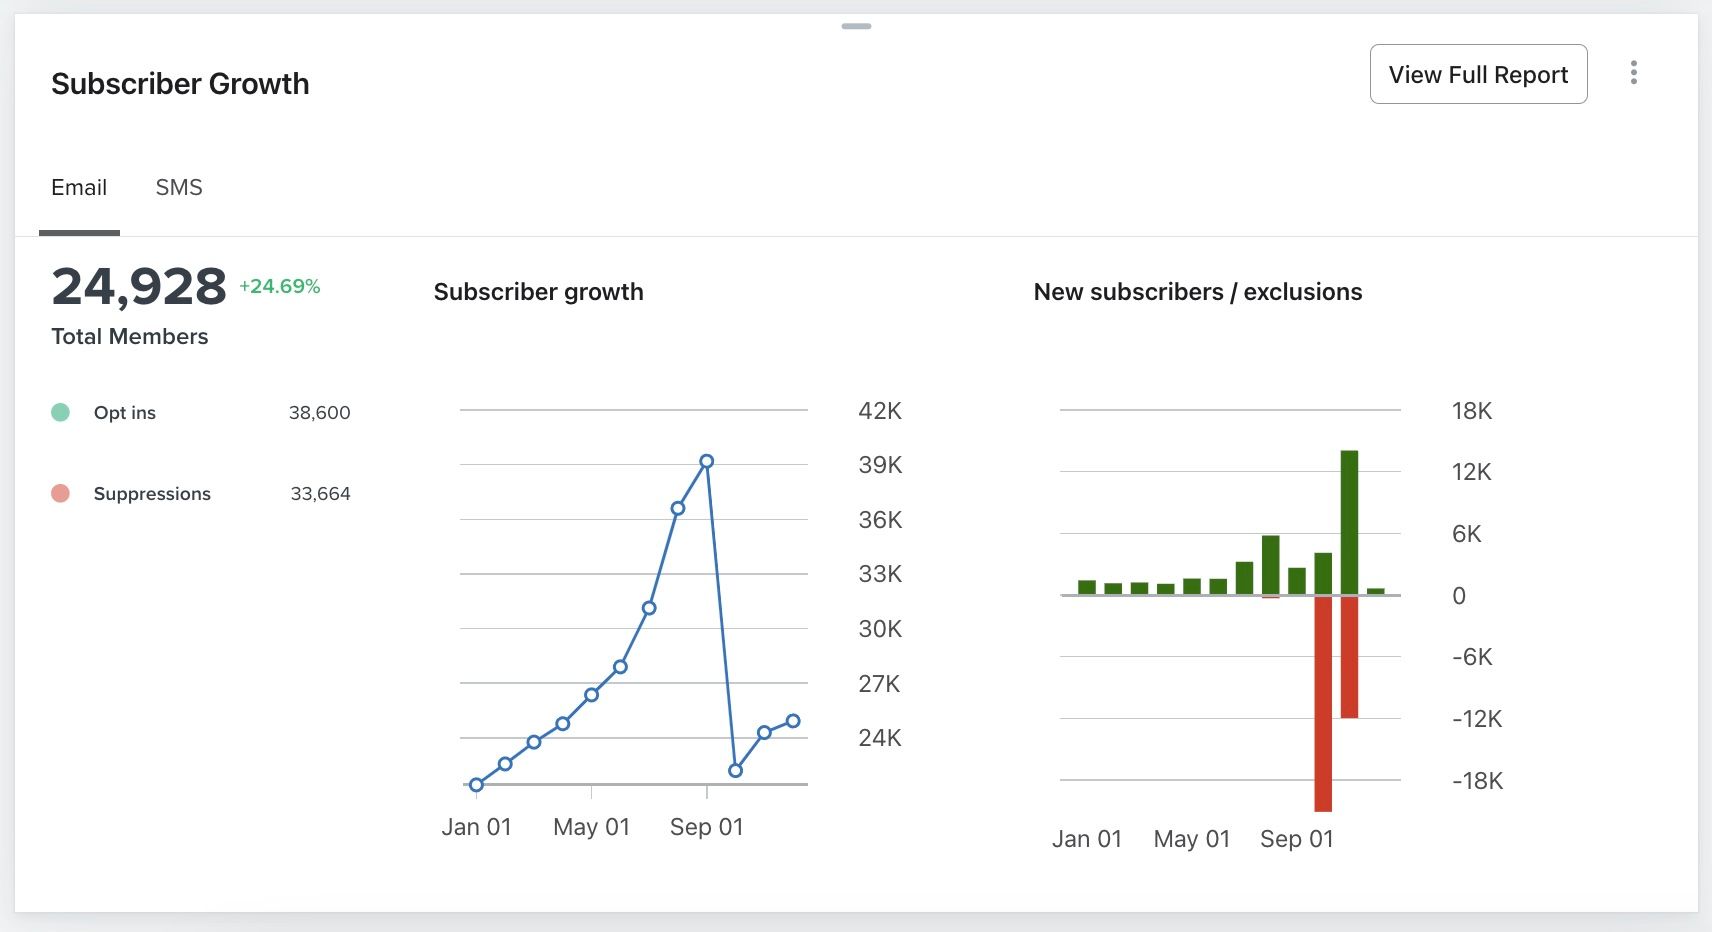
Subscriber growth card
The subscriber growth card allows you to track the performance of your subscribers over time to analyze the trends and health of each channel. You can gain insights about how your count of subscribers grows and shrinks across both the email and SMS channel. Selecting View Full Report will take you the full subscriber growth report.
Additional resources
- Getting started with reporting
Learn about the different robust Klaviyo reporting tools available in your account. Klaviyo is built to help your business grow and strengthen your relationships with your audience by putting data to work. Segmentation and automation tools allow you to personalize and target your communication efforts across channels to boost engagement and drive business growth. However, in order to understand how well your business strategies and marketing efforts are working, you need proper reporting to measure and analyze performance trends over time.
- How to build an analytics or overview dashboard
Learn how to build a dashboard to visualize all email, SMS, flow, and deliverability trends, and understand the health of your business. Dashboards (also referred to as overview dashboards) provide an all-encompassing, customizable report detailing your success across each marketing channel.
- Troubleshooting empty cards on analytics or overview dashboards
Learn how to troubleshoot and fix empty cards that are appearing in your analytics dashboard (also referred to as the overview dashboard).