Getting started with PAR Punchh
You will learn
Learn how to integrate with PAR Punchh, an all-in-one loyalty and engagement platform for restaurants and convenience stores.
Before you begin
- Make sure you have a PAR Punchh subscription to the Platinum PAR Punchh Loyalty package which includes PAR Punchh Amplify. If your brand is on either the Essentials PAR Punchh Loyalty or Premium PAR Punchh Loyalty package, you’ll have to request a subscription to the PAR Punchh Amplify add-on. Access to PAR Punchh Webhooks is available only with a subscription to PAR Punchh Amplify.
- Make sure you have admin or similar access privileges on the PAR Punchh account to configure settings in PAR Punchh.
Integrate PAR Punchh with Klaviyo
In Klaviyo
- In Klaviyo, select the Integrations tab.
- Click Explore apps.
- Search for Punchh and select the card.
- On the next page, enter your Base URL and Business admin key.

5. Base URL will be the URL where you access the Punchh platform.
6. Business admin key can be generated by navigating to Administration > All Users, Roles, and Permissions > Choose your user > Scroll to the bottom to generate your Business Admin Key.
- For more information, see this article from Punchh’s Help Center.
7. Click Connect.
8. Review the permissions and click Allow.
9. Copy the webhook URL that has been generated for you and save it to a secure location.

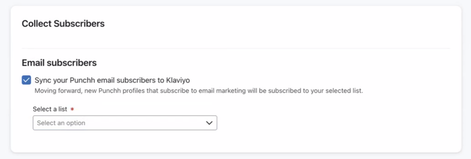
10. Check the setting to sync future Punchh email subscribers to Klaviyo. Then, select your main email list (or another list, if desired) from the dropdown. We recommend setting this list to single opt-in.
11. Click Save.
In Punchh
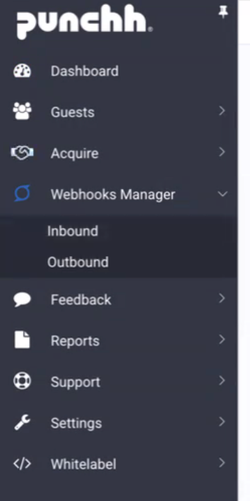
- In a new tab, log in to your PAR Punchh admin. Then, navigate to Punchh > Webhooks Manager > Outbound.
2. Select the Webhooks tab.

3. Click Base URL.

4. Click + Add New URL.

5. Input the following:
- Name
Klaviyo - Webhook Base URL
https://a.klaviyo.com - Admin Email
restaurants@klaviyo.com
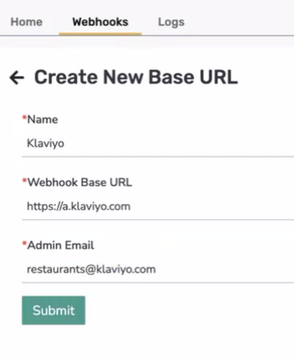
6. Click Submit.
7. Select the Webhooks tab, then click + Create Webhook.

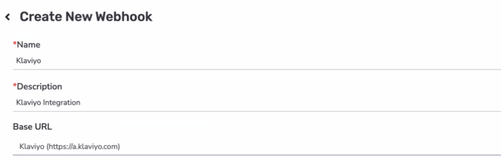
8. Input the following:
- Name
Klaviyo - Description
Klaviyo integration - Base URL
Select Klaviyo from the dropdown
- Webhook End Point
Paste the Webhook URL that you copied from Klaviyo. Then, delete https://klaviyo.com so that you are left with /api/webhook...

- Authentication
Select Bearer - Auth Bearer Token
From the Webhook End Point, select the string after s= and before &k= and paste it in this field

- Events Selection
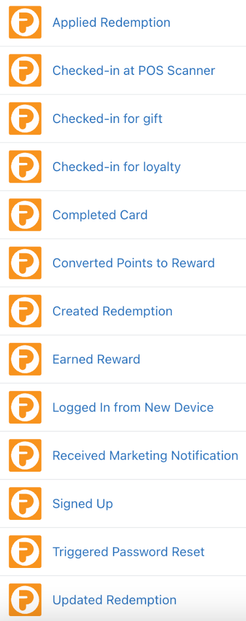
Select each of the events listed below, one at a time- Guest
- Loyalty Checkin
- Gift Checkin
- Redemption
- Rewards
- Transactional Notifications: User Signup
- Transactional Notifications: POS Scanner Checkin
- Transactional Notifications: Points to Reward
- Transactional Notifications: Card Completion
- Transactional Notifications: Redemption Applied
- Redeemable

9. Make sure to check Active.
10. Click Verify & Submit. You should then see a success message.
Your integration is now activated and profiles, events, and consent updates will start syncing to Klaviyo.
Update your Punchh integration
To update the integration in Klaviyo:
- Log in to Klaviyo.
- Select the Integrations tab.
- Select Punchh.
- Click the Update button in the banner.

5. Review the permissions in Klaviyo and click Allow.
6. Review the permissions and select Allow. You'll be redirected to Klaviyo.
7. Check the box to sync Punchh email subscribers to a Klaviyo list, and then select a list from the dropdown.
8. When you're done, click Save.
Understand your PAR Punchh data
Klaviyo syncs different events and objects from PAR Punchh related to rewards, membership, and PAR Punchh properties.
To view your PAR Punchh data:
- Click the Analytics dropdown in the left-hand navigation sidebar.
- Select Metrics. Here, you can view all of the metrics in your account.
- Filter this view to see PAR Punchh metrics by using the filter selector next to the search bar and selecting PAR Punchh.
Learn more about your PAR Punchh data.
Segment customers using PAR Punchh data
You can use PAR Punchh’s metrics to segment customers and target them with a campaign. For example, you can create a segment of everyone who signed up for your PAR Punchh loyalty program in the last 30 days and send a campaign to that segment.

- Click the Audience dropdown in the left-hand navigation sidebar.
- Click Lists & Segments.
- Click Create New in the top right.
- Select Create segment.
- Name your segment and select tags if desired.
- Under Definition, select What someone has done (or not done) > Signed Up > at least once > in the last > 30 > days.
- Click Create Segment.
Use PAR Punchh data in flows
You can use PAR Punchh metrics and objects to trigger flows. For example, you can use the Signed Up metric to trigger a flow that sends when someone signs up for your loyalty program.
You can use Punchh metrics and objects to trigger flows, or sequences of automated actions. Klaviyo offers multiple pre-built flows using Punchh data. To view these pre-built flows:
- In Klaviyo, select the Flows tab.
- Click Create flow.
- Filter by Punchh to see all Punchh flows.

You can also create your own flows from scratch. For example, you can send messages to someone immediately when they sign up for your loyalty program.
To create a flow using PAR Punchh metrics:
- Navigate to the Flows tab from the left-hand navigation sidebar.
- Click Create flow in the top right.
- Click Build your own in the top right.
- Name your flow and select tags if desired, then click Create flow.
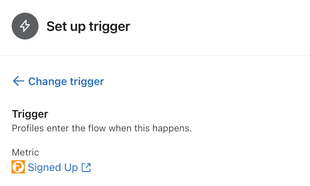
- In the flow builder, under Select a trigger, choose Your metrics.
- Select Punchh, then select a Punchh metric such as Signed Up.
7. Click Save.
8. Add time delays and messages relevant to the triggering action. Learn more about creating a welcome series.

9. Once your content is ready, click Update Action Statuses in the top right of the flow builder to set the flow live.
Outcome
You've now integrated PAR Punchh with Klaviyo and learned about PAR Punchh data in Klaviyo, segmenting customers using PAR Punchh data, and using PAR Punchh data in flows.
Additional resources
- Understanding Klaviyo-built integrations
Learn about the built-in integrations offered by Klaviyo that will allow you to sync data with your new Klaviyo account and use this information for precision targeted marketing.
- How often integrations sync reference
Learn what data syncs from a particular Klaviyo integration and how often the sync runs. We've organized these integrations by ecommerce platforms, email service providers, and other data integrations.
- enhancing restaurant guest relationships