How to create and use macros for Helpdesk tickets
Only Owners, Admins, Managers, or Support roles can access this feature.
You will learn
Find out how to create and use macros (previously called “quick responses”) in tickets in Klaviyo Helpdesk. Macros are pre-written, reusable responses your support agents can insert into replies for SMS and web chat tickets.
Before you begin
There are a few important things to remember before using macros:
- Before you can add a macros, you need at least 1 active message in Klaviyo Helpdesk, either:
- 1 web chat
- 1 SMS from a subscriber
- 1 Email message
- 1 WhatsApp Message
- 1 Instagram DM
- Macros used in SMS tickets are billed the same as any other SMS message in your billing plan.
New to using tickets in the Klaviyo Helpdesk? Check out our guide to the Klaviyo Helpdesk for more information.
About macros
Macros are designed to save your support team time by eliminating the need to repeatedly type responses to common inquiries. They’re helpful when customers frequently ask similar questions, and for standardizing consistent messaging and tone.
You can create different macros for different types of support requests (e.g., shipping time, returns policy, or order status), and organize them by category. This makes it easy for your support team to quickly find and insert the right response for each customer ticket.
Personalization supported in macros
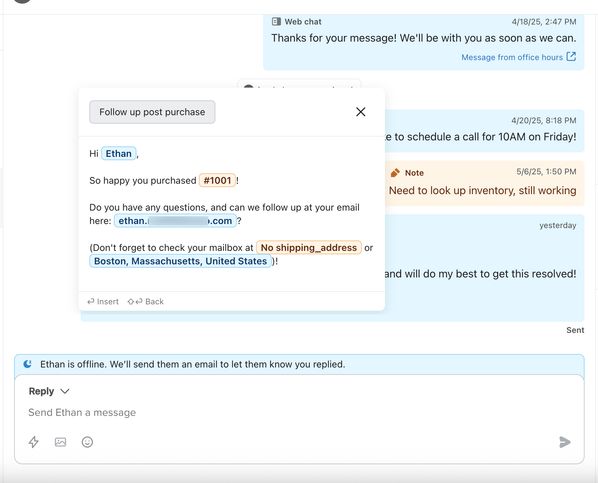
Additionally, the macros you create can include profile and order personalization variables, which act as placeholders that automatically insert customer data each time the macro is used. Personalization variables streamline the support workflow, so agents don’t need to search for or manually enter customer information in every reply.
Note that Klaviyo can only auto-populate customer data for the profile and order variables shown in the dropdown menus in the macro creation modal. These available options are listed and defined at the bottom of this guide in the Personalization available for macros section.
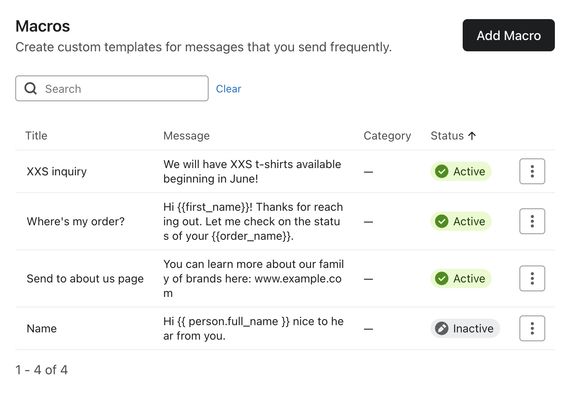
Example macros
Title: Where’s my order?
Message: Hi {{first_name}}! Thanks for reaching out. Let me check on the status of your {{order_name}}.
Title: Order arrival
Message: Hi {{first_name}}! So happy you purchased {{order_id}}. Your order is arriving to {{shipping_address}} and is estimated to arrive on estimated_delivery_at.
Create a new macro
To add a macro:
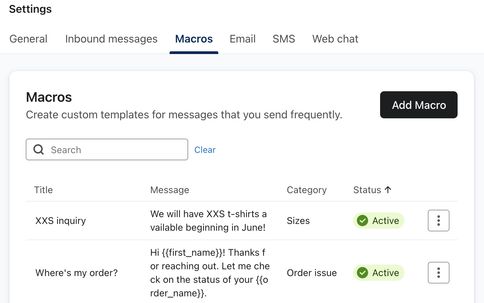
- Navigate to Service > Helpdesk.
- Click Settings along the left.
- Select the Macros tab in the top menu bar.
- Click Create macro.
- Click Add macro to open the creation modal.
- Under Title, enter a name that reflects the macro’s purpose (e.g., Refund request)
- In the Message body text box, input your message content. To further customize your response, you can:
- Click the smile icon to add emojis.
- Select the person icon to insert profile personalization (e.g., first name).
- Click the package icon to insert order personalization (e.g., Order ID).
- Open the Category dropdown menu to select an existing tag or create a new one. Tags are used to group similar macros by topic, like putting all shipping-related responses together, to help your support team quickly find the right macro.
- Under Status, choose either Active or Draft.
- Active means they can be inserted into messages from the quick insert menu in a ticket.
- Inactive means they cannot be inserted into a ticket and are hidden from the quick insert menu. Inactive macros can only be accessed from the Macros settings page.
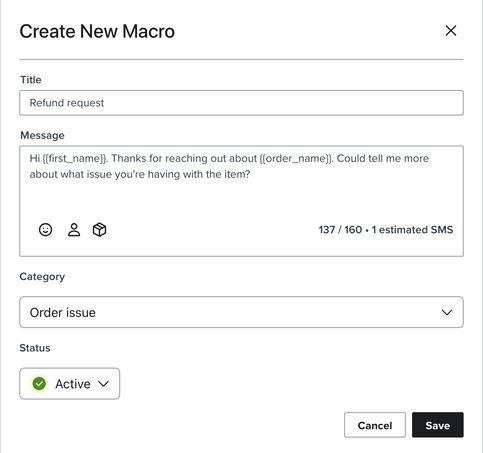
- Click Add to save the macro.
All macros you create are stored on the Macros settings page. Note that macros with order and profile personalization appear as personalization tags on this page. However, when used in a ticket reply, these tags will be replaced with the relevant customer data.
Insert a macro into a ticket
To use a macro in a ticket:
- In Helpdesk, click into a ticket.
- Click the lightning bolt icon below the reply field to open the macro quick insert menu.
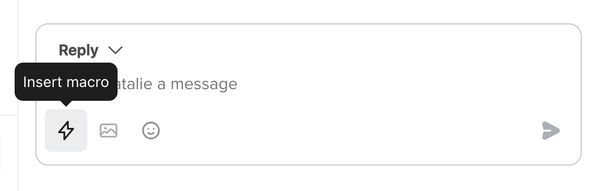
- Select the macro you want to use.
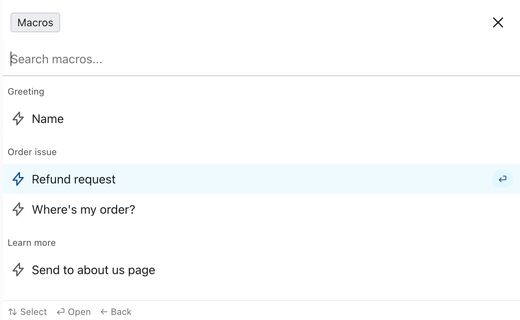
- A preview modal appears when you select a macro, displaying any personalized content. If customer data for a personalization tag is unavailable, it will show as "No_[personalization tag]".
- Insert the macro into the reply box by pressing Enter or the forward arrow key. Be aware that macros lacking customer data for personalization will insert a blank space.
- Edit the response as needed in the reply field.
- Click the send button.
Personalization (dynamic content) available for macros
Supported profile personalization
Profile personalization auto-populates properties from a user’s Klaviyo profile. The following profile personalization is supported in macros:
Profile personalization | Description |
first_name | The person’s first name. |
last_name | The person’s last name. |
The person’s email address. | |
phone_number | The person’s phone number. |
address | The person’s home address. |
Supported order personalization
Order personalization in macros automatically fills in customer order details from Shopify. The following order data is supported in macros:
Order personalization | Description |
order_id | The unique numeric identifier for the order. |
order_name | The human-readable name or number assigned to the order (e.g., "#1001"). |
customer_email | The email address of the customer who placed the order. |
customer_first_name | The first name of the customer associated with the order. |
customer_display_name | The display or full name of the customer (may include first and last name). |
shipping_address | The address where products in the order will be shipped. |
payment_info_billing_name | The name associated with the billing information used for payment. |
price_breakdown_currency | The currency code (e.g., USD, EUR) used for the order. |
price_breakdown_shipping | The total shipping cost for the order. |
price_breakdown_total | The total price of the order, including all charges. |
price_breakdown_tax | The total tax amount applied to the order. |
price_breakdown_discount | The total discount applied to the order. |
price_breakdown_subtotal | The subtotal price of the order before discounts, shipping, and taxes. |
price_breakdown_totals_before_tax | The total amount of the order before taxes are applied. |
updated_at | The date and time the order was last updated. |
status | The current fulfillment or payment status of the order. |
estimated_delivery_at | The estimated date and time for delivery of the order. |
latest_fulfillment_display_status | The status of the most recent fulfillment event for the order. |
latest_fulfillment_tracking_url | The tracking URL for the latest fulfillment, if available. |
latest_fulfillment_estimated_delivery_at | The estimated delivery date of the latest fulfillment. |
is_refunded | Indicates if the order has been fully refunded. |
created_at | The date and time when the order was created. |
canceled_at | The date and time the order was canceled, if applicable. |
Additional resources
- How to edit and delete macros
Learn about managing options for macros used in your Klaviyo Helpdesk (previously called “quick responses”). Macros are pre-written templates you can use when replying to SMS and web chat tickets.
- How to edit and delete macros
Learn about managing options for macros used in your Klaviyo Helpdesk (previously called “quick responses”). Macros are pre-written templates you can use when replying to SMS and web chat tickets.
- Guide to Klaviyo Helpdesk
Learn about Klaviyo Helpdesk, which helps you manage support conversations across all channels, powered by the data you already have in Klaviyo.