How to create a price drop flow
Find out how price drop flows work and how to set them up in Klaviyo. Price drop flows work for either a catalog from an ecommerce integration or a custom catalog. Price drop flows will not send to anyone who has already purchased the item, regardless of whether they bought it at full price or when it was discounted. Additionally, price drop flows will not send if inventory is 0 or negative or the variant is not published.
Price drop flows let customers know when products they’ve looked at lower in price. This can mean an easy sale for you, as customers love a deal — especially on items they actually want. These flows are also a valuable tool for marketers, as the messages typically receive high engagement and conversion rates.
Before you begin
- Price drop flows are available for stores using Shopify, BigCommerce, WooCommerce, Magento 2, PrestaShop, Salesforce Commerce Cloud, or a catalog synced via custom catalog feed or API.
- Price drop flows will only trigger for items that are listed as in stock.
Requirements for catalogs synced via custom catalog feed or API
If you have not done so, consult our developer resources:
In order to create a price drop flow, make sure your catalog meets the following requirements:
- Products or variants must have price and inventory fields mapped with data available.
- Ordered Product and either one or both of Viewed Product or Started Checkout events must have price and product ID fields as part of the event payload, as well as existing instances of these events in your account.
- Even if the catalog contains product variants, these events must include parent product level IDs.
Please be aware of the following before setting up price drop:
- If you’re using the Catalogs API, your catalog must contain variants, even if the variant is a duplicate of the main product.
- If you are using a custom catalog in addition to a catalog from an ecommerce integration, price drop flows will only trigger based off of one of these catalogs. If you set up your flow to trigger off of your custom catalog, you may contact Klaviyo Support to revert this back to your integration catalog.
Next steps
- From the main Klaviyo menu, navigate to Content > Products to confirm that products from your custom catalog have been synced.
- Reach out to our Support Team and request access to the “price drop trigger for custom catalogs” feature. Make sure to specify the following:
- The account which has a custom catalog or API catalog, if you have multiple accounts.
- Event IDs for all metrics used as triggers with product data such as Ordered Product, Started Checkout, and Viewed Product.
- For each event, the field names for product ID and price.
- For Started Checkout, the field name for the list that contains the products from the checkout.
- Once the support team has completed your request, you can continue on and create the flow.
How to trigger a price drop flow
- Navigate to Flows > Create flow > Build your own.
- Name your flow and add tags.
- Click Create flow to continue.
- In the flow builder, select Price drop from either the Recommended or All triggers tab.
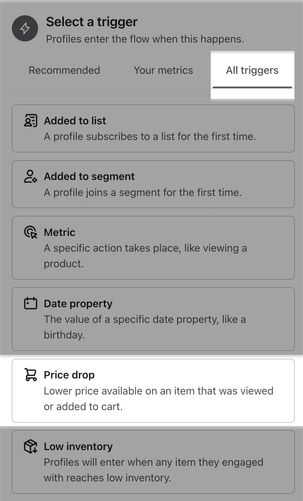
- Choose when a price drop flow will trigger; i.e., at what amount or percentage a product's price needs to drop.
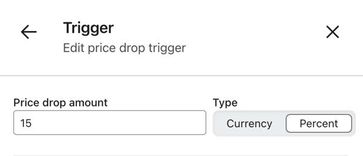
You can adjust the trigger at any point, but it will only apply to events triggered after you change it.
- Choose who you want this flow to send to, people who:
- Started checkout with that product in their cart — this will include the fewest people, but they will be more likely to convert.
- Viewed the product — this will include a greater number of people in the flow, but they will be less likely to make a purchase.
- Both — this option will pull in both groups.
These conditions are checked both at the trigger and before any messages send out to ensure that you’re not sending to those who have already purchased or only seen the lower price. Klaviyo does not pull in anyone who either purchased the product after the flow’s triggering event or viewed/started checkout when the item was at a lower price.
- (Optional) Change the time period for when you want someone to have viewed or started checkout with the item. The default is the past 30 days.
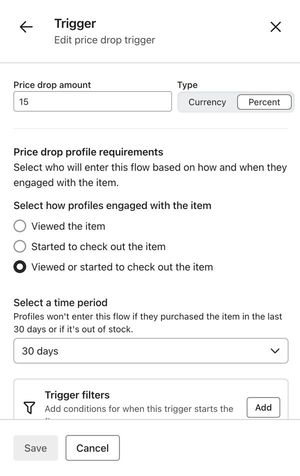
- When you're done, save the trigger.
- Add in a message immediately after the trigger.
- Add in any splits, time delays, and follow-up messages.
A time delay is not recommended, as you want to inform customers as soon as the price changes.
- Select Update status when you're ready for the flow to start sending.
- Choose Live from the dropdown.
- Click Save.
How to preview and test a price drop flow
Unlike with other metrics, a price drop event will only be registered in Klaviyo if a price drop flow is set to live or manual status when a price drop occurs. This means at least 1 message in a price drop flow needs to be live or manual for the events to be added to your account for the purposes of previewing.
If you want to use price drop event variables in your message, such as the original price and reduced price:
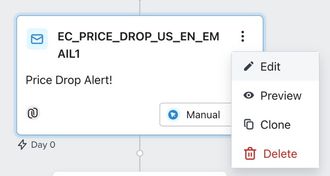
- Set a message in the flow to Manual status using the dropdown on the action card.

- Trigger a price drop event from your store by starting a checkout or viewing a product (depending on your price drop flow settings) with an item then lowering the price of the item.
- Select a message in the flow and click Edit from either the action button (3 dots) or the sidebar.
- Click Edit email for email messages.
- In the editor, click Preview & test in the upper right.

- In the sidebar, select the event and person you want to use to see a preview directly in Klaviyo.
- Hover over the variable’s name until you see the message Copy {{ person.variable_name }} variable, then click to copy it.
- Paste the variable where you'd like to see it appear in your message.
- Once you've added all the variables you'd like, click Send test to send a preview to your own inbox.
Price drop flow examples
Depending on how you want your price drop flow to work, you can set it up in various ways. Let’s start with a basic example that sends two messages: one right away and a reminder for those who haven’t made a purchase. For this flow, it will look like the following.
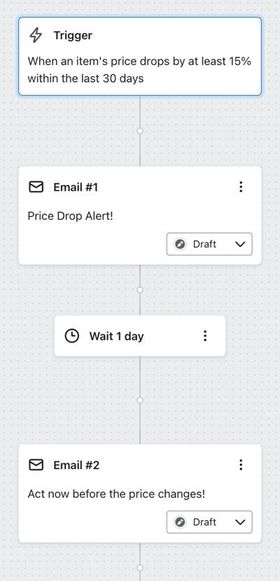
You can use email, SMS, or WhatsApp for these messages. Klaviyo will only send SMS or WhatsApp messages to profiles who have explicitly opted in to that channel. Profiles without consent for a specific channel will automatically be skipped for that message.
Using SMS, WhatsApp, and email together
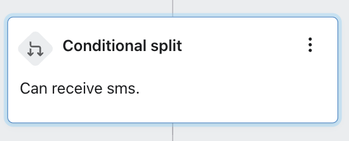
For a multichannel price drop flow, add a conditional split directly after the trigger. Use the split to check whether someone is subscribed to SMS or WhatsApp.
Send subscribers with SMS or WhatsApp consent down one path and everyone else down the other. This allows you to prioritize sending a text message first while continuing to send email to profiles who are not opted in to SMS or WhatsApp.
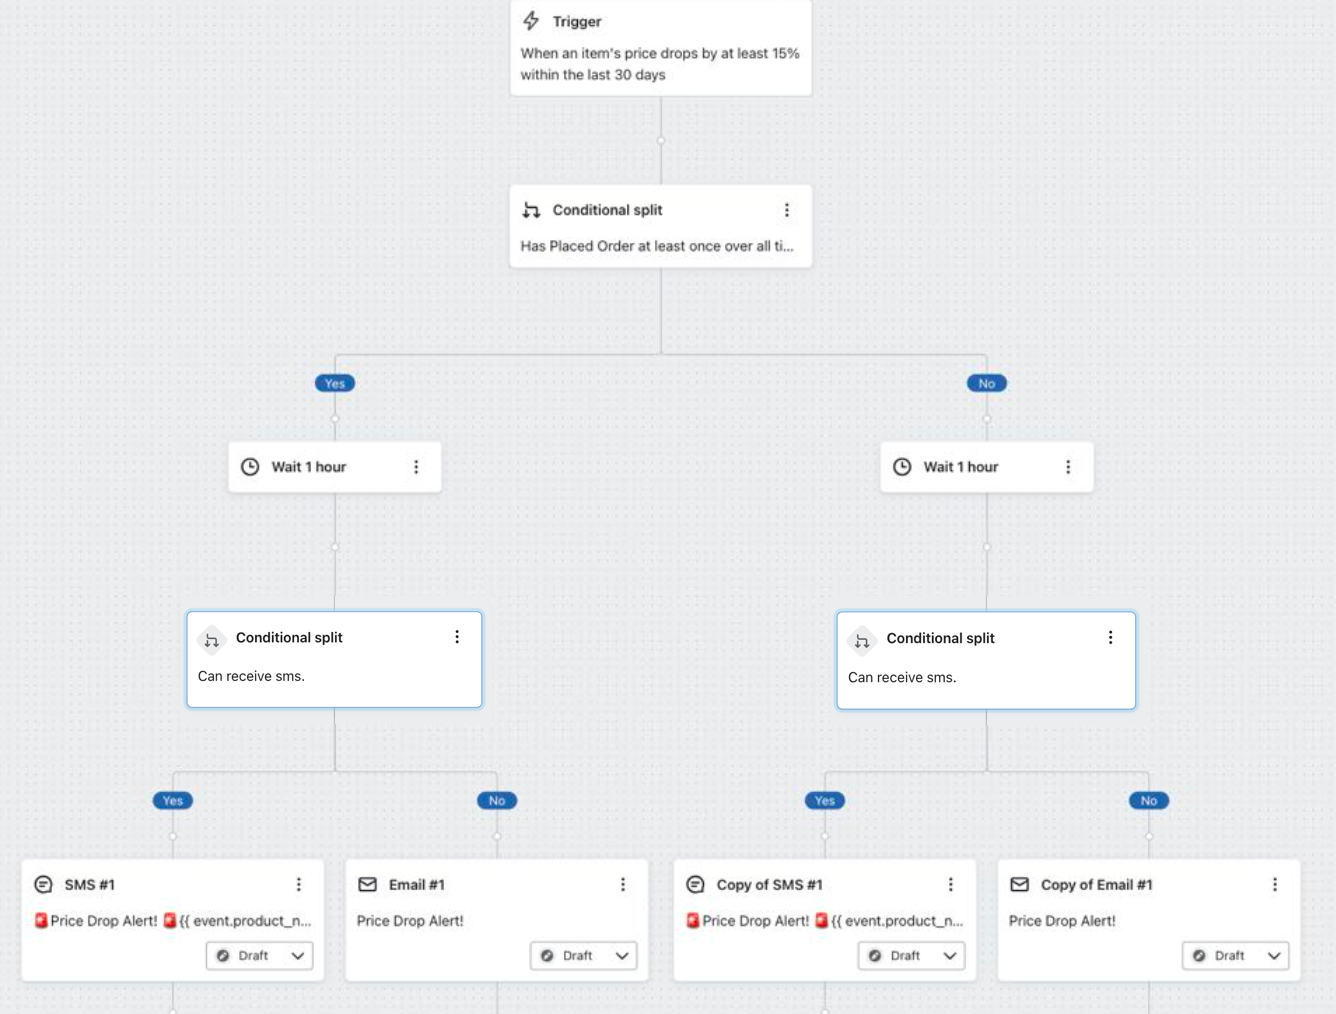
Send to non-customers first
One of the largest dropoffs in the marketing funnel is when you try to convert someone into a customer. Price drop flows are a great tool for converting a website browser into a buyer. In Klaviyo, you can set this up by placing a conditional split directly after the trigger to send returning customers down a different path. Then, add a time delay before the message to returning customers.
The example below shows what this looks like for a price drop flow with both SMS and email messages.
Set different rules based on product
To set different rules based on a product’s price or category, you need to set up multiple price drop flows and then use filters to target specific items.
Say you want to change the message based on the item’s initial price and how much the price dropped. Perhaps on most items, you want to send a message whenever the price drops by at least 10%. However, say you have products that are under $20, and on those products, you want to send a message when the price drops by $2.00 or more. In this case, create two price drop flows and add trigger filters to target the products you want.
Price drop report
It’s important to monitor the performance of your price drop flow over time. To access this report, click on the flow’s trigger and then click View price drop report. You can export this report as a CSV.
If you have multiple versions of the same product with different variants, you would need to drop all these products and their variants to the same price in order for them to appear in your price drop report.
The price drop report will only include price drop events that occur after the flow has been set up. It will not include a history of all price drop activities.
The report will show the following in order of most to least recent:
- SKU
- Product title
- Original price
- Reduced price
- Price drop timestamp
- Sent
Additional resources
- How to create an upsell or cross-sell flow
Learn how to create a flow that allows you to follow up with customers to try to cross-sell or upsell similar or related products after they make a purchase. Klaviyo has a built-in product review/cross-sell flow as well as new and repeat customer thank you flows that you can repurpose as upsell or cross-sell flows.
- How to create a date property-triggered flow
Learn how to set up a date property to trigger a flow, which is a great way to set up a flow sequence around key dates you collect from subscribers. Common examples of date property-triggered flows include: