How to create content blocks for Customer Hub
You will learn
Learn how to create content blocks for your Customer Hub. Content blocks are highly customizable and personalizable blocks that have access to Klaviyo profile data which allow you to display integrations (e.g. loyalty point balance), personalized offers, and more.
Customer Hub for Shopify currently supports standard storefronts and Shopify Headless. For WooCommerce, navigate to https://help.klaviyo.com/hc/en-us/articles/47792369863451
For feedback about Customer Hub functionality, email customerhub@klaviyo.com.
Before you begin
This guide explains how to set up content blocks so they display on your site’s Customer Hub. Before proceeding, ensure that you have the Customer Hub feature enabled in Klaviyo.
Learn more about Customer Hub.
What you can do with content blocks
Content blocks help you customize the For you tab of the Customer Hub interface. You can use them to display customer-specific information or encourage visitors to take a certain action, so each person enjoys a tailored experience when interacting with your onsite Customer Hub. You can create your own custom content blocks or use a template from Klaviyo's content block library, which includes pre-configured blocks for common scenarios and surfacing customer data (e.g., loyalty points or subscription status) from various integrations.
Common use cases for content blocks
- Encourage actions
- Prompt visitors to contact you (e.g., “Email us”)
- Send shoppers to a specific URL or page (e.g., subscription management or referral information pages)
- Highlight and guide customer journeys
- Promote special offers or exclusive collections for signed-in shoppers
- Showcase a highly-rated product with reviews and images
- Display personalized information from a Klaviyo profile
- Use personalization tags to dynamically show customer-specific details from their Klaviyo profile. This can be information you’ve collected via Klaviyo, imported, or synced from other platforms or integrations, such as:
- Loyalty points
- Subscription status
- Membership tier
- Use personalization tags to dynamically show customer-specific details from their Klaviyo profile. This can be information you’ve collected via Klaviyo, imported, or synced from other platforms or integrations, such as:
- Advanced personalization
- Use if/else conditional logic to control what information displays in a content block based on customer profile data (e.g., display rewards information exclusively to rewards program members and present a default message to everyone else).

Content block events
When you create a content block, you must give it a name. Klaviyo tracks each time a site visitor clicks on a content block as a Customer Hub clicked on content block event, using the name you provide for reporting and filtering. For this reason, it’s best to choose names that are familiar and relevant to the content in each block.
Keep in mind, names are for internal use only; they aren’t visible to your customers. You also cannot change a block’s name after it’s created.
Create a new content block
There are a few steps to follow to create and publish content blocks to your Customer Hub interface. The next few sections walk through this setup.
Access content blocks
- Navigate to Service - Customer Hub tab in Klaviyo’s left-hand navigation.
- Click Design.
- In the right-hand side preview, find the "+" button
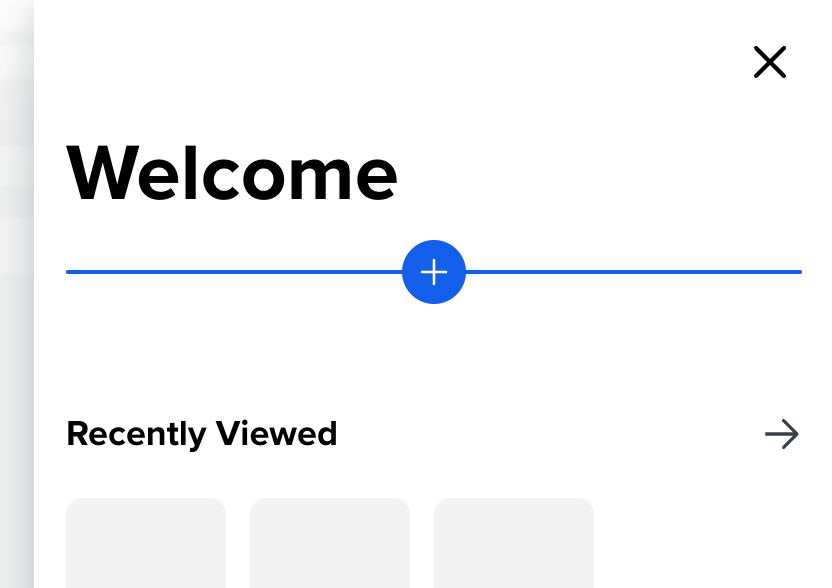
- Click the "+" button to choose how to add a content block:
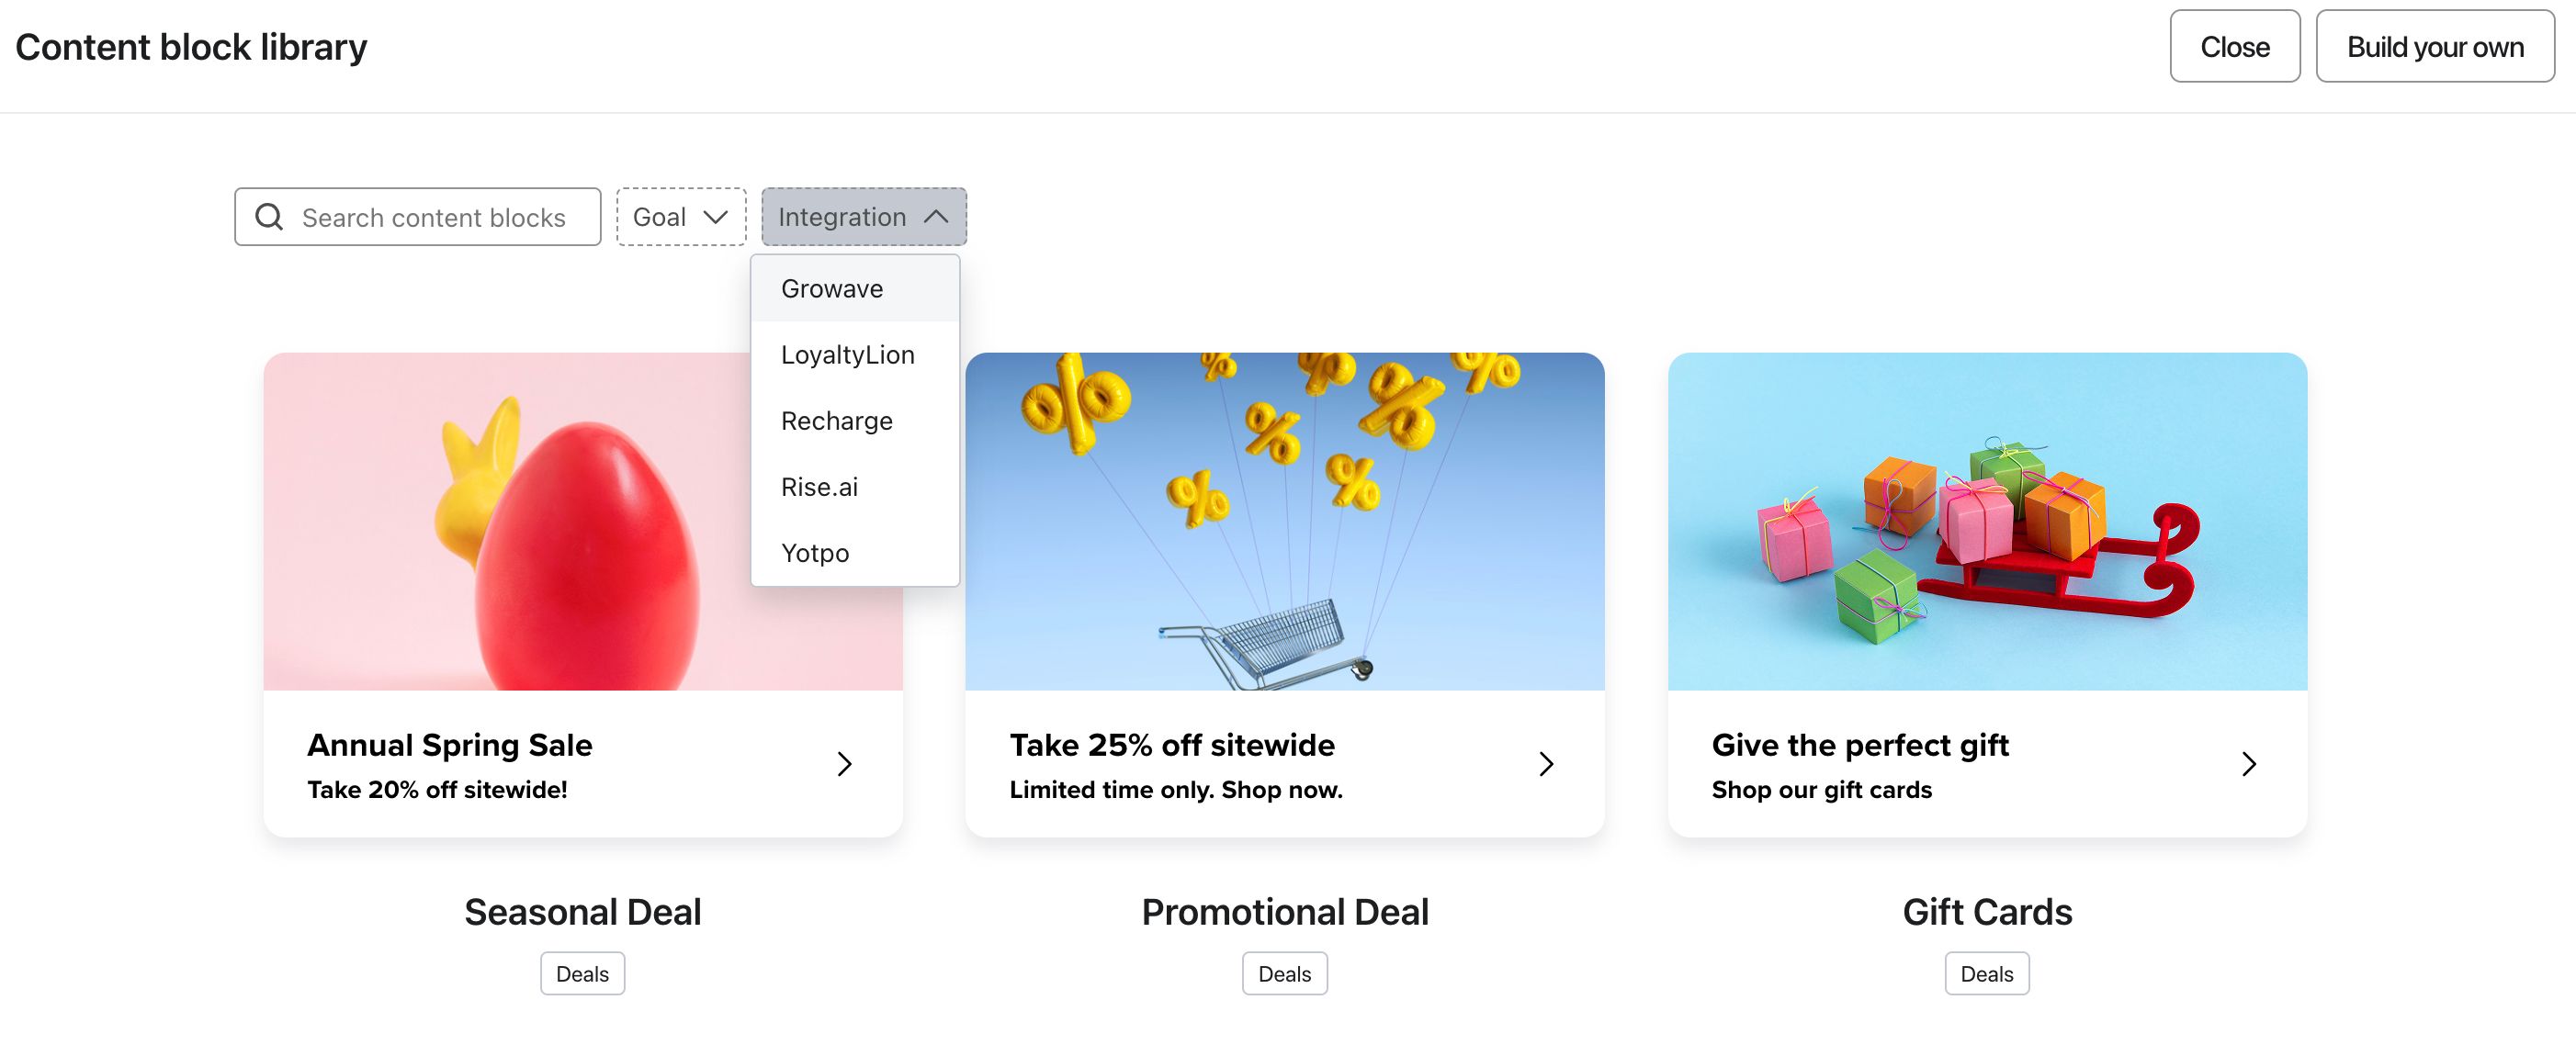
- Use a pre-built template from the content block library.
- Browse the library by category (e.g., loyalty, deals, list growth) or filter by integration. Click Add block on any template to open it in the content block editor with pre-filled, but fully editable fields
- Use a pre-built template from the content block library.
Integration-specific content blocks require that you have already enabled that respective integration in Klaviyo.
- Build your own content block.
- Click Build your own to open the a blank setup menu in the editor
- Click Build your own to open the a blank setup menu in the editor
Configure your content block
Once you've chosen your starting point (template or from scratch), the content block will show in the preview. You can click on any content block to edit its configurations.
- Under Content, you can edit:
- Block title
- Write a heading or a call to action (e.g., Shop Spring Collection).
- Block description
- Add details or context using regular, static text, or insert personalization tags to pull dynamic, customer-specific information (e.g., available rewards points). Event data is not supported.
- Block title
If you use an integration-specific template, personalization tags are pre-configured to match the platform's custom property names.
- Link (Optional)
- Provide a URL to direct visitors when they click the block (e.g., to a product page). You can also choose if the link should open in a new tab.
- Internal name
- Create a recognizable name (e.g., “Rewards” for a block showing rewards points). Note that this name is used for reporting and cannot be changed once saved.
- Banner image (Optional)
- Upload an image to display at the top of this content block.
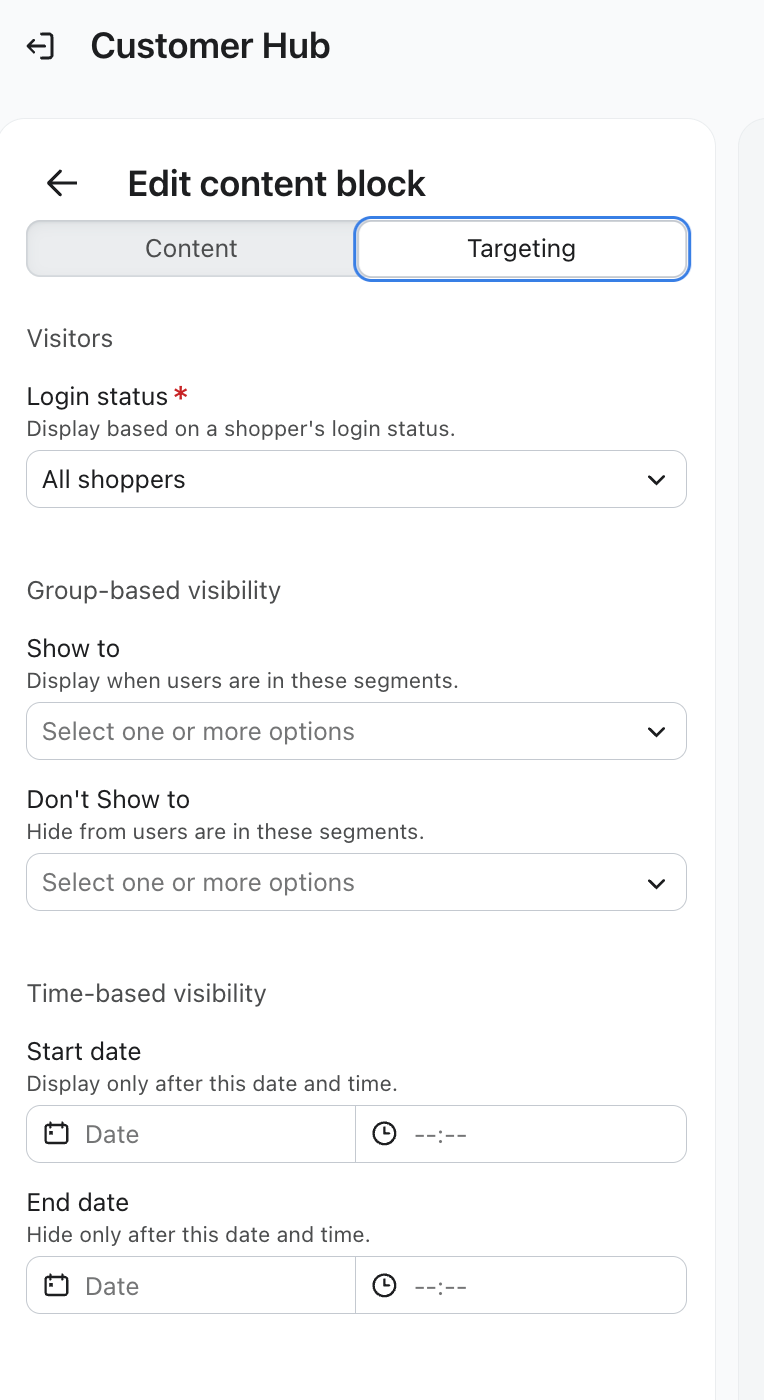
- Under Targeting, choose which types of visitors can see the content block:
- Login status
Choose which types of visitors can see the content block based on login status.- Note: If you choose to display a custom content block to Recognized / Identified shoppers, please ensure the block does not contain sensitive personal information (PII). While Klaviyo automatically redacts PII in native tabs like Orders and Profile, brands are responsible for the privacy of data added to custom content blocks.
- List/segment membership
Show or hide the block for certain lists or segments:- Show to: Select lists/segments that should see the block.
- Don’t show to: Select lists/segments that should not see the block.
- Login status
- When you’re finished, click Add.
To preview how your content block looks in your Customer Hub, switch to the Design menu along the left. From here you can view your in the Customer Hub preview canvas, as well as select any content blocks to edit them.

Scheduling content blocks
You can schedule content blocks to go live, update, or be removed at a specific date and time — without needing to manually publish or delete them in the moment. This is useful for time-sensitive campaigns like flash sales, holiday promotions, or any situation where you want precise control over when content appears on your site.
Scheduled changes apply to all onsite visitors, including unauthenticated shoppers who haven't signed in. This means you can use scheduled content blocks as a top-of-funnel marketing tool, not just for identified customers.
Schedule a new content block
When creating a content block, you can choose to publish it immediately or set a future go-live date and time.
- Follow the steps in Create a new content block above.
- Before clicking Add, look for the Schedule option in the editor.
- Toggle Schedule for later and set a date and time for when the block should go live.
- Click Save. The block will remain inactive until the scheduled time, then publish automatically.
Schedule an update to an existing content block
You can queue changes to a published content block — such as swapping out an image, updating a description, or adjusting targeting — to take effect at a future time.
- Click on the content block you want to update in the Design canvas.
- Make your desired changes to the block's content, image, link, or targeting settings.
- Select Schedule update instead of saving immediately, and choose when the changes should apply.
- Click Confirm. Your current block remains live as-is until the scheduled update takes effect.
Schedule a content block for removal
You can schedule a content block to be automatically removed at a specific date and time — for example, when a promotion ends.
- Click on the content block you want to remove.
- Select Schedule removal and set a date and time.
- Click Confirm. The block will continue to display until the scheduled removal time, then disappear from the Customer Hub automatically.
Preview scheduled changes
Before a scheduled update goes live, you can step through your content blocks to see exactly how the Customer Hub will look at a given point in time. This is helpful for QA, reviewing translations, or verifying that a sequence of updates looks correct.
- In the Design view, find the timeline or Scheduled indicator above the canvas.
- Use the preview controls to move forward in time and see how your content blocks will appear after each scheduled change takes effect.
- Click on any content block in the preview to review its configuration at that point in time.
Note: The preview reflects the state of your content blocks after each scheduled update — it is not a continuous scrub of all possible times.
Manage, modify, or cancel scheduled updates
You can view and manage all pending scheduled changes from the Design view.
- Navigate to Service > Customer Hub > Design.
- Click the Scheduled tab or look for the scheduled changes panel to see all upcoming updates across your content blocks.
- From here you can:
- Edit a scheduled update to change its content or timing.
- Cancel a scheduled update to discard the change entirely without affecting what's currently live.
How customers will see your content blocks
The content blocks your site visitors see, and the details displayed in those blocks, depend on whether they’ve signed in to their account and if Klaviyo has identified them. Keep in mind that:
- Klaviyo can only display content blocks targeted to specific lists or segments to visitors who have signed in to an account or who have been identified by Klaviyo in another way (e.g., followed a link in an email or filled out a sign-up form). Anonymous, signed-out visitors will not see these blocks.
- Content blocks with personalization tags will only display profile data for signed-in visitors. If a visitor is signed out, the default value will display. If there is no default value, the text will not show.
If you configure a content block to only show to a specific segment, and that segment becomes inactive, the content block will no longer be visible or accessible to anyone. To prevent your segments from becoming deactivated, and ensure continued access to your content blocks, click the star icon next to the segments name in the Segments area in Klaviyo.
Using personalization tags to surface profile data
Content blocks support the use of profile and custom personalization to dynamically pull information from each customer's Klaviyo profile.
The content block library features several integration-specific templates that are already set up with the correct personalization tags for that platform and specific use case. However, if you have a different integration or use case in mind, you can add or modify personalization tags in your content block's description to display the data you need.
Note that event data is not currently supported for content blocks in Customer Hub.
Example use cases with personalization tags
When referencing a custom profile property in a personalization tag, make sure the value in the “lookup” section matches how you’re storing that property in Klaviyo. Custom properties may be formatted or named something different than the examples provided.
- Surface available loyalty points:
You have{{ person|lookup:'loyalty_points'|default:'0'|floatformat:0 }}points - Remind a shopper of their membership tier (e.g., Bronze, Silver, Gold):
{{ person|lookup:'Membership Tier'|default:'No membership' }}Status - Prompt a certain shopping journey with personalization:
Celebrate your{{ person|lookup:'breed_type'|default:'dog' }}
Tip: Keep in mind that when using personalization tags, there may be some visitors who haven’t provided all the data your tags reference. To account for these instances, use default text to prevent blank spaces in place of the missing data.
Using conditional logic
For more advanced customization, you can use conditional if statements to control how a block appears to different shoppers based on their profile information.
Example if/else statements
- Help members manage their current subscription while incentivizing non-members to start a subscription plan:
{% if person.subscription_status not "Cancelled" and person.subscription_status %}Manage your subscription {% else %}Start a subscription & save! {% endif %} - Engage VIP loyalty members while showing non-members a CTA to join:
{% if person|lookup:'Loyalty Points' > 150 %}Hey VIP! You’ve always got free shipping & free returns {% else %}Have you heard about our VIP program? Join today on our website to start earning rewards. {% endif %}
Learn more about if statements.
Additional resources
- How to style your Customer Hub
Learn about design options for styling your Customer Hub drawer, and how you can design it to match your brand. Because the Customer Hub interface is ingrained in the customer experience, it’s best practice to style it to appear as an extension of your website.
- How to display product recommendations in Customer Hub
Learn how to display personalized product recommendations in the Customer Hub drawer to tailor shopping experiences for your customers and drive conversions. By showing products that appeal to customers, you can improve conversion rates and provide cross-sell opportunities to increase average order value.
- Message personalization reference
Learn how to use Klaviyo’s personalization variables, or tags, to customize the experience for your customers.