Message personalization reference
Learn how to use Klaviyo’s personalization variables, or tags, to customize the experience for your customers.
Personalization tags can be used in emails (including the email’s subject line), SMS/MMS messages, push notifications, and Customer Hub. This article outlines certain available tags, their structures and forms, and how to customize them. To learn how to add personalization, head to our article on adding personalization to your messages.
Personalization tags were previously called template tags and variable syntax.
About personalization tags
When you input tags into a text field, they look like the sentence on the left in the table below. Once the message is displayed, the tags are replaced by information from the recipient’s profile or event details, and will look like the sentence on the right.
Hi | Hi George Washington, your favorite color is Green |
Profile personalization generally begins with person, with the exception of a few special tags like first_name and last_name. Event variables, which can be used in metric-triggered flows, begin with event. Organization tags (like your company name and address) begin with organization.
All personalization tags are case sensitive and must exactly match the property names they reference. Make sure your tags are spelled correctly and use the same casing that appears on your profiles.
Profile personalization
Profile personalization enables you to display special Klaviyo properties in your messages. The list below covers all profile personalization (i.e., built-in Klaviyo properties). Select profile personalization tags are available from the Personalization menu in the email editor, or from the preview modal for SMS and push messages.
If you’d like to add custom properties to your messages, jump ahead to the section on custom personalization.
Tag | Profile property |
| |
| First name |
| Last name |
| Recipient organization |
| Address 1 |
| Unique ID ($id/external ID) |
| Latitude |
| Longitude |
| Klaviyo ID |
| Full name |
| Title |
| Phone Number |
| Address 2 |
| City |
| State / Region |
| Country |
| Zip Code |
| Source |
| Consent |
| $consent_form_id |
| $consent_form_version |
| $consent_method |
| Recipient timezone |
| $consent_timestamp |
| $phone_number_region |
| Recently viewed items |
| Expected date of next order |
Custom object tags
Custom object tags enable you to use object data in flow and campaign sends.
Review tag references for specific examples of how to use tags to get an object ID or return a count.
You must create an object first before you can use custom object data in templates. The {{ object }} tag is only available when an object has triggered a flow.
Tag | Outcome |
| Return the object that triggered a flow |
| |
| Return a single object from an object filter |
| |
| Return a count from an object filter |
| Retrieve an object by ID |
| Retrieve all records for an object from one profile |
Organization tags
Organization tags allow you to include information about your company or organization in your messages. You can manage this information by navigating clicking your organization name in the bottom left corner, then selecting Settings > Organization > Contact Information. All organization tags start with organization. See the table below for the list of organization tags.
Organization tag | Description |
| Your organization’s name |
| Your organization’s website |
| Your organization’s full address, including city, state/region, and zip code |
| Your organization’s street address |
| The second part of your organization’s address (e.g., apartment or unit number) |
| Your organization’s city |
| Your organization’s state, province, or region |
| Your organization’s zip code |
Link and preview tags
Link and preview tags allow recipients to manage their subscription preferences and view your message in their browser. These include:
These tags are only supported for email templates. If you click one of these links from a preview email, you'll be directed to a placeholder page, rather than a live consent page or preview.
Unsubscribe
Klaviyo requires an unsubscribe link in all emails. Use a simple unsubscribe tag for a link that says “Unsubscribe”, or add your own text in quotes.
Tag | Output |
| Unsubscribe |
If you'd no longer like to receive emails, | If you'd no longer like to receive emails, click here. |
Alternatively, you can use the {% unsubscribe_link %} tag to generate an unsubscribe URL. Rather than generating a full linked word or phrase, this tag creates just the unsubscribe URL. Use this tag if you’d like to use a different color for your unsubscribe link than the link color set in your template’s styles, or use a linked button or image rather than a text link.
Tag | Output |
| This is a fancy unsubscribe link. |
When a recipient clicks the unsubscribe link, they're taken to a customizable confirmation page.
Manage preferences
Preference pages allow recipients to update their preferences, allowing you to segment and target your messaging more effectively. To include a link to this page for each recipient, use the manage preferences tag.
You can create list-specific and general manage preference pages. List-specific pages are sent when you send a message to just one list. The general manage preferences page is used when you send to a segment, a combination of lists, and in flows that are not list-triggered. Learn more about manage preferences pages.
Use a simple manage preferences tag for a link that says “Manage Preferences”, or add your own text in quotes.
Tag | Output |
| Manage Preferences |
Want to update your preferences? | Want to update your preferences? Click here. |
Alternatively, you can use the {% manage_preferences_link %} tag to generate a manage preferences URL. Rather than generating a full linked word or phrase, this tag creates just the URL for the recipient’s preference page. Use this tag if you’d like to use a different color for your link than the link color set in your template’s styles, or use a linked button or image rather than a text link.
Tag | Output |
| This is a fancy manage preferences link. |
Web view
To give recipients the option to view an email in their web browser, you can use the web view tag.
Tag | Output |
| View in Your Browser |
Can't see this email? | Can't see this email? Open in your browser. |
| This is a fancy web view link. |
Preview text
In some cases you may want to display your preview text inside the body of your template. You can reference any preview text you set on the email preview/setup screen by using the tag {% render_variable preview_text %}.
If you update the preview text on the email preview screen, this tag displays your updated preview text.
Custom personalization and event tags
Custom tags reference custom profile properties (i.e., any data you collect about your contacts other than special Klaviyo properties and events), like someone’s birthday or contact preferences. Event tags reference a specific event’s data (e.g., a placed order event) and can only be used in flows triggered by that event.
To add a custom tag, click Personalization in an email text field and locate the tag. To add an event tag, preview your message and copy the event variable tag from the preview data. Alternatively, use the formats outlined below to manually add custom tags to your templates.
Tag format | Description | Example |
| A simple profile personalization tag |
|
| A profile personalization tag, if the property name contains spaces or special characters |
|
| A simple event variable tag |
|
| An event variable tag, if the variable name contains spaces or special characters |
|
| An event variable tag, if the event variable is nested in the event data |
|
| An event variable tag, if the event variable is nested in another variable with a name containing a space or special character |
|
Use dot (.) notation for tags with no spaces or special characters. If your property names contain spaces or special characters (e.g., $), use lookup notation.
Note that, with nested properties, if one property name uses lookup notation, all later properties must also use lookup notation. This means that event|lookup:'Collection Names'|lookup:'0' is correct, but event|lookup:'Collection Names'.0 is not.
Customizing tags with filters
To customize the way your tags appear, apply template filters. Filters can be used to apply title case, set the number of decimal places for a number, and much more. Two of the most common filters are default and title.
The default filter sets a default value to appear if a message recipient doesn’t have that property set. In the example below, 'friend' and 'tasty treats' are set as the default values in case a recipient’s name or favorite food is not set in their Klaviyo profile.
Text with personalization tags | Output |
Hey | Hey friend, any interest in some tasty treats? |
The title filter allows you to apply title casing to any text tag, to ensure it appears consistently once the message is sent. For example, some subscribers may use all capital or all lowercase letters when they fill out your signup form. Without a filter, their first name would use the casing they initially used when filling out your form. However, the title filter corrects the casing so their name appears correctly.
Text with personalization tags | Output |
Hey | Hey Elise, have you seen our latest launch? |
There are dozens of other filters available for your messages. Learn more about using filters to customize tags.
Date tags
Date tags give you a quick way to insert date information into an email. The date is in your account’s timezone and reflects the day or time a message was sent.
The {{ today }} tag is one of the most common date tags, and it populates a timestamp when the message is sent. To use the today tag, paste the following line of code into your template:
{% today "%Y-%m-%d" as today %} {{ today }}
Note that using the {{ today }} tag without the preceding code will not render anything; the full line of code is necessary.
To learn how to use or customize date tags, head to our article on date tags in templates.
Currency tags
Event data like Placed order, Added to cart, and more often have financial value associated with them (e.g., a product’s price or the value of a customer’s cart). Use the {% currency_format ... %} tag to apply your country’s currency formatting to that value.
For example, consider the $value field in the Started checkout metric below:

Using just the variable {{ event|lookup:"$value" }}, this property will render with just one decimal place and no currency symbol in the email:
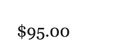
However, with the currency format tag, {% currency_format event|lookup:"$value" %}, the number renders with a currency symbol and the correct number of decimal places:
To use the currency format tag, replace the placeholder text in {% currency_format PLACEHOLDER %} with your variable.
For example, if your variable is {{ event.item.price }}, the complete currency format tag would be {% currency_format event.item.price %}. If your tag includes filters (e.g., a default value in case the property is empty), include those in the tag too: {% currency_format event.item.price|default:”0” %}.
How to select a country
There are 2 places you can set the currency format for your messages:
- For your entire account
Navigate to Settings > Organization > Organization language and regional format and select an Organization language. - For a specific message
Select a different currency format for a single message from that template’s Styles tab in the Currency section.
Troubleshooting the currency_format tag
This tag is only supported for variables that are numbers (e.g., 10, 24.56). Properties with the currency symbol included (e.g., $40, $76.30) are strings, and the currency_format tag cannot alter them.
Conditional statements
Conditional tags allow you to include content in your messages for recipients who meet certain criteria, and not include it for others. They give you powerful controls for personalizing your messages for each recipient.
If statements
If statements allow you to control the content someone receives based on profile or event data.
In the example below, a person will be shown the first line of text if they have more than 150 loyalty points. If they have less than 150, but more than 0, they will see the second line. And if they have no loyalty points, they will see the third message.
{% if person|lookup:'Loyalty Points' > 150 %}
Hey VIP! You’ve always got free shipping & free returns
{% elif person|lookup:'Loyalty Points' > 0 %}
You have {{ person|lookup:'Loyalty Points' }} points, and you just need 150 to become a VIP!
{% else %}
Have you heard about our VIP program? Join today on our website to start earning rewards.
{% endif %}
Within an if statement, an initial {% if ... %} condition is required, as well as the closing {% endif %} tag. All other elements (i.e., {% elif %} and {% else %} tags) are optional. You can use an unlimited number of {% elif %} tags, followed by a maximum of one {% else %} tag. Each email recipient will only see the first message they qualify for.
For statements
"For" blocks allow you to iterate over each item in a variable that's storing a list and render them individually. Below is an example statement:
| Oversized Beach Blanket × 1 Beach Chairs × 4 SPF Sunscreen × 2 Plastic Cooler × 1 |
Each For statement must contain the following:
- An opening
{% for ... %}tag, containing a row alias (item in the example above) and row collection (event.shopping_cart_items in the example above) - A closing
{% endfor %}tag
Between the two required tags, you can include any text you’d like. To include variables nested within the row collection, replace the beginning of the variable name (the row collection plus the number following the row collection) with your row alias. For example, the variable {{ event.shopping_cart_items.0.name }} would become {{ item.name }}.
Conditional statements and the inline text editor
When you add certain conditional statements to a text block, they may disappear from the inline text editor. The code is still present; it is just hidden. To view and edit conditional statements, open the text block's Source code field.
The following tags are only visible in a text block's Source code field:
- {% for ... %}
- {% endfor %}
- {% if ... %}
- {% elif ... %}
- {% else %}
- {% endif %}
- {% with ... %}
- {% endwith %}
Additional resources
- How to create and send an email campaign
Learn about the basics of email campaigns, including what they are and how to send them in Klaviyo.
- How to use the preview panel for message personalization
Learn how to use the preview panel to understand the personalization data available for your messages and how to access personalization variables. Use the preview modal as your source of truth for personalization options.
- How to build dynamic blocks in a flow email
Learn how to use dynamic table blocks to add product and other event information to your metric-triggered flows. In this article, you'll learn how to create a dynamic block using the example of an abandoned cart reminder showing the products that were left behind.
- Troubleshooting email template error messages
If you encounter errors or warnings in an email template, you may need to resolve them before sending your message. Search this resource for the error message or warning you’re encountering to find tips for resolving the issue.
- How to create content blocks for Customer Hub
Learn how to create content blocks for your Customer Hub. Content blocks are highly customizable and personalizable blocks that have access to Klaviyo profile data which allow you to display integrations (e.g. loyalty point balance), personalized offers, and more.