How to use custom objects in templates
You must have access to custom objects to use this functionality.
You will learn
Learn how to use custom objects in templates, so you can use object data in flow and campaign sends.
You must create an object before you can use custom object data in templates. For the personalization menu, object filters, and recipient record lists, use an object with a profile relationship. Its records must be linked to the recipient to appear in their message.
Accessing object data through the personalization menu
You can personalize text blocks in the drag-and-drop template editor using properties from a custom object, or the count of records for an object.
Learn how to use Klaviyo's template editor.
If you are starting with an HTML template, you can create a drag-and-drop copy first:
- Navigate to Content > Templates, then open Email: saved. Open your HTML template’s 3-dot menu and select Clone to drag and drop.
- Open Converted templates to check its progress. When the status is Ready to use, click the converted template’s name to open it.
- Review the copy’s layout and personalized content before using it. The original HTML template is unchanged.
To get started with adding object data into your templates:
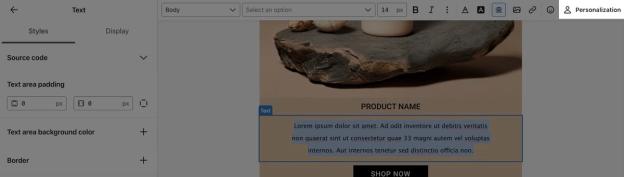
- Add a new text block or select an existing text block.
- Double-click in the text block and then position your cursor where you want to insert your dynamic property.
- Select the Personalization button in the text toolbar.
- In the personalization modal, select Objects from the All types dropdown.
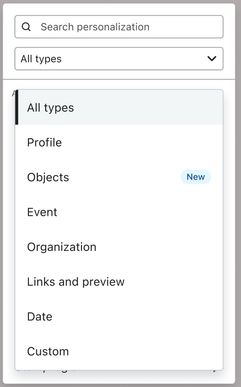
- Within Objects, you’ll see all the objects on your account that you can use to pull data into the template. Select the object that contains the data you’d like to use in the template.
- Select a property to display, or Number of objects to display a count. Next, select an object filter. You can also create a new object filter here.
- Click Insert after selecting an existing filter. If you create a new filter, its tag is inserted when you finish creating it.
- Apply any text styles you need. For a property value, add default text by editing its tag to include
|default:'value'. Replacevaluewith the text you want to display when the property is empty.
To specify the capitalization rules for object data, you'll need to manually set the rule in the personalization tag. For example, these tags use the object that triggered a date-triggered flow:
- {{ object.full_name|title|default:'value' }}
John Doe - {{ object.full_name|upper|default:'value' }}
JOHN DOE - {{ object.full_name|lower|default:'value' }}
john doe
Learn more about modifying values with Django filters.
Accessing object data with personalization tags
You can use personalization tags in emails (including the email’s subject line), SMS/MMS messages, push notifications, and Customer Hub to display object data.
Learn how to use personalization tags in Klaviyo.
Object personalization tag reference
You can use the following personalization tags with objects.
Using the object that triggered a flow
{{ object }} is only available when an object has triggered a flow. The {{ object }} template tag is only available in date triggered flows based on an object. This is similar to the {{ event }} template tag for event triggered flows.
These examples use the following:
- Object called Pet which is referenced with the object tag in the template.
- Object property called Name
Structure | Example |
{{ object.object_property }} | {{ object.Name }} |
{{ object | lookup:'object_property' }} | {{ object | lookup:'Name' }} |
Getting an object by ID
These examples use the following:
- Object called Pet
- Object property called Name
- Event that triggered the flow with an object property called pet_id. This field is the same as the object ID for the Pet object.
Structure | Example |
{% customobject event.object_id object_type_title="Title" as alias %} | {% customobject event.pet_id object_type_title="Pet" as pet %} |
{% customobject event.object_id object_type_title="Title" as alias %} | {% customobject event.pet_id object_type_title="Pet" as pet %} |
Return a single object from an object filter
These examples use the following:
- An additional object filter called oldestDog
- Object property called Name
Structure | Example |
{{ object_filter.object_filter_name.object_property}} | {{ object_filter.oldestDog.Name }} |
{{ object_filter.object_filter_name | lookup:'object_property' }} | {{ object_filter.oldestDog | lookup:'Name' }} |
Return an integer from an object filter
These examples use the following:
- An additional object filter called countOfDogs
Structure | Example |
{{ object_filter.object_filter_name }} | {{ object_filter.countOfDogs }} |
Return multiple objects from an object filter
For a filter named dogs configured with Multiple, loop through the matching records to display each pet’s Name property:
{% for pet in object_filter.dogs %}
{{ pet.Name }}
{% endfor %}
Retrieve object records
Use customobjects to retrieve up to 5 records linked to the recipient, ordered from most recently added to oldest. Loop through those returned records to display their properties. This example uses the following:
- Object called Pet Profile
- Object property called name
Structure | Example |
{% customobjects object_type_title="Title" as alias %} | {% customobjects object_type_title="Pet Profile" as pets %} |
Object data in subject lines
Use the same custom object syntax in subject lines as in the message body. These examples show the syntax for each source of data:
{{ object_filter.oldestDog.Name }}displays the Name property from the single-object filter oldestDog.{{ object.Name }}displays the Name property from the object that triggered a date-triggered flow.{% customobject event.pet_id object_type_title="Pet" as pet %}{{ pet.Name }}{% endcustomobject %}looks up a Pet record by ID. Use it in a flow triggered by an event containing pet_id.
For example, use {{ object.Name }} in a date-triggered flow based on the Pet object to display a customer’s pet name in the subject line.
Draft view:

Email preview:

Object data in show/hide logic
You can also configure whether to show or hide a block in a template based on object data. Use a property or count from an object filter, or the object that triggered a date-triggered flow. You can use object data in a single show/hide condition or in the condition for each show/hide logic variant. For data retrieved by ID, use the advanced conditional logic described below.
You must create object filters before you can reference them in show/hide logic.
For example, in a date-triggered flow based on a Pet object, use object.Breed == 'Labrador' to show a block only when the triggering pet’s Breed is Labrador. Use the exact breed value from your data.
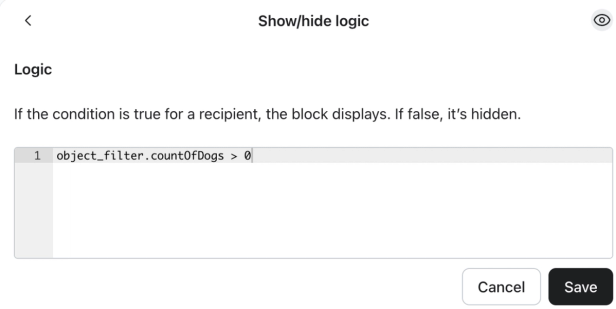
- Select the block and open the Display tab. Under Show/hide logic, select Show only to a specific audience, or select Personalize for multiple audiences to create logic variants. Then select Use code.
- Enter a condition such as
object_filter.countOfDogs > 0without{{ }}or{% %}around it. Object filters can be used in campaigns and flows. Useobjectonly in a date-triggered flow based on object data. - Click Save to apply the condition.
Custom object sections support show/hide logic for one audience only. Logic variants aren’t available for them. Learn more about show/hide logic variants.
For more flexibility (e.g., making some information conditional on information returned by {% customobject %} or {% customobjects %}) then consider using advanced conditional logic with {% if ... %} logic directly in a text block.
Object filters
What is an object filter?
Object filters select records linked to each recipient using criteria you set. You can display a property from 1 matching record, properties from up to 10 matching records, or a count of matching records.
Create a new object filter
To get started with creating an object filter:
- Add a new text block or edit the text in an existing text block in your template.
- Select the Personalization button.
- Within the personalization modal, select Objects from the All types dropdown.
- Select the object that contains the data you’d like to set a filter for.
- Select the property you want to display. To create a count filter instead, select Number of objects.
- Click Create if there are no filters yet. If filters are listed, leave them unselected and click Create object filter.
On the Create object filter modal, set the following information:
- Name
Enter a unique name containing only letters and numbers, such as oldestDog. Do not use spaces or special characters. - Set filter conditions
Define the rules an object must meet to be included in the text block. - How many objects should be displayed?
For a property value, select Single for 1 record or Multiple for up to 10 records. Count filters do not show this setting. - Select property and Sort order
For a property-value filter, choose the property used to select or sort records, then choose its sort order. For example, sort by a birthday property with Oldest to select the oldest pet first. These fields do not appear for count filters.
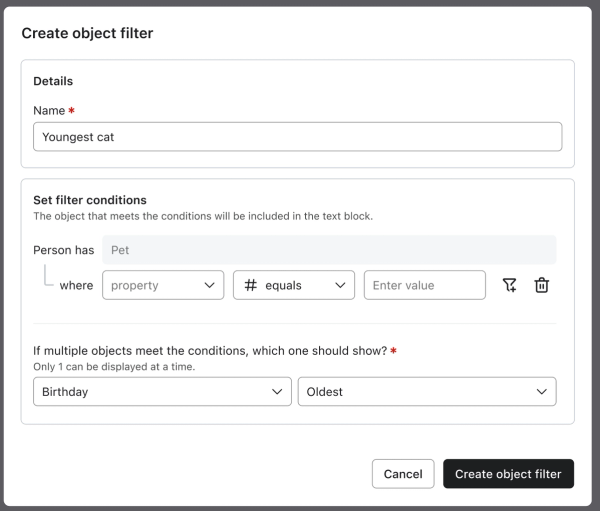
Click Create object filter to save your filter and insert its tag into the text block.
Once your object filter is created, you can use it in show/hide logic and personalization tags to display specific object records based on the criteria you set.
Additional resources
- Getting started with custom objects
Learn about custom objects, which allow you to store and associate multiple properties to a single "object." Custom objects enable you to map diverse, multi-relational data concepts into Klaviyo that can’t be stored using profile properties. You can then use custom objects in your messages, segments, and more.
- Message personalization reference
Learn how to use Klaviyo’s personalization variables, or tags, to customize the experience for your customers.
- How to use the preview panel for message personalization
Learn how to use the preview panel to understand the personalization data available for your messages and how to access personalization variables. Use the preview modal as your source of truth for personalization options.