How to translate consent pages into different languages
You will learn
Learn how to translate the text in your consent pages (i.e., subscribe, unsubscribe, and manage preferences pages) into the language that your subscribers use.
Each of your Klaviyo lists is connected to your account's default consent pages by default. This means that any emails sent to one or more of these lists will use the default preference page, subscribe page, and unsubscribe page. You also have the option to customize consent pages for a particular list (list-specific consent pages). If you do this, any emails sent to that list will use the customized consent pages, rather than the account-level pages. This guide will walk you through how to find and edit the text in each kind of consent page so you can translate it into your preferred language.
Head to our guide on getting started with consent pages for more information about these pages and how they work.
Translate a consent page
By default, Klaviyo’s consent pages use American English; however, all text fields in your consent pages are fully editable, so you can change them to a different language. Note that this also includes buttons, privacy disclosures, and error messages.
Translate your account's default consent pages
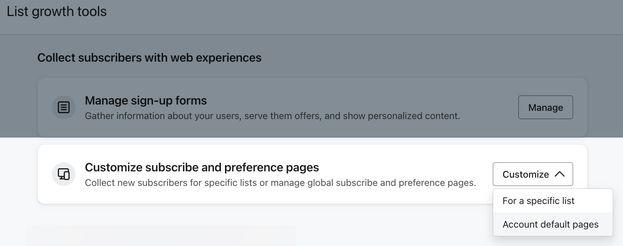
- In Klaviyo, navigate to Audience > Growth tools.
- Next Customize subscribe and preference pages, click Customize.
- Select Account default pages.
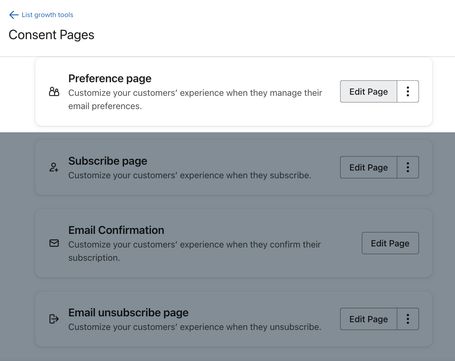
- Below the page type you’d like to edit (e.g., preference page), click Edit Page.
- Click any text in the preview that you want to edit to see a Text menu appear along the left side.
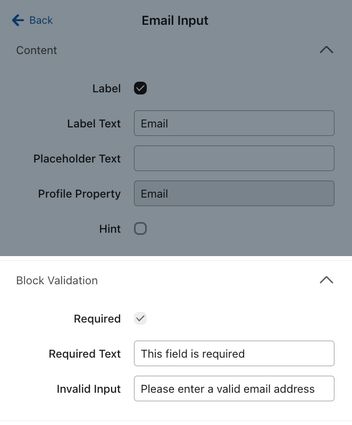
- Delete the default text and replace it with any text in your preferred language. Note that you can also customize Required Text language and Invalid Input language that comes with input fields (e.g., email field) in your subscribe page. This helps you ensure that the text for any error messages that a shopper may see is consistent with the rest of your consent page's language.
Make sure to complete this for all steps, including the Success page in the menu bar.
- Click Publish to publish your changes.
Translate a list-specific consent page
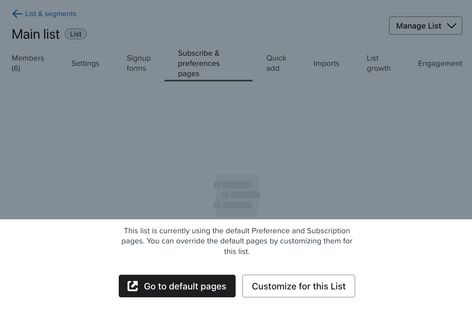
- Navigate to Audience > Lists & Segments in Klaviyo.
- Choose a list.
- Select Subscribe & preferences pages in the menu bar.

- Click Customize for this List (if you haven’t yet customized any of this list’s pages).
- Below the page type you’d like to edit (e.g., subscribe page), click Edit Page.
- Click on any text you want to edit in the preview to see a Text menu appear with editing options.
- Delete the default text and replace it with any text in your preferred language. Note that you can also customize Required Text language and Invalid Input language that comes with input fields (e.g., email field) in your subscribe page. This helps you ensure that the text for any error messages that a shopper may see is consistent with the rest of your consent page's language.
Make sure to complete this for all steps, including the Success page, which you can find in the menu bar.
- Click Publish to publish your changes.
Additional resources
- How to customize content based on language
Learn how to collect someone's preferred language and then target them in that language.
- How to change the currency for your account
Learn how to change the default currency symbol in your Klaviyo account from the dollar sign ($) to another currency. This change is useful if you conduct business in a different currency, as it can help save you time and minimize the risk of using an incorrect symbol.