How to set up lead capture with Shop on a sign-up form
You will learn
Learn how to add the Continue with Shop block to a Klaviyo sign-up form so shoppers with a Shop account can subscribe using the details saved to their account, without typing them in. Shop is Shopify’s shopping app, and many shoppers already have a Shop account from buying on other Shopify stores.
When a shopper clicks Continue with Shop on your form and completes the Shop sign-in, Klaviyo sends an email subscription request to the list you choose and shows them the step you select.
Continue with Shop is rolling out gradually, so you may not see it in your account yet. If the Continue with Shop block isn’t in your form editor, follow the steps to set up the legacy lead capture with Shop experience instead.
This feature is specific to Shopify, and will only be available to Klaviyo customers who use Shopify as their ecommerce platform.
Before you begin
Note the following before you add Continue with Shop to a form:
- No Shop Pay or coupon required. Unlike the legacy lead capture with Shop experience, you don’t need to activate Shop Pay on your store or add a coupon to your form.
- Supported form types. You can add Continue with Shop to popup, flyout, embed, and full page forms. It isn’t available for back in stock forms or landing pages.
- Consent. Continue with Shop collects email consent. To collect SMS or WhatsApp consent using your form’s phone number fields, send shoppers to a phone number opt-in step after Shop. Set up SMS or WhatsApp in your account before collecting consent for that channel.
- 1 block per form. You can add 1 Continue with Shop block to each form.
- Spin-to-win and Smart Opt-in. You can’t add a spin-to-win block to a form that has a Continue with Shop block. Smart Opt-in does not run for the initial Shop submission. If you use it on a later SMS opt-in step, set Go to step to the phone number step, so the shopper can enter their number before receiving a one-time code.
- Shop branding. The button always uses Shop’s purple brand color, which you can’t change. You can choose the button text and adjust its corner radius, spacing, font size, and line height.
Your list’s opt-in settings still apply. If the selected list uses double opt-in, shoppers must complete the confirmation before they are subscribed. Signing in to Shop does not bypass that confirmation.
Add Continue with Shop to a sign-up form
To add Continue with Shop to a form:
- Navigate to Sign-up forms. On an existing form, open the 3 dots menu and select Edit, or create a new form.
- In the left sidebar, click Add content (the plus icon) to open the Add blocks panel.
- Under Integrations, drag the Continue with Shop block onto the step where you collect email. For example, place it above your email field.
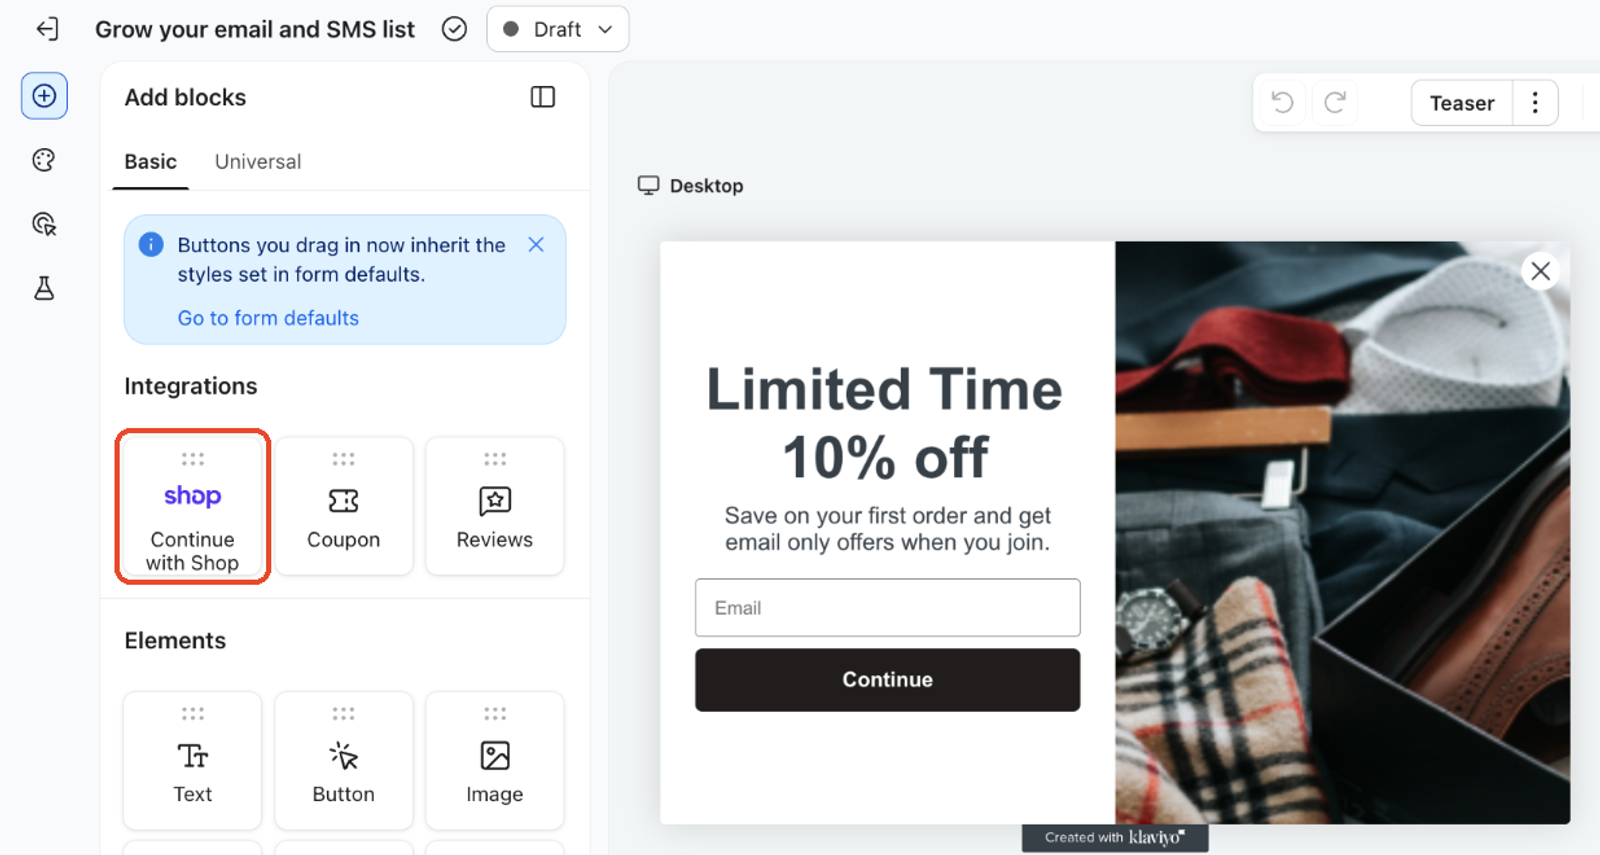
- Select the block to open its settings. Under Action, choose:
- List to submit: the list that receives subscription requests from shoppers who continue with Shop.
- Go to step: the step shoppers see after they finish in Shop. For example, send them to your SMS opt-in step, to a step that collects more information (like their birthday), or straight to your success step.
- (Optional) To collect SMS or WhatsApp consent after Shop, use a phone number opt-in step. Follow the steps below to add and connect it. If your form already has a phone number step, skip to connecting it to Continue with Shop. Check its channel, list, and disclosure settings before publishing:
- Click Step (the plus icon), select Mobile opt-in, then click Next.
- Choose Text messaging, WhatsApp, or WhatsApp and text messaging, then click Next.
- Choose the list for phone subscribers. For a text messaging step, also choose the opt-in method offered in the modal. Click Add step.
- Select the Continue with Shop block and set Go to step to the phone number step. Then check the following settings on the phone number step.
- Channel: select the phone number input and choose Text message, WhatsApp, or WhatsApp and text message.
- List to Submit: select the phone number step’s submit button to choose the list for phone subscribers. You can use a different list from the one selected on the Continue with Shop block.
- Disclosure language: include the appropriate consent language on the phone number opt-in step. For SMS, use your account’s disclosure language and check it before publishing. Learn how to configure SMS opt-in disclosure.
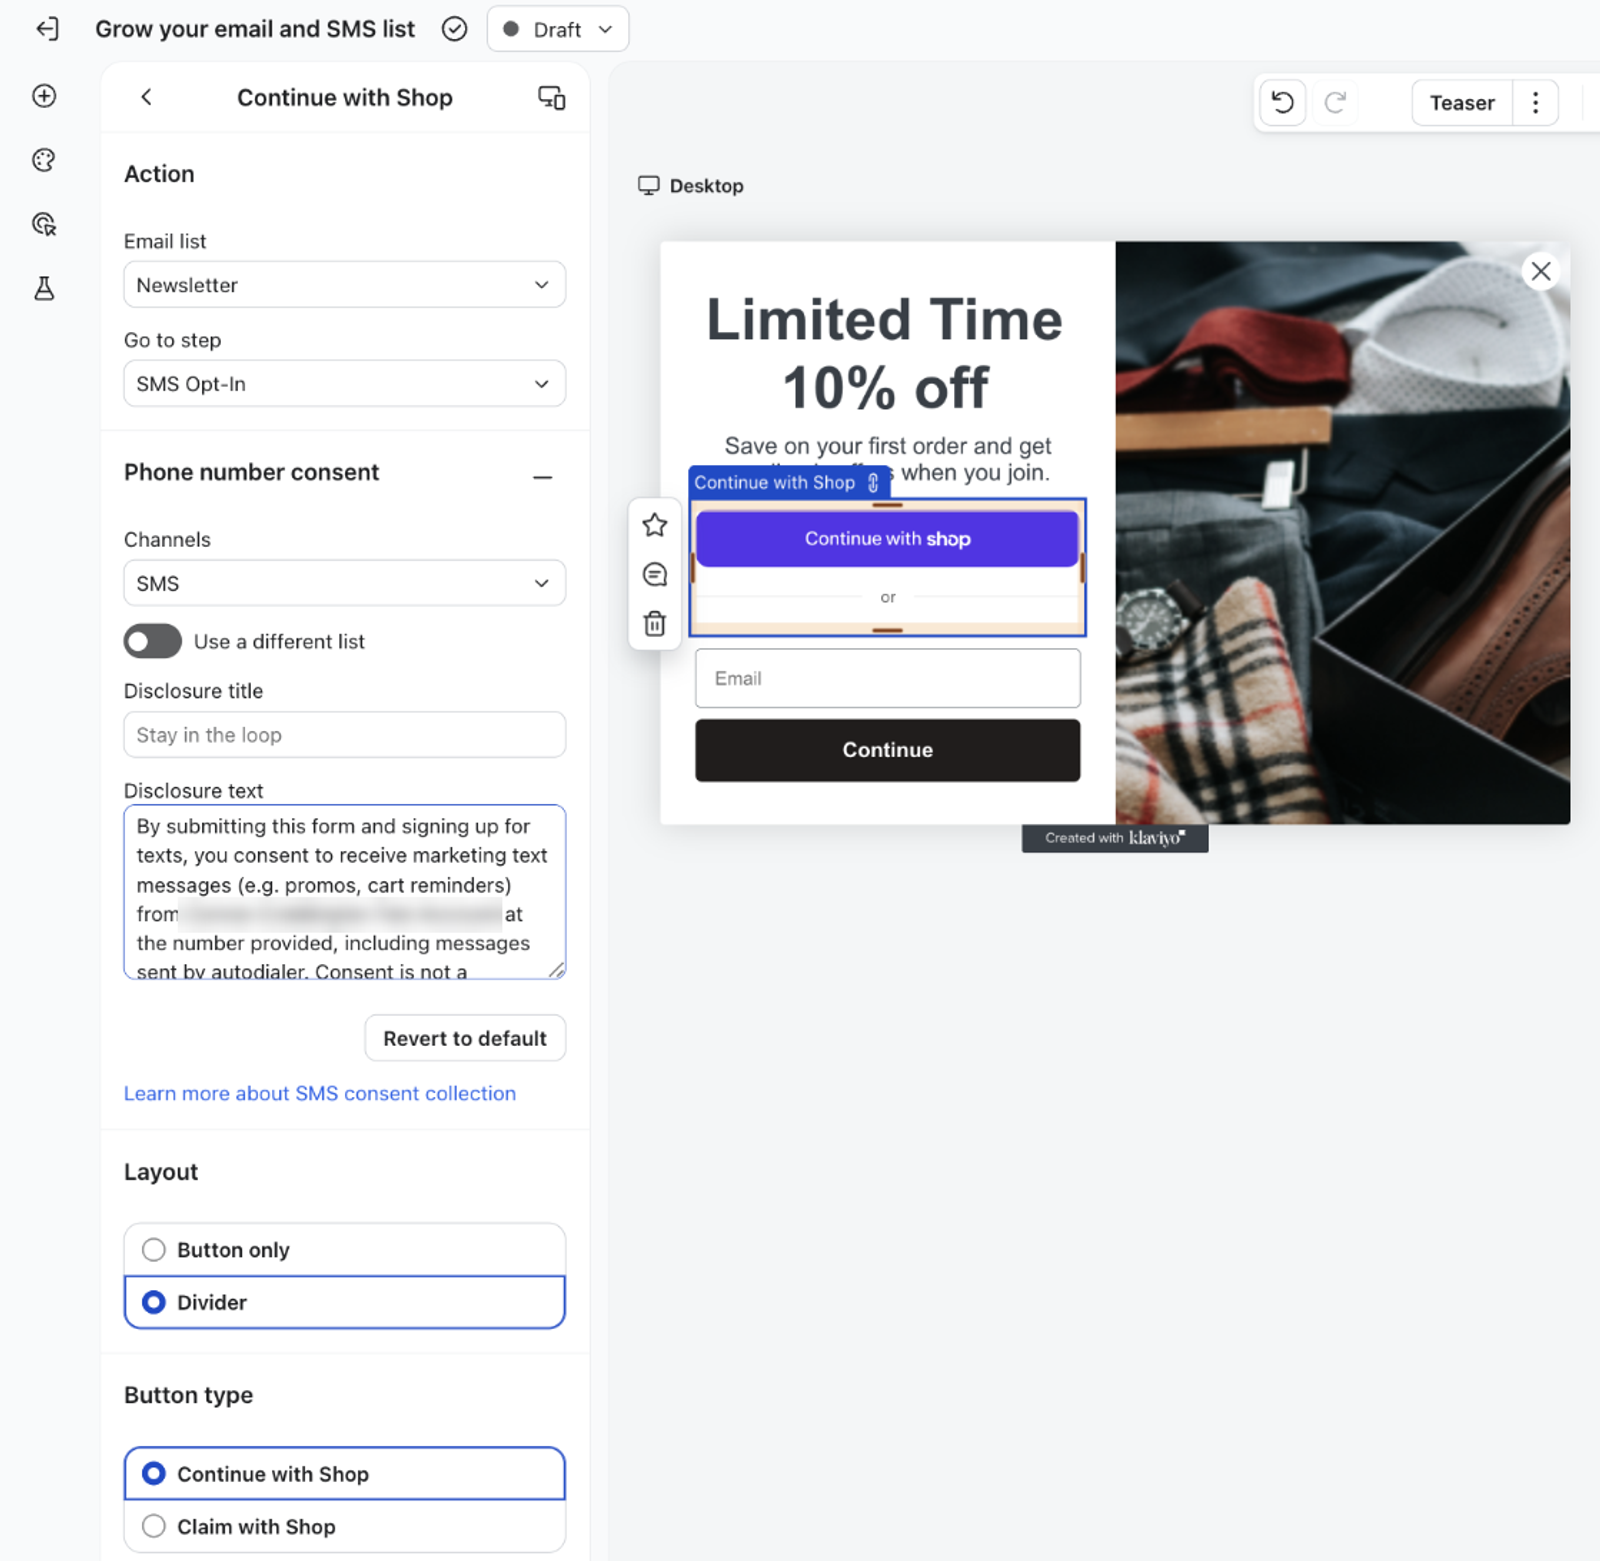
- Select the Continue with Shop block. Under Layout, choose Button only or Divider. The divider adds an “or” line below the button, which separates it from your email field when you place the block above it.
- Under Button type, choose Continue with Shop or Claim with Shop. Both options work the same way; only the button text changes. Claim with Shop is a good fit for forms that offer a discount.
- (Optional) Under Shop appearance, adjust Border radius, Base spacing, Font size, and Line height. You can also adjust the block’s padding.
If your form already uses legacy lead capture with Shop and you want shoppers to use only the new experience, open Targeting & behavior > Display and turn off Turn on lead capture under Lead capture with Shop. The Continue with Shop button follows your selected Go to step without opening the legacy modal.
Collect additional profile information
To collect a shopper’s name, birthday, or other details after Shop, include those fields on a later form step. If you also collect phone consent, put these fields on the phone number step selected in Go to step. Shoppers can enter and submit their details on that step. Continue with Shop does not fill in those fields on later steps.
To collect these details:
- Select the Continue with Shop block and set Go to step to the step that contains these fields.
- For name fields, set the text input block’s Profile property to First Name or Last Name.
Publish your form
Click Publish or schedule when you’ve finished configuring your form. Resolve any blocking form alerts, then select Publish now to make the form live. To publish later, select Schedule, set the dates and times, then click Schedule.
For an embed form, copy the embed code from Targeting & behavior > Display and add it to the page where the form should appear.
How Continue with Shop works for shoppers
Once your form is live, shoppers see the Continue with Shop button on your form.
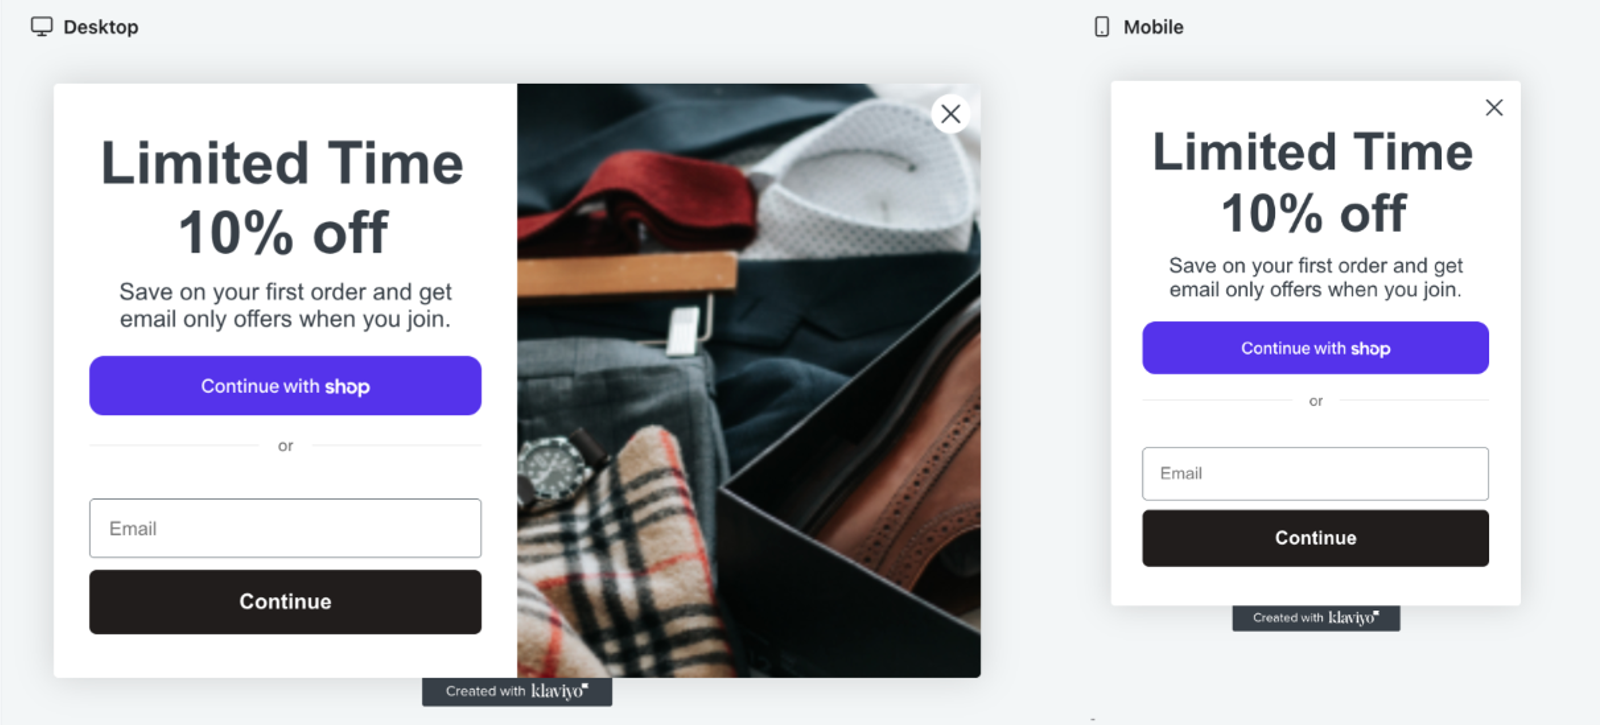
- Shoppers who are signed in to Shop on their device see a personalized Continue with Shop button.
- Other shoppers see the standard button. They can sign in to Shop, or fill out your form as usual.
- On desktop, Shop opens in a pop-up window. On mobile, Shop opens in the same tab and then returns the shopper to your form.
- In Shop, the shopper chooses whether to share their details with your brand. If they agree, Klaviyo sends an email subscription request and shows the step you chose in Go to step. If that step collects phone number consent, the shopper can complete it on your form. Your list’s opt-in confirmation requirements still apply.
- If a shopper closes Shop without finishing, they can still fill out your form as usual.
Make sure your form works on its own. If Shop can’t load on a shopper’s device, the Continue with Shop button doesn’t appear, and the shopper sees the rest of your form.
After publishing, test Continue with Shop on your website on desktop and mobile. Check that it opens the step you selected, that any extra fields and phone opt-in step work, and that you can complete the form without using Shop.
Find form submissions
Use the Form submitted by profile event to find shoppers who submitted your form. Its form_id property identifies the form, so you can use it in a segment definition. This event does not include a submission_method value that distinguishes Continue with Shop submissions from other submissions to the same form.
Set up the legacy lead capture with Shop experience
If Continue with Shop isn’t available in your account yet, you can use the legacy lead capture with Shop experience. It recognizes site visitors with Shop Pay accounts once they enter their email, saves and applies their discounts, and offers an easy SMS opt-in.
Shop Pay is an online checkout service offered by Shopify that allows 1-click checkout to improve the buying experience for your customers. Once a buyer uses Shop Pay for the first time, their information is saved for future purchases.
If Continue with Shop is available in your account, use it instead. To replace the legacy experience on an existing form, turn off Turn on lead capture under Targeting & behavior > Display > Lead capture with Shop, then add the Continue with Shop block.
Legacy requirements
You will need to activate Shop Pay on your Shopify store before you can set up lead capture on a Klaviyo sign-up form.
There are certain requirements that make a sign-up form eligible to use lead capture with Shop. Your form must:
- Be a popup or flyout form
This functionality is not available for embed or full page forms.
- Have a submit button on the first step that submits the form and continues to the next step
- Collect email consent on the first step
- If you want to collect SMS consent also, you must use a multi-step form that collects email consent on the first step, followed by SMS consent on the 2nd step. Forms collecting solely SMS consent are not eligible for lead capture.
- If you want to collect SMS consent also, you must use a multi-step form that collects email consent on the first step, followed by SMS consent on the 2nd step. Forms collecting solely SMS consent are not eligible for lead capture.
If lead capture with Shop is enabled on your form, Smart Opt-in is not supported. If you want all shoppers to go through a Smart Opt-in experience, disable lead capture with Shop.
- Include disclosure language if collecting SMS consent
- Have a coupon (static or unique) configured on the success step
Meet these requirements on both desktop and mobile versions of your form.
Enable lead capture with Shop on a sign-up form
Set up lead capture on a sign-up form:
- Select Sign-up forms in Klaviyo’s main navigation.
- Open the 3 dots menu for the form you want to edit and select Edit, or create a new form.
- Select Targeting & behavior in the left sidebar, then select the Display tab.
- Under Lead capture with Shop, turn on Turn on lead capture.
- When you turn this on, any of your form’s unfulfilled requirements for using lead capture populate under the error message. For example, the form below is missing the coupon on the success step:
To resolve this error, click Add block to configure a unique or static coupon on the success step.
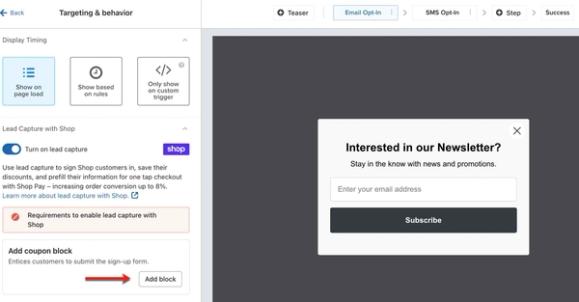
If you’re using a multi-step form that collects SMS consent, you must include disclosure language on the SMS opt-in step.
- Click on Success in the menu bar to customize the success message that appears when new subscribers submit the form.
It’s best practice to use generic language in your success step (e.g., “Hooray! Here is your coupon!”) to give subscribers a clear and consistent opt-in experience. This is because a subscriber may choose not to receive texts, so if the success message thanks them for opting into email and SMS, it could create a confusing experience for shoppers that did not give SMS consent.
- Check that all requirements are met for both desktop and mobile, and resolve any blocking form alerts before publishing.
- When you’re satisfied with your form, click Publish or schedule, then select Publish now. To publish later, select Schedule, set the dates and times, then click Schedule.
What shoppers see with the legacy experience
Once this form is live, any site visitors with Shop Pay accounts will be recognized when they submit the first step (their email address). A Shop Pay modal will appear asking them to authenticate their account.
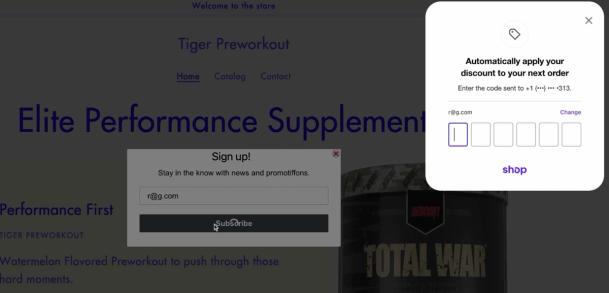
Note that shoppers who do not have Shop Pay accounts will go through the form steps as normal and the modal will not populate. Also, if your form has additional steps beyond the email and SMS step (e.g., a step asking for a shopper’s birthday), Shop Pay users who authenticate their accounts will skip these steps and only see the Shop Pay modal journey and your form’s success step.
The site visitor’s experience will differ depending on the type of form and how they choose to interact with the Shop Pay modal:
- If the shopper chooses not to authenticate their account and immediately closes the Shop Pay modal, your sign-up form will automatically show its next step, whether that is an SMS opt-in step or a success step.
- For an email-only sign-up form, if the shopper enters the code to authenticate their Shop Pay account, the modal will then show the success step with the coupon code, and will inform them that the discount will automatically apply to their next checkout.
- For a multi-step form that collects SMS consent, if the shopper enters the code to authenticate their Shop Pay account, the modal will next ask for SMS consent. The shopper’s phone number from their Shop Pay profile will be pre-filled.
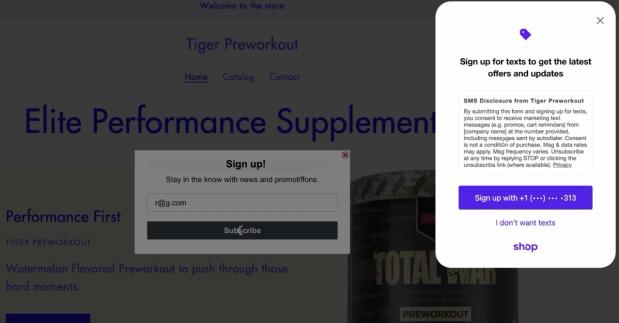
- If the shopper gives SMS consent, it will prompt them through Shop Pay’s SMS opt-in experience to confirm their SMS consent, and then show the form’s success step with the coupon that’s automatically saved to their next checkout.
- If the shopper does not give SMS consent, the Shop Pay modal will disappear and they will see the form’s success step with the coupon that’s automatically saved to their next checkout.
Now that you have lead capture with Shop set up on your sign-up form, create a personal Shop Pay account to test the different shopper experiences described above.
Additional resources
- Getting started with sign-up forms
Learn how to create and customize sign-up forms in Klaviyo to publish on your website so you can engage shoppers, collect emails and phone numbers, and build long-lasting customer relationships.
- Getting started with Shopify
Learn how to integrate Klaviyo with Shopify in order to bring your customer profile and order data into Klaviyo and reach customers with targeted messaging. Additionally, enable Klaviyo onsite tracking and sign-up forms, and sync data from Klaviyo to Shopify.
- How to add coupon codes to sign-up forms
Learn how to add static and unique coupon codes to your sign-up forms to drive higher submission and conversion rates, and encourage customers to spend more on your site.