How to add a push notification to a flow
You will learn
Learn how to use Klaviyo to send push notifications from your iOS or Android app via flows.
Sending push notifications in flows allows you to complement your email or SMS strategy. For example, you may want to send abandoned cart push notifications in addition to email reminders.
Just like in SMS and emails, you can use emojis, variables, and template tags to personalize push messages.
Before you begin
Before you can send push notifications, note that:
- You have to set up push notifications in your Klaviyo account.
- Only app users that consent to notifications will receive push notifications from you. When an app user opts in to receive notifications, they will get a push token that allows you to target them with notifications through both campaigns and flows in Klaviyo.
Note that what you can do with flows depends on how you integrate your app with Klaviyo. For instance, if you want to send messages about your app’s loyalty program, related events (e.g., reached 100 stars) must sync into Klaviyo. We recommend working with your development team or a third party to make sure the proper data and events are tracked.
Common use cases
Push notifications are often used in flows, including:
- Welcome series
- Abandoned cart and browse abandonment notifications
- Thank you flows
- Fulfillment flows (e.g., order shipped or ready for in-store pickup)
- Winback flows
- Wish list notifications
- App loyalty program messages
- Profile alerts (e.g., complete your profile)
Push notifications in flows
To use this feature:
- Navigate to the Flows tab.
- Either create a new flow or edit an existing one.
- Drag the push notification action into your flow.
- In the Content tab, select the type of push notification you want to send:
- Standard
Display a push notification on users’ lock screens. - Silent
Send a hidden notification to your user’s mobile app.
- Standard
- For both standard and silent push notifications:
- Select the Behaviors tab.
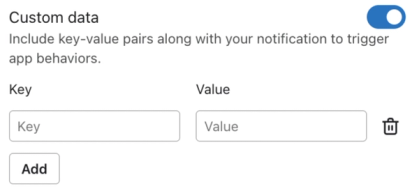
- Under Custom data, you can include key-value pairs along with your notification to trigger app behaviors from both standard and silent push notifications. You can add up to 10 key-value pairs per push. Learn about key-value pairs.
- The following push settings apply to standard push notifications:
- In the Content tab, configure your message’s title and content. The character limit for push notifications is 178 characters.
- Optional: add an image or GIF (iOS only).
- Click into the Behaviors tab to adjust the following message settings:
- Open action
Choose whether you want subscribers to go to your app's home page (open app) or to a specific page (deep link). - Show badge count (iOS)
Decide if you want the badge count to increase by 1, be set to a certain number, or be set to the value of a specific property. - Sound (iOS)
Choose if you would like subscribers to hear a sound when they receive the push notification.
- Open action
- Optional: Edit the push notification component settings:
- Skip recently messaged profiles
This setting enables Smart Sending. We recommend leaving this setting on for any high-revenue and transactional flows, and turning it off for any silent push. - Additional Filters
If you would only like certain people to receive a push notification, you can edit the additional filters to further hone your audience. Additional filters are not recommended for silent push notifications.
- Skip recently messaged profiles
- Once you're finished configuring your push notification, set it live.
Additional resources
- How to use deep links in push notifications
Learn how to use deep linking in Klaviyo push notifications so that you can direct customers to a specific in-app screen. Deep links make it easy for your profiles to access the content they want with a simple tap.
- How to send a push notification campaign
Learn how to use Klaviyo to send push notification campaigns via your iOS or Android app.
- Understanding your push notification settings
Learn about the push notifications settings page, where you can set up push notifications for your mobile app and adjust the Smart Sending window.