Understanding targeting and behavior settings for sign-up forms
You will learn
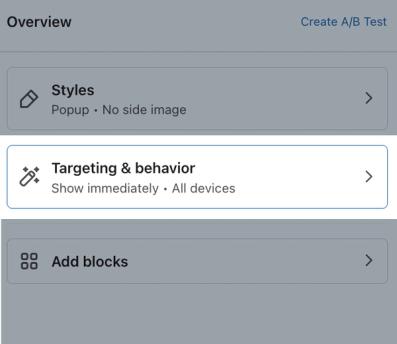
Learn about the Targeting & behavior section of the sign-up form editor, where you can control and change when a form appears on your site, and who sees it. Open the form editor for an existing sign-up form, then select Targeting & behavior to adjust the display and targeting settings covered in this guide.
Before you begin
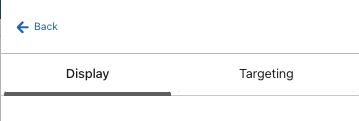
In the Targeting & behaviors tab, you can toggle between Display and Targeting menus.
On the Display menu you can edit:
- Timing
- Display Priority
- Frequency
- Devices
- Custom trigger
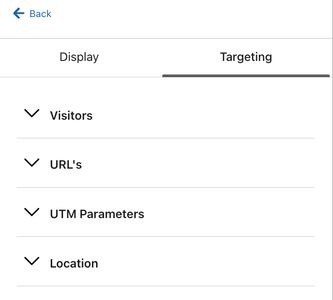
On the Targeting menu you can choose who sees your form by targeting:
- Visitors
- URL's
- UTM parameters
- Locations
This guide will walk you through each of the options in the Display menu, followed by each of the options in the Targeting menu.
Based on your Customer Privacy settings in Shopify, Klaviyo may not track onsite events (and thus, not apply certain types of form targeting) for visitors to your Shopify store in the EU, EEA, UK and Switzerland, unless they have provided consent.
Overall, if a visitor hasn’t consented, and would otherwise have been included per the targeting requirements, they will not see the form because they will not be identified. Targeting for these visitors will apply as follows:
- If you select “Don’t show to existing Klaviyo profiles,” the visitor will still see the form because they won’t be identified as an existing profile.
- If you select “Target visitors in a list or segment,” the visitor will not see the form (even if they are otherwise in the list or segment) because they will not be identified.
- If you select “Show to all visitors,” the visitor will see it.
- If you select "Show to any existing profile," "Show to email subscribers only," or "Show to SMS subscribers only," the visitor will not see the form because they will not be identified as an existing profile, email, or SMS subscriber.
- Certain custom triggers based on cookie information and user properties will not trigger due to a lack of identification.
- Targeting by location is not affected.
- Targeting to show on device type (desktop, mobile) is not affected.
Adjust a form's display options (timing, frequency, device display, etc.)
Timing
In the Timing section of the Display menu, you can choose when your sign-up form should display on your website. By default, your form will be set to show Immediately, meaning it will appear right away when someone visits the page on your website. You also have the option to show the form:
- Based on rules
Trigger your sign-up form to display based on 1 or more of the following rules:
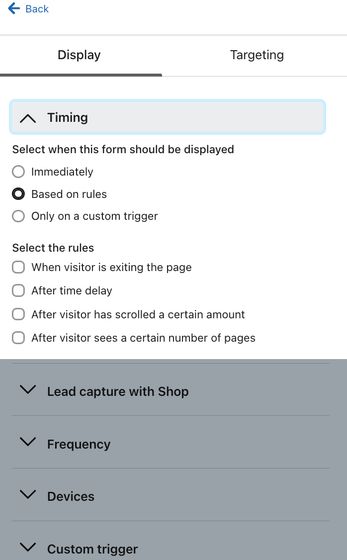
- When visitor is exiting the page
Trigger the form to display when site visitor is about to navigate away from the page. Commonly referred to as "exit intent forms," the form will appear when someone mouses above the viewport on desktop, hovers on the either side of a page, or scrolls quickly upward on a mobile device. - After a time delay
Trigger the form to display after a certain time delay. You can input the number of seconds someone must be on the page before the form loads. As a general rule, visitors usually do not spend more than a few seconds on each page. If your message is crucial, display the form immediately or after 1 or 2 seconds. - After visitor has scrolled a certain amount
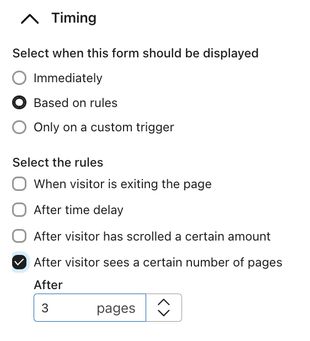
Trigger the form to display after a visitor has scrolled to a certain point on the page; 0% is the top of the webpage, whereas 100% is the bottom. - After visitor sees a certain amount of pages
Trigger the form to display after a visitor has seen a certain amount of pages on your site. For example, if you input 3 pages, the form will display when a visitor views 3 unique pages on your website, such as 3 different product pages.
Showing a sign-up form After a visitor sees a certain amount of pages will keep count per browser session. If someone views 2 unique pages on your site, closes your site, and then opens your site again in a new window, their page count will start again at 1. Similarly, if a visitor views the same product page twice, it will count as 1 unique page viewed. Unique pages are determined by URL, and query parameters and fragments are ignored in the count.
A switch will appear beneath the time delay options allowing you to Show only when all of the selected rules are met. If you choose multiple delays, all must be satisfied in order for the form to appear. For example, if you select exit intent and set the form to display after someone scrolls midway through the page, a visitor needs to complete both actions (scrolling halfway down the page, then showing exit intent) in order for the form to appear.
- Only on a custom trigger
Trigger the form to display based on any condition, such as a button click or in your own code. See how to trigger a sign-up form to appear when a button is clicked for more details. These settings are available for popup, flyout and full page forms; embedded forms will always appear immediately upon page load.
Beneath Timing, Shopify users will see an option to enable lead capture. For more information, head to our guide on setting up lead capture with Shop.
Display priority
Use display priority to control which sign-up form appears first when multiple eligible forms could display at the same time. Klaviyo compares queued forms by priority and shows the highest-priority form first.
Display priority is most useful when you have overlapping forms, such as a generic welcome form and a more specific promotion, SMS, or UTM-targeted form that can qualify on the same page.
You can choose from 4 priority levels:
- Low
- Medium (default)
- High
- Highest
Use Low for forms that should appear after other eligible forms, Medium for standard behavior, High for forms that should appear before Medium and Low forms, and Highest for forms that should appear before all other eligible forms. If multiple forms share the same priority, the order is not guaranteed.
Embedded forms are part of the page and always appear immediately on page load, so display priority is most relevant when multiple popup, flyout, or full page forms could appear for the same visitor.
Frequency
In the Frequency section of the Display menu, you can determine how often your sign-up form should appear for each site visitor. You can edit display frequency for popup, flyout, or full page forms. Embed forms will always show as they are a part of your site page.
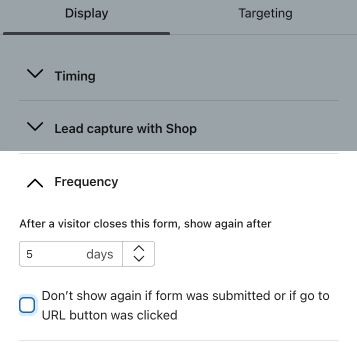
- After a visitor closes this form, show again after __ day(s)
Use this setting to determine how often a visitor who has closed the form should see it.- Set this option to 0 days to show the form on every visit.
- Choose a longer timeframe (e.g., 5 days) to limit the form from appearing too often.
- Don't show again if a form was submitted or a URL button was clicked
Use this setting to determine if a visitor will see the form again after completing it.- Check the box if you want a form to never appear again after someone fills it out.
- If you’d like the same visitor to have the opportunity to fill a form out more than once, leave this option unchecked.
These settings rely on Klaviyo’s cookie, so if a visitor clears their cookies or uses an incognito browser, the form may reappear the next time they visit your site.
Devices
In the Devices section of the Display menu, you can choose whether you want your sign-up form to display to visitors browsing on desktops, mobile devices, or both.
The Devices setting will be disabled for sign-up forms that include a tap-to-text button (a button with its Action set to Subscribe via SMS), because they will automatically only display on mobile devices.
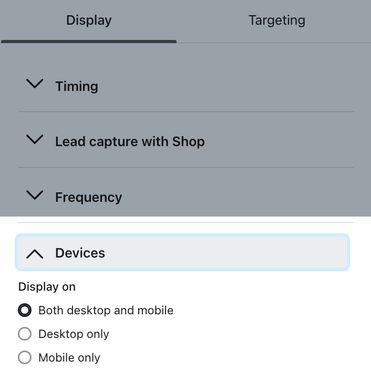
- Both desktop and mobile
Sign-up form set to show on both devices will display for all shoppers, regardless of the device they are browsing on. - Desktop only
Sign-up forms set to display on desktop will not appear for shoppers on mobile devices. A form set to appear on desktops will also appear on tablets. - Mobile only
Sign-up forms set to display on mobile will not appear for shoppers on desktop devices.
You can also choose visibility settings for each block and field in your sign-up form (e.g., set an image block to only be visible on desktop devices, but not when it appears mobile devices). Learn more about dynamic blocks in sign-up forms.
Click outside form to close
Popup, flyout, and full page sign-up forms all have a dismissal icon (X button) automatically added in the top right corner. Viewers must click the X button to close the sign-up form; however, if you're using a popup form type, you can also choose to allow viewers to close the form by clicking the area outside the form.
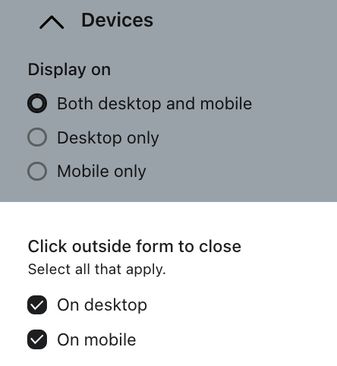
- On desktop
Check this option to allow viewers on desktop to close the form by clicking the area outside the form, in addition to the X button. - On mobile
Check this option to allow viewers on mobile to close the sign-up form by clicking the area outside the form, in addition to the X button.
If both options are checked off, a user can click outside the form to close it on both devices.
Embedded forms cannot be dismissed, and flyout and full page forms can only be dismissed by clicking a close button or filling out the form.
Adjust a form's targeting settings (by visitor, URL, UTM, cart contents, etc.)
In the Targeting & behaviors section of the form editor, toggle to the Targeting menu. From here you can further target your sign-up forms to give browsers a personalized experience based on their profile data within Klaviyo. You can choose from multiple targeting options (i.e., target by visitor, by URL, by UTM, or by location) to display only to certain people.
Targeting by visitor
In the Visitors section of the Targeting menu, you can choose to display your sign-up form only to visitors who meet certain criteria. Note that a form will only display for a visitor when all criteria are met, including your elected Device and Timing settings. Visitor targeting relies on Klaviyo’s cookie, and a visitor who has recently cleared their cookies, is using a new device, or visits your site with an incognito browser will be treated as a new, anonymous visitor.
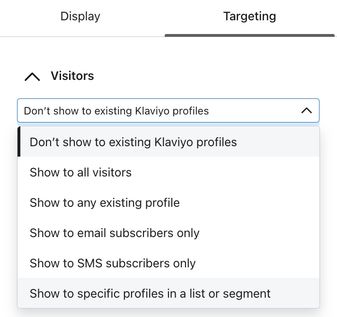
- Don't show to existing Klaviyo profiles
The form will only appear to visitors who are unknown to Klaviyo. - Show to all visitors
The form will appear for all site visitors. - Show to any existing profile
The form will appear to anyone with an existing profile in your Klaviyo account (meaning anyone with an active profile will qualify to see the form, regardless of if they have opted in). - Show to email subscribers only
The form will appear to email subscribers that haven't signed up for your SMS marketing yet. - Show to SMS subscribers only
The form will appear to SMS subscribers that haven't signed up for your email marketing yet. - Show to specific profiles in a list or segment
- Include these lists and segments
The form will appear to cookied visitors who are members of any of the lists or segments you select. - Exclude these lists and segments
The form will only appear to visitors who are not known to be members of any of the lists or segments you select, including both anonymous visitors and visitors who are cookied, but not known to be a member of any of the selected groups.
- Include these lists and segments
Whenever someone joins or is removed from a segment or list, those changes will be automatically reflected by your sign-up form’s targeting. Head to our article on Understanding how segments update for more information.
Targeting by URL
In the URL's section of the Targeting menu, you can configure which URLs a form does and does not appear on.
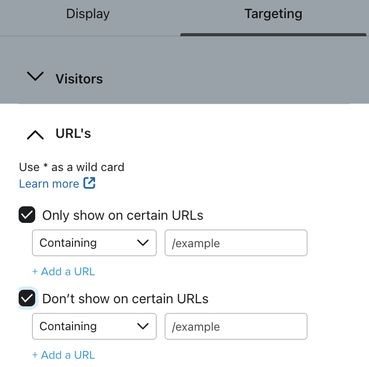
- Only show on certain URLs
Check this option to select a specific URL(s) that the sign-up form will display on. - Don’t show on certain URLs
Check this option to choose the URL(s) where the sign-up form should be hidden.
While Klaviyo supports URL targeting for sign-up forms in Single Page Applications (SPAs), please note that the Don't show on certain URLs option is not currently supported for SPAs.
You can toggle between Containing or Exactly Matching for each setting.
- Containing
This option includes any URL with part of the value you input. For example, if you input "Containing www.klaviyo.com/," this will include www.klaviyo.com/blog, www.klaviyo.com/features, and so on. - Exactly Matching
This option means that you can target 1 specific URL. For example, "https://help.klaviyo.com/The-Signup-Form-Editor" will include only that exact URL, and will not include "https://help.klaviyo.com/The-Template-Editor".
If you select Exactly Matching, be sure to include the correct protocol (e.g., http:// or https://) at the beginning of your URL.
An asterisk (*) can be used as a wildcard in your URLs. For example, if you'd like a sign-up form to appear on both "help.klaviyo.com/The-Signup-Form-Builder" and "help.klaviyo.com/The-Template-Builder", set the form to appear on URLs containing "help.klaviyo.com/The-*-Builder".
Targeting by UTM parameters
In the UTM Parameters section of the Targeting menu, you can target customers based on UTM values added to a URL (e.g., only showing a sign-up form to shoppers coming to your website from Facebook). UTM parameters can help you provide your target audience with unique offers or promised content from the original ad.
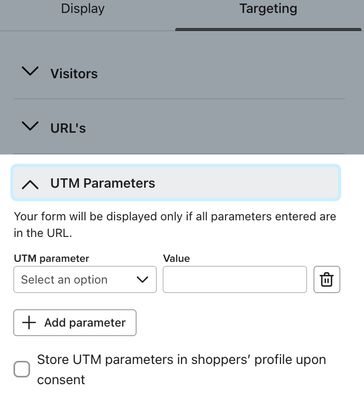
Select a UTM parameter option, then enter a Value in the corresponding text box. Keep in mind that spaces are not valid in URLs, so you will need to use an underscore where necessary in the Value field. You can add multiple parameters by clicking Add parameter.
Klaviyo uses AND logic for targeting with each UTM parameter you add (not OR logic). For example, if you add Source and Medium parameters, only shoppers coming to your site from a URL that contains both UTM_source and UTM_medium will see the sign-up form. The form will not show to shoppers coming from a URL that contains only one or the other.
Klaviyo supports the following UTM parameters, and the ability to add multiple:
- Source
- Medium
- Campaign
- Term
- ID
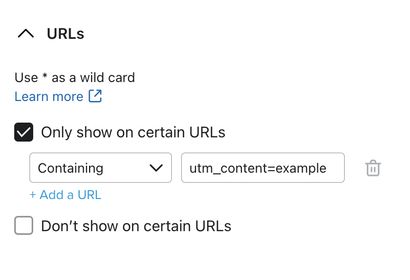
Alternatively, you can use URL targeting based on UTM parameters. To set this up, select Only show on certain URLs option and enter a URL that includes your UTM parameter. For instance, if you want to target based on the utm_content parameter, choose Only show on certain URLs > Containing, and then input your parameter (e.g., "utm_content=example").
You also have the option to Store UTM parameters in shoppers’ profile upon consent. By enabling this, Klaviyo will store the UTM parameters from the source a shopper came from as a custom property on their Klaviyo profile. This allows you to see where a subscriber originated from, so that you can use this information for segmentation in your future campaigns and flows.
If you have a sign-up form targeted based on UTM parameters, and a second form set to always show immediately to visitors, both forms may be eligible at the same time. In that case, Klaviyo will show the higher-priority eligible form first.
To make sure the UTM-targeted form appears as intended, either:
- set the UTM-targeted form to a higher display priority than the more general form, or
- add a targeting restriction on the general form so that it does not show on URLs with the UTM parameter.
If both forms use the same priority, the winner is chosen based on form ID, so use different priority levels when one form should reliably override another.
Targeting by location
In the Location section of the Targeting menu, you can choose to show or not show a sign-up form to visitors based on their location.
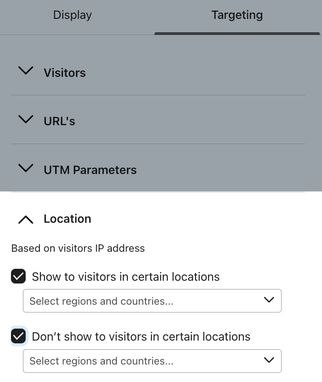
- Show to visitors in certain locations
The sign-up form will show to site visitors whose location is identified in the specified location(s). - Don't show to visitors in certain locations
The sign-up form will not show to visitors whose location is identified in the specified location(s).
Klaviyo uses each site visitor's IP address to determine whether they meet the criteria. This is helpful if you sell in certain countries and want to show language-specific forms to customers based on where they're located. This may be useful if, for example, you want to include specific data protection language for people in the EU, but do not want browsers in another region to see the same information.
Targeting by cart contents
In the Cart contents section of the Targeting menu, you can choose to trigger a sign-up form based on a shopper's cart attributes (e.g., total cart value, total number of items in cart, or specific product criteria). For more specific instructions head our guide on triggering a sign-up form based on cart contents.
Targeting by cart contents is currently available for Shopify users only. .

Sample behaviors & targeting settings
If you use more than one sign-up form that can qualify for the same visitor at the same time, set display priority intentionally so your most important form appears first.
Welcome sign-up form
To create a sign-up form for site visitors who are not yet subscribers, start with the following settings in the Targeting and behaviors section:
- Under Display:
- Timing: Immediately
- Frequency:
- Show again 90 days after closing
- Don't show again if form was submitted or if go to URL button was clicked
- Devices: Both desktop and mobile
- Timing: Immediately
- Under Targeting:
- Visitors: Don’t show to existing Klaviyo profiles
Welcome sign-up form with offer
To create a sign-up form for engaged visitors that includes an incentive, like a 15% off coupon, add and design teaser that's set to show before displaying form and after form is closed.
Next, set the following settings in the Targeting & behaviors section:
- Under Display:
- Timing: Based on rules
- After a time delay > Show again after 15 seconds
- After a visitor has scrolled a certain amount > 30% Scroll distance
- Frequency:
- Show again 90 days after closing
- Don't show again if form was submitted or if go to URL button was clicked
- Devices: Both Desktop and Mobile
- Timing: Based on rules
- Under Targeting:
- Visitors: Don’t show to existing Klaviyo profiles
Exit intent form: subscribe before you leave
To create an exit intent form that encourages visitors to subscribe before they leave your site, start with the following settings in the Targeting & behaviors section:
- Under Display:
- Timing: Based on rules > When visitor is exiting the page
- Frequency:
- Don't show again after submit form or go to URL action
- Show again 30 days after closing
- Devices: Both Desktop and Mobile
- Under Targeting:
- Visitors: Don’t show to existing profiles
SMS form for email subscribers
To show your email subscribers a form encouraging them to share their phone number and subscribe to your SMS updates, start with the following settings in the Targeting & behaviors section:
- Under Display:
- Timing: Based on rules > Show 3 seconds after page load
- Frequency:
- Show again 90 days after closing
- Don't show again after submit form or go to URL action
- Devices: Both Desktop and Mobile
- Under Targeting
- Visitors: Show to email subscribers only
Next steps
Once you’ve published a sign-up form, build a welcome series to deliver your form’s offer (e.g., a discount or free shipping on their first order) and introduce new subscribers to your brand.
Additional resources
- How to view sign-up form responses
Learn how sign-up form responses are stored in Klaviyo, where to access a person’s form responses, and how to export a CSV of these responses from a group of profiles.
- Understanding sign-up form analytics
Learn how to analyze your sign-up forms' performance so you can iterate and optimize based on knowledge of areas you excel in and areas where you can improve. This guide will help you gain a better understanding of your sign-up form analytics and each of the available reporting pages (i.e., Overview tab and A/B test results tab).
- Klaviyo practitioner certificate
- Creating an effective acquisition strategy using signup forms