How to choose your upgrade preference
You must:
- Be an Owner or Admin.
- Have Billing Permissions in your user role.
- Have a Profile & Email, Mobile Messaging, Helpdesk, or Customer Agent plan.
You will learn
Find out how to change to a different billing upgrade preference for messages: automatically upgrade, use flexible sending, or none (to manually upgrade).
About the billing upgrade preferences
Your billing upgrade preferences decide what happens when you reach your plan’s messaging limits for Email, Mobile Messaging, Helpdesk or Customer Agent. These preferences:
- Don’t upgrade based on your profile count, as Klaviyo does that automatically when your billing cycle renews.
- Aren’t available for other plan types (e.g., Reviews).
There are 3 options for what happens when you reach your messaging limits. You can:
- Use flexible overages
Provides additional usage from the next plan tier for a one-time fee. This option keeps you at your current plan tier. - Automatically upgrade (also called auto-upgrade)
Upgrades you to the next plan tier when you reach your plan’s email, mobile message, helpdesk ticket or customer agent conversation limit.- When you first purchase a subscription for the Profile & Email plan or the Mobile Messaging plan, auto-upgrade is toggled on by default.
- When your purchase a subscription for the Helpdesk plan or Customer Agent plan, flexible overages are toggled on by default.
- None
Stops all sending until you upgrade, flex, or the billing cycle renews. This option is not available for all plans.
Regardless of which option you choose, Klaviyo sends several notifications to the Owner when an account approaches the limits of a plan (e.g., when they reach the 75% and 90% marks). That way, you are not surprised when your account stops sending, flexes, or upgrades automatically.
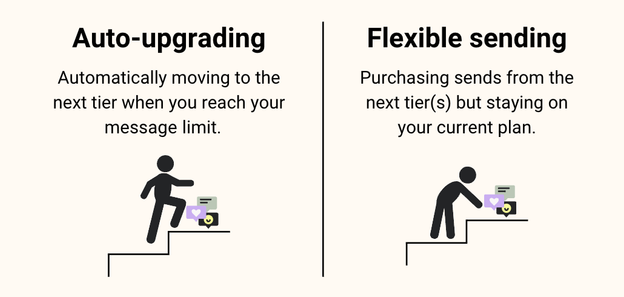
Flexible overages vs. auto-upgrade
Both flexible overages and automatically upgrading are a way to keep sending without being interrupted. The key difference is how: whether you stay on your current plan or move up a tier.
Flexing is a 1-time fee for all of the messages at the next tier at your current unit rate (that is, the cost per message). You can flex multiple times in a single billing cycle (e.g., buy messages from 1, 2, or even 3 times), but the plan you’re on does not actually change. Additionally, you can auto-downgrade based on profiles if you’re using flexible overages.
On the other hand, auto-upgrade moves you up a tier to a new plan, which you stay on until you downgrade. When you auto-upgrade, you are charged the difference between your current plan and the new plan.
Who is flexible overage best for?
Flexible overage is best for people who occasionally need extra usage during the year and who want to go back to their original plan once these times are over. It is not meant for those who are growing consistently and frequently need more email, message, ticket, or conversation volume consistently throughout the year.
When to upgrade vs. flex plans
Flexing is typically more expensive than upgrading. When you flex plans, you are buying all of the profiles, sends, or credits of the next tier at the cost per message of your current tier. If you are frequently flexing plans, it can be more cost effective to upgrade.
Flexing is better if you don’t consistently exceed your plan’s limits. It’s also good for anyone who doesn’t want to worry about remembering to downgrade.
Will I be auto-downgraded?
The only time you may be auto-downgraded is if you turn on the option to auto-downgrade based on profile count. This feature will downgrade your plan if your profile count is less than the number of profiles in a lower-tiered plan.
The downgrade occurs 24 hours before the end of your billing cycle. If you reduce your profile count less than 24 hours before the billing cycle resets, your plan will not be auto-downgraded.
You will not be auto-downgrade if using auto-upgrade or based on the number of messages you send.
Downgrading always takes effect the following billing cycle. You will finish out your current month's plan before your plan changes. Thus, we do not refund downgrades, as stated in our terms of service.
What happens if a credit card payment fails?
If a credit card payment fails, auto-upgrade and flex sending will be disabled. In order to enable either of these options again, please correct your payment. Then, contact us in order to re-enable your billing preference.
Auto-downgrade based on profiles
This automatically downgrades your plan if your active profile count qualifies for a lower plan 24 hours before your billing cycle ends. (Auto-downgrade does not occur if you decrease your active profile count less than 24 hours before your billing cycle resets.) The downgrade goes into effect for the next billing cycle.
Auto-downgrade is only available for the Profiles & Email plan (i.e., you cannot auto-downgrade based on message sends. Additionally, auto-downgrade can be used with flexible sending but not with auto-upgrade.
You can choose to auto-downgrade your Profiles and Email plan in Klaviyo’s billing preferences page.
Change your billing upgrade preferences
There are several ways you can change your billing update preferences, including at checkout in Klaviyo or from within an email and in-app notifications.
However, the simplest approach is through the Billing Preferences page:
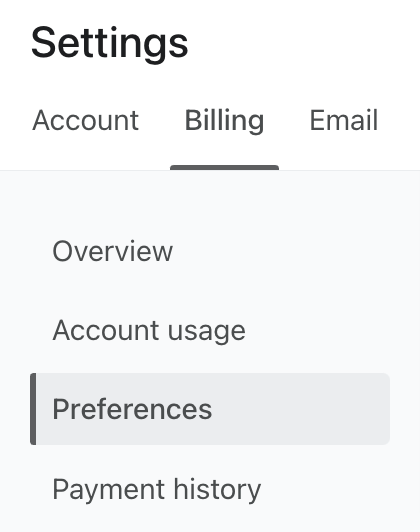
- Select your account name in the lower left.
- Go to Billing > Preferences.
- Find the plan you want to change options for (e.g., email, SMS, etc.).
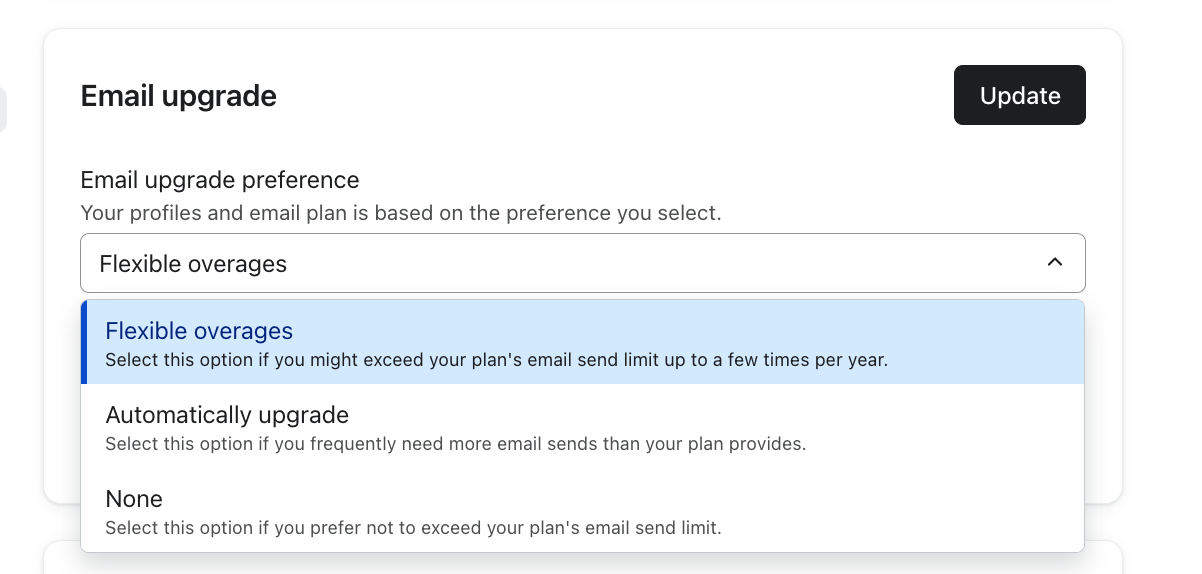
- Open the dropdown.
- Select one of the following options to change what happens when that plan type reaches its plan limits:
- None to stop sending or manually upgrade.
- Automatically upgrade to enable auto-upgrade.
- Flexible overages to flex plans.
- Note the cost associated with upgrading or flexible sending.
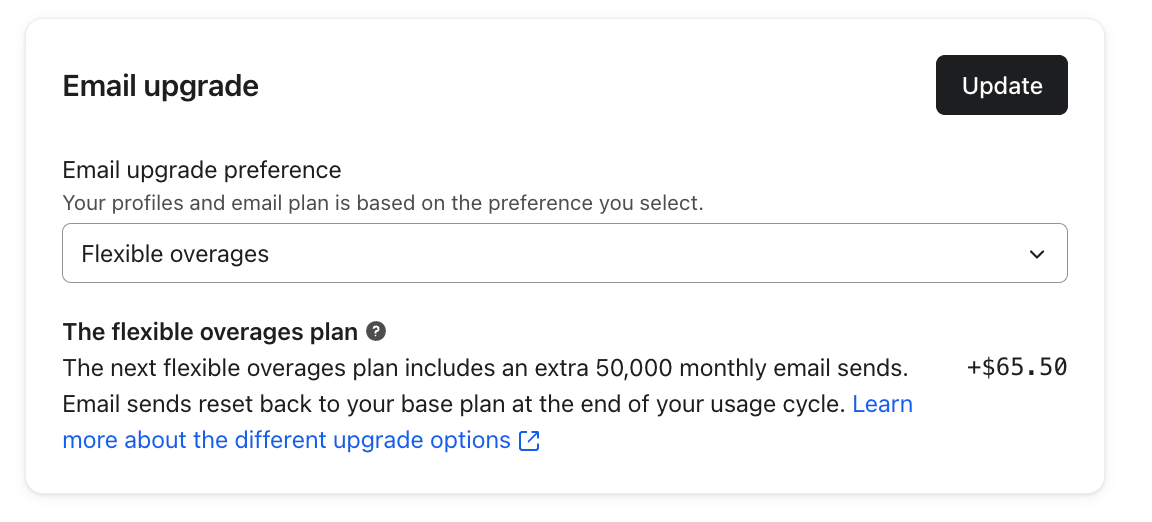
- Click Update to save.
Once you save this setting, it takes effect immediately. For instance, if you choose flexible sending and 1 day later you reach the limits of your plan, you will flex plans at that time.
Additional resources
- How to add or change a plan in Klaviyo
Learn how to manually upgrade or downgrade your Klaviyo billing plan.
- How Klaviyo billing works
Learn how Klaviyo bills customers for Profiles and Emails, Mobile Messaging, Reviews, Advanced Klaviyo Data Platform (formerly “CDP”), Marketing Analytics, Customer Hub, Helpdesk, and Customer Agent.
- How to update your credit card information
Learn how to update the credit card information associated with your account. Note that Klaviyo does not support multiple credit cards in a single account.