How to automatically forward support emails to Klaviyo Helpdesk
Learn how to forward customer emails to Klaviyo Helpdesk to manage support in one central place. You can set up automatic email forwarding to direct any emails sent to your customer support address to Helpdesk, allowing you to handle email support through Klaviyo.
Before you begin
- Ensure you have admin access to your email provider and domain settings. Invite your admin to Klaviyo if you need help configuring forwarding.
How email forwarding works
Adding email support to Klaviyo Helpdesk allows you to manage customer emails alongside other support channels. After you set up email forwarding, any message sent to your support address (for example, support@yourcompany.com) is delivered directly to your Klaviyo Helpdesk.
Each inbound email appears as a new ticket in Klaviyo Helpdesk. You and your team can view, assign, and reply to tickets from within Klaviyo. All replies are sent to your customer’s email, supporting two-way communication.
Set up automatic email forwarding
You can forward multiple email addresses into Klaviyo Helpdesk. Repeat these steps for each address you want to add.
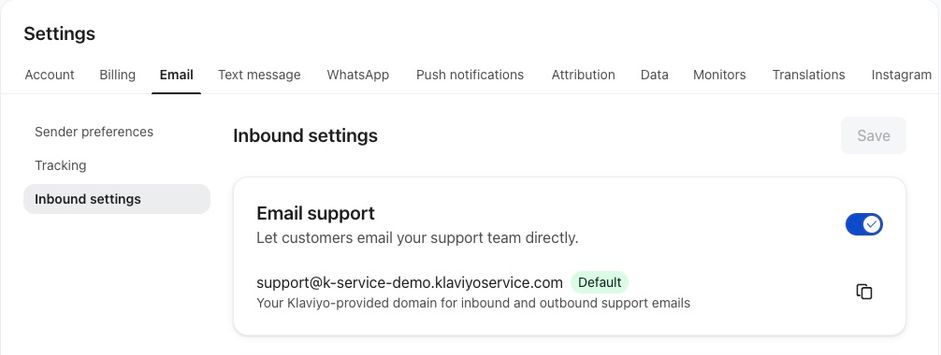
- In Klaviyo, go to your account icon in the bottom left corner and click Settings > Email > Inbound settings or click here.
- Under Email support, toggle the setting On. You’ll see an auto-generated Workspace email address. Emails forwarded here will create tickets in your Helpdesk.
- Click Add email address.
- Enter your support email address (e.g., support@yourcompany.com) and click Next.
- In the Forward your emails step, copy your workspace email address. This is the same address shown earlier.
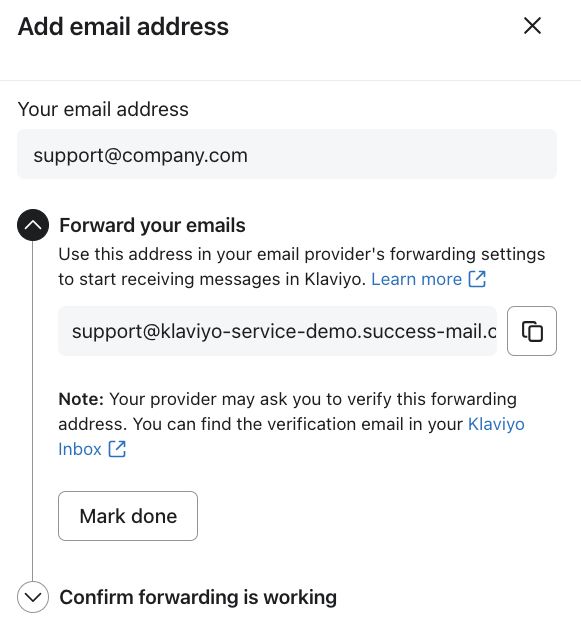
- Set up forwarding from your support email to the workspace email address in your email provider’s settings. Note that this setup will vary depending on your provider. See your provider’s documentation for exact steps:
Setting up Gmail differs significantly from setting up Google Workspace. If you're unsure which one you have, check if you have an administrator; if so, it's Google Workspace.
If you are using Outlook you need to ensure that the 'Enable external forwarding' switch is enabled. If you are unsure whether it's enabled or disabled, connect with your IT team to enable it.
Your provider may ask you to verify the forwarding address. Look for a verification email in your Klaviyo Helpdesk, usually under the Unassigned tab.
- After completing the verification, go back to Klaviyo and click Mark done on the Add email address menu.
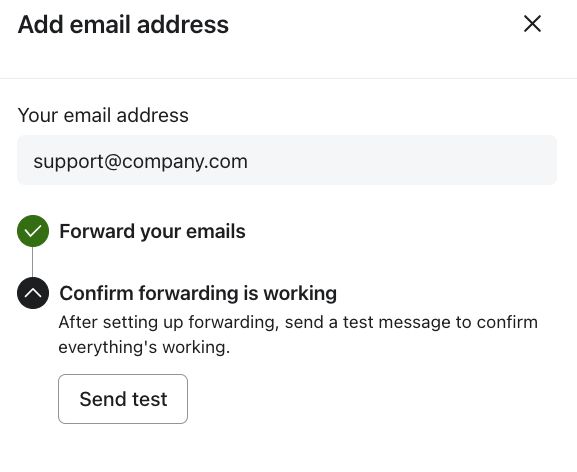
- Click Send test. This prompts Klaviyo to send a test email to confirm your setup. When forwarding is active, you’ll see a success message. This may take a minute to load.
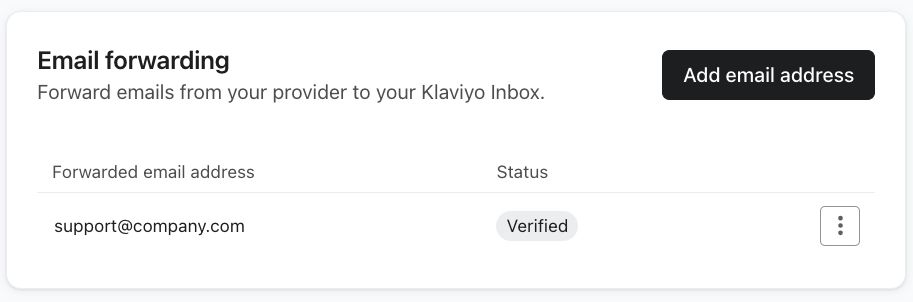
- Click Finish setup. Once confirmed, the email you just added will display in the Email forwarding section.
Test your forwarding address
Now that your email forwarding connection is set up, send a test email to your support address and confirm it appears in your Klaviyo Helpdesk.
- If the test email does not appear, ensure your address is marked as Verified in the forwarding table and that setup is complete.
- If you still don’t receive forwarded emails, double-check your forwarding settings in your email provider and review your email provider’s documentation.
Managing email support tickets in Klaviyo’s Helpdesk
After you set up email forwarding, all emails sent to your support address will appear as tickets in the Klaviyo Helpdesk.
Your support team can:
- Click any ticket to see the full email conversation and any attachments from the customer.
- If the sender’s email matches an existing profile in Klaviyo, their profile details and communication history are visible in the sidebar.
- If there is no match, a new profile is automatically created.
- Reply directly from Klaviyo Helpdesk; your response is sent to the customer’s email address.
- Manage all follow-up messages in the same ticket thread until the ticket is closed, either by a team member or automatically.
Support emails sent via Helpdesk do not affect marketing email deliverability and are not included in your marketing email billing. Learn more about Klaviyo Helpdesk.
Troubleshooting
Symptom: My forwarded support email was marked as failed even though I followed the documentation
Likely Cause: Enterprise emails providers often disable forwarding to external recipients by default for security purposes.
Fix: You’ll need to reach out to your IT admin to enable forwarding to external recipients.
Symptom: My forwarded support emails are not appearing in Helpdesk, or my test emails fail.
Likely cause: The emails are being manually forwarded (i.e., a team member clicks "Forward" in their inbox). Manually forwarded emails lack the original headers that Klaviyo Helpdesk requires to identify the customer. These emails will be dropped and will not create a ticket.
Fix: You must set up automatic, server-side forwarding from your support inbox to your Klaviyo workspace email. Instruct your team not to manually forward messages into the helpdesk; instead, have them manage all tickets from within the Klaviyo Helpdesk UI.
Symptom: Tickets are being created, but the "customer" is one of my own company's email addresses (e.g., info@mybrand.com) instead of the actual customer.
Likely cause: You are using chained or nested forwarding. For example, customers email info@mybrand.com, which then forwards to help@mybrand.com, which then forwards to your Klaviyo workspace address. In this case, Helpdesk may incorrectly identify the intermediate address (info@mybrand.com) as the original sender.
Fix: Configure your email provider to forward messages directly from the first inbox your customers contact (e.g., info@mybrand.com) to your Klaviyo Helpdesk workspace email. Remove any intermediate forwarding steps.
Additional resources
- How to assign tickets in your Klaviyo Helpdesk
Learn how to assign tickets within your Klaviyo Helpdesk to efficiently manage customer inquiries and delegate responsibilities among your support team. By understanding views in Helpdesk and assignment actions, you can ensure efficient, organized customer support operations.
- How to create and use macros for Helpdesk tickets
Find out how to create and use macros (previously called “quick responses”) in tickets in Klaviyo Helpdesk. Macros are pre-written, reusable responses your support agents can insert into replies for SMS and web chat tickets.
- Getting started with web chat
Learn about web chat, which is a 2-way communication channel you can add to your website. Web chat can be set up on its own for you to use with Customer Agent and Helpdesk, but it's also designed to be a seamless part of Customer Hub. Web chat allows your business to engage in live, personalized conversations with visitors on your website so they can easily get answers to their questions or assistance with issues.