How to integrate with Salesforce CRM
You will learn
Learn how to integrate Salesforce CRM with Klaviyo. This integration makes it easy to connect your Salesforce account, choose which objects to sync, and map fields—all through a guided, in-app setup flow.
With this integration, Klaviyo can automatically sync Salesforce data (such as Leads or Contacts) into Klaviyo profiles, allowing you to personalize messaging and segment customers using CRM data.
Before you begin
Before you start, make sure that:
- You are logged in to your Salesforce account.
- If your business has multiple Salesforce organizations, you are logged in to the correct organization.
- You have admin access to your Salesforce account.
Connect Salesforce to Klaviyo
- Login to Klaviyo. Then, select the Integrations tab.
- Click Explore apps to open the Klaviyo App Marketplace. Search for and open the Salesforce app listing. Then, click Install.
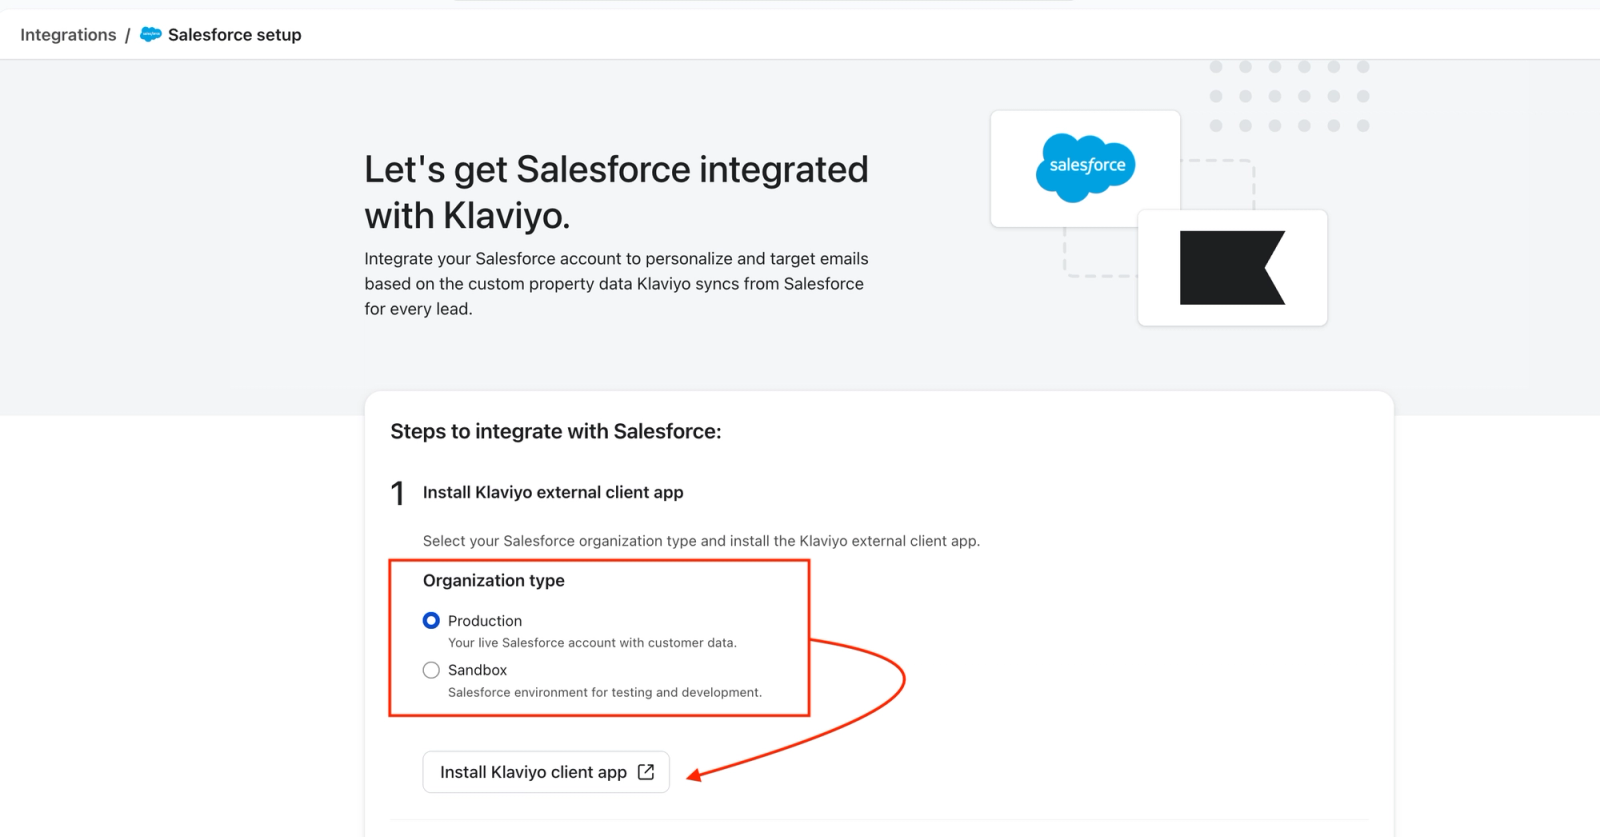
- You will be redirected into the Salesforce integration setup flow. For step 1, select whether you are connecting to a Production or Sandbox Salesforce organization, then click Install Klaviyo Client app.
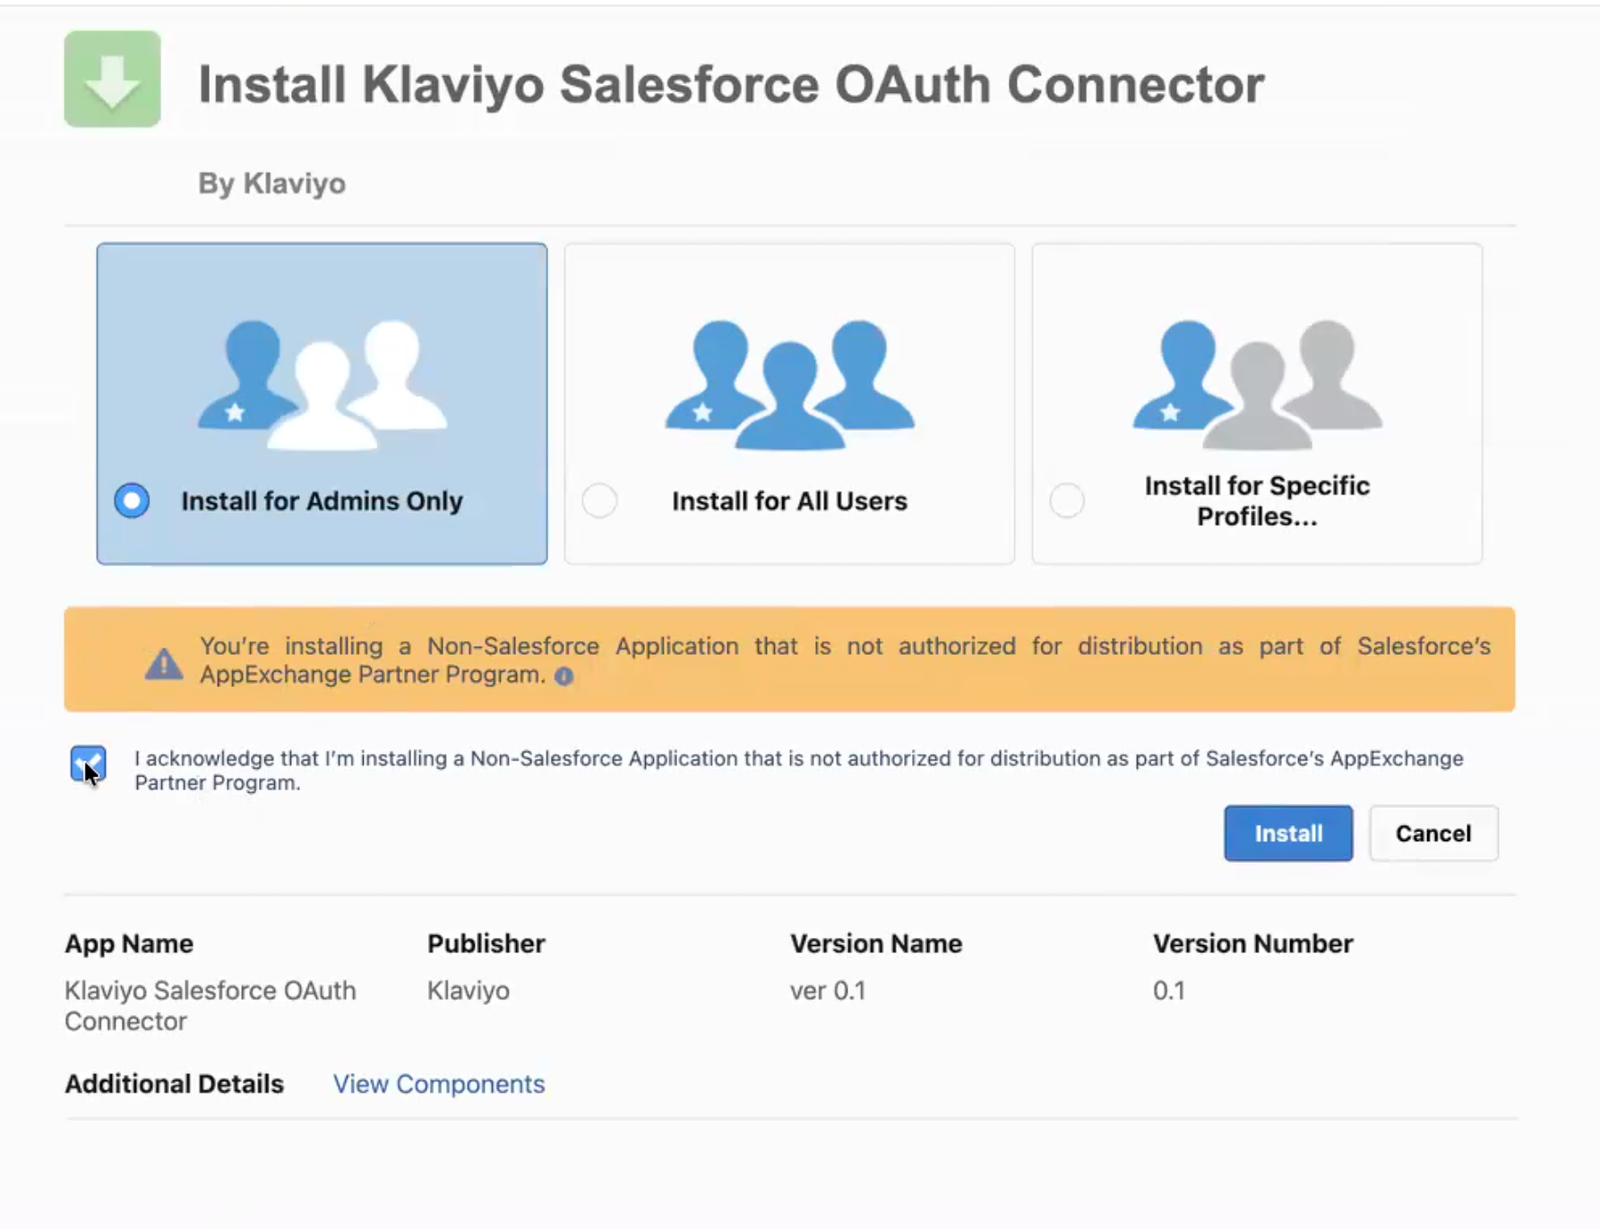
- In Salesforce, follow the installation wizard to acknowledge and install the “Klaviyo Salesforce OAuth Connector” package in the Salesforce organization you are connecting to Klaviyo.
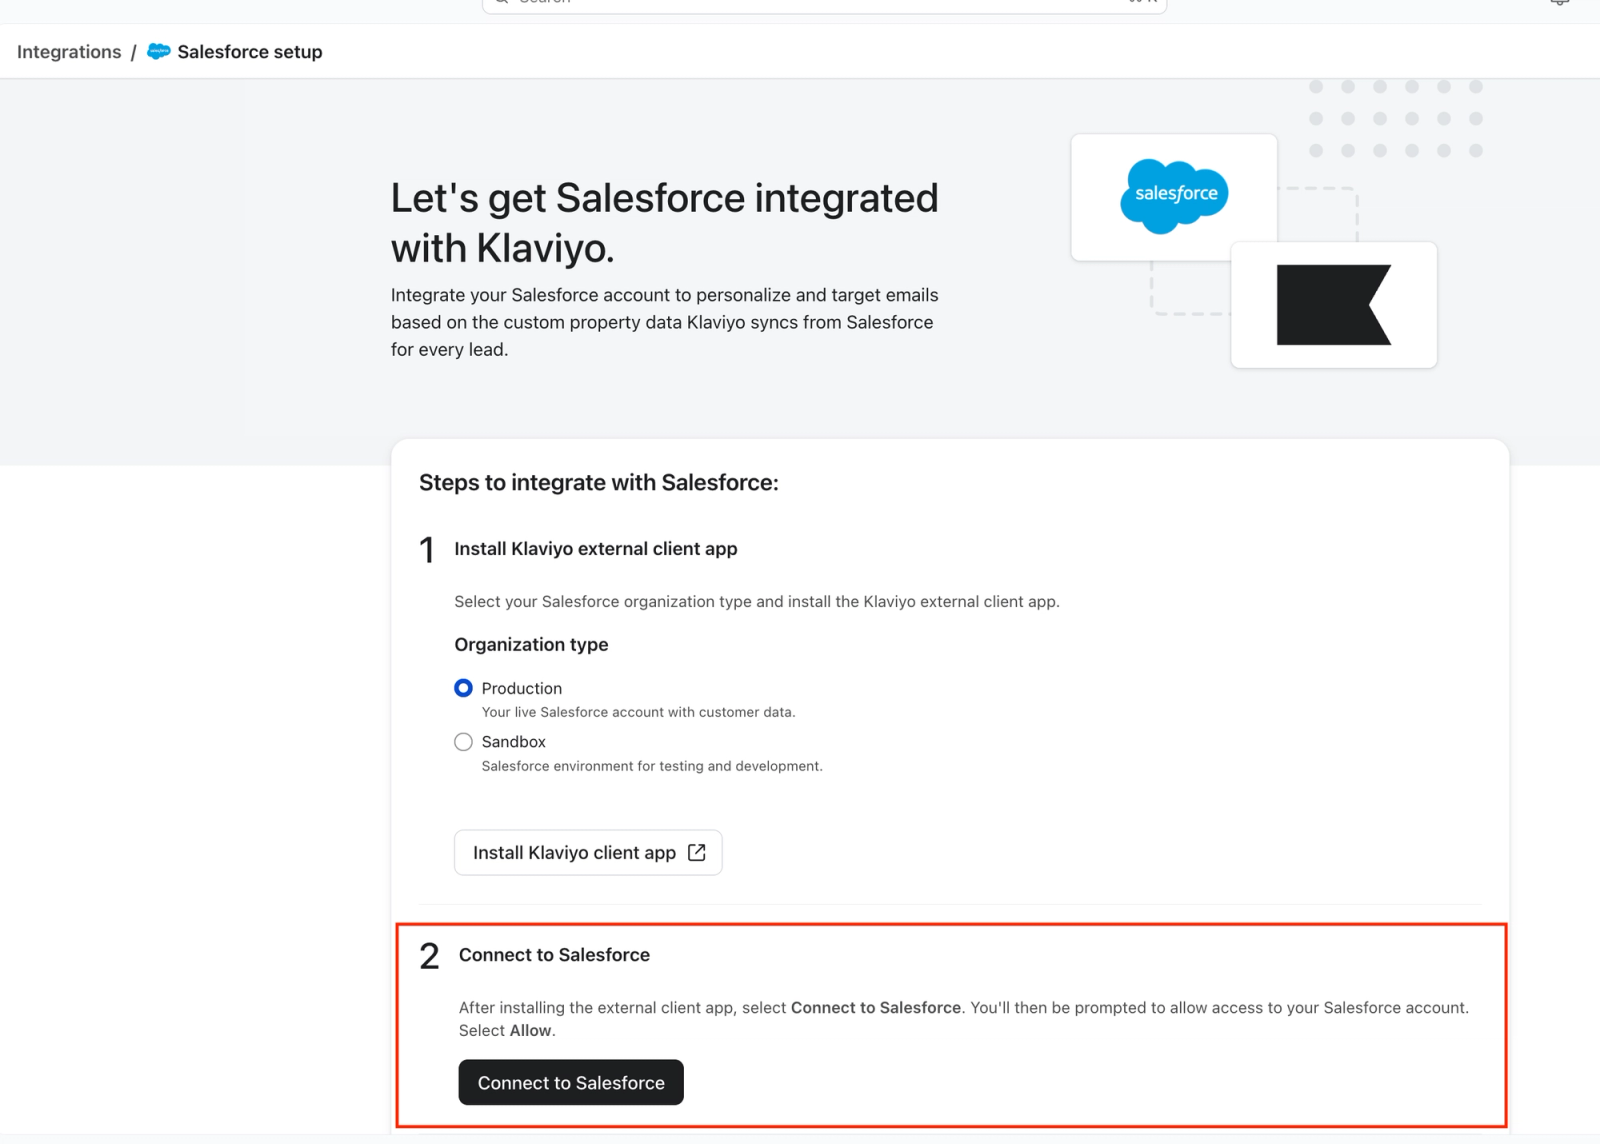
- Once installation is complete, return to the Salesforce integration setup page in Klaviyo. Then follow step 2 and click Connect to Salesforce.
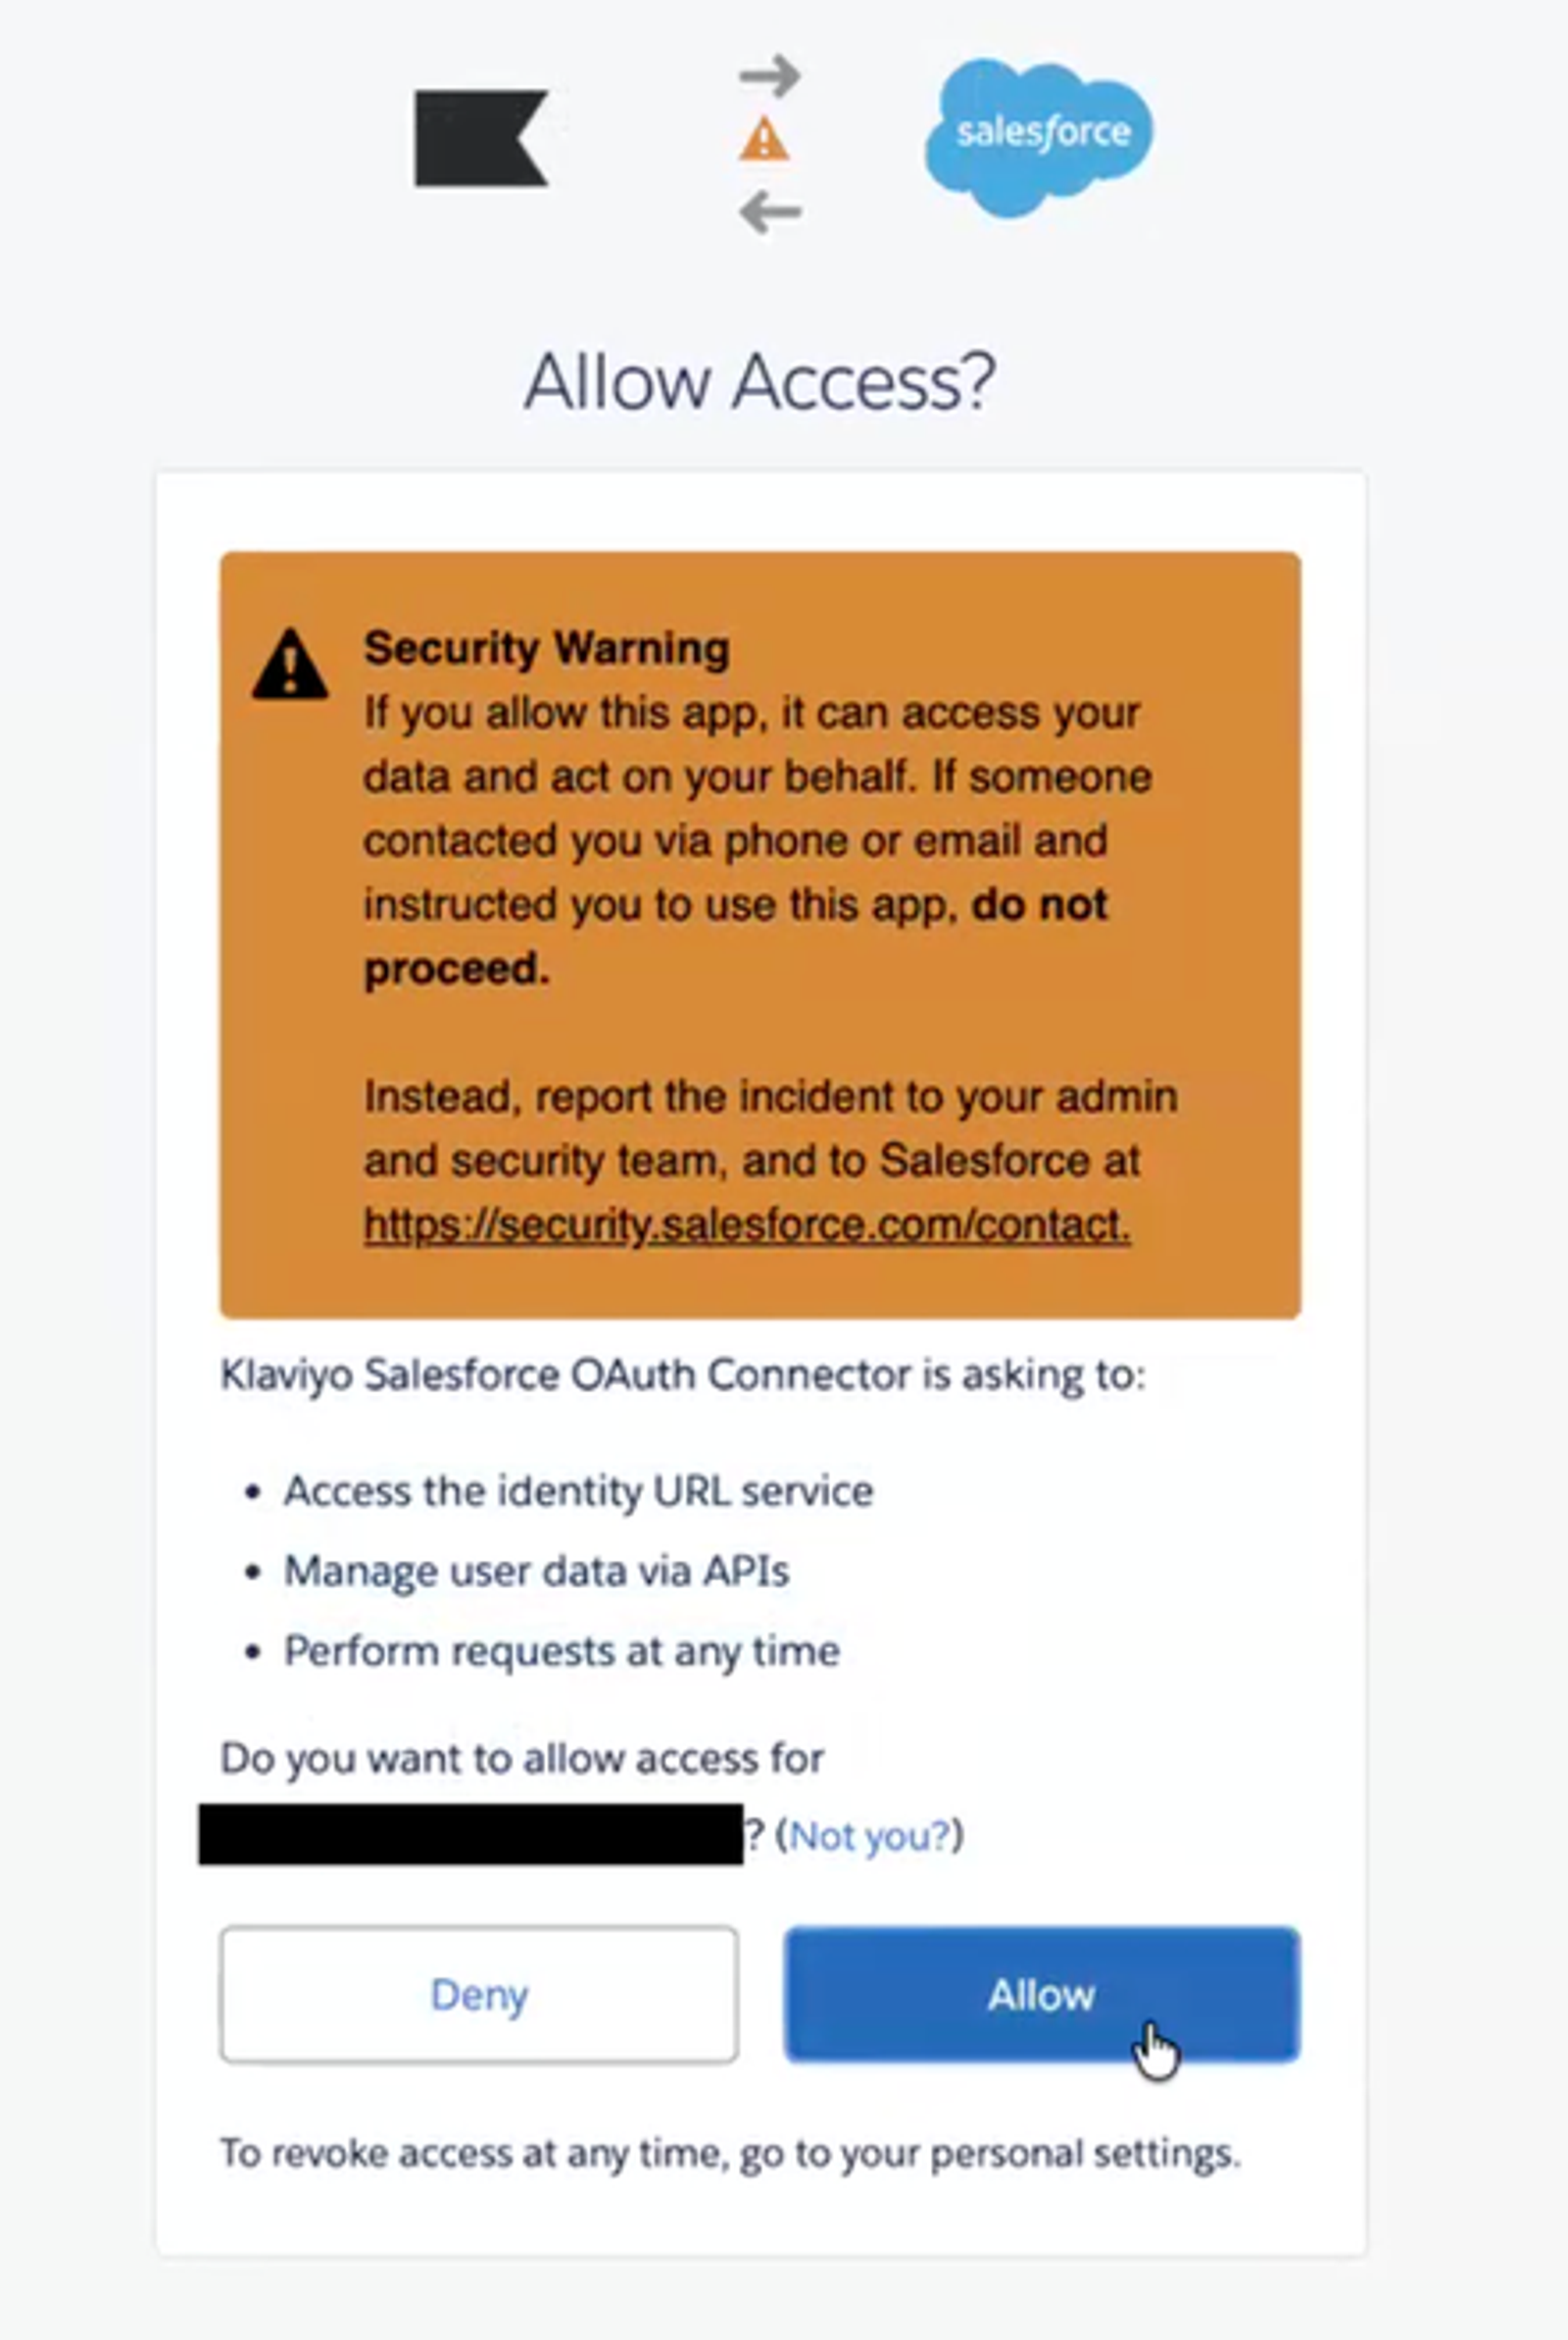
- Click Allow to complete the OAuth flow and finish connecting Klaviyo to Salesforce.
Choose a Salesforce Object to sync
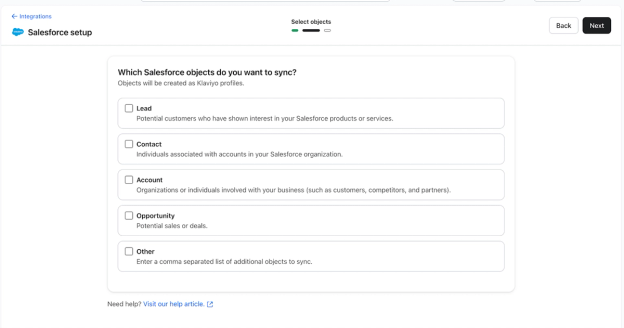
After connecting, you’ll be prompted to select which Salesforce objects you want to sync into Klaviyo. Click Next to continue.
You can now choose up to 3 objects to sync into Klaviyo. Available options include:
- Lead - Potential customers who have shown interest in your Salesforce products or services
- Contact - Individuals associated with accounts in your Salesforce organization
- Account - Organizations or individuals involved with your business (such as customers, competitors, and partners)
- Opportunity - Potential sales or deals
- Other (availability depends on your Salesforce setup)
Objects synced from Salesforce will be created or updated as Klaviyo profiles. When syncing multiple objects:
- Records from all selected objects will sync to Klaviyo.
- If a record’s email address matches an existing Klaviyo profile, that profile will be updated.
- If a record’s email address does not exist in Klaviyo, a new profile will be created.
- If the same person exists across multiple synced objects with the same email address, Klaviyo will consolidate them into a single profile based on email. (Field mappings are configured per object in the next step.)
Map Salesforce fields to Klaviyo properties
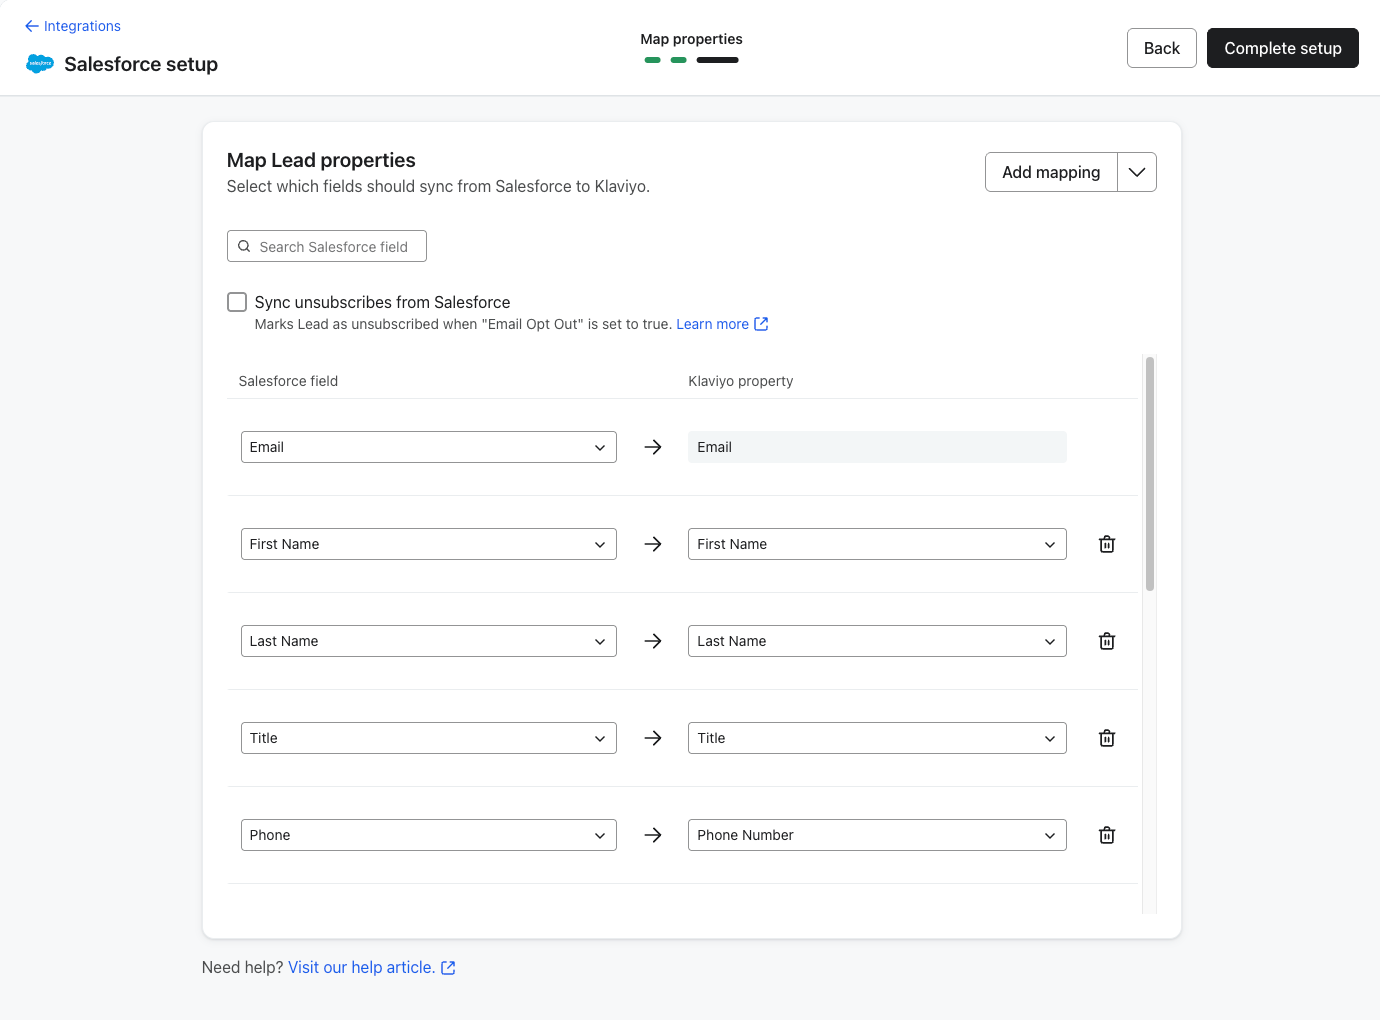
Next, you’ll map Salesforce fields to Klaviyo profile properties. Note that some core mappings such as email, phone number, first name, and last name are pre-mapped. Mapping of the Salesforce email address is required.
When you’ve selected multiple Salesforce objects to sync, you’ll configure field mappings separately for each object. This allows you to control which fields from each object become Klaviyo profile properties.
Add or edit mappings
- Use Add mapping to map additional Salesforce fields for the currently selected object.
- Select a Salesforce field on the left and the corresponding Klaviyo property on the right.
- Remove mappings using the trash icon if needed.
- Repeat this process for each synced object.
If the same Klaviyo profile property (for example, Phone Number or City) is mapped from multiple Salesforce objects, Klaviyo will sync the most recently updated value from Salesforce into the profile.
Import mappings via CSV (optional)
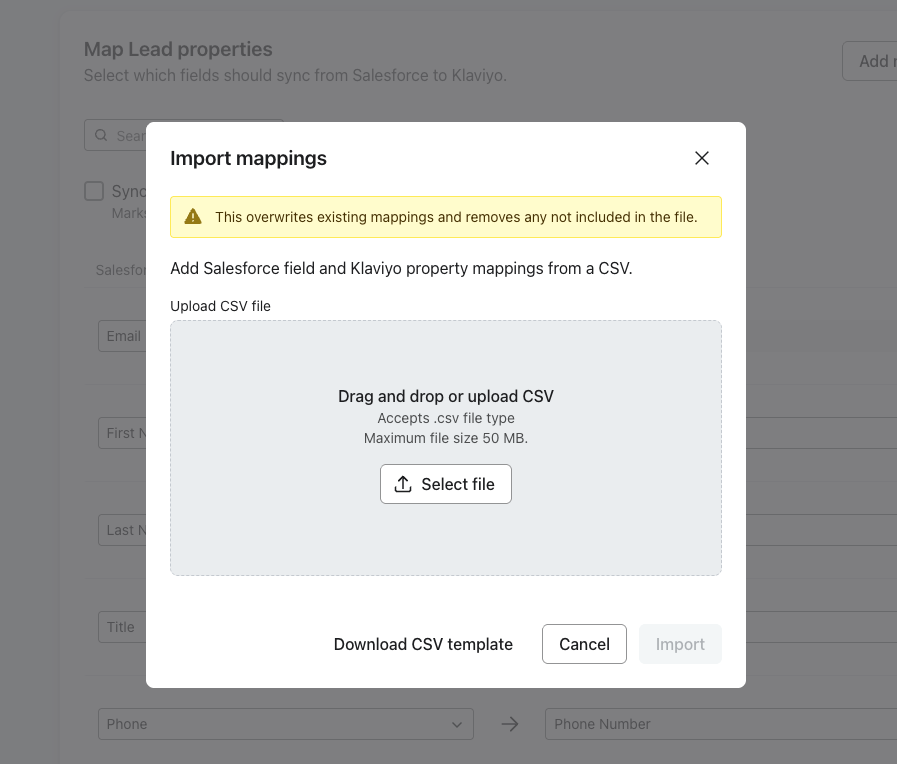
CSV imports replace all existing field mappings for the selected object. If a field is not included in the file, it will be removed from your configuration. To avoid interruptions to syncing, confirm your CSV includes all required fields (such as Email) and any additional fields you want to continue syncing.
To import your mappings via CSV:
- Click Add mapping → Import mappings.
- Download the CSV template.
- Add your Salesforce → Klaviyo field mapping to the CSV template.
- Upload the completed CSV to apply mappings in bulk.
Unsubscribe handling (optional)
You can enable the option to sync the Salesforce object as unsubscribed when Email Opt Out is set to true on the Salesforce object. This will mark the profile as unsubscribed from email in Klaviyo.
Complete setup
Once your mappings are complete, click Complete setup. Klaviyo will finalize the integration (this usually takes a few seconds). You’ll see a confirmation message once your Salesforce account is successfully connected and syncing.
Monitor Salesforce sync and verify data
The Salesforce integration syncs to Klaviyo every hour.
To check your integration:
- Click the Analytics dropdown in Klaviyo and select Metrics. Filter by Salesforce, then find the metric Became Lead and click on its Activity feed icon.
- If your integration has started syncing data, you will see Became Lead events, with the Salesforce icon, added to this activity feed.
- Klaviyo imports all of your Salesforce leads. To verify this, compare the number of leads being added to Klaviyo on a particular day with the number of leads being added to Salesforce and confirm they match.
- Hover over yesterday's datapoint (on the activity feed for Became Lead, which you can find by clicking on the metric) or look in the table of data below the chart to see how many payments occurred yesterday and compare it to the data stored in Salesforce.
- If the data doesn’t match, the issue is most likely that the timezone in your Klaviyo account doesn't match the timezone in your Salesforce account. To check your timezone setting in Klaviyo:
- Click your account name in the lower left.
- Select then clicking Settings > Organization.
- Scroll down to Time zone.
Salesforce metrics in Klaviyo
Currently, Klaviyo syncs one metric with Salesforce CRM: Became Lead.
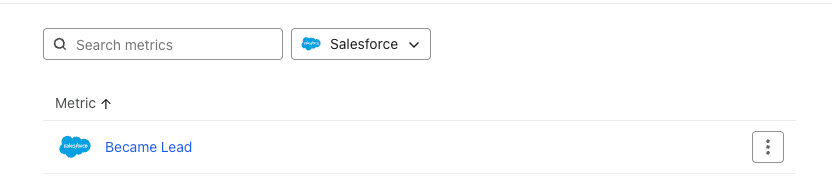
This metric is tracked when a new lead is created in Salesforce. The event itself does not include any data from Salesforce, but when this event is logged, Klaviyo will sync the following custom properties for each lead and attach them to the lead’s Klaviyo profile:
- Id
- FirstName
- LastName
- Title
- Company
- Street
- City
- State
- PostalCode
- Country
- Latitude
- Longitude
- Phone
- Website
- LeadSource
- Status
- Industry
- NumberOfEmployees
- HasOptedOutOfEmail
- Owner Email
You can then use these properties in segments, in flows, and to dynamically populate customer properties into your message templates.
Troubleshooting
Issues with installation and authentication
Migrate from basic auth to OAuth
If you set up the Salesforce integration before OAuth was supported, your Salesforce application may be connected to Klaviyo using basic authentication.
Existing basic authentication connections will continue to work until their credentials expire. However, once those credentials expire, they cannot be reset or renewed. To keep your Salesforce integration connected to Klaviyo, you will need to migrate to OAuth.
- Login to the Salesforce Organization that is connected with Klaviyo.
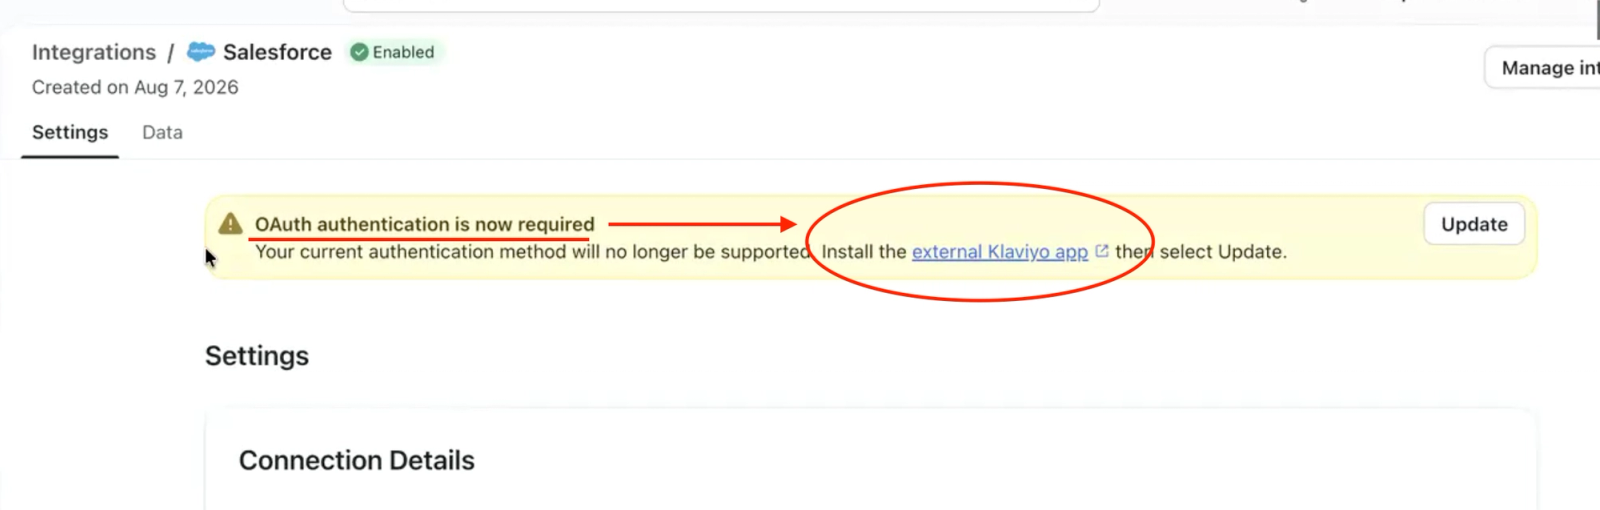
- In the Klaviyo portal, go to your Salesforce Integration Settings page. There should be a banner at the top of the page saying “OAuth authentication is now required”. Within the banner’s description, click on the hyperlink that says "external Klaviyo app” to install the “Klaviyo Salesforce OAuth Connector” package into your Salesforce Organization.
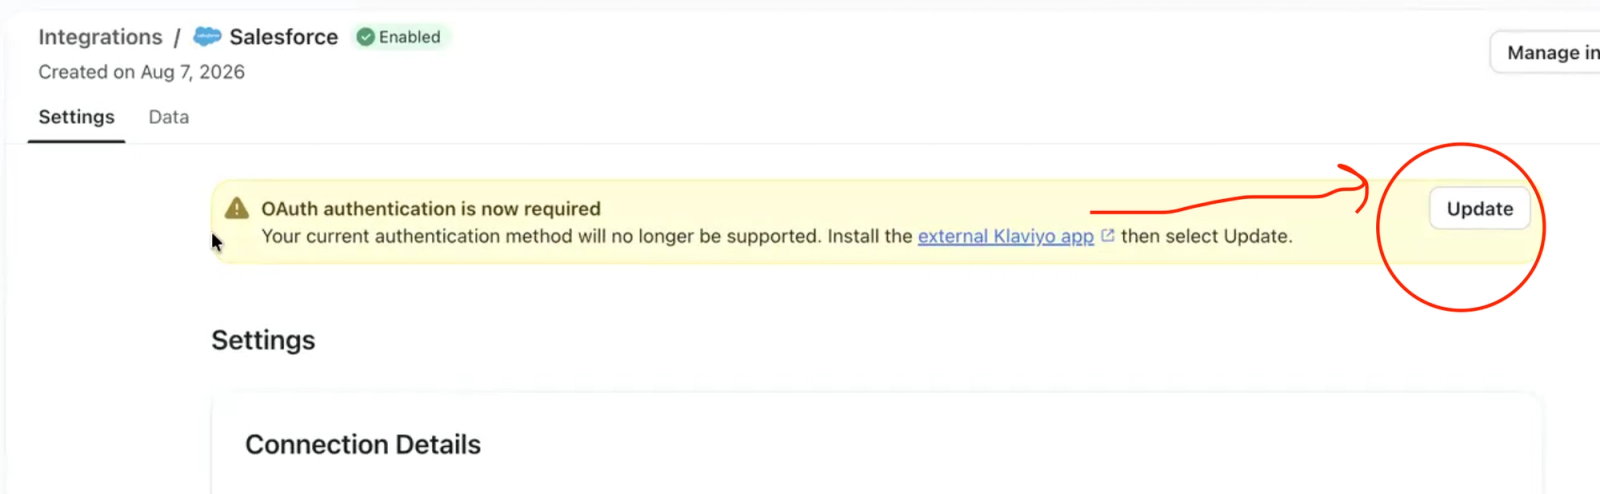
- Once installation is finished, navigate back to your Salesforce Integration Settings page and click Update. Then complete the OAuth flow.
For more information, take a look at the “Connect Salesforce to Klaviyo” section at the top of this guide.
Error “External Klaviyo App isn’t installed. Install it then try again”
This error indicates the Salesforce Org you are trying to authenticate (or re-authenticate) with does not have the “Klaviyo Salesforce OAuth Connector” package installed.
Please ensure that:
- You are logged into Salesforce
- You are logged into the Salesforce organization that is integrated with Klaviyo. If your business has multiple Salesforce organizations, you may be logged into the wrong organization.
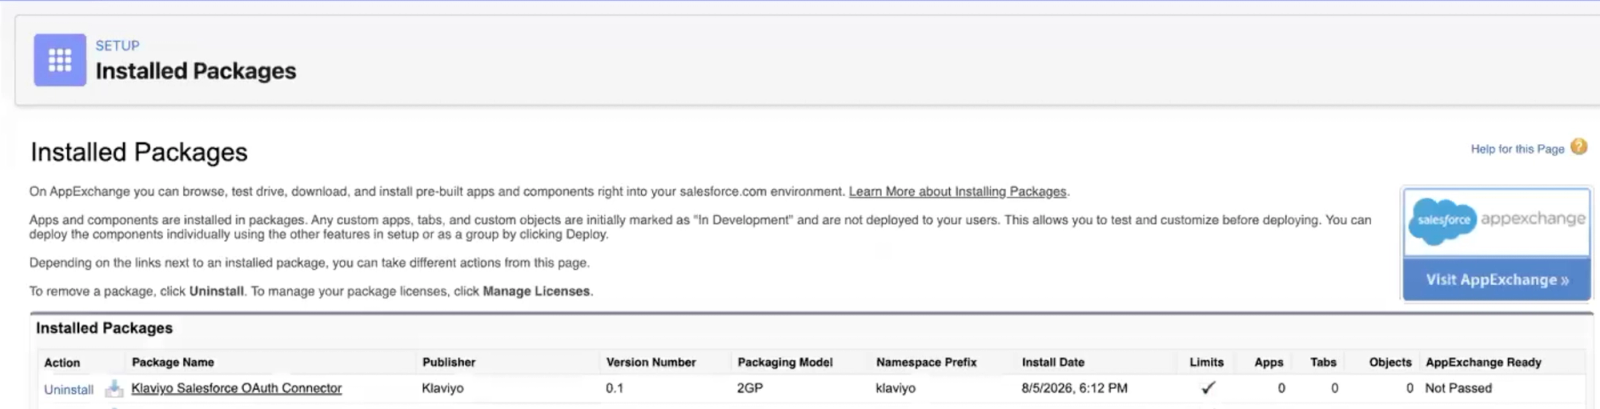
- If you are logged into the correct Salesforce organization and are still getting this error, search your installed packages in Salesforce to verify whether the “Klaviyo Salesforce OAuth Connector” package is installed. If it isn’t installed, repeat step 1 in the integration setup flow to install the package (see “Connect Salesforce to Klaviyo” section at the top of this guide). Or if you had an existing integration and are migrating to OAuth, click the hyperlinked “external Klaviyo App” text to install the package (see the “Migrate to OAuth” section above).
If you are still having issues, please contact support.
Account mismatch error message
If your business has multiple Salesforce organizations, make sure you are logged in to the Salesforce organization currently connected to Klaviyo when re-authenticating the integration
If you are logged in to a different Salesforce organization, you will see an “Account Mismatch” error:
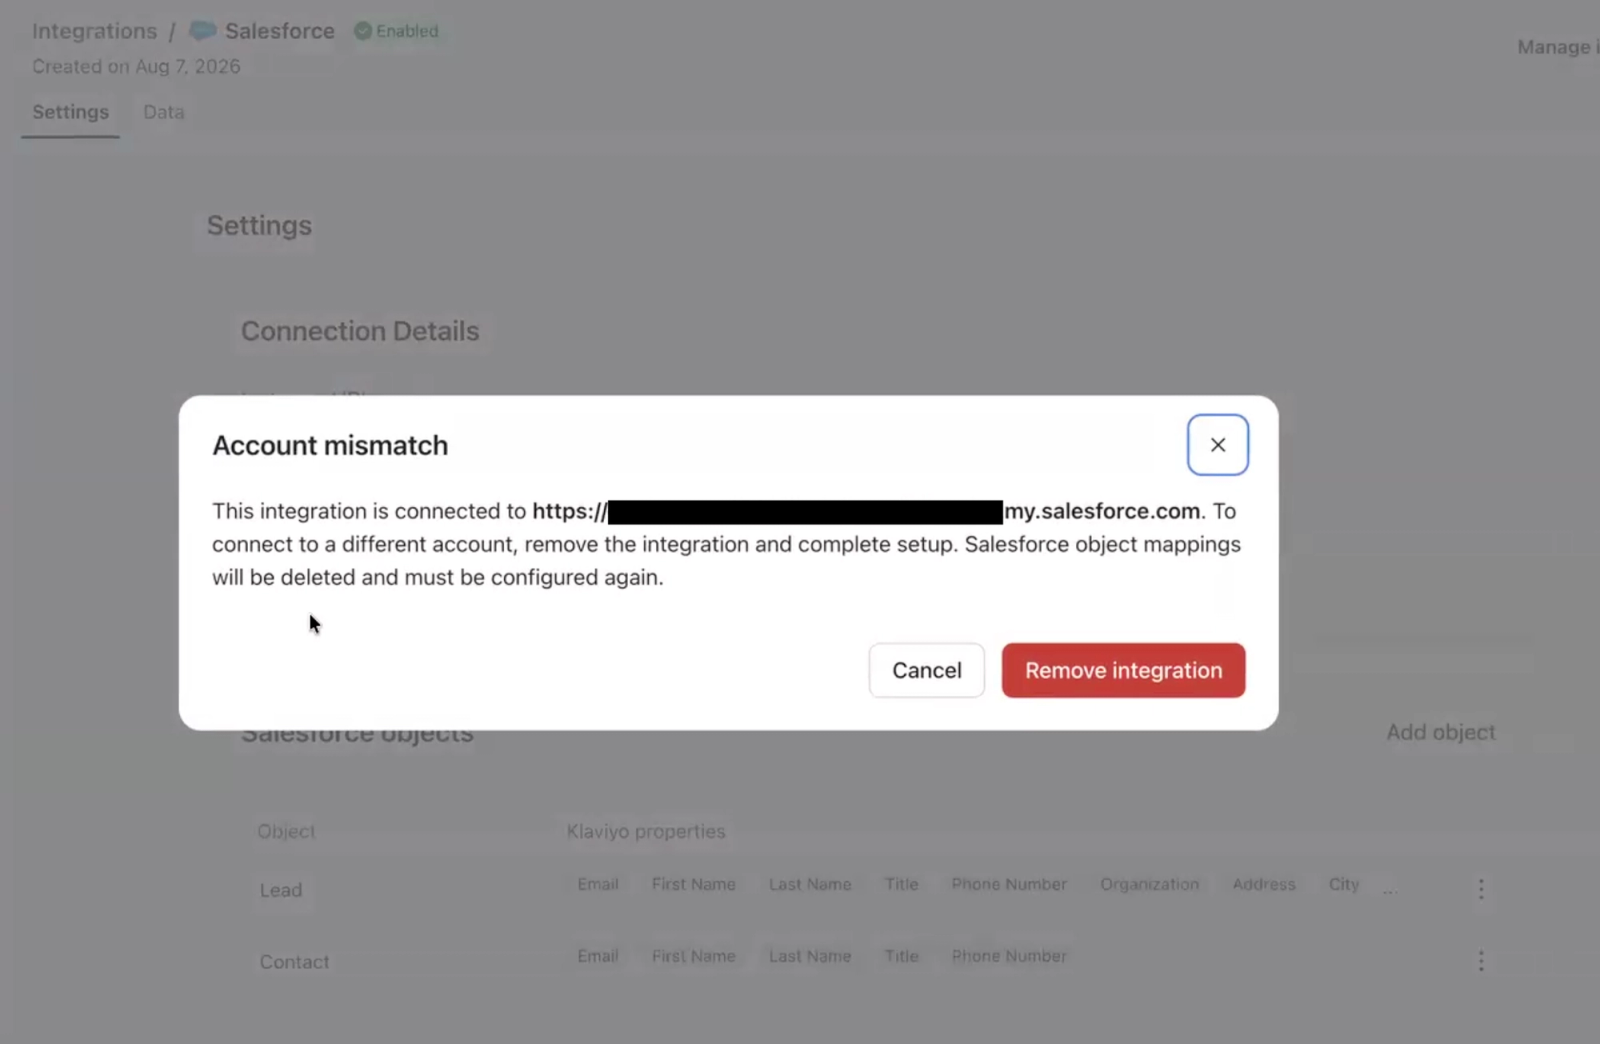
To resolve the error, do one of the following:
- Reconnect the existing Salesforce organization: Close the window, log out of Salesforce, then log in to the Salesforce organization currently connected to Klaviyo and try again.
- Connect a different Salesforce organization: Uninstall the Salesforce integration in Klaviyo, reinstall it, and complete the Salesforce integration setup flow using the new Salesforce organization.
Field mapping warnings and errors
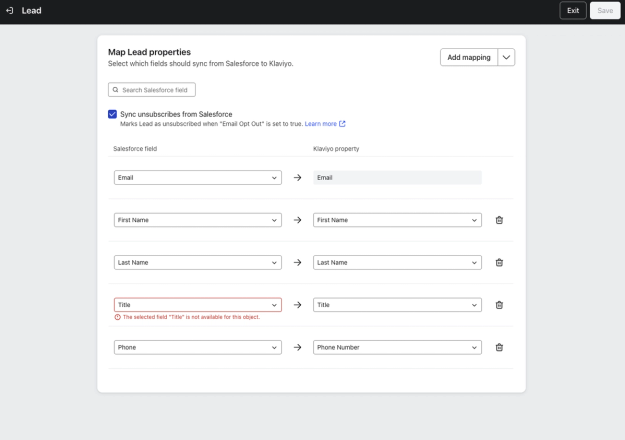
Klaviyo continuously validates your Salesforce field mappings to ensure data can sync reliably. If a mapped Salesforce field becomes unavailable (for example, if it’s deleted, renamed, or permissions change), you may see a warning or error in your integration settings.
When a non-required field is unavailable
If a mapped Salesforce field is no longer available and it is not required, Klaviyo will:
- Display a warning indicating which field is missing.
- Continue syncing all other available fields.
- Exclude the unavailable field from future syncs until it is updated or removed.
To resolve this,
- Navigate to your Salesforce integration in Klaviyo.
- Open the affected object.
- Update or remove the invalid field mapping.
- Save your changes.
Once updated, syncing will continue as expected.

When a required field (Email) is unavailable
If the Salesforce Email field is no longer available for an object (for example, due to schema changes or permissions), Klaviyo will:
- Display an error indicating the Email field is missing.
- Stop syncing data for the affected object.
- Prompt you to update your field mappings to restore syncing.

To resolve this,
- Navigate to your Salesforce integration in Klaviyo.
- Open the affected object.
- Ensure a valid Salesforce Email field is mapped to Klaviyo’s Email property.
- Save your changes.
Once the Email field is successfully mapped again, data syncing will automatically resume.
Profiles missing in Klaviyo
If Salesforce records aren’t appearing as profiles in Klaviyo, first verify that a valid email field is mapped for each object you’re syncing. Klaviyo uses the email address as the required identifier to create or update profiles; records without a mapped email field or without valid email values will not sync as profiles. Ensure that:
- A Salesforce email field is mapped to Klaviyo’s Email property for every selected object.
- The mapped email field contains actual email values in Salesforce — blank or invalid emails can prevent records from syncing as profiles.
Once a valid email field is mapped and records include email addresses, Klaviyo will create or update those profiles on the next sync.
Outcome
You have now integrated your Klaviyo account with Salesforce CRM and reviewed your synced data.
Additional resources
- Getting started with flows
Learn how to use flows, also known as automations or drip campaigns, in Klaviyo for personalized and automated communications to your customers, and learn how to set your first flow live.
- Getting started with segments
Learn how to create and use segments in Klaviyo, which are a powerful tool for understanding your audience and sending targeted messages.
- Understanding the types of information exchanged between Klaviyo and apps
Learn about what types of data are exchanged between Klaviyo and external apps, and where that data is found in your Klaviyo account. When you integrate a third-party application with Klaviyo, the two platforms exchange information. Most data exchange with Klaviyo is one-way; data is pulled into your Klaviyo account so you can leverage a broad scope of your customers' data within Klaviyo.