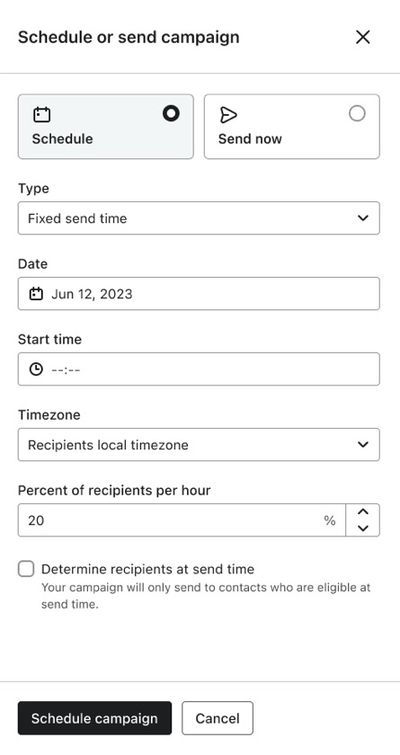
Understanding campaign schedule and send options
Learn what sending options are available for campaigns and how you can use them. When you schedule or send a campaign, you can choose things like your send time, send strategy, timezone, and other details.
Schedule vs. Send now
If you choose Send now when sending a campaign, it will begin sending immediately. This process may take several minutes or more.
Alternatively, choose Schedule to select a time in the future for the campaign to send. When scheduling a campaign, you have a few send strategy options, outlined below.
Send strategies
When scheduling a campaign, choose between a fixed, gradual, or smart send time in the Type menu.
- Fixed send time
Select this option if you want all recipients to receive the email around the same time. Available for all channels. Sending times may be slightly slower during peak times (e.g., on the hour, on the half hour). For faster sending, choose off-peak times (e.g., 3:04 p.m. instead of 3:00 p.m.) by typing in a minute value rather than selecting a 15-minute interval.
Note that there is required processing time when sending emails, so there may be a few minutes between your scheduled send time and email delivery, even during off-peak times. - Gradual send
Select this option to send your campaign in batches, delivering to a percentage of your recipients at a time until everyone has received it. Choose to send a batch every hour or every minute, and set the percentage per batch from 1% up to 50%. Lower percentages spread your campaign over a longer window. For example, sending to 1% of recipients each minute delivers the campaign in 100 batches over roughly 100 minutes. This is useful for avoiding a spike in website traffic as recipients click through, and for pacing your sending to support deliverability. You cannot use this strategy when you're A/B testing a campaign. Available for all channels. - Smart send time
This option is only available to senders who meet certain criteria. Use Klaviyo’s AI tools to determine the ideal send time for your audience(s), then send at that time for optimal results. Learn how to use the smart send time feature. Available for email.
Determine recipients at send time
When Determine recipients at send time is enabled, Klaviyo takes a fresh snapshot of your target list or segment as close to send time as possible to ensure you’re reaching the most up-to-date audience.
When used with:
- Specific timezone: Klaviyo takes the snapshot immediately before the campaign sends at the scheduled time for that timezone.
- Recipient Local Timezone: Klaviyo takes a single snapshot right before the first message is sent to the earliest recipient timezone. That snapshot is then used for all subsequent timezone sends.
This option is available for:
- SMS
- Mobile push notification
By default, determine recipients at send time is turned off. Learn how to change when campaigns determine recipients.
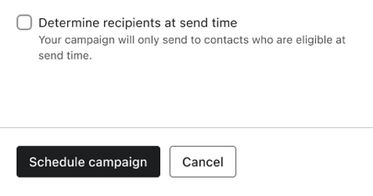
When this option is not checked, Klaviyo takes a snapshot of your target list or segment the moment you click Schedule campaign. If anyone is added to or removed from your list between the moment you schedule the message and when it sends, these changes will not be reflected in the send list.
Note that anyone who unsubscribes will be filtered out of the send, even if they unsubscribe between when you schedule the message and when it begins sending. However, this may lead you to using more sends than expected, as your list or segment may have grown since the time you created the campaign.
Timezone options
Depending on your send strategy, you may have 2 timezone options: recipient’s local timezone or a specific timezone you choose.
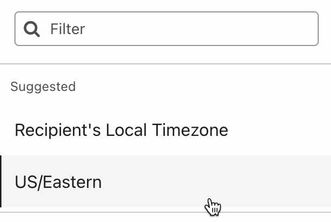
Recipient’s local timezone
Select this option to send the campaign at a specific time in each recipient’s local timezone.
For campaigns with A/B tests, this option will only appear when there is a 50/50 split.
For example, if you send at 3 p.m. and select the recipient’s local timezone, a subscriber who lives in California will receive the email at 3 p.m. PT, while the UK subscriber will receive it at 3 p.m. GMT. If a recipient’s timezone is unknown, they will receive the message in your account’s timezone.
If the scheduled send time has already passed in a recipient's timezone, you have 2 options:
- Send the campaign to those recipients immediately.
- Wait until the scheduled time on the following day to send to those recipients.
If you choose to send immediately, you cannot change the send time after you schedule the campaign.
When you choose to send based on each recipient's timezone, you cannot also determine recipients at send time, meaning that no new recipients will be added to the campaign after you click Schedule.
Specific timezone
When a specific timezone is selected, the message will be sent to everyone at that time. For example, if you send a message at 3 p.m. PT, the message will be sent to all subscribers at 3 p.m. PT, regardless of their location.
Additional resources
- How to change when a campaign's recipients are determined
Learn how to adjust the account-level settings for when campaigns determine recipients. There are 2 options for when a campaign determines recipients:
- How to cancel a scheduled or sending campaign
Learn how to cancel a campaign that has been scheduled or partially sent. Campaigns that have already been fully sent cannot be cancelled. If you don't see the option to cancel a campaign by following the steps below, then sending is already complete and it can no longer be cancelled.