Getting started with Zenoti
You will learn
Learn how to integrate with Zenoti, a tool that assists beauty, wellness, and fitness brands with booking, scheduling, marketing, payments, reporting, inventory, and more.
Before you begin
- This integration relies on Zenoti Webhooks and APIs, which require a subscription to Zenoti's Klaviyo Integration Package. To verify whether you have this package, access the Zenoti dashboard as the owner and navigate to Admin > Setup > App. If you are unable to see this option in the sidebar, please contact your Zenoti CSM or Zenoti Support to confirm your subscription to the package.
- You must have Owner credentials in Zenoti to set up this integration.
Integrate Zenoti with Klaviyo
Generate a Zenoti API key
To integrate Zenoti with Klaviyo, you'll first need to generate an API key in Zenoti:
- In your Zenoti account, navigate to Configuration > Integration > Apps.
- In the top right, select Add.
- On the next screen, enter the following information:
- Name
Klaviyo - URI
(Leave blank) - Description
Klaviyo integration - Login User Type
Employee - Source App
ClientApp
- Name
- Select Next.
- On the next page, scroll to the bottom and click Select All for both JWT Groups and APIKEY Groups columns, then select Next.
- On the next page, select Generate API Key. Make sure to store this information somewhere secure for use in the next steps.
- Select Finish.
Add the integration in Klaviyo
Next, add the integration in Klaviyo:
- Log in to Klaviyo and select the Integrations tab.
- Click Explore apps.
- Search for Zenoti and click the card.
- On the next page, click Install.
- Paste your API key from Zenoti and click Connect.
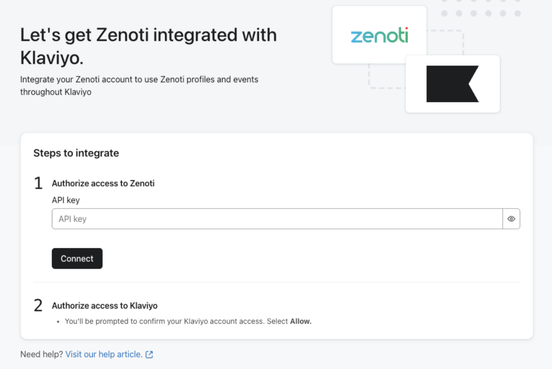
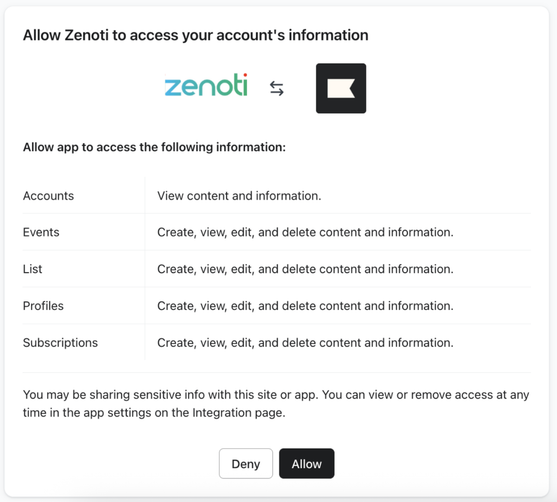
- Review the permissions and click Allow.
- On the next page, copy the Webhook URL and save it somewhere secure for use later.
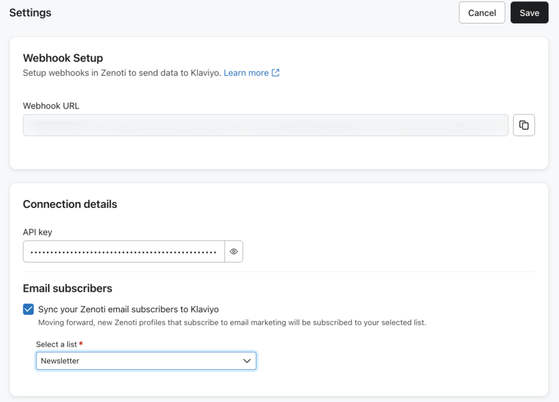
- Under Email subscribers, check Sync your Zenoti email subscribers to Klaviyo if you wish to do so.
- If you selected the setting above, choose a Klaviyo list for these subscribers to be added to.
- When you are done, click Save.
Create a Zenoti webhook
Lastly, you'll need to create a webhook in Zenoti:
- Back in Zenoti, navigate to Configuration > Integration > Webhooks.
- Select Create a webhook.
- On the Create a new webhooks listener page, select all options under Appointment, AppointmentGroup, Class (if you are using classes), Guest, and Invoice, then click Next.
- On the next screen, enter the following information:
- Name
Klaviyo - Description
Klaviyo/Zenoti Integration - Request Type
POST - URL
Paste the webhook URL copied from Klaviyo.
- Name
- In the top right corner, click Complete.
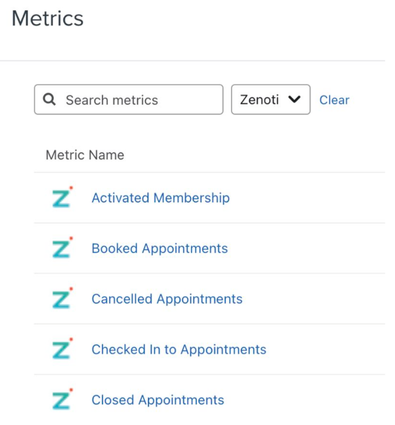
Understand your Zenoti data
Klaviyo syncs many different events from Zenoti related to appointments and membership. We sync 1 year of historic Zenoti data.
To view your Zenoti data:
- Click the Analytics dropdown in the left-hand navigation sidebar.
- Select Metrics. Here, you can view all of the metrics in your account. The metrics with a Zenoti icon represent all of the metrics synced from your Zenoti integration.
- Filter this view to see only Zenoti metrics by using the filter selector next to the search bar.
Learn more about your Zenoti data.
Segment customers using Zenoti data
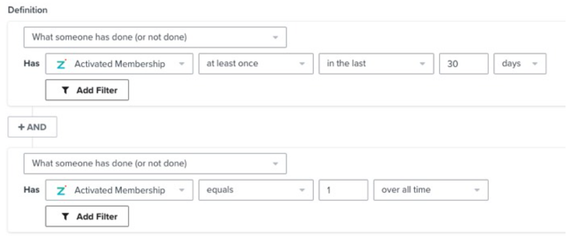
You can use Zenoti’s metrics to segment customers and target them with a campaign. For example, you can create a segment of everyone who has activated a membership in the last 30 days and send a campaign to that segment.

To create the example segment shown above:
- Click the Audience dropdown in the left-hand navigation sidebar.
- Click Lists & segments.
- Click Create List / Segment in the top right.
- Select Segment.
- Name your segment and select tags if desired.
- Under Definition, select What someone has done (or not done) > Activated Membership > at least once > in the last > 30 > days.
- Click Create Segment.
For this example, if you’d like to make sure the segment only includes people who activated a membership for the first time:
- Click AND to add a new exclusive condition.
- Add the condition: What someone has done (or not done) > Activated Membership > equals > 1 > over all time. This will exclude anyone who has activated a membership more than once
Use Zenoti data in flows
You can use Zenoti metrics to trigger flows. For example, use the Activated Membership metric to trigger a flow to send messages to someone immediately when they activate their membership. You can also use the flow to send a series of messages letting them know how to get the most out of their membership.
If you are using Zenoti to send email and SMS notifications, make sure to turn off messages that you would rather send through Klaviyo flows so that your customers aren’t receiving repetitive messages. See Zenoti’s support documentation for more information on how to disable email and SMS notifications.
To create a flow using Zenoti metrics:
- Navigate to the Flows tab from the left-hand navigation sidebar.
- Click Create flow in the top right.
- Click Create from scratch in the top right.
- Name your flow and select tags if desired.
- Click Create Flow.
- In the flow builder, choose Metric as the trigger.
- From the dropdown, select a Zenoti metric, such as Activated Membership, indicated by the Zenoti icon.
- Click Done.
- Add time delays and messages relevant to the triggering action. For the Activated Membership example, you can create messages to:
- Thank the customer for activating their membership.
- Inform the customer about the benefits of their membership.
- Send promotional material relevant to their membership.
- Once your content is ready, click Update Action Statuses in the top right of the flow builder to set the flow live.
Outcome
You've now integrated Zenoti with Klaviyo and learned about Zenoti data in Klaviyo, segmenting customers using Zenoti data, and using Zenoti data in flows.
Zenoti API key expiry
Please note that Zenoti's API keys currently expire every 12 months and must be updated in Klaviyo for the integration sync to continue.
Every 12 months, you will need to create a new API key in Zenoti and re-integrate with Klaviyo following these steps:
- Remove your current Zenoti integration in Klaviyo.
- In Klaviyo, select the Integrations tab
- Find Zenoti on the list of enabled integrations.
- Click the triple dots, then select Remove integration.
- Re-integrate following the steps in this article.
Additional resources
- Understanding Klaviyo-built integrations
Learn about the built-in integrations offered by Klaviyo that will allow you to sync data with your new Klaviyo account and use this information for precision targeted marketing.
- How often integrations sync reference
Learn what data syncs from a particular Klaviyo integration and how often the sync runs. We've organized these integrations by ecommerce platforms, email service providers, and other data integrations.
- Zenoti data reference
This article covers the data that is synced when you integrate Zenoti with your Klaviyo account.