How to import profile properties using a CSV upload
You will learn
Learn about profile properties and how to import them by uploading a CSV file.
This method of adding profile properties to Klaviyo requires that you upload contacts to a list. If your file includes contacts that have not explicitly opted in to email or SMS marketing, exercise caution to ensure you don’t send those contacts unwanted messages, as this can hurt your deliverability. Learn more about deliverability.
Table of contents
To import profile properties using a CSV upload:
Create a CSV file
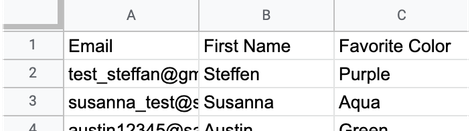
The first step in uploading profile properties to Klaviyo is creating a correctly formatted CSV file containing those properties. Use any spreadsheet tool to create your file, like Excel or Google Sheets.
- In your CSV, label the first row of the first column Email.
- In the first cell of the following columns, add the name of the profile properties you'd like to upload (e.g., First Name, Last Name).
- In the following rows, add in the email address and profile properties you'd like to upload.
Make sure that all the data in your spreadsheet is in a format that can be read by Klaviyo. Learn more about data types in Klaviyo, including how to format them.
Upload profile properties
Once your CSV file is ready to upload:
- Navigate to Audience > Lists & Segments in Klaviyo.
- In the top right corner select the Create New button and set the list name and any tags.
- Choose Create List.
- If you’re using an existing list rather than a new list, click into the list and open the Manage List dropdown in the top-right corner, then Import Contacts.
- Click Upload Contacts.
- Click Upload and select the CSV file you just created in the upload modal.
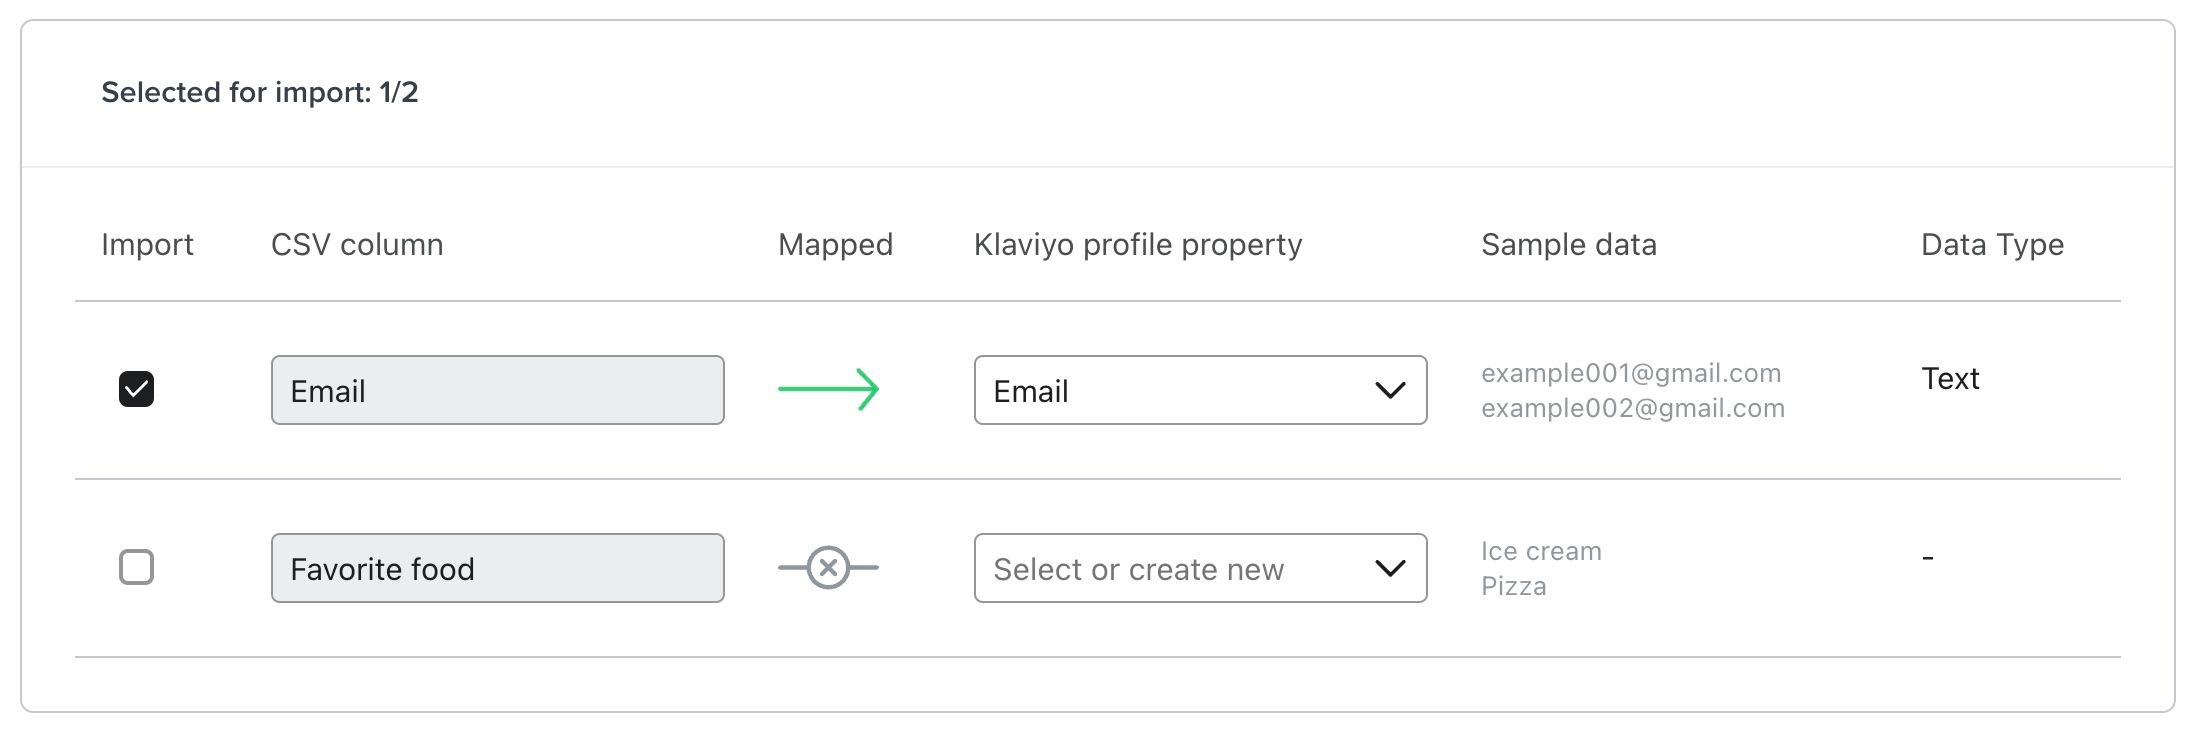
- Map each column from your CSV to an appropriate property in Klaviyo.
- If the property doesn’t yet exist in Klaviyo, click the Select or create new dropdown and
select Create new field.
- Click Next.
- Select No, import without updating subscription status.
- Click Import.
Do not update consent status to subscribe these profiles. If you do, all profiles in the list will be marked as subscribers in Klaviyo, even if they've previously unsubscribed. By selecting No, import without updating subscription status, anyone with a current subscription will remain subscribed, and unsubscribers will remain suppressed.
Your import may take anywhere from a few seconds to a few hours, depending on the size of your list. You can navigate away from the page and the upload will continue.
Having trouble with your upload? Head to Klaviyo’s guide to troubleshooting list imports.
Review your import
Once the import is complete, open up your list and click on any profile. Navigate to the Information section of their profile. Here, you’ll find the properties you just uploaded. Many will appear under Custom Properties, but note that some default Klaviyo properties, like phone number or first and last name, will appear in the Contact section.
Note that if there are any new contacts being added to your list as part of this upload, they will enter any list-triggered flows associated with the list. Temporarily turn off your flow if you are adding new contacts to a list and don't want them to trigger the flow.
Ensure compliance
In order to maintain strong deliverability and comply with data privacy and marketing laws, make sure you only market to people who have explicitly opted in to email or SMS marketing. If the list you uploaded contains profiles who haven’t opted in, we recommend taking precautions to ensure you don’t reach out to them accidentally. For example, you could:
- Review your segment definitions to confirm only opted-in subscribers are included.
- Delete the list once the upload is complete. To delete the list, but keep the profiles, navigate to the Lists & Segments tab. Locate the list you just created and click the more options icon (three vertical dots). Click Delete.
To maintain the security of your data, Klaviyo's support team is not able to open your CSV files. For further assistance troubleshooting a list import, contact the support team with a detailed description of the problem and screenshots of the error you encounter.
Additional resources
- Understanding the information section of a profile
Learn about the information section of a profile in Klaviyo, which contains details such as when and how the profile found you and the last time they were active.
- Profile properties reference
Learn about the difference between custom and Klaviyo properties, how to use them to track information about your subscribers, how to remove them, best practices, and more.
- Understanding data types
Learn about the different options available for storing your data in Klaviyo, and how to use each one. Klaviyo allows you to harness the data collected about your customers to power data-driven marketing choices that will grow your brand. That being said, it's important to understand the data that's being pulled into your account.