How to add a link that applies a coupon code to a Shopify cart
You will learn
Learn how to add a link in your email or SMS that applies a coupon code directly to a shopper's Shopify cart. Having the coupon already applied to the cart makes it easier for them to take advantage of the discount and buy quickly. To set this up:
- Create a coupon code. This can be inserted as a parameter into a link.
- Add the link to a button in your email or paste the link into an SMS.
When the subscriber clicks the SMS link or button in your email it will redirect them to the link and automatically apply the discount to their next cart.
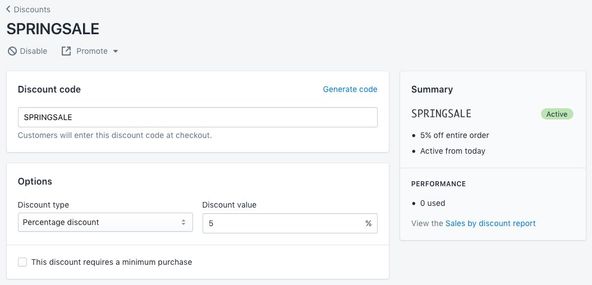
Create a coupon code
- Navigate to Content > Coupons to create your coupon code. You can create either a static code or unique codes.
- To create a static code, head to Shopify and create a percentage discount code or a monetary discount code according to the type of promotion you want to offer.
- To create a static code, head to Shopify and create a percentage discount code or a monetary discount code according to the type of promotion you want to offer.
- To create unique (also called "dynamic") codes, follow the instructions outlined in how to create unique coupon codes for Shopify.
Note that unique coupons must be either imported or created in Klaviyo, while static coupons must be created in Shopify.
- Once you've created the code, copy it so that you can later paste it in your message.
- Choose whether you want to send the coupon within a flow or campaign email or SMS, found via the Flows or Campaigns tab in Klaviyo, respectively.
- Open the message editor editor.
- For email:
- Drag and drop a button block into your email template for your link, if there is not one already.
- Paste the link In the button's Link address field (with the code as a parameter). For help formatting your link, read the next section.
- Example of a button with a link:
- Example of a button with a link:
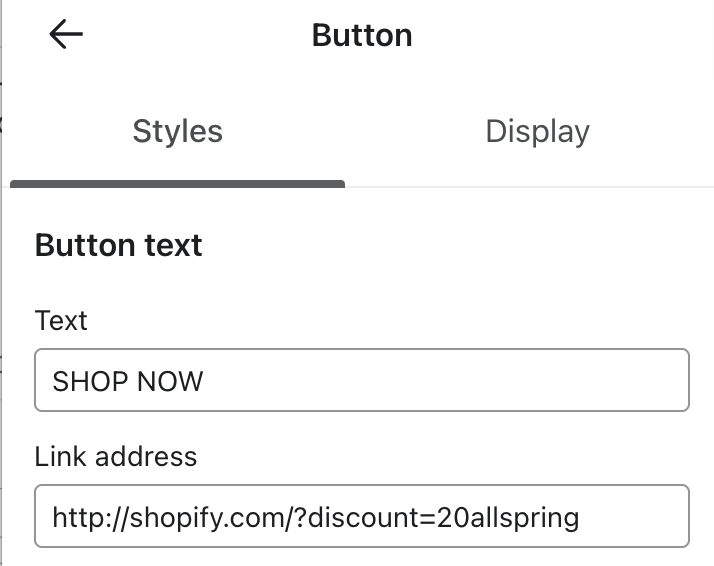
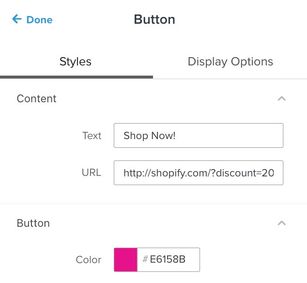
- Customize your button text to alert shoppers about your coupon.
- Click Next.
- For SMS, simply paste in the link, then click Next.
Link formats for coupon codes
Klaviyo cannot ensure that a coupon will be auto-applied at checkout if you initially link customers to a non-checkout page; your Shopify site may end up stripping the coupon from the site URL. If you link to a non-checkout page and experience this issue, you should contact your theme developer.
Apply a discount code and link to checkout
Shopify syncs the Checkout Started event to Klaviyo with a Checkout URL property, which links back to each customer's unique cart. If you are sending abandoned cart messages (triggered by the Checkout Started event) and would like to link a customer to their abandoned cart with a discount code added, add the following snippet:
Static Shopify coupon link structure:
{{ event.extra.checkout_url }}&discount=CouponName
Klaviyo-generated coupon link structure:
{{ event.extra.checkout_url }}&discount={% coupon_code 'CouponName' %}
Apply a discount code to an event URL
For browse abandonment or added to cart flows, using {{ event.extra.checkout_url }} will not work. This represents the URL associated with a checkout, but browse abandonment and added to cart events are captured before a checkout is started. Instead, you can redirect recipients to a product page with the coupon applied using the following, based on {{ event.URL }}:
{{ organization.url|trim_slash }}/discount/CouponName?redirect={{ event.URL|cut:"https://YourSite.com" }}
Make sure to replace CouponName with the name of your coupon, and YourSite with your website (e.g., klaviyo.com).
Apply a discount code and link to your homepage
You can add a link that points back to your homepage and automatically applies the discount to your customer's cart. There are multiple formats you can use:
mysite.com/discount/CouponNamemysite.com/?discount=CouponName
For unique coupon codes, you can use:mysite.com/discount/{% coupon_code 'CouponName' %}
With any of these options, you should replace mysite.com with your website, and where you see CouponName, make sure to replace with the discount code you created in Shopify.
For example, if your brand's website is klaviyo.com and you are using a coupon called WELCOME, the full URL would beklaviyo.com/discount/WELCOMEor klaviyo.com/discount/{% coupon_code 'WELCOME' %}.
Apply a discount code and link to another page on your site
You may want to apply a discount code to a shopping session, such as a collection page or another page on your site, rather than link the customer directly back to your homepage or rebuild the customer's abandoned cart.
In this case, you can use one of the following URL structures based on whether you are using a static or unique coupon:
mysite.com/discount/CouponName?redirect=/new-pathmysite.com/discount/{% coupon_code 'CouponName' %}?redirect=/new-path
With either structure, replace:
- mysite.com with your website
- CouponName with the name of your coupon
- new-path with the desired URL extension. For example, if you would like to link someone to a specific collection page, you would use
?redirect=/collections/mycollection
For example, if your brand's website is klaviyo.com and you are using a coupon called WELCOME, the full URL would beklaviyo.com/discount/WELCOME?redirect=/pricingor klaviyo.com/discount/{% coupon_code 'WELCOME' %}?redirect=/pricing
Troubleshooting
Here are some quick troubleshooting tips:
- When previewing the message, note that it won't show a live coupon. Instead, you’ll see the name of your coupon, followed by -PREVIEW.
- If you trigger a live send and your coupon code isn't auto-applying to your cart, ask yourself the following questions:
- Is the item in the cart already discounted? If it is, Shopify won't allow an additional discount on top of the existing discount.
- In the coupon definition, are there specific products or collections that the coupon applies to, and does the product in the cart match the configuration? If the product doesn't match the coupon rules, this could be the issue.
- If you test your link in a live send and it does not properly apply your discount code, you likely need to adjust the added parameter so that it starts with "&" instead of "?".
- This is because "?" only works when your discount is the only parameter you're adding to your link, and if you're adding multiple parameters, you'll need to use "&". Change your link format to the following and it should work:
mysite.com/discount/{% coupon_code 'your_code' %}&redirect=/new-path
Additional resources
- How to edit coupons in Klaviyo
Learn how to edit coupons that Klaviyo generates so that you can use them in your messaging and encourage subscribers to make a purchase on your website.
- How to create unique coupon codes for Shopify
Learn how to create single-use coupon codes for your Shopify store so that each customer receives their own unique coupon code for a given promotion on your site. This feature provides an alternative to creating a generic, also known as a static, coupon code, so you don't have to worry about codes being shared.
- How to add coupon codes to sign-up forms
Learn how to add static and unique coupon codes to your sign-up forms to drive higher submission and conversion rates, and encourage customers to spend more on your site.