How to use sign-up forms to offer tiered discounts
You will learn
Learn how to use sign-up forms to offer different discounts to different types of customers, then set up your welcome series so each subscriber receives the appropriate discount. Setting specific targeting settings in your forms can help you avoid offering discounts unnecessarily and tailor the language in your emails based on what you already know about your contacts.
Before you begin
Consider what customers you want to target and how you want to incentivize them.
For example, you may want to incentivize site visitors to sign up for your email list with an offer based on their browsing and purchase history. The example below uses these discounts:
- 20% off to visitors who have browsed fewer than 3 times and never purchased
- 15% off to visitors who have browsed 3 or more times and never purchased
- 10% off to visitors who purchased more than 180 days ago and haven’t bought since
- No discount to visitors who purchased in the last 180 days
This is something you can accomplish using a combination of segments, sign-up forms, coupons, and flows.
Click to expand for other example use cases
- Targeting shoppers with high-value items in their cart with larger discounts than low-value shoppers.
- Targeting VIP customers with a different welcome offer and messaging than your other customers.
Before creating these segments, make sure your ecommerce integration is sending Placed Order events to Klaviyo and onsite tracking is recording Active on Site events. Enable Klaviyo sign-up forms on your website, and choose the main email list that all of these forms will submit to.
Create segments of audiences you would like to target
When building a new segment, you can identify the audiences you would like to target with offers on your sign-up forms. In our example, we're going to isolate 4 groups and use the following definitions in the segment builder:
- Visitors who have been to our site fewer than 3 times and never purchased (20% off)
- Visitors who have visited our site 3 or more times and never purchased (15% off)
- Visitors who purchased more than 180 days ago and haven't bought since (10% off)
- Visitors who have purchased in the last 180 days (no discount)
Navigate to Audience > Lists & segments, then select Create > Segment. Name each segment after its definition so you can easily keep track of each one. Add the conditions below, then click Create segment. Repeat for each audience.
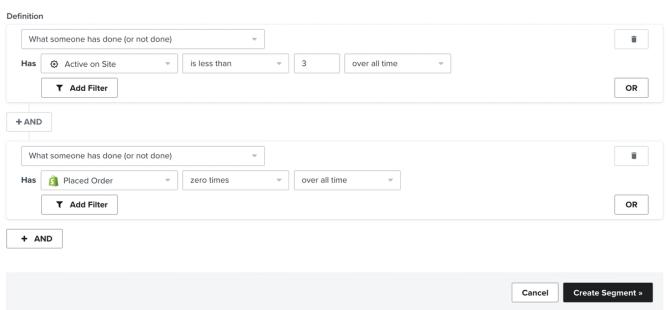
Browsed fewer than 3 times and never purchased
Use What someone has done (or not done) > Active on Site > is less than > 3 > over all time. Alternatively, you can restrict browsing activity to a specific timeframe, like 90 days, to narrow down your audience. Use the same browsing timeframe for both nonbuyer segments.
Klaviyo must identify a visitor to show a segment-targeted form. Visitors using a new device or cleared cookies can be unidentified even if they already have a profile or have purchased before. Use the separate form for unidentified visitors described below, but do not treat its audience as proof that someone is a first-time customer.
Add AND, then What someone has done (or not done) > Placed Order > zero times > over all time.
Browsed 3 or more times and never purchased
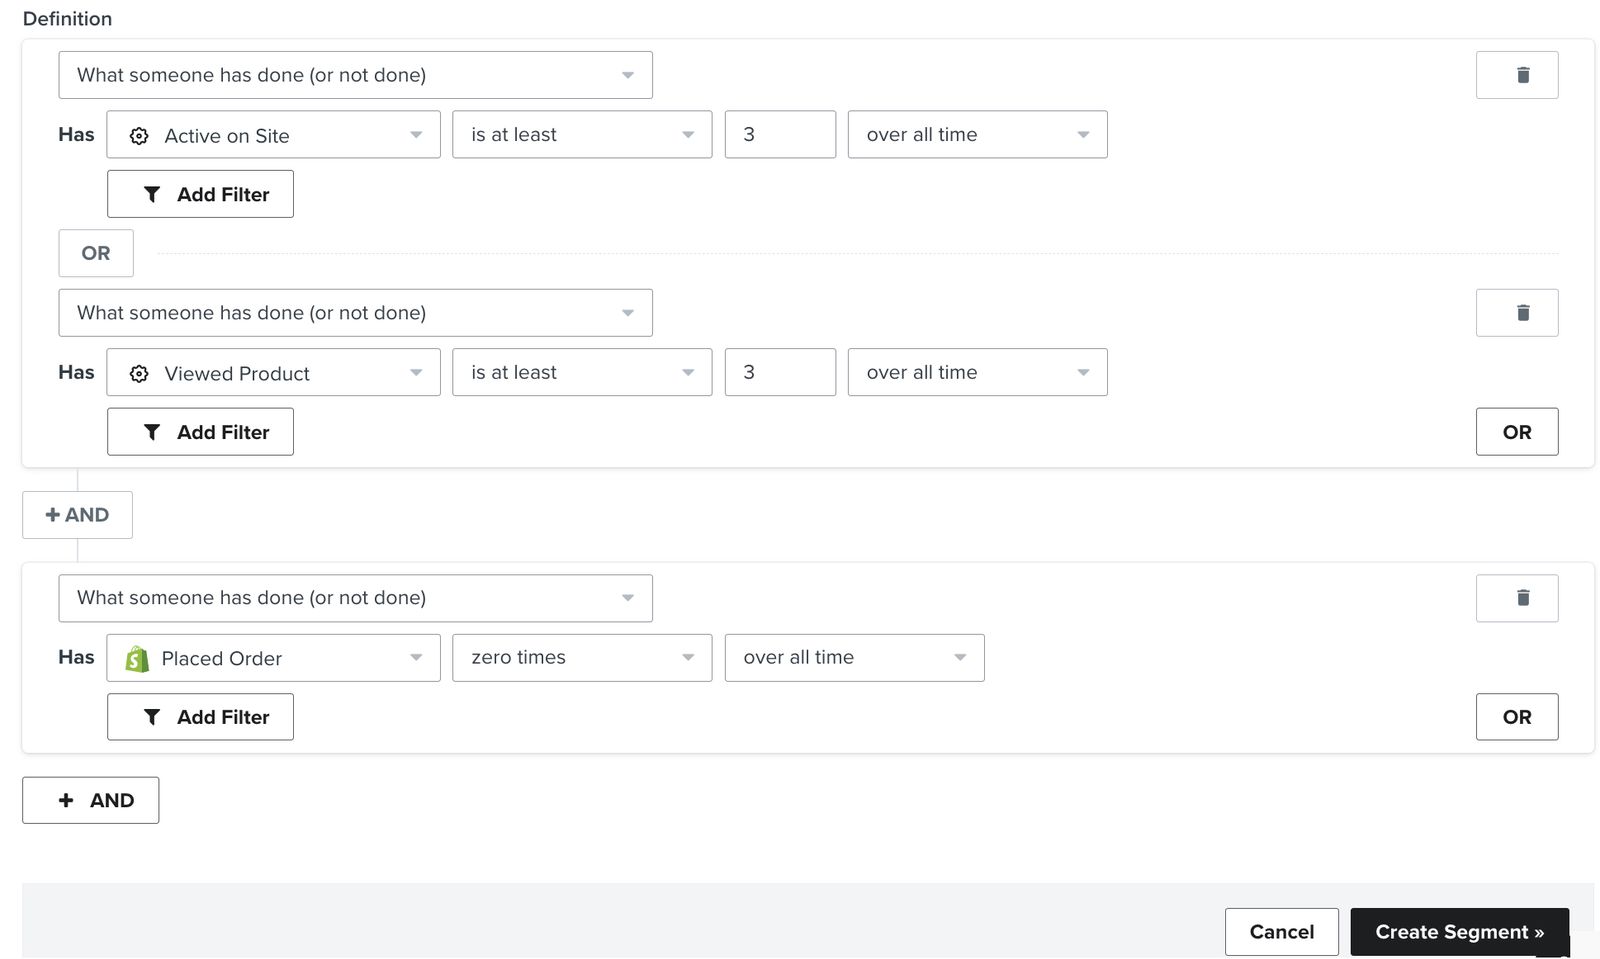
Use What someone has done (or not done) > Active on Site > is at least > 3 > over all time. You can use a shorter timeframe, like 90 days, if you use it for both browsing tiers. If you prefer to base the tiers on product views, use Viewed Product instead of Active on Site in both segments.
Add AND, then What someone has done (or not done) > Placed Order > zero times > over all time. Keep the purchase timeframe set to all time even if you shorten the browsing timeframe.
Purchased more than 180 days ago and haven't bought since
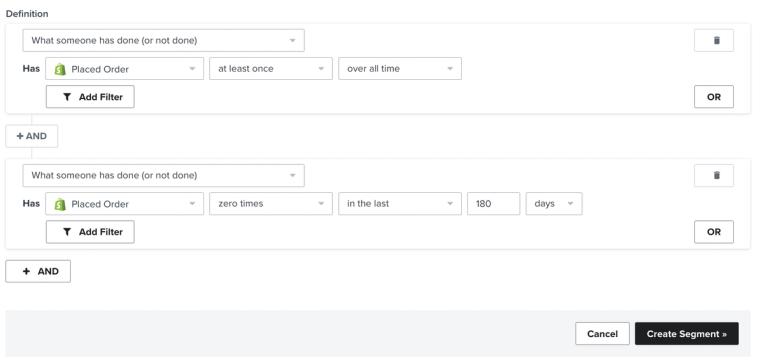
In this segment, you'll want to identify people who have purchased before, but not in the last 180 days. This is a good group to offer a discount that reflects the messaging you have in your winback series. Use Placed Order at least once over all time AND Placed Order zero times in the last 180 days.
Purchased in the last 180 days
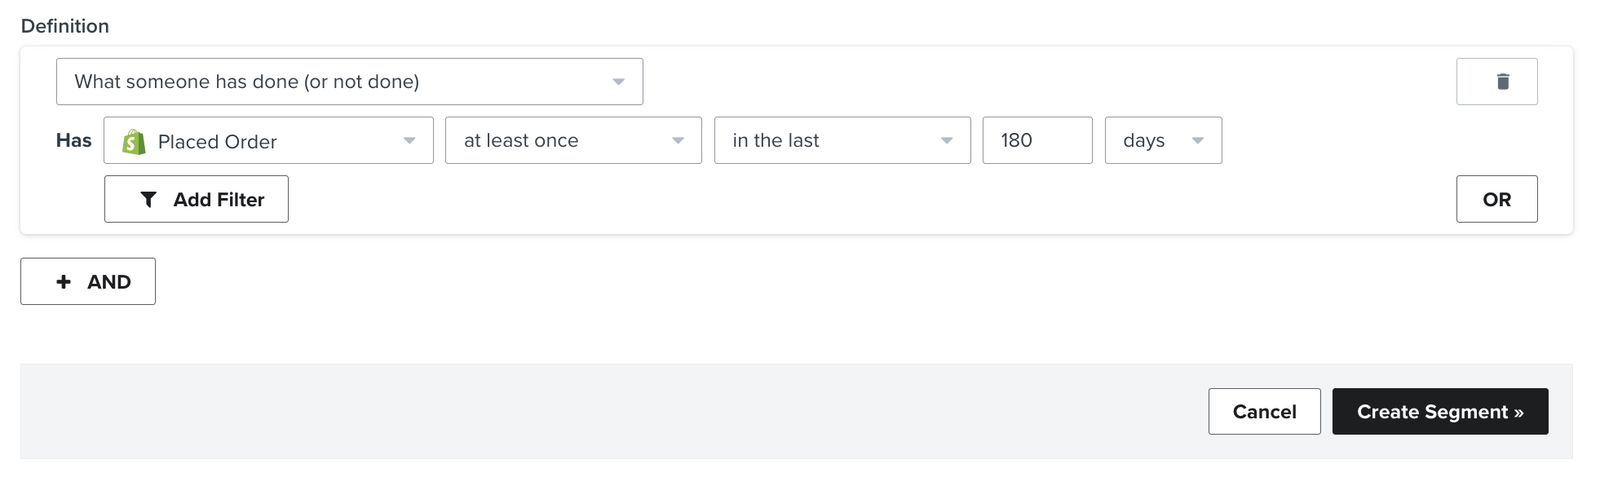
Target people who have bought in the last 180 days to encourage them to sign up for your email list without a discount. Use What someone has done (or not done) > Placed Order > at least once > in the last > 180 days.
Create coupons for each discount tier
Create coupons to use in your forms and welcome series. For example, Shopify and Magento 1 support generating unique coupons through their integrations. You can also use the uploaded coupons feature to offer unique codes created in your ecommerce store. For static coupons, create the codes in your ecommerce store and add the same code to each corresponding message.
For this example, create 3 coupons: 20%, 15%, and 10% off. For unique coupons, create a separate coupon with its own set of codes for each discount tier. Follow the relevant guide above to create the coupons.
Build segment-targeted sign-up forms
Once you've built the segments you would like to target, the next step is to create a separate form to target each group and prompt them to subscribe to your main list.
- Navigate to Sign-up forms and click Create form. Follow the setup prompts to choose a website form template or build a form from scratch.
- Use the editor to design the form to match your brand.
- Open Edit styles and select a Form type. We recommend a Popup, Flyout, or Full page form so that you can capture shoppers’ attention.
- Click the email submit button in the form preview. Set List to Submit to your main email list. Use this same list for all 5 forms, including the form for unidentified visitors.
- With the email submit button selected, go to Submit hidden fields and click Add a property. Add a profile property named Discount tier and enter the value for this form: 20%, 15%, 10%, or None. Keep any existing hidden fields.
- Open Targeting & display behavior and select Targeting. Configure the following settings:
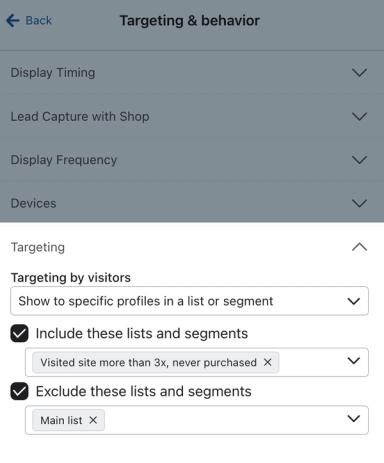
- Under Audience, select Show to specific profiles in a list or segment. Select Include certain lists and segments and choose the segment for this form’s discount tier.
- Select Exclude certain lists and segments and choose your main email list. This keeps identified visitors who already belong to that list from seeing the form, since the segment definitions do not exclude them.
- Click Success and update the message to match your list’s opt-in setting. For double opt-in, tell subscribers to check their inbox and confirm their subscription to receive the welcome email. If you want to show a coupon immediately, you can add a static code, a unique Shopify coupon, or an uploaded unique coupon to the success step. See how to add coupon codes to sign-up forms.
You will likely only want to do this if your list is single opt-in to prevent people from signing up to receive the discount but not confirming their email address. If your list is set to double opt-in and a subscriber does not confirm their email, they will not be added to the list or trigger the welcome series.
Each of the 4 segments needs its own form. You can reuse your design by cloning the first form:
- Return to Sign-up forms, open the form’s 3-dot menu, and select Clone. Select Clone to this account, name the copy, and click Continue. Repeat for each remaining segment. Open each copy and update its offer, Discount tier value, success-step coupon, and included segment. Keep the same main list and list exclusion.
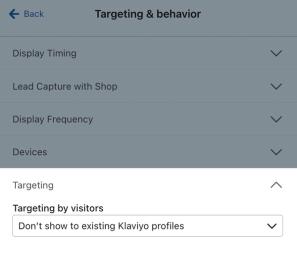
- Clone the 20% off form once more for unidentified visitors. In Targeting & display behavior > Targeting, set Audience to Don’t show to existing Klaviyo profiles. Keep Discount tier set to 20% and submit to the same main email list. This audience setting replaces the segment inclusion and list exclusion settings.
Include discounts in your welcome series
Use the Discount tier saved by each form to choose the first welcome email. This keeps the email offer aligned with the form instead of recalculating the tier from browsing or purchase history. Reserve this property for these forms, since a later submission can update its value.
If Discount tier is not available in the condition picker, add the custom property to a test profile first. Use the same spelling and text values as in the forms.
When you add a Split before existing messages, those messages move to its first path. Check that path before adding more emails. Keep the first email on each path specific to its offer, and use the guidance below to place any shared follow-up messages after the paths join.
- Open your existing welcome series for the main email list, or go to Flows > Create flow > Build your own to create one. For a new flow, enter a name and click Create manually (or Create flow if the manual option is not shown). Choose Added to list, select the same main email list used by your forms, and save the trigger.
- Drag Split from Logic onto the flow before the first email and any time delay, then select it. You can use 1 split with multiple paths for the discount tiers.
- On the first path, click Add path criteria. Choose Properties about someone, select Discount tier, and set it to equal 20% as text. Save the path criteria. Use Add path to create paths for 15% and 10%, saving each path’s criteria.
- Use Everyone else for the no-discount welcome email. This includes profiles with Discount tier set to None and subscribers who join the list without one of the 3 discount values.
- Add or edit the first welcome email on each path. Insert the matching 20%, 15%, or 10% coupon in the discount emails, and leave the no-discount email without a coupon. For unique coupons, use the coupon’s personalization tag; for static coupons, enter the code directly. If you also show a coupon on the form’s success step, use the same coupon in that tier’s email.
If your builder shows Conditional split instead of Split, check Discount tier for 20% in the first split, then add checks for 15% and 10% on the successive NO paths. Send each matching YES path its discount email, and use the final NO path for the no-discount email.
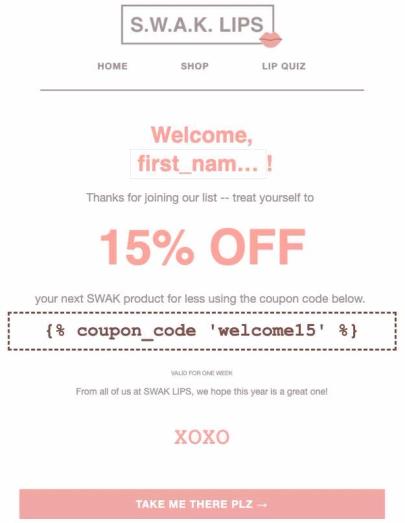
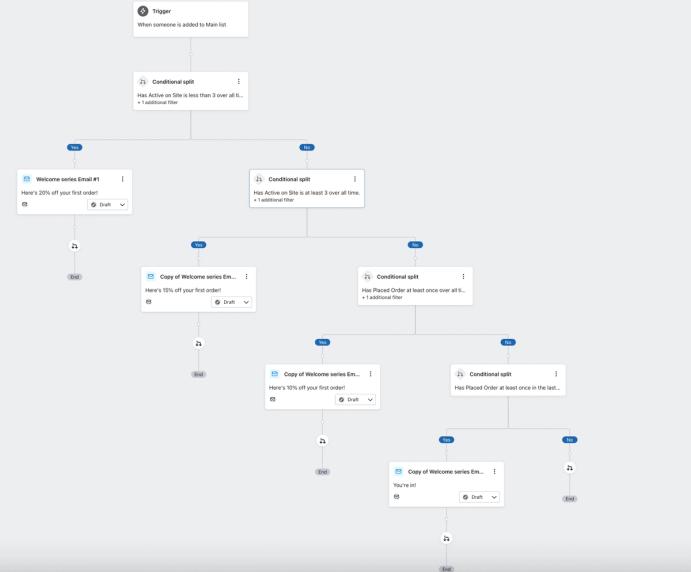
Depending on how you would like contacts to move through the flow after they receive the first email, you may want to join the paths to streamline the experience. From here, you can follow our other welcome series best practices.
Test and publish
- Preview the welcome emails and check the flow paths using test profiles with each Discount tier value, plus a profile without the property. When the flow is ready, click Review and turn on (or Update status for an existing flow), choose Live, and save.
- For each form, click Publish or schedule, choose Publish now, resolve any blocking alerts, and click Publish now to confirm.
- Test each offer with an email address that is not already on the main list. For a segment-targeted form, use an identified test profile that meets its segment conditions. For the unidentified-visitor form, use a new private browsing session. Confirm the subscription if double opt-in is enabled, then check that the profile has the expected Discount tier and receives the matching welcome email and coupon.
Additional resources
- How to create an email welcome series
Learn how to create a sequence of emails sent directly after someone subscribes to hear from your brand. This is a critical moment in the customer lifecycle because it's your opportunity to introduce new, interested prospects to your business and product offering. With a welcome series, you should capitalize on this display of interest.
- How to create and target a segment of recent cart abandoners
Learn how to identify site visitors who have recently abandoned a cart in order to target them across marketing channels. For example, you can create a recent cart abandoners segment and sync it to Facebook Custom Audiences to drive them back to your site, or you can create an exit-intent popup targeting shoppers as they're about to leave your website. While it's not possible to dynamically display the specific items left in someone's cart as you would in an abandoned cart email, you can still remind them of items left behind with the language and CTA you use.
- Getting started with coupon codes in Klaviyo
Learn how to create and upload unique and static coupon codes in Klaviyo to incentivize customers to engage with your brand. Offering an incentive can help you improve the customer experience, resulting in higher sales and increased lifetime value.