How to create a SMS and RCS automation
Only Owners, Admins, and Managers can access this feature, and you must have also set up SMS in Klaviyo.
You will learn
Learn how to build an automation, a type of text message conversation that allows you to ask questions, followup to responses, and send personalized recommendations. You can build two types of automations
- Branched automation from keywords and/or question choices
- Single-step automation with a message
For instance, you can run quizzes, surveys, one message keyword responses, and buying guides all through SMS and RCS. Not only is this a quick and easy way to engage your audience, it is a great way to gather zero-party data to inform your marketing strategies.
Note that this article focuses on the steps to create an automation. For details on how automations work, their settings, etc., see getting started with automations.
Before you begin
Please note the following:
- Automations only reply to text messaging SMS subscribers.
- SMS automations are not available for branded sender IDs, as this number type cannot receive text messages. They are available for RCS-enabled accounts and RCS-enabled phones.
- Your outbound messages count against your Mobile Messages plan.
Setup an automation
- Navigate to Automations.
- Click Create automation.
- Once in the new automation, click on the Trigger.
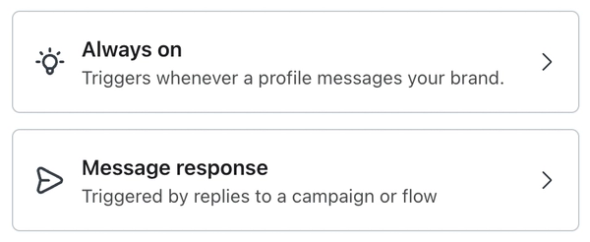
- Select a trigger type from the right sidebar, either:
- Always on (automation will always send and is not time bound).
or - Message response (specific to a campaign or flow message).
- Always on (automation will always send and is not time bound).
- Automations require an inbound channel match. If a customer messages a brand through an automation, their message must be sent through the same channel in order for the automation to work.
- For example, there's an automation configured via SMS. A customer must reply to that automation via the SMS thread in order for it to work. They can't reply via WhatsApp, etc.
Set up trigger keywords
- Type in the word you want as the trigger keyword. Please note that:
- Depending on the type of trigger, each one works differently
- Always on
- Matching type: Needs an exact match.
- Ex: if you use “Pets” as a trigger keyword, the automation will not trigger for “Pets,” and not “pet” or “petsitter."
- Matching type: Needs an exact match.
- Message response
- Matching type: It checks to see in an inbound message text contains a match, or what's called "fuzzy matching."
- Ex: if you use “Pets” as a trigger keyword, the automation will trigger for “Pets,” and “pet” or “petsitter.
- Matching type: It checks to see in an inbound message text contains a match, or what's called "fuzzy matching."
- Always on
- Please note that trigger keywords:
- Must be 3 or more characters. Max characters is 20.
- Must be unique (i.e., they cannot be used for any other automation)
- Can be a phrase and contain spaces: "I love pets"
- Trigger keywords are not case sensitive. "PETS" will still trigger "pets."
- Cannot contain special characters (i.e., +, -, &)
- Cannot be linked to a subscribe or compliance keyword (i.e., STOP, JOIN)
- Depending on the type of trigger, each one works differently
- Click Save.
- Optional: to add more trigger keywords:
- Click the trigger again.
- Select Add keyword.
- Optional: to add more trigger keywords:
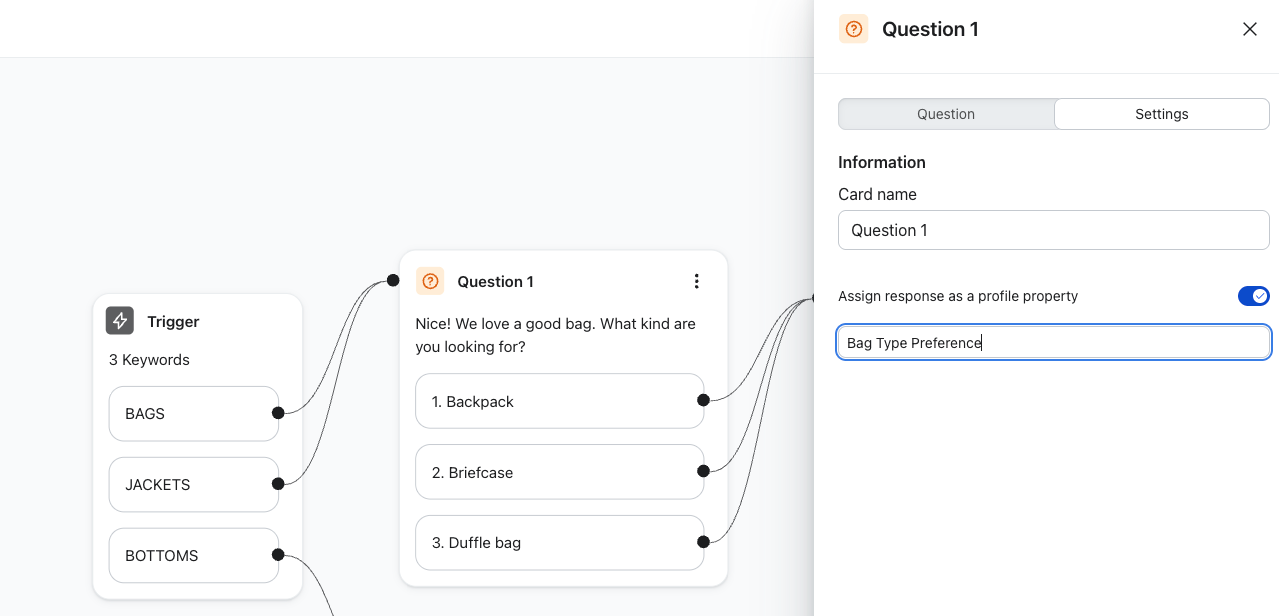
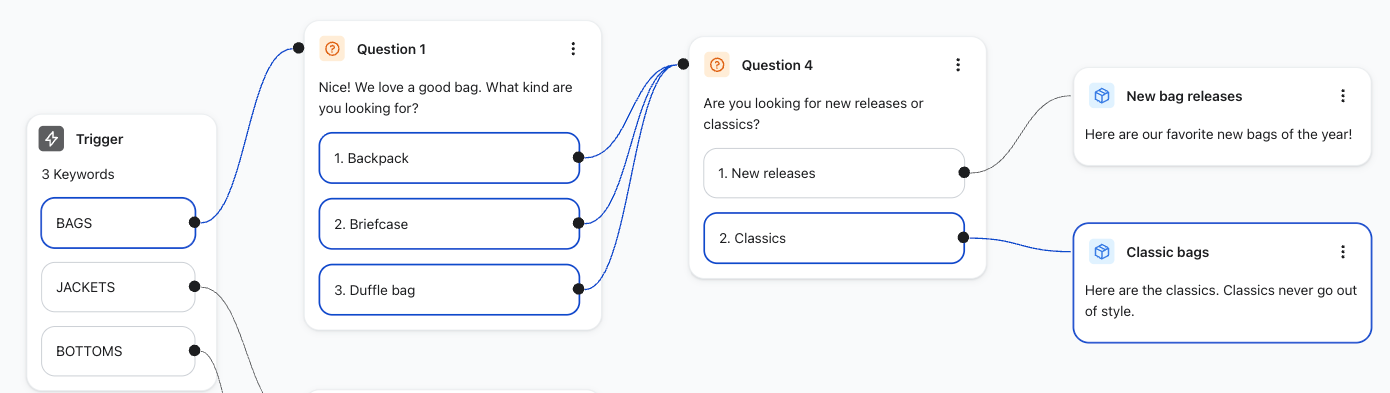
- Optional, but highly recommended: to set profile properties based on the keyword trigger, toggle on the Assign responses as a profile property option.
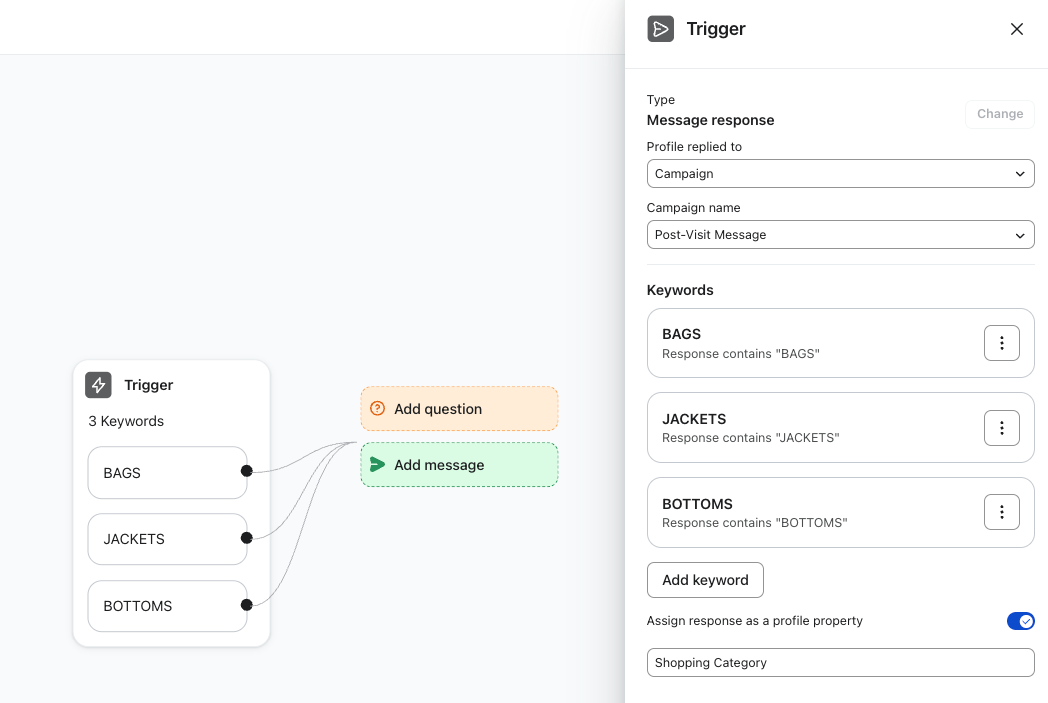
- For the example below, this creates a new custom profile property of “Shopping Category” to be either “Bags,” “Jackets” or “Bottoms”
- Select Save.
Build a branched automation
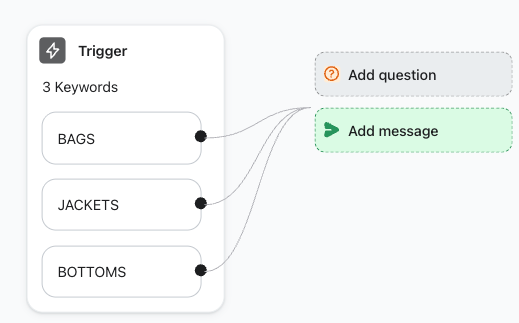
Branching from Keywords
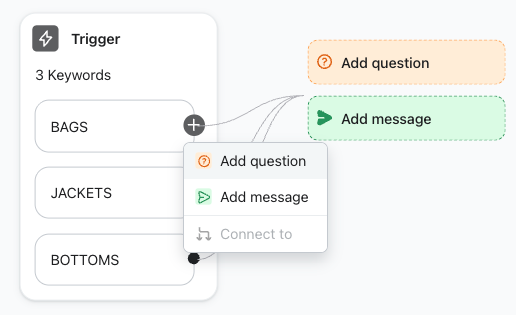
- Click the black dot on the keyword tile to open the Action Menu
- From here, you can Add Question or Add Message from an individual keyword if you want create a custom response from a keyword
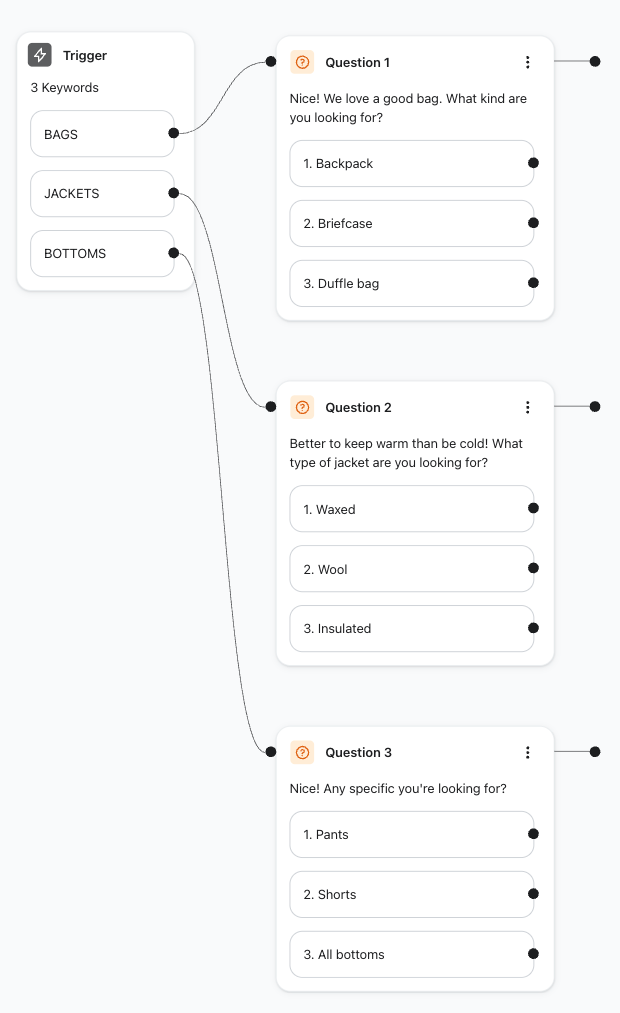
- For example, asking a new set of questions, or sending a single message, if someone replies with "Bags" "Jackets" or "Bottoms"
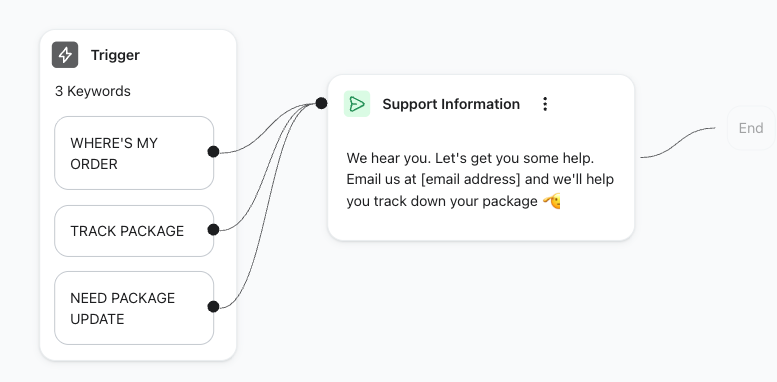
A branched keyword automation with personalized questions for each keyword
- Or you can have all keywords branched to the same message or question by clicking on the large Add question button
- For example, adding the same question or message from all keywords: or a single message if someone replies with "Bags" "Jackets" or "Bottoms"
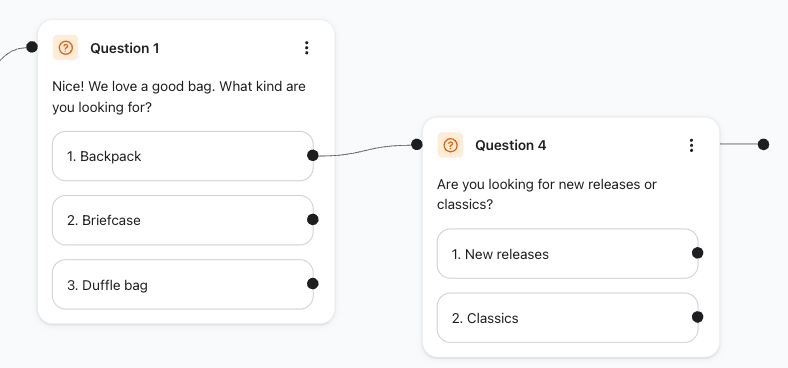
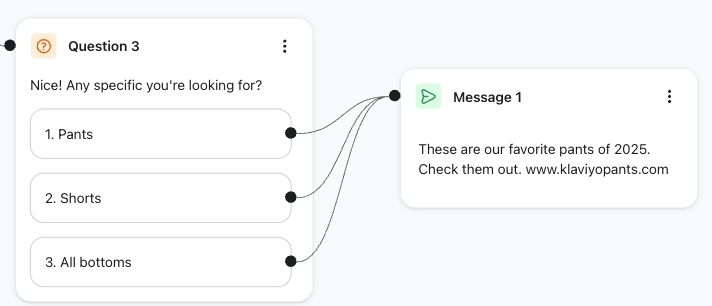
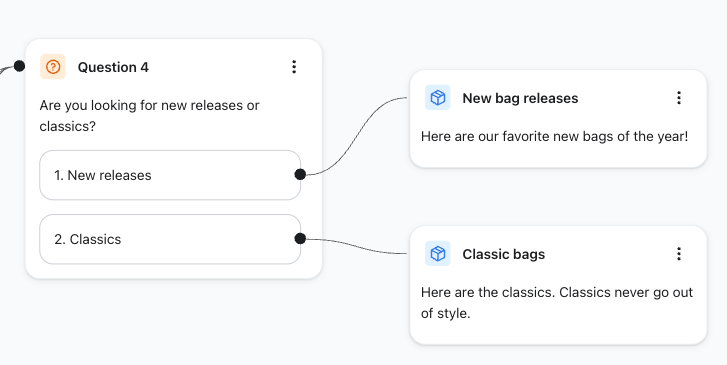
Creating Branches from Questions
- After adding a question, you can add another card branching from a question's choice. The branched path can be a Question, Message, or Recommendation
- To open the Action Menu, click the black dot on the question choice
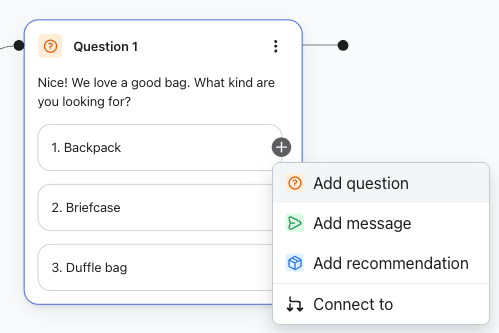
Add Question
- Click Add Question to ask a question with multiple choices.
- Optional: name your question in the Internal name field. Naming your messages makes it easier to refer back to them later.
- Add your question in the Question box.
- Include at least 2 choices for the question. Note that:
- Choices are numbered sequentially.
- Subscribers can reply with either the choice text or the number.
- Choices are recognized using “fuzzy” logic:
- A choice can appear anywhere in a message (including as part of another word).
- Abbreviations or misspelled words may be recognized (although it is not guaranteed).
- Be 1 or more characters. Max characters is 20.
- Best practices for choices are to not use:
- Single numbers or letters as choices (e.g., the number “21” or only the letter “A”).
- Hard-to-spell words.
- Long phrases.
- Include at least 2 choices for the question. Note that:
- Select Save.
- Unique questions can be added to every question's response if desired.
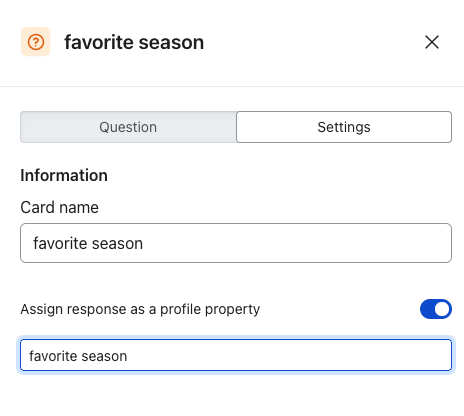
- Optional, but highly recommended: to set profile properties based on choices, toggle on the Assign response as a profile property option in the Settings tab.
- For the example below, the response "Backpack" can be saved as a new custom profile property for "Bag Type Preference."
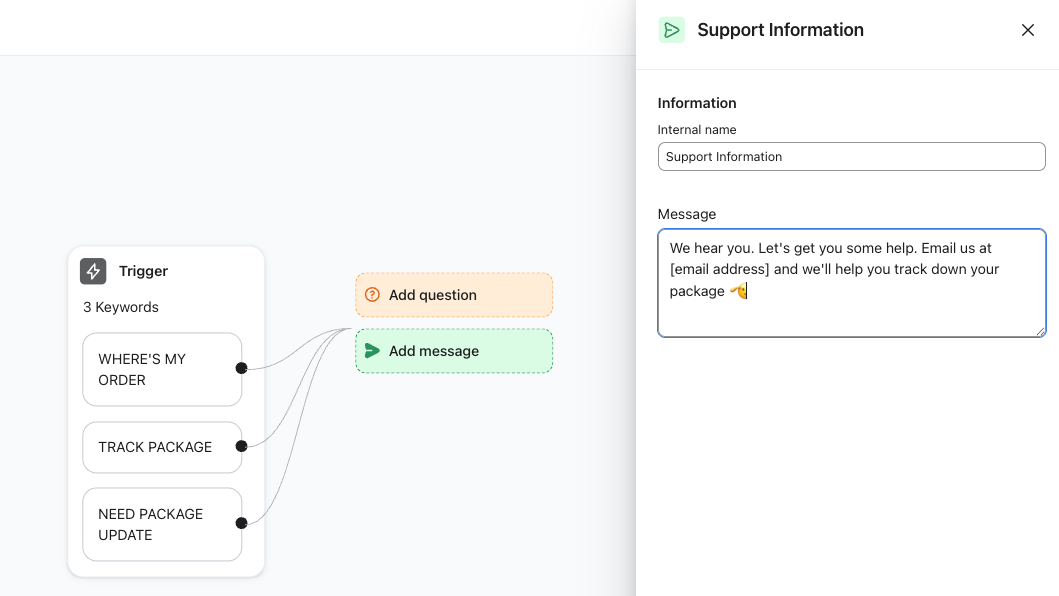
Add Message
- Click Add Message to respond with plain text.
- Optional: name your message in the Internal name field. Naming your messages makes it easier to refer back to them later.
- Select Save.
- You cannot add Recommendation or Question after adding a Message
Add Recommendation
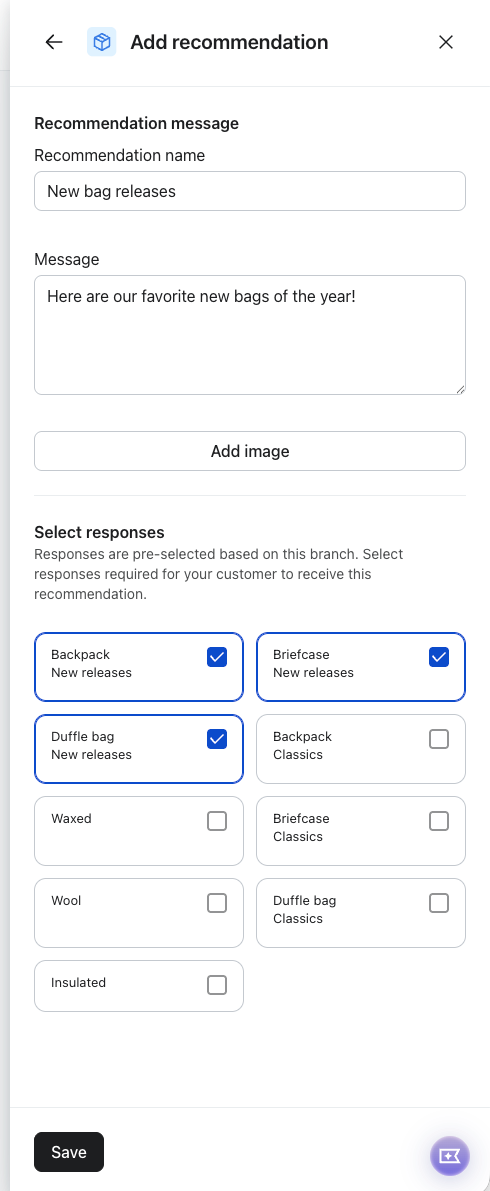
- Click Add Recommendation to respond with plain text and an image.
- Select the Response Combinations for the Recommendation
- Note: Recommendation combinations are automatically selected for you because that's what matches the branched path you have already create
- Select Save.
- You cannot add a Message or Question after adding a Recommendation
- To view where the recommendation is connected and associated branches, click the branch or hover over the Recommendation in the drawer.
Connect To
- Click Connect to to branch an existing question response to another card: question, message, or recommendation
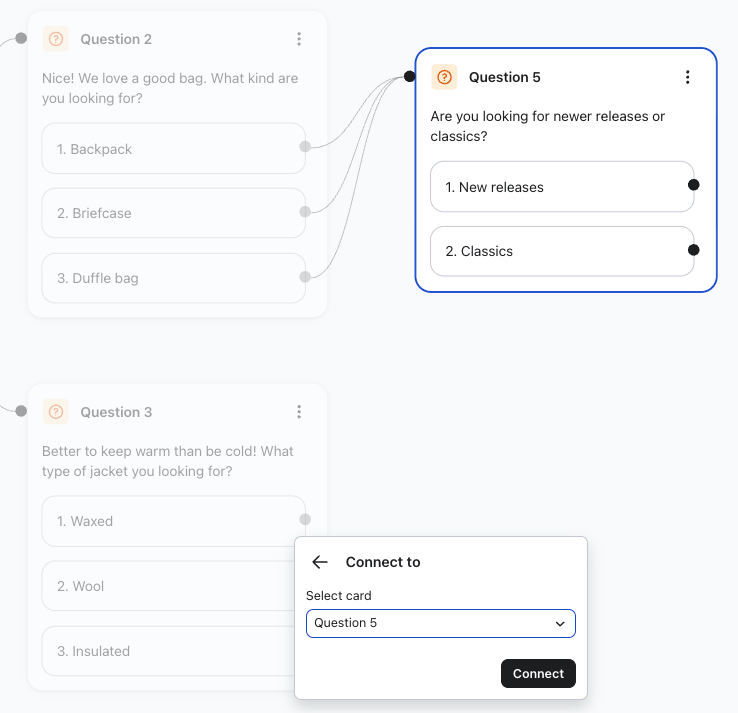
- Select the card in the dropdown menu. Hovering over the card name will help you see which one you will be selecting.
- Click Connect to build a branch from the question choice to another card
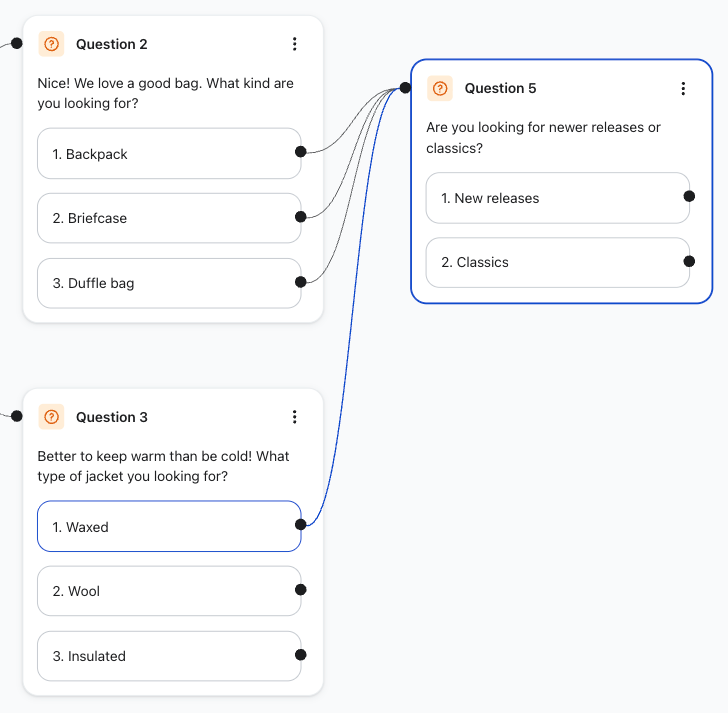
- You can have multiple branches leading, or converging, to one card
Branching from Questions
- After adding a question, you can add another action from a question's choice
- For example, if a user replies with "Beginner" for a skiing experience question, you can create a new automation path for that response.
- The automation path could be a message, question, or recommendation
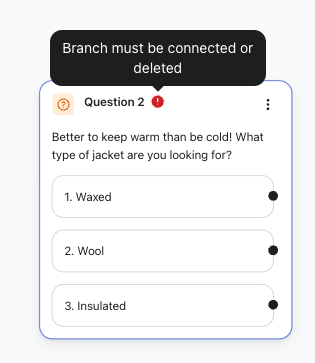
Isolated Cards or Branches
- It's possible for a card to be isolated from a branch when a question, message, or recommendation is disconnected from an original path
- Once a card becomes isolated, Recommendations need to be reset with the updated combinations.
- Isolated cards appear underneath the primary branched paths
- Automations cannot be activated with isolations. They need to be connected to a card in order to continue. The easiest way to do this is by selecting Connect To and selecting exists cards. The card will be automatically re-branched in the area where it's newly connected
Build a Single-step Automation
Set up trigger keywords
- Type in the word you want as the trigger keyword. Please note that:
- Depending on the type of trigger, each one works differently
- Always on
- Matching type: Needs an exact match.
- Ex: if you use “Pets” as a trigger keyword, the automation will not trigger for “Pets,” and not “pet” or “petsitter."
- Matching type: Needs an exact match.
- Message response
- Matching type: It checks to see in an inbound message text contains a match, or what's called "fuzzy matching."
- Ex: if you use “Pets” as a trigger keyword, the automation will trigger for “Pets,” and “pet” or “petsitter.
- Matching type: It checks to see in an inbound message text contains a match, or what's called "fuzzy matching."
- Always on
- Please note that trigger keywords:
- Must be 3 or more characters. Max characters is 20.
- Must be unique (i.e., they cannot be used for any other automation)
- Can be a phrase and contain spaces: "I love pets"
- Trigger keywords are not case sensitive. "PETS" will still trigger "pets."
- Cannot contain special characters (i.e., +, -, &)
- Cannot be linked to a subscribe or compliance keyword (i.e., STOP, JOIN)
- Depending on the type of trigger, each one works differently
- Click Save.
- Optional: to add more trigger keywords:
- Click the trigger again.
- Select Add keyword.
- Optional: to add more trigger keywords:
Add Message for Single-Step Automation
- Click Add Message to respond with plain text to the keywords.
- Optional: name your message in the Internal name field. Naming your messages makes it easier to refer back to them later.
- Select Save.
- Please note:
- At this point you can save the automation and are not required to add a Recommendation or Question.
- You cannot add Recommendation or Question after adding a Message
- Please note:
Add Question
- Click Add Question to ask a question with multiple choices.
- Optional: name your question in the Internal name field. Naming your messages makes it easier to refer back to them later.
- Add your question in the Question box.
- Include at least 2 choices for the question. Note that:
- Choices are numbered sequentially.
- Subscribers can reply with either the choice text or the number.
- Choices are recognized using “fuzzy” logic:
- A choice can appear anywhere in a message (including as part of another word).
- Abbreviations or misspelled words may be recognized (although it is not guaranteed).
- Include at least 2 choices for the question. Note that:
3. Optional: to add more choices, select Add Choice.
4. Optional, but highly recommended: to set profile properties based on choices, toggle on the Assign response as a profile property option in the Settings tab.
- For the example below, this creates a new custom profile property of “Favorite Season” to be either “Summer" or “Winter."
5. Select Save.
6. Optional: add more questions by clicking the plus (+) button and selecting Add question.
- Number of messages are limited depending on the automation trigger.
- Always on
- Limited to 4 questions.
- Message response
- Limited to 3 questions.
- Always on
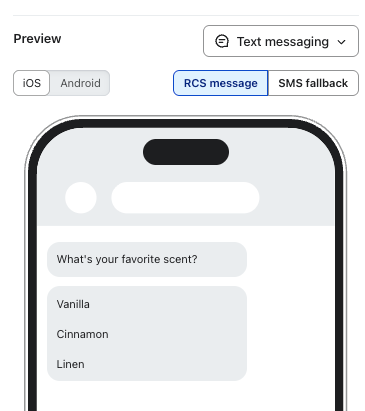
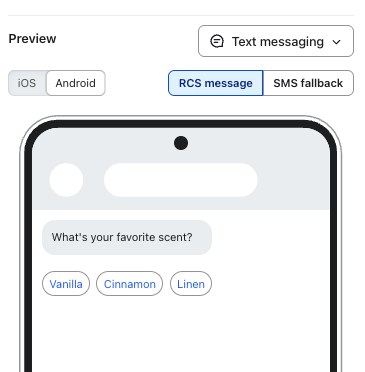
Note: Questions formatted for RCS
- Click Add Question to ask a question with multiple choices.
- If your account is RCS-enabled, you will see a RCS toggle in the Question previewer
- RCS formatting depends on the phone device
- iOS are buttons
- Android are a chiplist
- Users can click on these interactive components to reply to a question in an automated conversation
- RCS formatting only appears for RCS-enabled phones
- To learn more about RCS, visit this article
iOS
Android
Complete your automation
Add recommendations or Add Message
- After your questions, select the plus (+) button and then click Add recommendation or Add Message to finish the automation.
Optional: adjust your settings
Optional: adjust any session settings for your automation. To do so:
- Click the gear icon in the upper right.
- Select Session settings.

- You can update the following settings:
- Reprompt response
- Fallback response
- Maximum number of reprompts
- Maximum timeout (in hours)
- Channels (WhatsApp)
Preview and turn on an automation
Once you're happy with your automation:
- Preview the automation by clicking the "play" button in the upper right
- The preview is slightly different from the live experience. It doesn't catch typos or show link shortening. Learn more about previewing an automation.
- For RCS automations, the buttons and chiplist will appear correctly
- Double-check your trigger keywords, questions and choices, messages, and recommendations.
- Once the automation is on, you must turn it off to edit it, which causes it to immediately drop everyone currently in the automation.
- Click Turn on in the upper right.
Once you turn on an automation, it will send to any SMS subscriber who sends a trigger keyword.
Additional resources
- Getting started with SMS automations
Find out about Automations in Klaviyo, which you can use to create automated 1-on-1 conversations with your SMS subscribers. Automations make it easy to ask questions, recognize responses, and provide personalized recommendations to your customers.
- How to preview automations
Learn how to see how automation messages will appear to customers as well as how to test the entire automation without turning it on.
- How to view analytics for an automation
See how to check the performance of an automation, including how many people entered or completed it.