Getting started with Meta Ads
You will learn
Learn how to integrate Meta Ads with Klaviyo. The advertising integration with Meta provides two main features:
- Sync lists and segments to Meta as custom audiences so that you can advertise to these subscribers, as well as create Lookalike Audiences.
- Sync subscribers who sign up via Meta lead ad forms to Klaviyo.
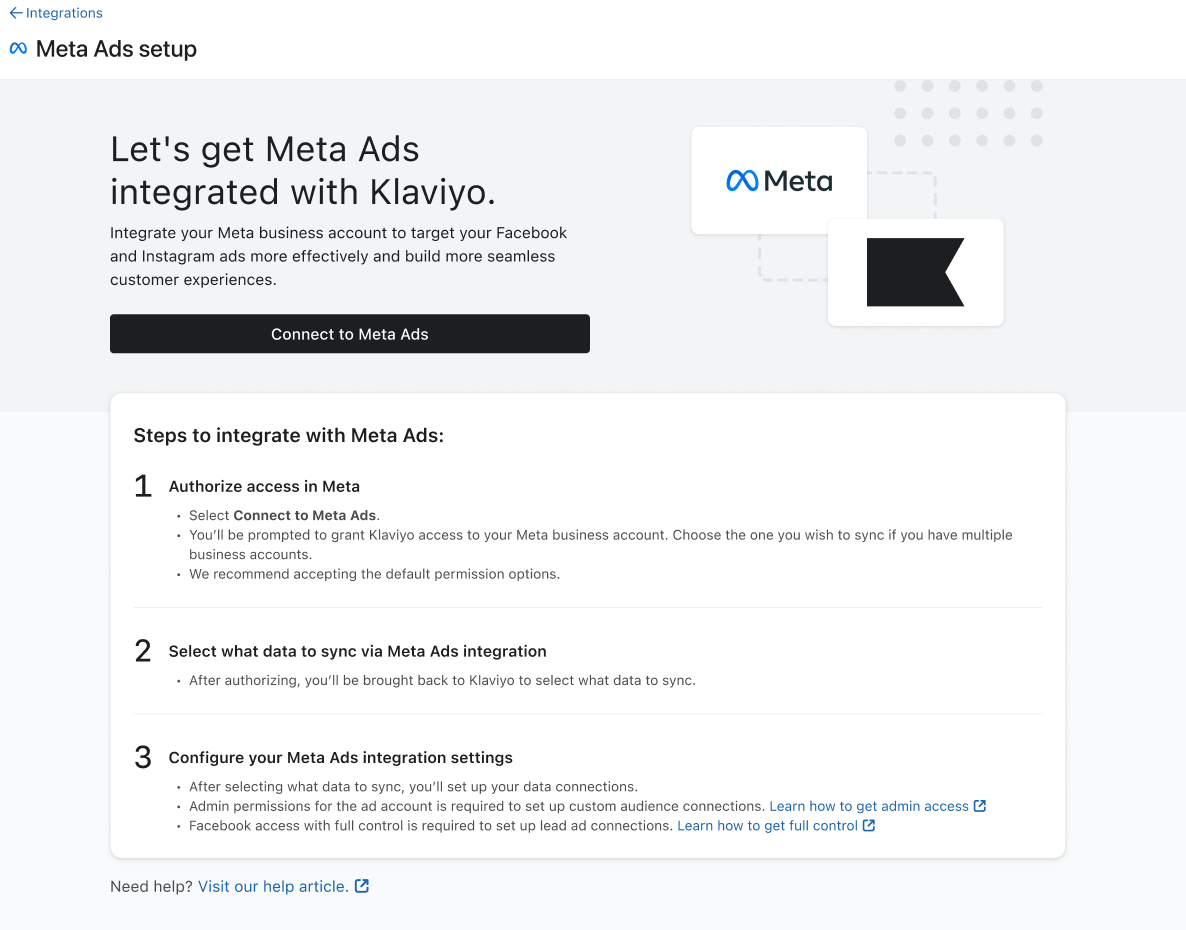
Add the Meta Ads integration
- In Klaviyo, select the Integrations tab.
- Click Explore apps and search for Meta Ads, then click on the card.
- On the next page, click Install.
- Next, click Connect to Meta Ads. You will be directed to Meta to log in, if you haven't already.
- Review and accept Meta's terms of service, if needed.
- Confirm your Meta login using the personal Facebook account tied to your Meta business account. Ensure you are logged in to the correct account and click Continue as...
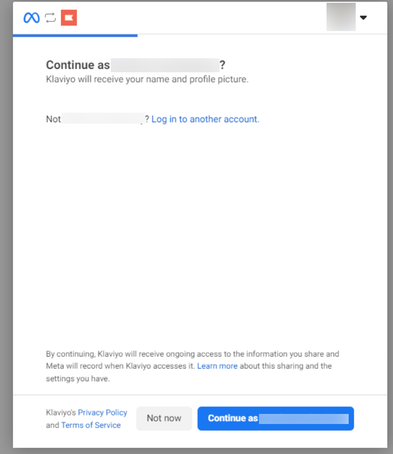
- If you encounter issues with Meta Ads permissions, consult our article Troubleshooting your Meta Ads integration.
- Back in Klaviyo, you'll be asked what data you want to sync: select custom audiences, lead ads, or both. Then, click Next.
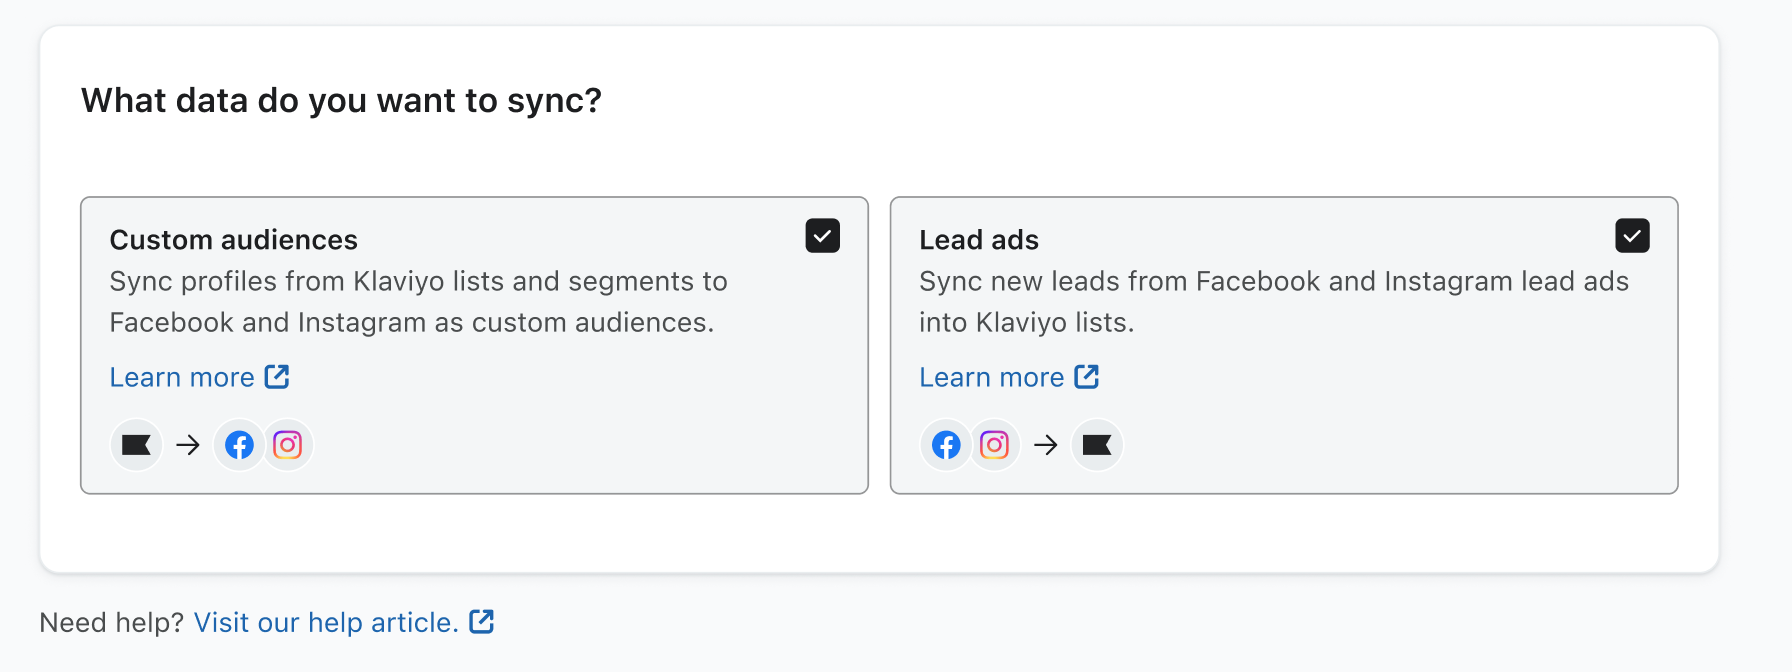
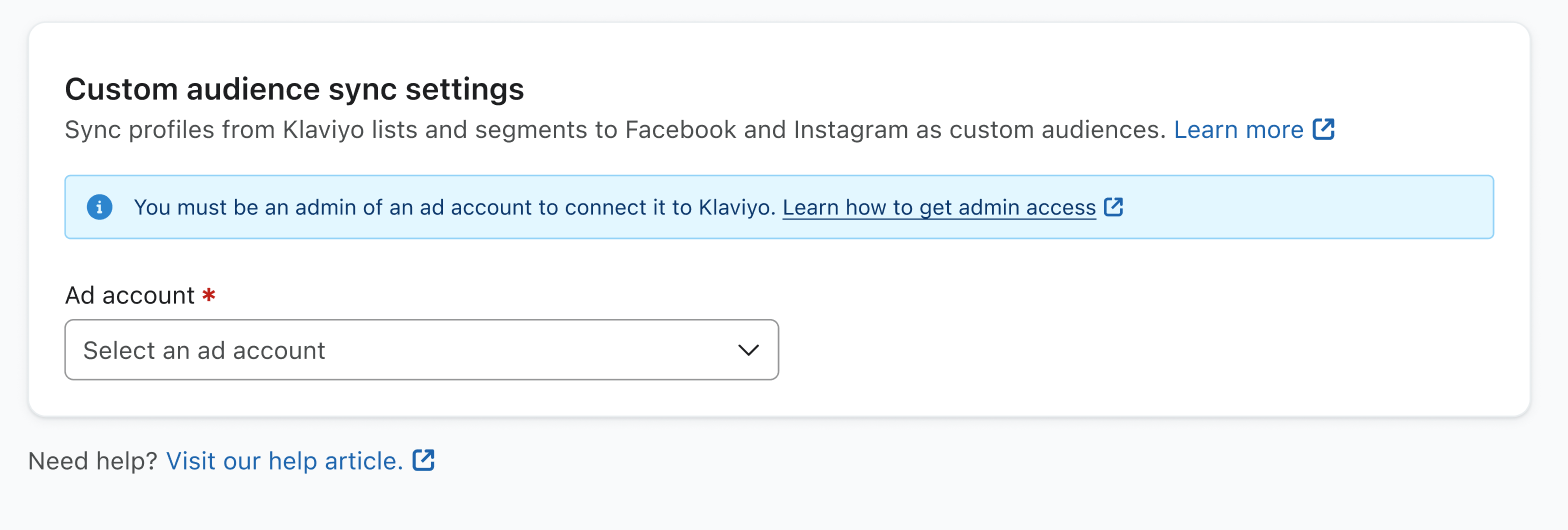
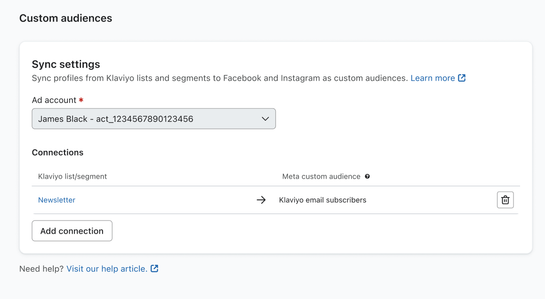
- For the custom audience sync:
- Select the ad account you want to use.
- Select the ad account you want to use.
- Click Add connection, then select a Klaviyo list/segment and a Meta custom audience to connect. The syncs you create must be one-to-one between Klaviyo lists or segments and Meta custom audiences.
- Add more connections if desired.
- When you're done, click Next.
- For the lead ad sync:
- Select the Facebook page you want to use.
- Click Add connection, then select a Meta lead ad, a Klaviyo list you want to connect, and the subscription you want to apply (email, SMS, email and SMS, or do not subscribe).
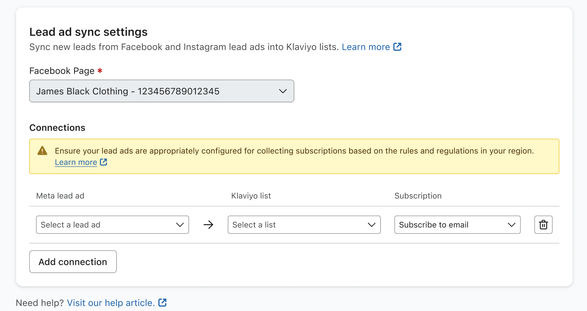
- Add more connections if desired.
- When you're done, click Complete setup.
- You'll receive a success message that your Meta Ads account is now connected to Klaviyo.

Data from lead ads syncs to Klaviyo in real time, while custom audiences can take 24-48 hours to update in Meta. This is due to a delay in Meta accepting and processing profiles from Klaviyo.
More about the custom audience sync
When planning your custom audience sync, be sure to choose a list or segment with over 100 profiles; Meta requires a minimum of 100 profiles to create a custom audience.
As profiles are added or removed from your list or segment, they will also be added or removed from that audience on an hourly basis. One thing to note is that only email addresses within Klaviyo that are associated with a Meta login will be synced, so the size of your audience may not match exactly with the size of your list/segment.
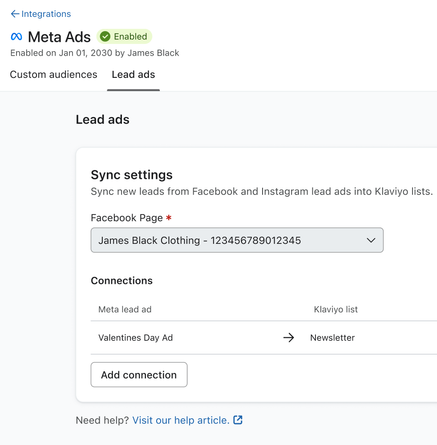
You can always add a custom audience sync at a later time. To do this, select the Integrations tab, find the Meta Ads integration, and click View Settings. Navigate to Custom audiences tab, and click Add connection at the bottom.
You can also edit connections here.
More about the lead ad sync
You can sync lead ads using the same lists as your custom audiences. You can also set up more lead ad connections after initially integrating. To do this, select the Integrations tab, find the Meta Ads integration and select it. On the Lead ads tab, and click Add connection.
When you connect a Meta lead ad to a list in Klaviyo, all future sign-ups will be added to your list. If you want to add contacts that signed up to your lead ad prior to integrating with Klaviyo, you must export the list from Meta and import the contacts into Klaviyo.
Want to learn more about collecting subscribers via lead ads, including how to edit existing connections? Check out our article How to sync Meta lead ad subscribers to Klaviyo.
The Filled Out Lead Ad metric
Whenever someone fills out a lead ad form, Klaviyo will track a Filled Out Lead Ad event. A timeline view of all lead ad activity can be viewed by navigating to the Metrics tab, under the Analytics dropdown, and filtering by Meta Ads. The metric will appear only after a lead ad has been filled out. If there are currently no Filled Out Lead Ad metrics in your account, we recommend you check to ensure a lead ad has been filled out.
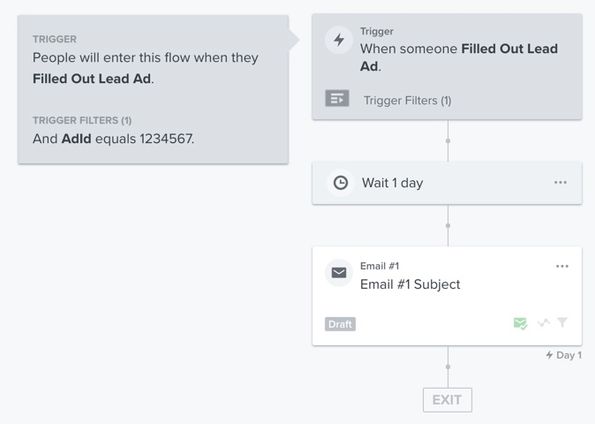
You can use the Filled Out Lead Ad event to build segments and trigger or filter flows. For example, you may want to create a welcome series flow for new Meta leads - just be sure to filter them out of the list's main welcome series.
The example below shows a flow triggered by the Filled Out Lead Ad metric. This flow also contains a trigger filter that only captures customers who fill out the ad with AdId 1234567.
All new Meta leads who are added to a Klaviyo list will also have this Filled Out Lead Ad metric attached to their individual profiles. If a profile already exists associated with the lead's email address, Klaviyo won't create a duplicate, but instead will start tracking Meta Ads data on the person's existing profile.
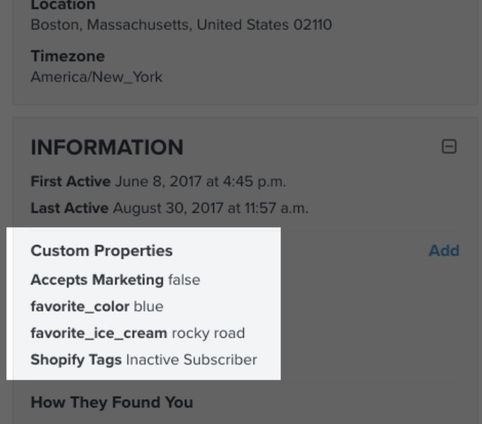
Any questions or additional fields on your lead ad form will also sync to Klaviyo for each new lead. These form responses will get recorded as custom properties on the lead's Klaviyo profile.
Manage your ad integrations from the Lists & Segments tab
You can create or update Meta custom audience syncs (or syncs for any other advertising platform) from within Klaviyo’s Lists & Segments tab.
To do this:
- In Klaviyo, select Lists & Segments in the left hand navigation.
- You’ll see ad platform icons in the Integrations column for each list and segment connected to an ad integration audience.
- To see more details for a given list or segment, click the three dots and select Linked integrations.
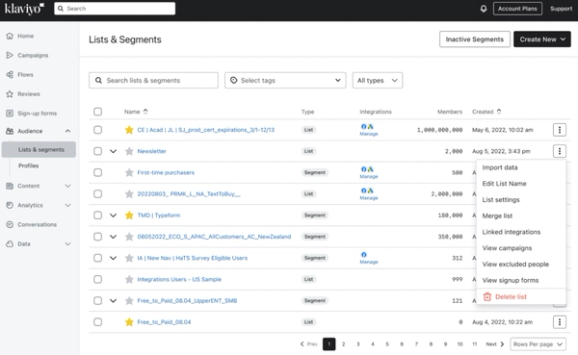
- You’ll be brought to the Integrations tab found within the list or segment’s Settings tab.
- Here, you’ll be able to do the following:
- Connect a new ad integration.
- Activate or deactivate a sync for the list or segment.
- Add a new sync for the list or segment, and select the corresponding Meta custom audience.
- After making any changes, click Save.
Best practices
Custom audiences
You can use the existing data in your Klaviyo account for targeted Meta ads as well.
Some common segments for retargeting in Meta include:
- Cart abandoners
Target customers who started a checkout in the past seven days, but haven't placed an order in the past seven days, with an ad that echoes the message or discount you provide in your abandoned cart flow. - Winback
Target customers that haven’t purchased in a while featuring popular or trending items. - Re-engage
Target inactive subscribers with a relevant ad featuring items they’ve viewed on your site or featuring a limited time offer promotion. - Cross-sell
Target customers who have bought one product (e.g. pants) with a different but complementary product (e.g. shirts). - New customer
Target those that have visited your site but never purchased to encourage first-time conversions. - Cross-channel
Target those you're already reaching by email with a relevant ad that reinforces the message and has a similar call-to-action (CTA). - Lookalike
Take a VIP list or segment in Klaviyo and create a lookalike audience in Meta to reach new leads that resemble your best customers.
Lead ads
In Klaviyo, you can create a segment of VIP customers or otherwise engaged subscribers. You can build this segment based on different criteria, such as:
- Website activity
Use Active on Site and Viewed Product metrics to segment frequent site visitors. - Purchase behavior
Use a Placed Order metric and apply a frequency and/or a timeframe filter to capture loyal customers (for example, everyone that has placed at least 2 orders in the last 6 weeks). - Lifetime value
Use the Revenue metric to segment those that have purchased over a certain amount over all time.
Sync this VIP segment to a custom audience in Meta. Once you do this, you can create a lookalike audience to try to find new customers with similar interests and attributes. Target this audience with the same introductory offer you would run on your website, except in order to receive it, all they need to do is fill out the form attached to your lead ad.
From here, when these new leads come into Klaviyo through your lead ad, you can trigger a targeted welcome series flow to get these new prospective customers to use their offer.
Outcome
You've now integrated Meta Ads with Klaviyo account and learned about best practices for using the integration.
Additional resources
Klaviyo resources
- How to sync Meta lead ad subscribers to Klaviyo
- Meta Ads data reference
- How to determine your Meta audience sync strategy