How to A/B test offers using sign-up forms
You will learn
Learn how to to A/B test different types of promotions in sign-up forms, so you can determine which type performs best and deliver that offer to new subscribers. Offering a perk, like a discount or free item, can motivate site visitors to subscribe and learn more about your brand; however, it can be hard to tell whether your perk is working, or if there’s an alternative that would be more effective.
This guide will cover how to A/B test a sign-up form with 2 different types of offers, and how to deliver the correct promotion to those who subscribe to each one.
Test offers using a form
You can use an A/B test on a sign-up form to experiment with different offers . This will help you understand which ones perform best and are most compelling for your specific audience. For example, you can compare how a 10% discount compares to a free shipping coupon.
To create an A/B test for 2 different offers:
- Create a new sign-up form or open an existing one.
- Edit the design and content of the sign-up form so it includes 1 of the offers that you'd like to test. This will be variation A in your test.
- In the top left corner of the editor, click Create A/B test.
- Adjust the names of the 2 variations that you plan to test so that you can easily distinguish between the 2 of them. Then, click Create test.
- Switch to Variation B using the dropdown arrow in the top right. Here, edit the form’s copy to indicate the new offer you plan to test in this version.
- Add a hidden property indicating this form version's respective offer. You’ll use this later when you set up the flow to deliver the correct offers to your new subscribers.
- To add a hidden property, click the submit button in the form editor. Under Submit Hidden Fields, click Add a property. Set Profile Property to Offer, and set Value to match the offer in your form version. For example, if your variation A offers a 15% discount, you could set the value to 15% off.
- Toggle back to the other variation of your form, then add a hidden offer property there as well. Make sure to set the value to matches the offer specified in this variation (e.g. free shipping).
- Once you’ve built both versions of your form and added a unique hidden property to each, click Continue to test settings.
- Customize the traffic and winner selection settings for your A/B test.
- When you're ready to set both variations of your sign-up form live, click Publish A/B test.
- Finally, test your form by filling it out.
- Navigate to your site and trigger the form to appear. Make sure you meet the conditions for the form set in the Targeting & Behaviors section, or it may not appear for you. Once you fill out the form, the new hidden property will be added to your profile in Klaviyo, which is important for the next step: creating your flow.
Deliver the right offer to subscribers
After building your 2 form versions and setting them live, you’ll need to deliver the correct offers to those who subscribed to each one. To do so, create a flow and use a flow filter and a conditional split:
- Navigate to Flows > Create from scratch.
- In the flow builder, select List from the Trigger Setup pane in the left-hand sidebar.
- Set the list connected to your sign-up form as the flow trigger list. If you need to double check the list, navigate to Sign-up forms, then look under the List column next to your form.
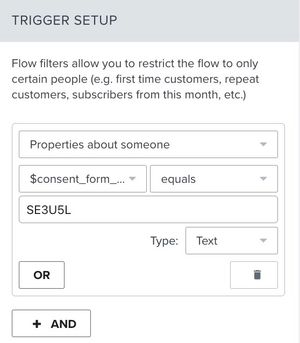
- Click Flow filters > Add a flow filter.
- Set the following definition: Properties about someone > $consent_form_id, and select your form’s ID as the Dimension value.
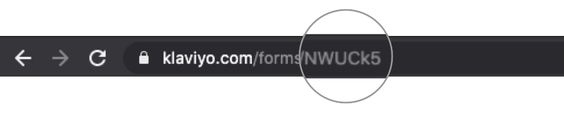
- You can locate any form’s ID by navigating to the form editor and viewing its URL. The form ID will be a six-character code at the end of the URL.
If you have any other welcome flows triggered by the same list, make sure to exclude these new subscribers from that welcome flow. You can exclude them by entering the flow builder for the welcome flow, then adding this flow filter: Properties about someone > $consent_form_id > doesn’t equal > [your form ID] (with the ID representing your offers form ID).
- Once the flow filter is set, click Save > Done.
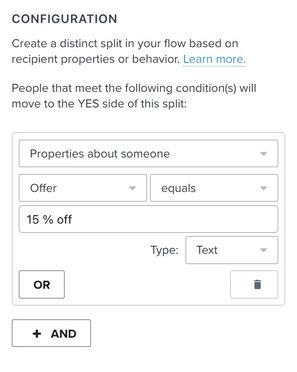
- Drag a Conditional Split block into the flow, then configure the condition to Properties about someone.
- Under Dimension, select Offer (or whichever name you used in the hidden property). In the Dimension value section, select 1 of the 2 offers.
- Don’t see the dimension or dimension value available in your flow filter dropdown? Make sure you’ve tested your form by filling it out. When you fill out the form, the property and value will be added to your profile properties in Klaviyo, as well as the flow filter dropdown.
- Don’t see the dimension or dimension value available in your flow filter dropdown? Make sure you’ve tested your form by filling it out. When you fill out the form, the property and value will be added to your profile properties in Klaviyo, as well as the flow filter dropdown.
- When the conditional split is set, click Save.
- Beneath the Yes path of the split, drag and drop a welcome message (email or SMS, depending on your form) that includes the appropriate offer. In this case, an email with a coupon code for 15% off.
- Add another message under the No path with the second offer you’re testing in your A/B test.
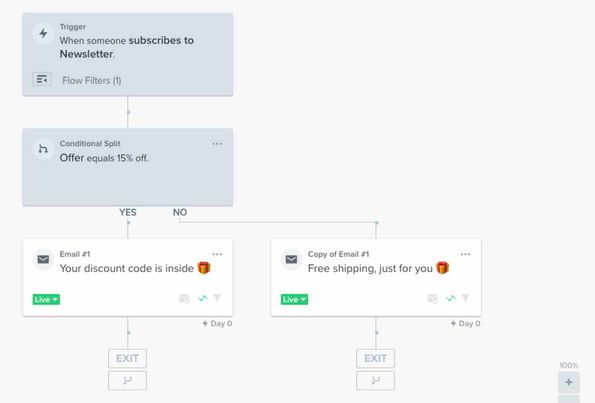
- Once the messages are ready, set your flow live. New subscribers will be directed down the correct path based on the offer they saw in their sign-up form.
Next steps
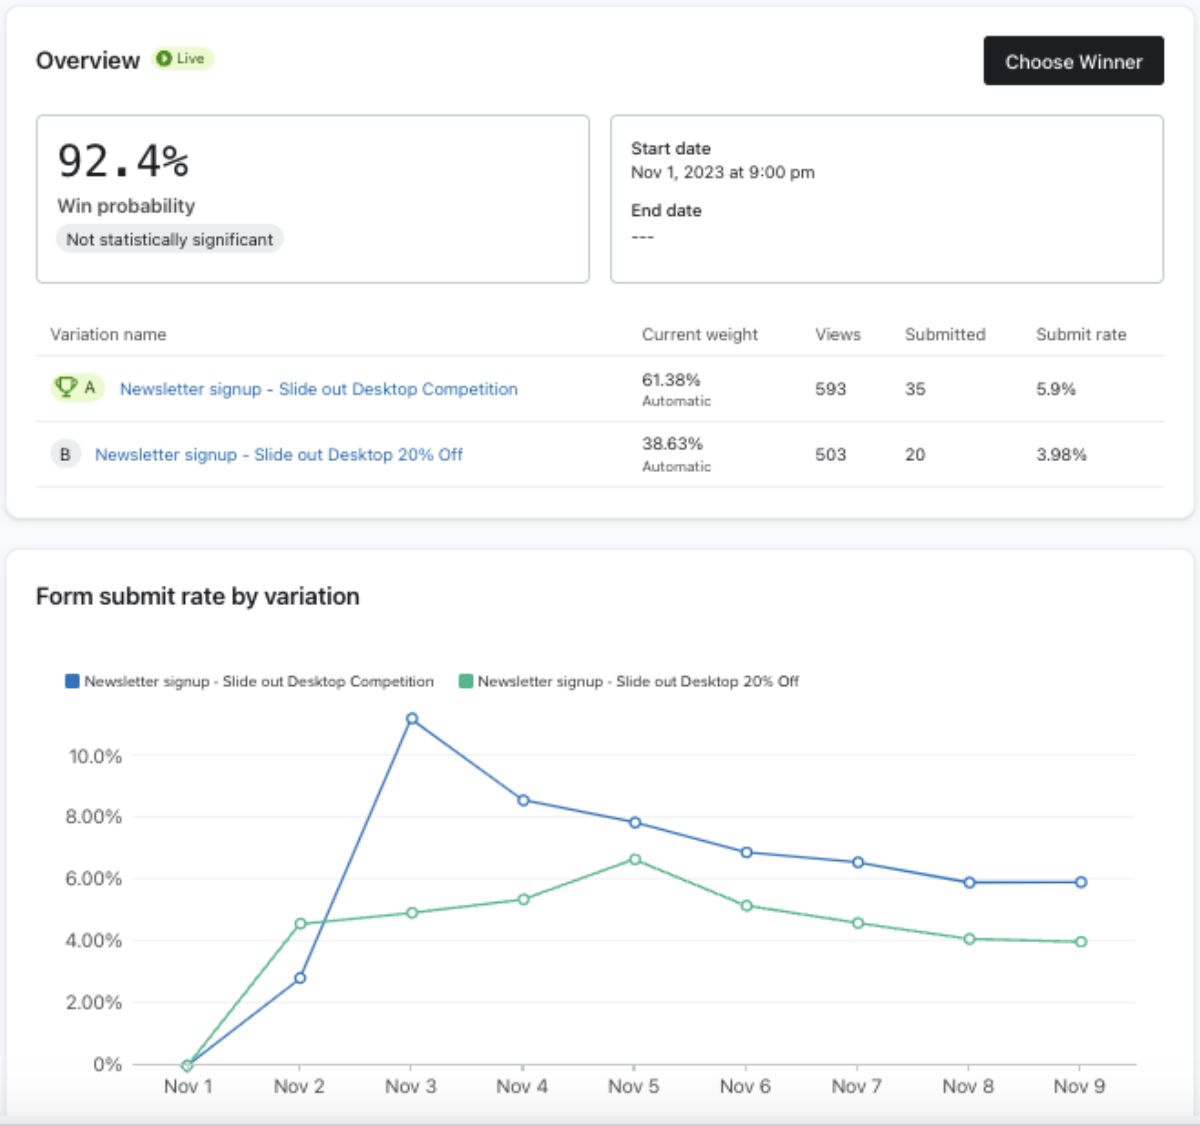
Use the A/B test results page to analyze metrics on the ongoing test, or to measure results once it's complete. To find this page:
- Navigate to Sign-up forms.
- Click the 3 dot menu next to the form you ran the A/B test on.
- Select Analytics from the dropdown.
- Toggle to the A/B test results tab, and head to reviewing A/B test results for guidance on analyzing your form's metrics.