How to show or hide template blocks and sections based on dynamic variables
You will learn
Learn how to show a particular block or section in an email to certain recipients using the template editor’s show/hide logic builder.
You can use this to display different content to, for example, those in certain loyalty tiers or who purchased a particular product. This feature allows you to target your email content based on information about your subscribers, so each recipient has a highly personalized marketing experience.
Before you begin
You can show/hide content based on:
- Profile data (i.e, profile or custom properties)
- Event variables, but only for:
- Event-triggered (also called metric-triggered) flows
- Custom-coded show/hide blocks
Before you craft your email, you must have the data you need in your account. In other words, you must have 1 event or profile with the property you want to use.
Using profile data
If you want to show/hide conditions based on profile data (e.g., location, language, etc.), you need at least 1 profile with that data.
Profile and custom properties can be added in the following ways:
- Sign-up forms
- CSV uploads
- Ecommerce integrations
- List growth and loyalty integrations, like Typeform or Yotpo
Learn more about profile properties in Klaviyo.
Using event properties
Similarly for event properties, there must be 1 event in your Klaviyo account. Then, you can show/hide blocks based on that flow’s trigger event using custom-coded blocks. You cannot reference event data using the logic builder.
So, in an abandoned cart flow with the trigger Started Checkout, you can build show/hide conditions based on a cart’s value or the specific items the customer added.
Craft your message
The show/hide logic builder supports profile data formatted as text, numbers, and lists. It does not support event data, dates, or booleans. If you’d like to use unsupported data in your show/hide condition, use custom code to write the condition.
- Add a block or section to an email template.
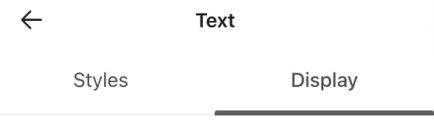
- Select the Display tab.
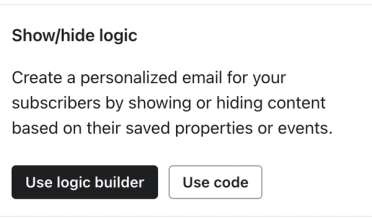
- Under Show/hide logic, select Use logic builder.
- Select a condition.
- You can create a simple condition with a single criteria, or a more complex condition with several criteria connected by AND or OR. Learn more about AND versus OR connectors.
- Use the Add condition button to add additional conditions, if desired.
- Select Save.
If you use show/hide logic on a section and a block within that section, the settings can interact and cause conflicts. Learn more in our article on display options.
AND vs. OR in show/hide conditions
When evaluating show/hide logic, conditions connected by AND are evaluated before conditions connected by OR. Consider the order your logic will be evaluated when writing it to ensure it is interpreted as you intend.
As an example, consider the following condition:
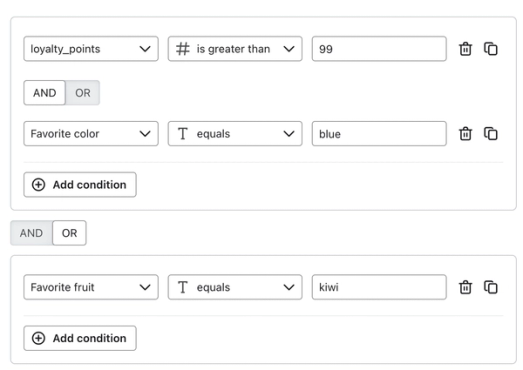
Following these criteria, see whether the block is visible for some sample recipients:
Recipient | Does the block appear? | Why? |
Jane loyalty_points = 145 Favorite color = green Favorite fruit = banana | No | Jane could qualify if her favorite color was blue, or if her favorite fruit was banana. |
Alex Favorite color = blue Favorite fruit = apple | No | Alex could qualify with more loyalty points, or if his favorite fruit was kiwi. |
Amanda Favorite color = blue Favorite fruit = pomegranate | Yes | Amanda qualifies because she has > 99 loyalty points and her favorite color is blue. Her favorite fruit is not considered because she meets both criteria on the opposite side of the OR operator. |
Stephanie Favorite color = orange Favorite fruit = kiwi | Yes | Stephanie qualifies because her favorite fruit is kiwi. The other conditions are not considered because she meets the criteria on one side of the OR operator. |
Use cases for show/hide blocks
Loyalty program banner
If you have a loyalty program, show active participants how many points they currently have. Offer contacts who haven’t yet signed up for the program an incentive for joining. To set this up, you’ll need 2 banners.
Show active loyalty program participants a banner with this show hide condition:
Loyalty points > is greater than 0

Show prospects a banner with this condition:
loyalty_points > is not set

You may need to adjust the criteria based on the data available in your own account.
Personalized imagery
If you collect information about how your subscribers use your product, show them imagery that relates to them.
For example, a brand that sells backpacks might ask whether subscribers use them for commuting, travel, or hiking. Depending on their answer, this brand could show imagery of their products in those environments.
To set this up, you’ll need 3 image blocks showing your product in 3 different settings.
Show commuters a picture of a biker wearing the backpack during a commute with this condition:
Bag preference = Commuting

Show travelers a picture of one of your backpacks in a busy airport with this condition:
Bag preference = Travel

Show everyone else a picture of one of your backpacks in a scenic outdoor landscape with this condition:
Bag preference > doesn’t equal > Travel AND Bag preference > doesn’t equal > Commuting
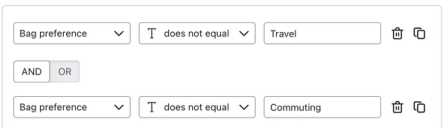
Notice that the last image isn’t just targeted at hikers; anyone who isn’t a commuter or traveler will see it. It’s important to account for recipients who may not have this property set, so your email looks great for everyone.
Product-specific notes
Referencing an item from within a flow’s trigger event requires using custom code.
Communicate product-specific information to cart abandoners, to give them key information that might influence their purchase decision. For example, if you are running out of a product, add a text block with a low-stock warning that only appears for people with that item in their cart with this condition:
ITEM_NAME in event.Items

Location-specific messaging
Location-specific conditions can only evaluate text; they cannot evaluate distance from a zip code. Show a custom banner to residents who live in a certain area, like those in the same town as your brick-and-mortar pop up shop with this condition:
City = Boston

Troubleshooting show/hide blocks
If your show/hide block isn’t rendering as expected, use the Convert to code button to convert the builder logic to code. From there, you can inspect and tweak the code to render as expected.
Converting logic to code is not reversible.
When troubleshooting, confirm the data type used in your condition value is the same as the data type in the profiles you are referencing. For example, the number 22 is different than the text value “22”. If your condition is set to Number but your values are stored as text on the profile, the condition won’t be able to evaluate correctly.
Converting text to numbers
If you have number properties, but they are stored as text within a profile, you can convert them to numbers within the custom code field using the |multiply filter. To use this, add the filter directly after the variable name:
person.Birthday|multiply:"1" > 21
Booleans stored as text
If your true/false data is stored as text, not as a boolean, or if you are referencing a property that contains both booleans and text, you can use these structures to cover all scenarios. Include all spellings and capitalizations that are present in your data.
Sample condition | Show the block if... |
person|lookup:'VIP' == 1 or person|lookup:'VIP' == 'true' or person|lookup:'VIP' == 'True' | The VIP property is set to the boolean value true or the strings true or True |
person|lookup:'VIP' == 0 or person|lookup:'VIP' == 'false' or person|lookup:'VIP' == 'False' | The VIP property is set to the boolean value false or the strings false or False |
Non-alphanumeric characters in properties
If the properties or values referenced by your show/hide block contain non-alphanumeric characters (e.g., symbols like =, <, or >), your condition will not be supported, and you'll see an error message. For best results, use only letters (uppercase or lowercase, case-sensitive), numbers, underscores (_), or dashes (-).
Custom coding show/hide blocks
If you prefer more control, or if you’d like to build a condition using event data, dates, or booleans, custom code your show/hide blocks rather than using the logic builder. To start from scratch using code, select the Use code button from the show/hide logic settings.
Alternatively, convert an existing show/hide condition to use code with the Convert to code button.
Converting logic to code is not reversible.
If you choose to use code, make sure you have a strong understanding of Django, programming logic, and Klaviyo’s data types. Klaviyo’s support team is not able to provide direct support or troubleshooting for custom code.
Learn more about supported condition structures.
Show/hide conditions based on event data
If your email is sent as part of an event-triggered flow (e.g., an abandoned cart or order confirmation flow), you can show/hide blocks based on the details of that flow’s trigger event. So, in an abandoned cart flow with the trigger Started Checkout, you can custom code show/hide conditions based on a cart’s value or the specific items the customer added. Learn more about event variables.
Understand how data is stored
Before configuring your show/hide condition, check to see how your data is stored. There are 5 data types in Klaviyo:
- Text
- Number
- Date
- Boolean
- List
How your data is stored will influence which show/hide conditions will work for you. Learn how to identify data types in your own account.
Craft your message
The first step to adding custom-coded show/hide conditions in a message is to build the email template. This section will walk through a specific example, but you can follow the same steps to set any block to display based on your own criteria.
For example, if your company sells leather bags, you may collect customer preferences for how they use their bags with a sign-up form, as shown below.
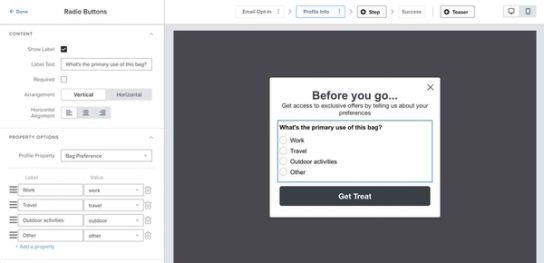
You can then display a different image based on your customer’s bag preference. For example, if the customer’s preference is “Work,” the bag will appear in an image next to a laptop. If the customer’s preference is “Outdoors,” the bag will appear near a scenic overlook on a hiking trail.
- Create a campaign or flow message.
- Add an image block.
- Upload the work-related image to the block.
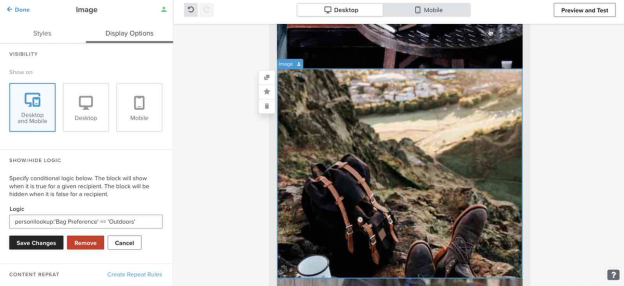
- Click Display from the image block’s customization menu.
- Under Show/hide logic, select Use code.
- Add this condition: person|lookup:'Bag Preference' == 'Work'.
- Click Save Changes.
- Click Done on the block.
This block will show only to people who have selected “Work” as their preference.
Next, add in the travel-related image to a new block under the work-related image. Follow the same steps as before, but this time, use the condition person|lookup:'Bag Preference' == 'Outdoors'.
This block will only show to people who have selected “Outdoors” as their preference.
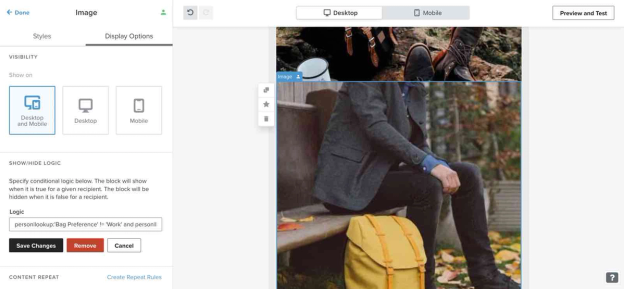
Finally, add in an image to appear for anyone who hasn’t selected either “Work” or “Outdoors.” Use a more generic image, and this condition: person|lookup:'Bag Preference' != 'Work' and person|lookup:'Bag Preference' != 'Outdoors'.
Here, != means "does not equal", so this condition looks for people who have chosen something other than “Work” or “Outdoors,” or have never selected a preference.
Once you’ve configured each of the blocks, preview your message using 3 profiles. These profiles should be subscribers who meet one of each of the image criteria:
- Customer who chose “Outdoors”
- Customer who chose “Work”
- And customers with no preference/other preference
You can use these steps to show or hide blocks based on any profile or event data in your account.
Create a show/hide condition with profile data
If you are building a custom-coded show/hide condition based on a profile property, replace the sample variable from the tables in the conditional logic reference (e.g., person|lookup:'Favorite Color') with your profile property.
To find the correct variable to use:
- Click Personalization to open the personalization menu.
- Choose an option from the menu to add it to the text block.
- Copy the variable name from within the tag. To identify the variable name, remove the curly brackets around the variable, as well as |default:'' at the end (if present), along with any other filters.
For example, in the screenshot below, the full tag is {{ person|lookup:"Accepts Marketing"|default:"" }}. The variable name is person|lookup:"Accepts Marketing", so select that portion to use in your show/hide condition.
Create a show/hide condition with event data
You can use event data to show or hide a block if your message is part of an event-triggered flow. Only data within the trigger event can be used in a show/hide condition.
To identify event variables:
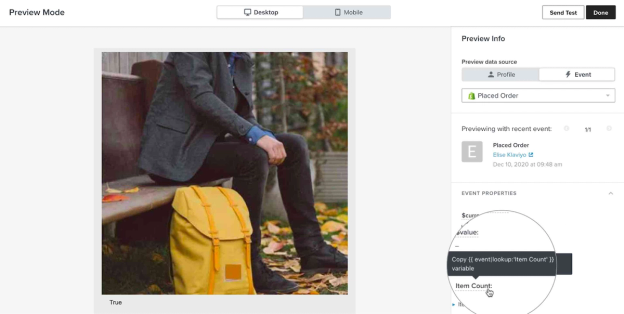
- From the template editor, click Preview & test.
- Under Preview data source, click Event.
- From the dropdown menu, select the event that will trigger the message you’re building.
- Scroll through the Event properties to find the data you’d like to include.
- Click the property name to copy the tag.
- Paste the tag into a text block or text editor.
- Remove the curly brackets (i.e., {{ and }}) from the tag, as well as any filters.
- Use the variable that remains in your show/hide condition.
In the screenshot below, you’ll see the tag {{ event|lookup:'Item Count' }}. You’ll only need the text event|lookup:'Item Count' for your show/hide condition. Note that your data may use a different structure, like {{ event.extra.line_items.0.title }} or {{ event.ShippingAddress.address1 }}. Use the variable as it appears in your event data.
Customize your show/hide conditions
Learn how to build custom show/hide conditions using the conditional logic reference. This resource contains sample conditions, which you can customize using your own profile and event data.
Additional resources
- Conditional logic reference for templates
Learn about all the available conditions you can use to dynamically display a block, section, or custom-coded piece of content only to certain recipients. To learn how to use these conditions in your templates, head to our article on how to show or hide template blocks based on dynamic variables.
- Message personalization reference
Learn how to use Klaviyo’s personalization variables, or tags, to customize the experience for your customers.
- Understanding profiles in Klaviyo
Learn about profiles, including how to find them and the data available on the profile page. Profiles are used to keep track of all the information you have about your customers and prospects.
- Apply programming logic concepts to build more personalized messages