How to customize a list's unsubscribe page
You will learn
Learn how to customize an unsubscribe page for a specific Klaviyo list, which is the page where your subscribers can unsubscribe from receiving your marketing.
Before you begin
To customize a particular list's unsubscribe page, you must disconnect the list from your account's default consent pages. This guide will cover disconnecting from the default pages, and then creating a new set of consent pages for the list (i.e., a manage preferences page, subscribe page, and unsubscribe page).
If you would like to standardize an unsubscribe page that all subscribers see when they unsubscribe, rather than customize one for a particular list, navigate to the Audience > Growth tools > Customize consent pages > Account default pages. Under Email unsubscribe page, click Edit Page. Learn more about consent pages.
Customize a list's unsubscribe page
Each of your Klaviyo list's is connected to the account-level consent pages by default. To disconnect from the default pages, customize an unsubscribe page for the specific list:
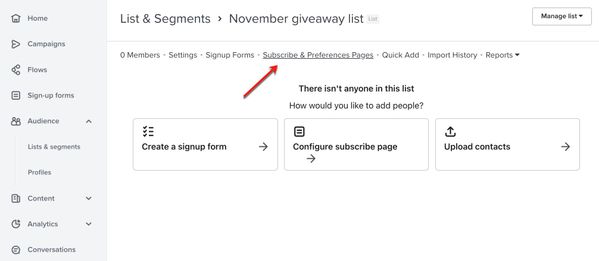
- In Klaviyo, navigate to Audience > Lists & segments.
- Select your list.
- From the menu bar, choose Subscribe & Preference Pages.
- Click Customize for this List. If you have already customized a new set of consent pages for this list, skip this step.
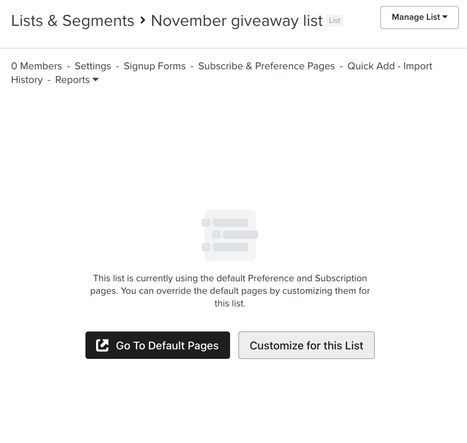
- You have now created a new set of consent pages for this list available to edit. Under Email unsubscribe page, click Edit Page.
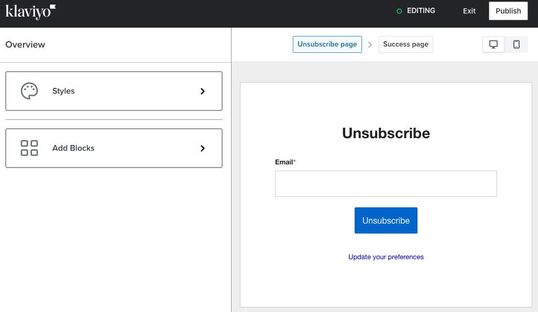
Edit your list's unsubscribe page
Selecting to edit the email unsubscribe page will bring you into its respective builder. Here you can customize the style and design to match your brand.
There are 3 options for editing:
- Style your page
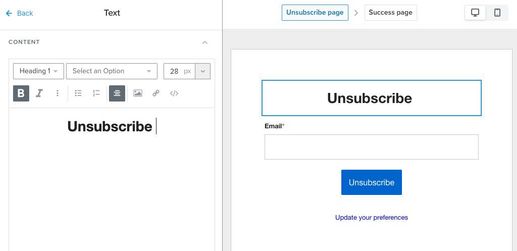
In the Styles tab, you can edit design settings such as Form Background, Page background, Form Styles, etc. - Add Blocks
Add elements to your consent page, such as a text or image block. You can also edit any text by clicking on it in the preview and replacing the default text with your own. - Edit the button
Click on the button in the preview for options to edit the Button Text, Button Styles, Block Styles, etc.
There are a few additional aspects of your page you may also want to edit:
- Page header
Consider editing the header of your unsubscribe page so it aligns with with your brand's tone.
- Page description
Adding a text block with a page description is a helpful way to remind subscribers what options they have besides unsubscribing. For example, you could include a call-to-action for subscribers to update their email frequency preferences rather than unsubscribing from emails all together.
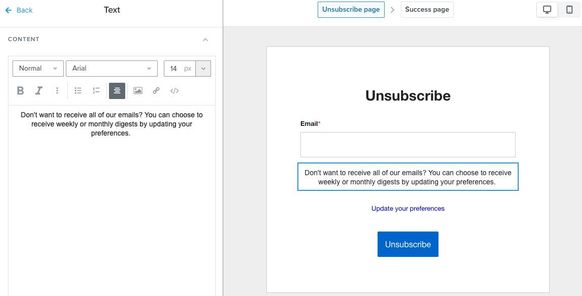
- Update preferences link
By default, Klaviyo will automatically include a link to your preferences page on your unsubscribe page like the one in the example above. You will want to ensure that your list's preferences page is also up-to-date so that subscribers looking to update their preferences actually find options after clicking this link.
Make sure to edit each step of the unsubscribe page. Click Success page in the top menu bar in the editor to adjust the design of the success message that appears when a recipient completes the form.
Next steps
Because you created a new set of consent pages in order to customize the unsubscribe page for this list, you will also need to edit the designs on the other consent pages if you want them to match your brand (i.e., the list-specific subscribe page and preferences page. Click Exit in the top right corner of the editor to return to the menu of consent pages so you can make further edits.
Additional resources
- Getting started with consent pages
Learn about the different consent pages related to Klaviyo lists, including the preferences, subscribe, and unsubscribe pages, and how to customize them.
- How to customize content based on language
Learn how to collect someone's preferred language and then target them in that language.
- How to use a subscribe page on your website
Learn how to create and customize a subscribe page so that your customers can easily sign up to hear more from your brand.