How to add a time delay to a flow
You will learn
You will learn how to add a time delay component within the flow builder which is used to create delays (or wait periods) between messages or other components in your flow series.
If components are back-to-back, without any time delays, they will all occur simultaneously. For this reason, you will likely always want to ensure you have a time delay component between consecutive emails or SMS.
A time delay must be followed by a flow action that is set to live or manual status. If a time delay is added to the end of a flow without an action following or if all following actions are set to draft status, profiles in the flow will skip the time delay and immediately exit the flow.
If you want to add a time delay before someone exits a flow, but you do not want to send out a message afterwards, you can use a non-message flow action such as an update profile property action at the end of the flow.
Add a time delay
To add a new time delay into a flow:
- Drag Time delay from the Logic section of the sidebar and drop it where you want the waiting period.
- In the Time delay details panel, set the length of the delay, then click Save. If you select Days, you can also choose a specific time of day or days of the week before saving.
Configuration options for a time delay include:
- Wait __ Minutes
- Wait __ Hours
- Wait __ Days
- Wait __ Days and delay until a specific time of day
When you choose to create a waiting period of X days, each day will be calculated as a 24-hour period. If you choose to wait X days but specify a certain time of day, however, each day will be calculated as a calendar day to avoid prolonged wait periods depending on when a recipient enters your flow. To explain this further, consider the following scenario.
Let's say you want to have a time delay set to "Wait 1 Day, until 3PM" and then send an email:
- Person A enters your series at 2 PM. Waiting 1 day (24 hours) would land your recipient at 2PM the next day and the email would send 1 hour later at 3 PM. The total amount of time between when they trigger the flow and when they receive the first email is 25 hours.
- Person B enters your series at 4 PM. Waiting 1 day (24 hours) would land your recipient at 4PM the next day. In order to send at your specified time of 3 PM, we'd need to wait another 23 hours. This means Person B would receive your email almost a full day later than Person A. What happens instead is that Person B will receive the email at 3 PM the following day, 23 hours after they triggered the flow.
To avoid the above problem, we'll only wait X "calendar days" instead of X "24-hour days" when your time delay includes a specific time of day. With this behavior, using the above example, Person A and Person B will both get the email at the same time.
Delay until a specific time
You may want to control what time of day recipients receive a specific flow email or SMS in your series. This can be useful when you want to normalize the time of day people receive your messages, for instance, if you know your audience typically opens emails at a certain time.
Within the settings for a time delay component, you can choose, Delay until a specific time of day. If you have an SMS following this time delay, this will establish the send time for that SMS.
After choosing a time of day, select a timezone. Choose Recipient's Local Timezone to use each recipient's timezone; if Klaviyo cannot determine it, the account's timezone is used instead.
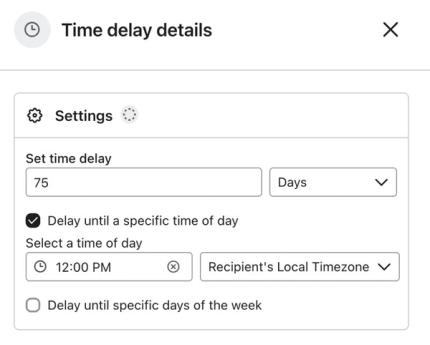
Without a specific time of day, a delay in days waits 24 hours per day from the preceding step, rather than targeting a set clock time. For example, if you put a 1-day delay immediately after the trigger and do not restrict the days of the week, the next message is scheduled for around the same time the following day as the trigger occurred. Other steps before the delay or weekday restrictions can change that timing.
Delay until a specific day of the week
If you only want a flow email or SMS to send on specific days of the week, add a time delay before it, select Days as the time unit, and enable Delay until specific days of the week.
All days will be selected automatically. You can remove days by clicking the X next to the day name or add days by clicking on the dropdown and clicking the checkbox next to the day.
Selected days shown in the dropdown are the days of the week when the message does send. Unselected days are the days of the week when the message does not send.
For example, let's say John enters your flow on a Tuesday:
- You have a delay after the trigger to "Wait 2 Days," but delay until a Monday, Wednesday, or Friday.
- John enters the flow on a Tuesday, we wait two days, and now it's Thursday. Because you only want emails to send on Monday, Wednesday, or Friday, however, we'll delay one more day until it's Friday.
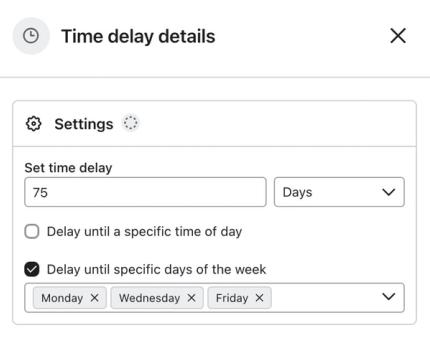
Messages are scheduled based on the timezone associated with the recipient's profile. If the profile's timezone cannot be accurately determined, your account's timezone will be used which can be found in your account settings.
When you delay until a specific day of the week, note that you will no longer see the expected number of days in any subsequent components (e.g., emails or SMS messages). For instance, if you have a time delay component that's set to wait 10 days and delay until Monday or Friday, it's not possible to determine when exactly a recipient will receive the following message; each person that is added to the flow is going to have a different number of days before they are sent the next message.
Additional resources
- Understanding flow branching
Learn how flow branching helps you personalize flows so that you can send individuals down different paths depending on what you already know about them.
Learn more about time delays in Klaviyo:
- Understanding time delays near splits
Learn when to place time delays before a split, and when to place them after.
- Understanding the timing of a flow
Learn how the timing of a flow is not only important to knowing when a certain message will send, but also to gaining insight into the customer's experience. As you build out your flow, you will want to keep two different timing considerations top-of-mind:
- Understanding how contacts move through a flow
Learn how contacts move through a flow. Flows are automated Klaviyo workflows that are set in motion by an initial trigger and then include one or more steps. Flows can be built to send timely communications to recipients, or they can simply apply certain actions, like updating a specific field on a profile.