How to enable onsite tracking for Shopify
You will learn
Learn how to enable Klaviyo onsite tracking on your Shopify store, which includes multiple events to help you engage identifiable browsers. Additionally, enabling onsite tracking allows you to use Klaviyo sign-up forms on your site.
Before you begin
Before enabling the app embed, ensure that you’ve integrated Shopify with Klaviyo. When integrating, please note that enabling the settings in "Sync data from Shopify" and "Sync data to Shopify" will help you see more onsite tracking events in your account due to more profiles syncing.
Additionally, please note the following:
- You can enable the app embed and onsite tracking settings at any time, regardless of when you integrate.
- The app embed for your Klaviyo account can only be associated with 1 Shopify store.
- Have you recently added a brand new theme to your Shopify store? If so, you'll need to re-enable the app embed by following the instructions in this article.
Based on your Customer Privacy settings in Shopify, Klaviyo may not track onsite events for visitors to your Shopify store in the EU, EEA, UK and Switzerland, unless they have provided consent.
About onsite tracking for Shopify
Klaviyo onsite tracking is enabled by turning on our app embed in Shopify and making sure certain settings are selected within Klaviyo. We track the following events:
- Active on Site
Triggered when someone visits your store. This event helps you segment your contacts based on engagement level. - Viewed Product
Triggered when someone views a product page on your store. Use this event to send reminders to customers in a browse abandonment flow. - Viewed Collection
Triggered when someone views a collection on your store. - Submitted Search
Triggered when someone submits a search on your store. - Added to Cart
Triggered when someone adds an item to their cart.
All of the events above are branded with the Shopify icon when they sync to Klaviyo, except Active on Site and Viewed Product, which have a gear icon. Shopify-branded tracking events are tracked via a Shopify pixel, while gear events are tracked by Klaviyo via a snippet installed by our app embed:
- Learn about who Shopify tracks (Shopify icon)
- Learn about who Klaviyo tracks (gear icon)
Enabling the Klaviyo app embed in Shopify
- In Klaviyo, select the Integrations tab.
- Click Shopify to access the integration settings page.
- In the Onsite tracking section, check Track behavioral events to enable tracking for Viewed Collection, Submitted Search, and Added to Cart. Note that Viewed Product is enabled by default, so it will start tracking once you enable the app embed, along with Active on Site.
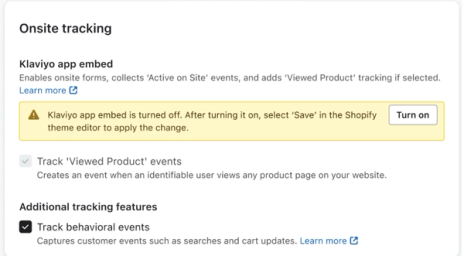
- You’ll see a message calling out that your Klaviyo app embed is turned off. Click Turn on to be brought to Shopify.
- If prompted, sign in to Shopify using the account you integrated with Klaviyo.
- You’ll be brought to your theme setting’s App embeds tab. Make sure the Klaviyo app embed is toggled on.
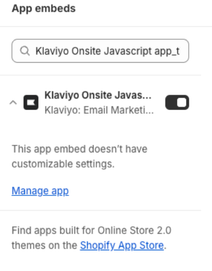
- Click Save in your theme editor.
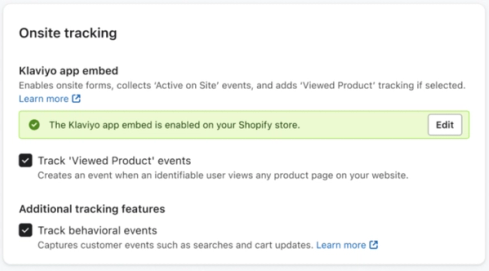
- Navigate back to your Shopify integration settings page in Klaviyo, and refresh the page if needed. You should see a green banner indicating that your app embed is now enabled.
Test Active on Site and Viewed Product tracking
Active on Site and Viewed Product events are tracked via the Klaviyo app embed. There may be a small delay until onsite tracking events start to sync after enabling them. We recommend waiting 15 minutes before testing.
To confirm that onsite tracking is working, follow these steps:
- Navigate to your Shopify site.
- On your homepage, add the following to the end of the URL, replacing example@gmail.com with your email address:
?utm_email=example@gmail.com - Reload the page.
- Navigate to a product page on your site.
- Navigate back to Klaviyo and search for your email address.
You will see that a Klaviyo profile has been created for you (if one didn't exist already), and that Active on Site and Viewed Product metrics have tracked on your activity feed.
Test Added to Cart, Viewed Collection, and Submitted Search tracking
Added to Cart, Viewed Collection, and Submitted Search events are tracked via a Shopify pixel. Profiles will be identified if they do one of the following:
- Submit a Klaviyo form.
- You must have enabled syncing profiles from Klaviyo to Shopify for this to work.
- Submit a Shopify form.
- Enter their information on the checkout page.
- Log in to their Shop account on checkout page.
- Log in to their customer account on the store.
You can complete one of the items above, and then take the desired action, in order to test tracking for each of these events.
Outcome
You have now enabled and tested Klaviyo onsite tracking on your Shopify store.
Additional resources
- Getting started with Shopify
Learn how to integrate Klaviyo with Shopify in order to bring your customer profile and order data into Klaviyo and reach customers with targeted messaging. Additionally, enable Klaviyo onsite tracking and sign-up forms, and sync data from Klaviyo to Shopify.
- Shopify data reference
Learn what data syncs from Shopify to Klaviyo and where to view it. This includes both order data (such as Placed Order, Ordered Product, etc.), delivery data, onsite tracking data, and customer data. If you have not already, read our guide on getting started with Shopify for step-by-step instructions on integrating, before continuing with this article.