How to set up Customer Hub with Headless Shopify
Connect Klaviyo Customer Hub to your headless Shopify storefront. Enable login, surface widgets (Favorites, FAQs), and power Active/Recently Viewed product experiences to lift engagement and conversion.
You will learn
You’ll connect Customer Hub to a headless Shopify storefront, choose a login method, and publish the Hub so shoppers can access it site‐wide.
Customer Hub for Shopify currently supports standard storefronts and Shopify Headless. For WooCommerce, navigate to https://help.klaviyo.com/hc/en-us/articles/47792369863451
For feedback about Customer Hub functionality, email customerhub@klaviyo.com.
Before you begin
Prerequisites
- A headless Shopify storefront with access to the Storefront API (Public access token / Storefront API public key in Shopify’s Headless Admin).
- Your Klaviyo company ID (used by the onsite JavaScript loader).
- Decision on shopper login: Shopify Customer Account API or Klaviyo One Time Password (OTP).
- If using existing accounts, have your storefront’s Login, Logout, and (optional) Manage account and Manage addresses routes ready.
- Ability to edit your storefront code and deploy changes.
- Who can set this up: You need an account role that can edit Customer Hub settings and publish widgets (Owner, Admin, or a custom role that has write access to Content and API keys).
Overview
Customer Hub is a site‐wide overlay that gives shoppers faster access to account actions and helpful shopping tools. For headless Shopify, you connect Klaviyo’s onsite script, choose a login method (Customer Accounts API or Klaviyo OTP), and optionally add:
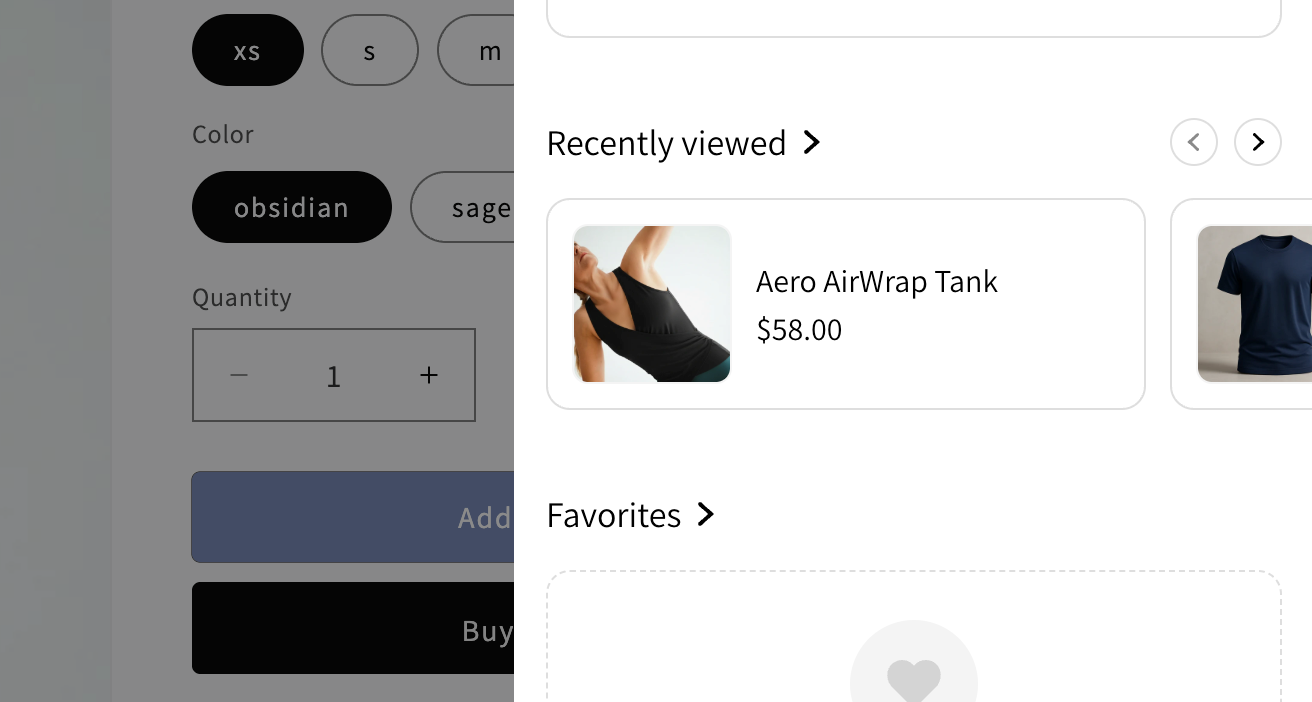
- Active Product: shows the product a shopper is viewing inside the Hub.
- Recently Viewed: lists recently viewed products using Klaviyo’s tracking.
- Favorites and FAQs widgets: render on PDPs and inside the Hub.
Use Customer Hub when you want an on‐page assistance layer that drives product discovery and faster checkout, improving conversion and lifetime value.
Setup
1 - Configure Customer Hub Settings
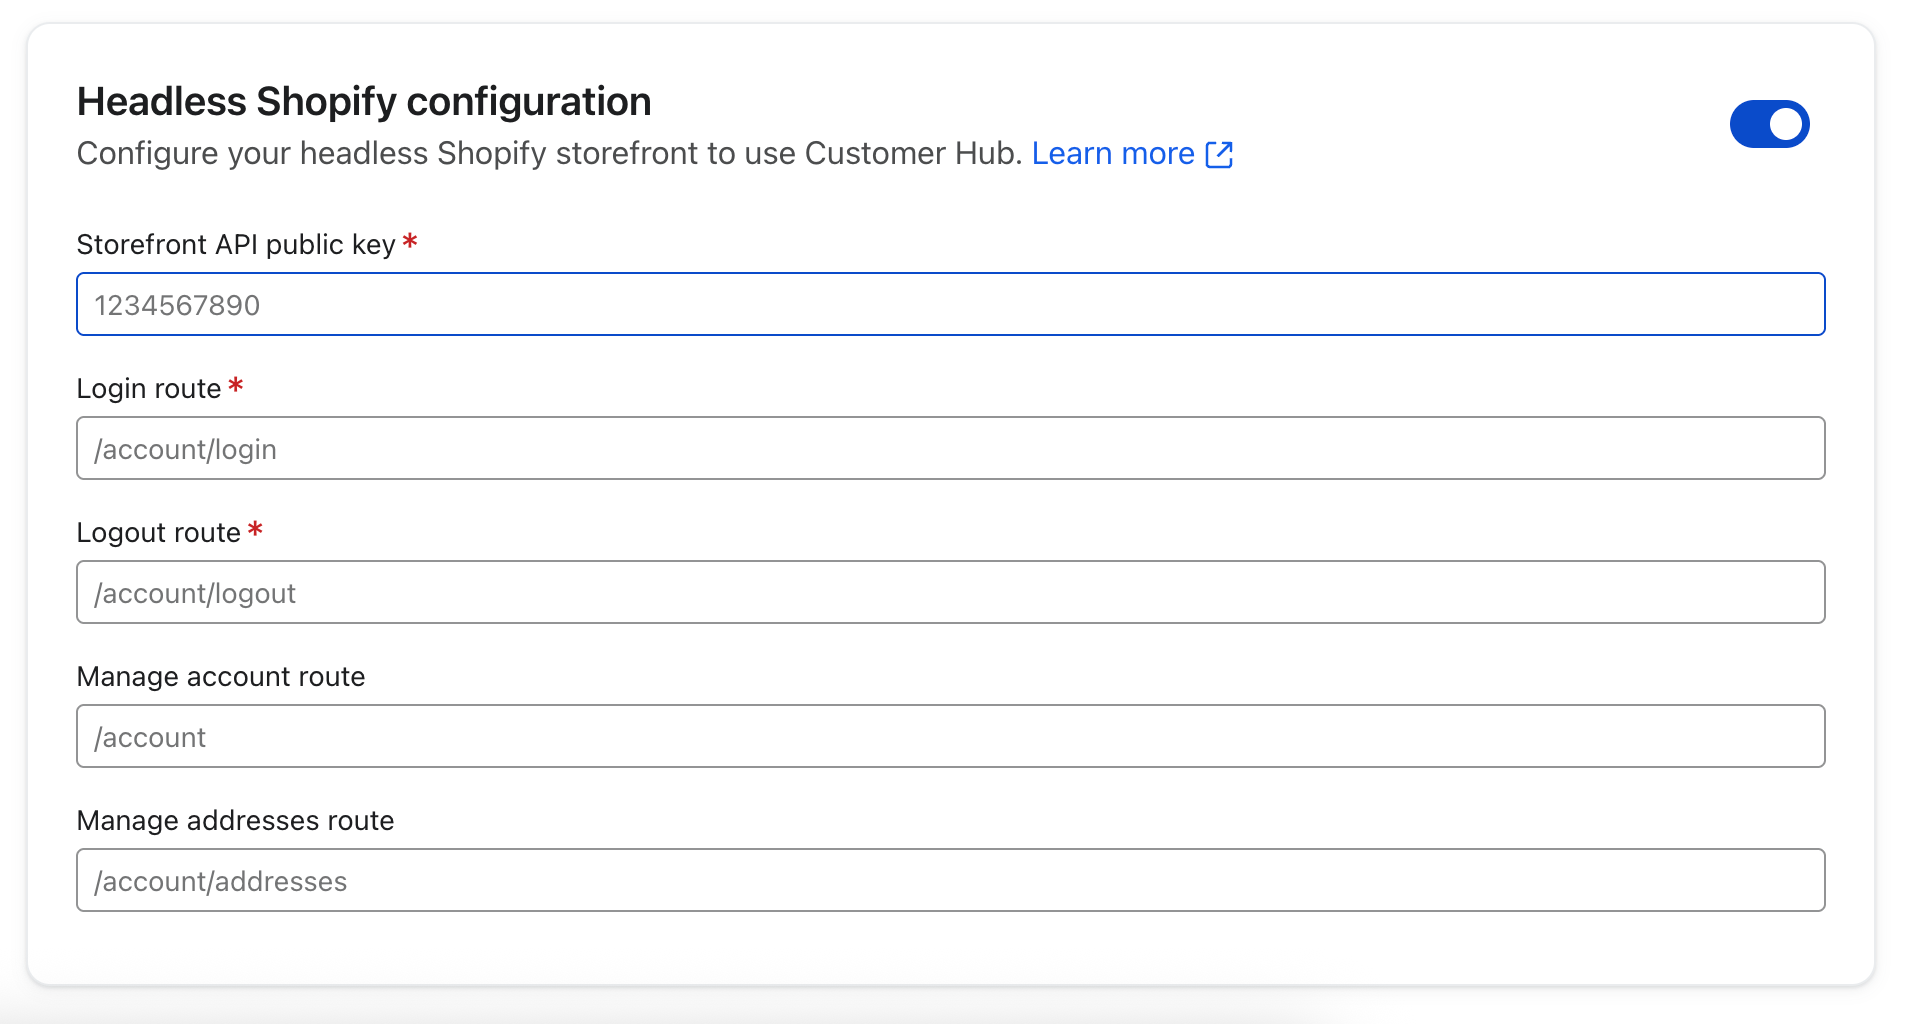
First, follow Getting started with Customer Hub and complete the onboarding wizard, just like with any other setup. Once this is complete, go to Customer Hub > Settings. You'll see the Headless Shopify configuration section.

Toggle on Headless Shopify configuration and then paste your Storefront API public key from Shopify’s Headless Admin (Public access token).
Under Shopper login, select Shopify Customer Account API (recommended so that all of your storefront apps can share Shopify's login) or Klaviyo One Time Password (OTP, only works with Klaviyo and won't log shoppers into any other apps).
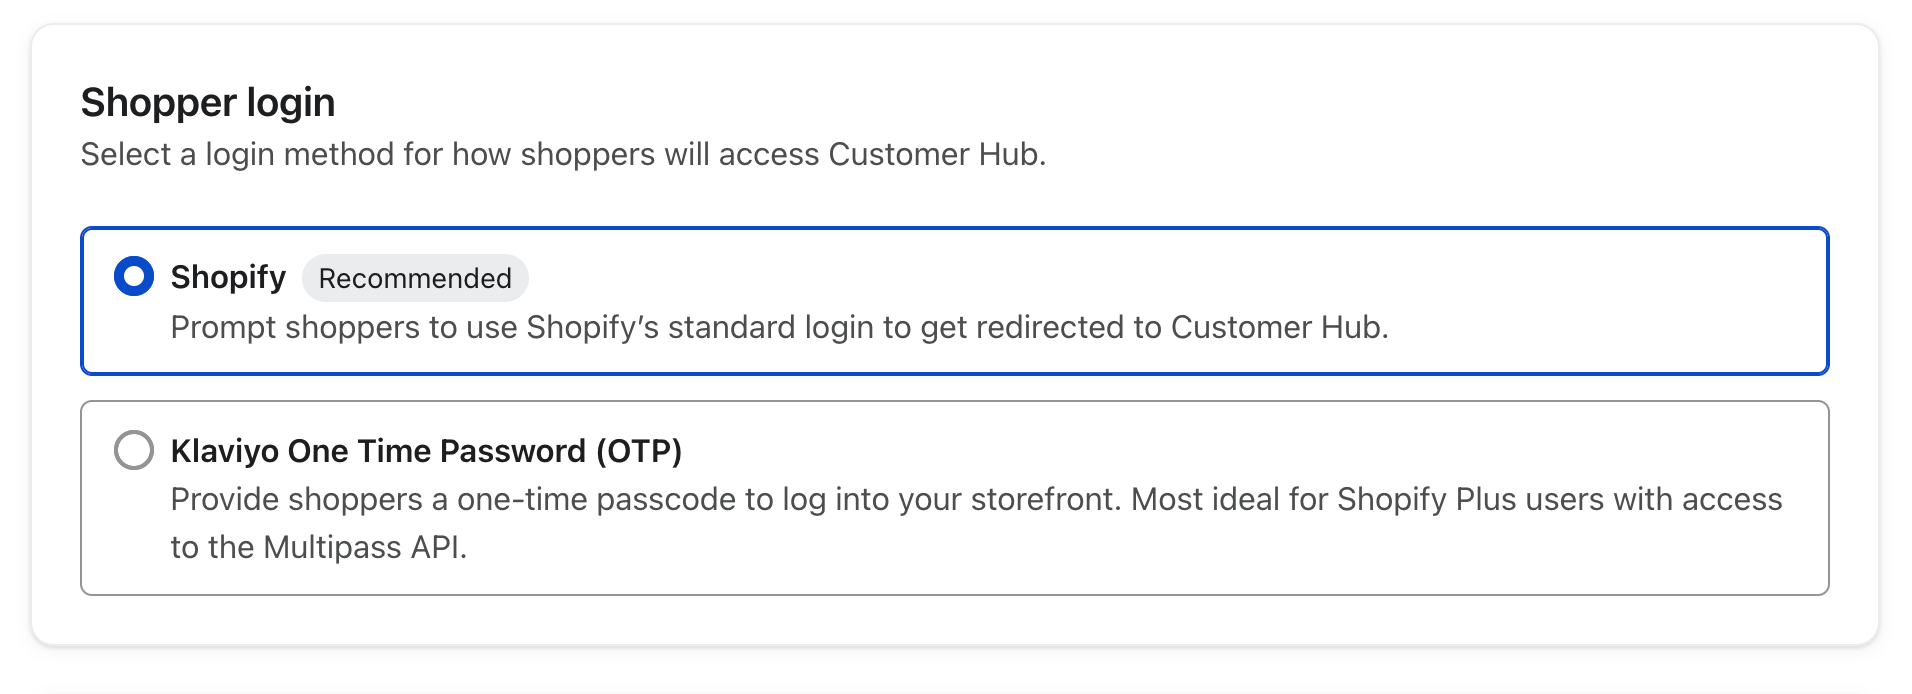
If you select Shopify Customer Account API, also enter your storefront Login, Logout, and optional Manage account/Manage addresses routes (used for redirects between the Hub and your site).
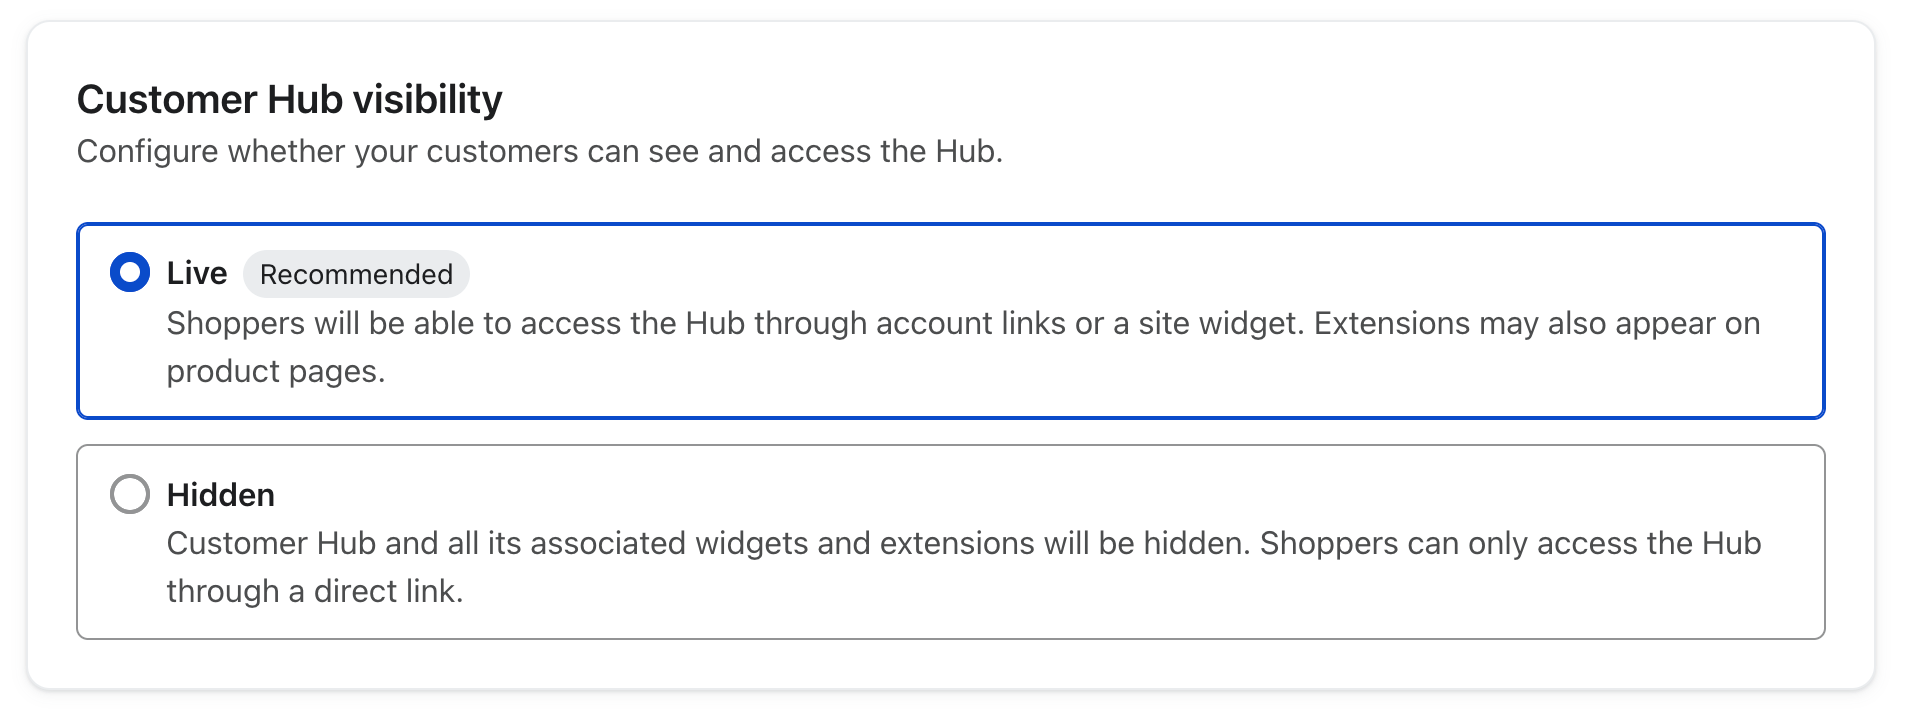
Publish visibility: set Customer Hub to Live.
2 - Load the Customer Hub JavaScript (Developer instructions)
Tip: If you already run Klaviyo onsite features, you may have a loader in place. Confirm before adding a second script.
Create /public/customerHub.js (or equivalent) with the following loader (replace COMPANY_ID with your Klaviyo public API key, also known as your Company ID):
// customerHub.js
// TODO: Configuration
const COMPANY_ID = '';
const script = document.createElement('script');
script.src = `https://static.klaviyo.com/onsite/js/${COMPANY_ID}/klaviyo.js`;
script.async = true;
script.onload = () => { console.log('Klaviyo JS script loaded successfully'); };
script.onerror = () => { console.error('Failed to load Klaviyo JS script'); };
document.body.appendChild(script);
The onsite script loads on every page. Look for the console message: “Klaviyo JS script loaded successfully.” In your root layout (e.g., root.tsx), include the loader:
// root.tsx
return (
  <html>
    <body>
      <script src="/customerHub.js" defer></script>
    </body>
  </html>
)
After this step, window.customerHubApi becomes available on pages where the Hub runs.
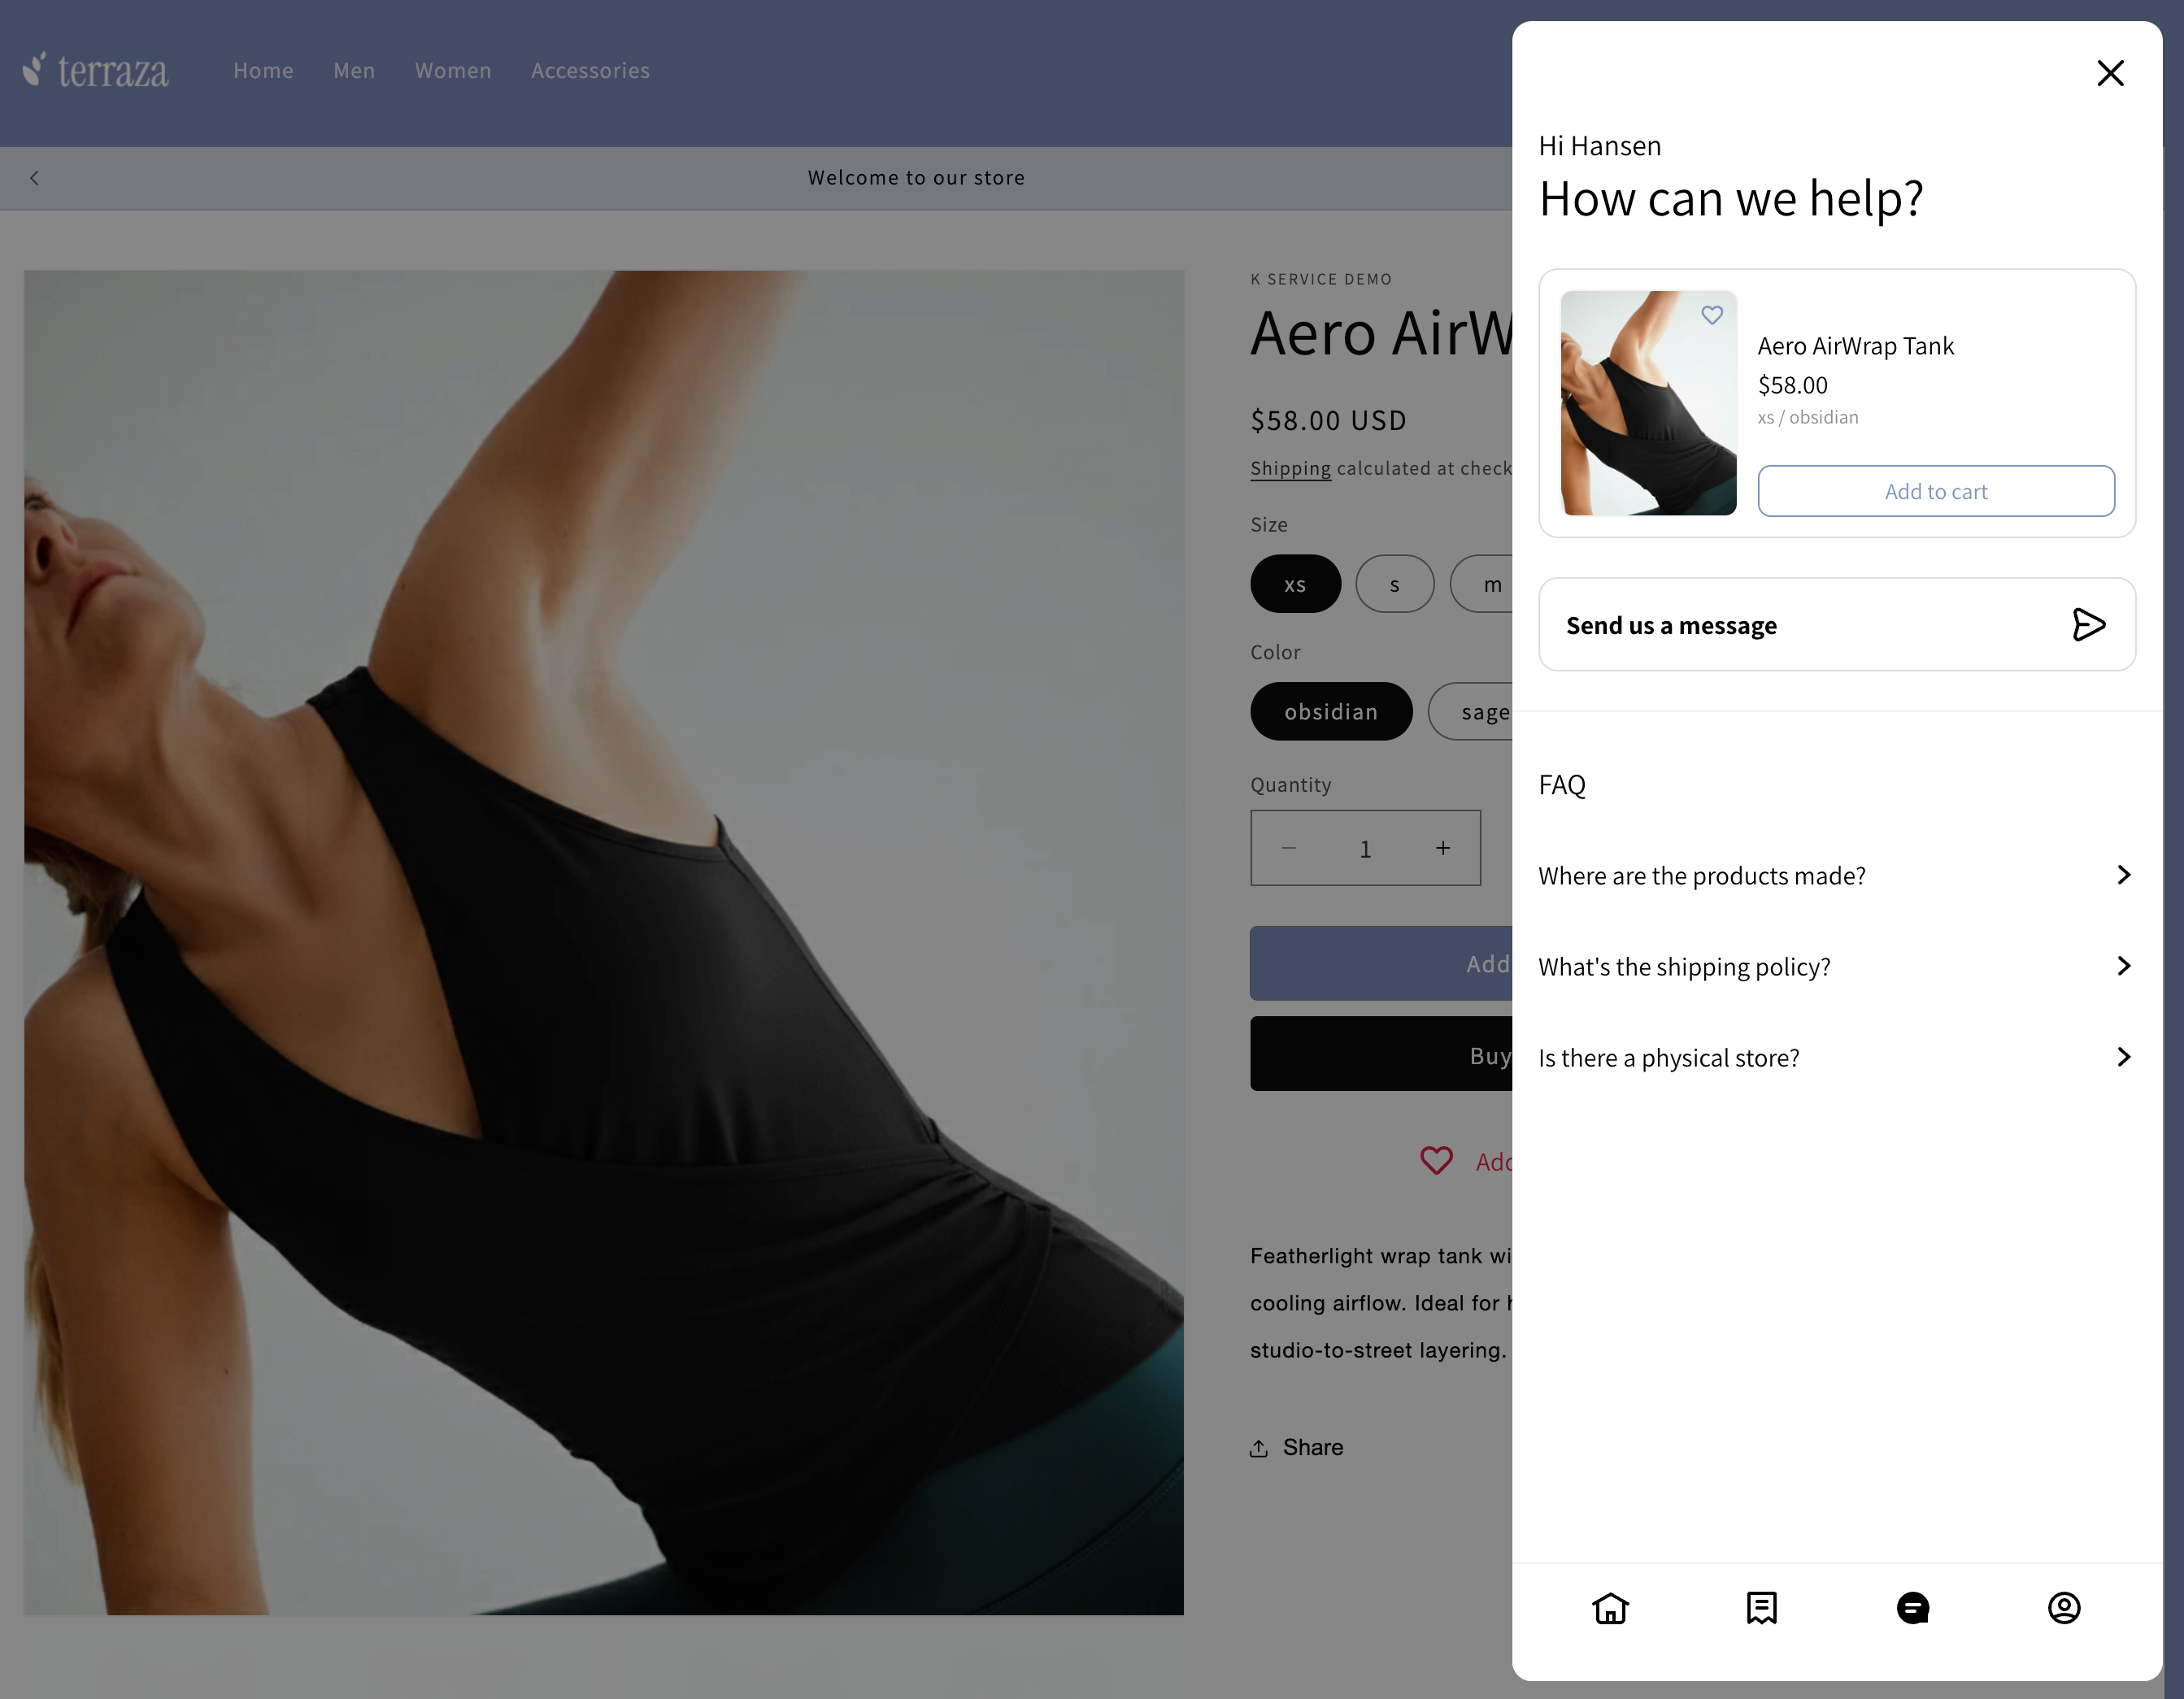
3 - Show the active product in Customer Hub
Add the hydrate call on your product detail page (PDP) so the current product appears in the Hub:
<!-- products.tsx -->
<script type="text/javascript">
  (function() {
    function waitForCustomerHubApi() {
      return new Promise((resolve) => {
        const check = () => {
          if (window.customerHubApi && window.customerHubApi.hydrateProduct) {
            resolve();
          } else {
            requestAnimationFrame(check);
          }
        };
        check();
      });
    }
    waitForCustomerHubApi().then(() => {
      window.customerHubApi.hydrateProduct("your-product-handle");
    });
  })();
</script>The Hub should now display an additional product card for the PDP the shopper is viewing on the "Chat" tab if you have it enabled.
4 - Enable recently viewed products in Customer Hub
Implement Viewed Product tracking so the Hub can populate Recently viewed items and you can use the metric elsewhere in Klaviyo. The following tracking snippets can also be directly added to your storefront, instructions can be found here in our Klaviyo Developers documentation: Integrate an ecommerce platform without a pre-built Klaviyo integration.
5 - Enable account link takeover
In order for Klaviyo’s Customer Hub to open by clicking the account icon in your storefront’s header, you need to already have an existing a-tag that references a link with /account (in which case we will automatically replace it for you). Or you can also manually define the icon link to point to #k-hub in order to open the drawer.

6 - Set up Customer Hub with Customer Accounts API authentication (recommended)
In order to use your existing storefront’s customer accounts and authentication setup, Customer Hub will require you to add a new API route to your storefront that will handle securely passing a logged in shopper’s access token to our services. What’s important is that the new API route is named and can be reached with ‘/api/authenticateCustomerHub’.
Note: the following code snippet example is for Shopify’s Hydrogen framework, more customized storefronts may require some additional workaround, however the general approach will be outlined here.
// ./app/routes/api.authenticateCustomerHub.js
// TODO: Configuration
const COMPANY_ID = '';
export async function action({context}) {
  // Pull the Customer Account API Client from your storefront's context
  const {customerAccount} = context;
  try {
    // Get the access token for the current customer
    const accessToken = await customerAccount.getAccessToken();
    if (!accessToken) {
      return new Response(JSON.stringify({message: 'User not logged in'}), {
        status: 200,
      });
    }
    // Send the access token to the Customer Hub API
    const response = await fetch(
      'https://atlas-app.services.klaviyo.com/api/onsite/headless-shopify-login',
      {
        method: 'POST',
        headers: {
          'Content-Type': 'application/json',
        },
        body: JSON.stringify({
          access_token: accessToken,
          company_id: COMPANY_ID,
        }),
      },
    );
    const responseData = await response.text();
    // Return the actual response from Customer Hub with the same status code
    return new Response(responseData, {
      status: response.status,
      headers: {
        'Content-Type':
          response.headers.get('content-type') || 'application/json',
      },
    });
  } catch (error) {
    return new Response(null, {status: 500});
  }
}
Once this is configured, as well as the storefront routes defined in Klaviyo’s settings, Customer Hub will be able link into your existing authentication setup and provide a seamless entry point into your existing customer accounts.
7 - Add the Favorites widget (recommended)
Both Favorites and FAQs will work within the Customer Hub drawer. However, you can add these widgets too on PDPs for additional engagement.
To add a Favorites entry point on PDPs and inside the Hub:
// products.tsx
// Example identifiers:
//   id: gid://shopify/Product/12345
//   data-product-id: 12345
const gid = "gid://shopify/Product/12345";
const productId = gid.split('/').pop();

return (
  <div
    className="kl-hub-favorites-slot"
    data-product-id={productId}
  />
)
Shoppers can now click Add to favorites on PDPs; the item appears in the Hub’s Favorite items.
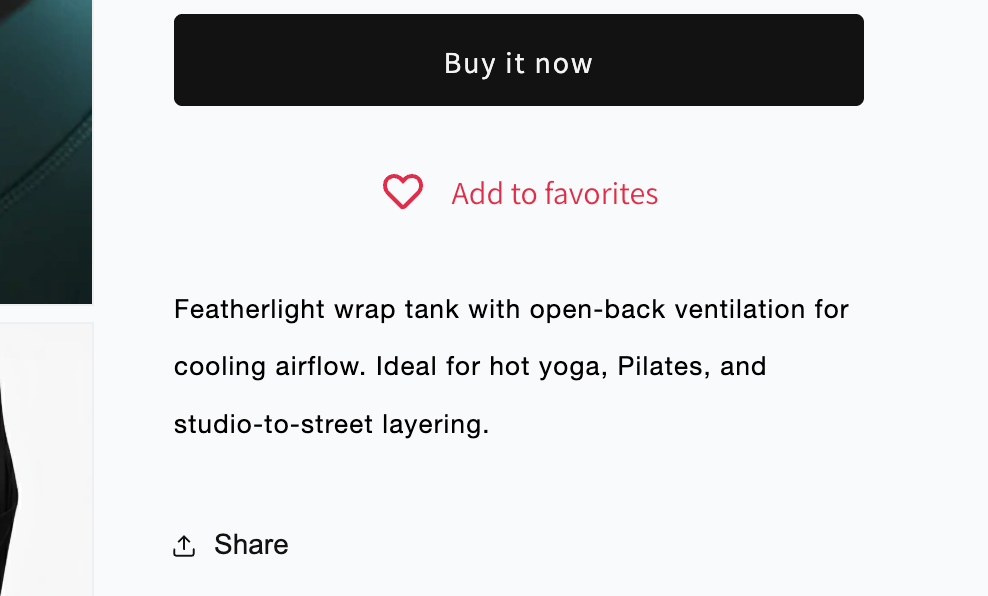
8 - Add FAQ blocks (recommended)
Similar to adding Favorites, adding FAQ blocks is as simple as adding a div on your product page with its product ID passed in to render FAQ’s that you can edit and design in Klaviyo.
Add a product‐specific FAQs block that you design in Klaviyo:
// products.tsx
// Example:
const gid = "gid://shopify/Product/12345";
const productId = gid.split('/').pop();

return (
  <div className="klaviyo-faqs-slot" data-product-id={productId} />
)
FAQ chips/buttons should now render on PDPs if they are set up, and are editable in Klaviyo
Best practices
- Publish to production only after verification — keep staging hidden until QA is complete; then set Live to expose the Hub. Impact: fewer support issues, faster time‐to‐value.
- Always hydrate the Active Product on PDPs — keeps product context visible in the Hub and nudges add‐to‐cart. Impact: conversion rate, RPR.
- Implement Viewed Product tracking early — populates Recently viewed and unlocks browse‐based flows. Impact: engagement and revenue from browse recovery.
- Add Favorites — creates a low‐friction save action and a persistent shortlist. Impact: repeat visits, add‐to‐cart.
- Use FAQs for objections — answer shipping, materials, or returns questions inline to reduce drop‐off. Impact: conversion rate.
- Prefer server‐side auth with Customer Accounts API when available — improves continuity for logged‐in shoppers. Impact: experience quality, support deflection.
Measuring success
Where to view results: Use Analytics > Metrics to monitor Viewed Product activity and downstream flow/campaign performance. Use your ecommerce revenue dashboards to track conversion and AOV changes after enabling Customer Hub. Key metrics to watch: conversion rate from PDP, add‐to‐cart rate, sessions with Hub opens (if instrumented), revenue per recipient (RPR), and browse‐driven revenue tied to Viewed Product events. Quick fixes checklist: Low Recently viewed activity? Verify the Viewed Product tracking snippet is firing and events are attributed to profiles. Low add‐to‐cart from Hub? Ensure Active Product hydration runs on every PDP and that variants/prices are correct. Few Favorites adds? Move the Favorites slot near core PDP CTAs and confirm the data-product-id matches the product.
Troubleshooting
Symptom: Customer Hub does not appear on the site.
Likely cause: Script not loading or Hub is Hidden.
Fix: Confirm customerHub.js loads (check console), the company ID is set, and Customer Hub visibility is Live in Customer Hub > Settings.
Symptom: Console shows “Failed to load Klaviyo JS script.”
Likely cause: Incorrect script URL or missing company ID.
Fix: Verify https://static.klaviyo.com/onsite/js/<COMPANY_ID>/klaviyo.js and that COMPANY_ID is populated.
Symptom: Active Product card does not show in the Hub on PDPs.
Likely cause: hydrateProduct not called or wrong product handle.
Fix: Ensure the wait loop runs and call window.customerHubApi.hydrateProduct("<handle>") with the correct product handle.
Symptom: Recently viewed section is empty.
Likely cause: Viewed Product tracking not implemented.
Fix: Add the Viewed Product tracking snippet from the developer guide and verify events in Klaviyo.
Symptom: Favorites or FAQ widgets don’t render on PDP.
Likely cause: Missing container or wrong attribute.
Fix: Add <div class="kl-hub-favorites-slot" data-product-id="..."> and/or <div class="klaviyo-faqs-slot" data-product-id="..."> with the correct product ID.
Symptom: Clicking the account icon doesn’t open the Hub.
Likely cause: Header link not pointing to /account or #k-hub.
Fix: Ensure the account anchor uses /account (auto‐takeover) or set href="#k-hub".
Symptom: Shoppers are not recognized as logged in inside the Hub.
Likely cause: Missing /api/authenticateCustomerHub route or failing API request.
Fix: Implement the Hydrogen example (or your framework equivalent), send access_token and company_id to Klaviyo’s login endpoint, and return the response.
FAQ
Q: Do I have to use Shopify Customer Accounts API for login?
A: No. You can use Klaviyo One Time Password (OTP) instead. If you already use Shopify accounts, connect via the Customer Accounts API for a seamless experience.
Q: Which storefront routes do I need to provide?
A: If using your existing accounts, provide Login and Logout routes; Manage account and Manage addresses are optional for deeper linking.
Q: Where do I find the Storefront API public key?
A: In Shopify’s Headless Admin under Storefront API > Public access token (also called Storefront API public key).
Q: Can Customer Hub take over my account icon?
A: Yes. If your header’s account link uses /account, Customer Hub can automatically open; you can also point it to #k-hub.
Q: Is Shopify Hydrogen required?
A: No. The authentication example uses Hydrogen, but any framework can implement a server route at /api/authenticateCustomerHub that posts the access token and company_id to Klaviyo.
Q: Can Favorites and FAQs live on PDPs and inside the Hub?
A: Yes. Add the respective container divs on PDPs; they will also surface in the Hub drawer.