Getting started with Salesforce Commerce Cloud
You will learn
Learn how to integrate Salesforce Commerce Cloud with Klaviyo. The Klaviyo cartridge and API integration allows websites using Salesforce Commerce Cloud (formerly Demandware) to quickly connect and send both real-time and historic data to Klaviyo. When you integrate Klaviyo with Salesforce Commerce Cloud (SFCC), Klaviyo will start tracking actions people take in real-time like website navigation, search tracking, viewing products, viewing categories, adding items to a cart, checking out, and ordering.
There are 3 main steps to integrating SFCC with Klaviyo:
- Installing the Klaviyo cartridge in SFCC.
- Adding enablement snippets to SFCC.
- Enabling the SFCC OCAPI integration in Klaviyo.
Before you begin
Klaviyo integrates with both SFCC Controller-based Site Genesis (SG) and Storefront Reference Architecture (SFRA) sites. Each framework requires a slightly different cartridge setup and snippets, described below.
Are you using a Klaviyo SFCC cartridge below version 23.7.0? 23.7.0 and up include a number of additional features, a more complete out-of-the-box install, and improvements related to developer experience. If you would like to upgrade, read How to upgrade your Salesforce Commerce Cloud cartridge.
In order to use our version 23.7.0 cartridge (or any higher version), we recommend updating your SFCC compatibility mode to 21.7 or higher.
If you'd like to start by integrating your development environment first, you can create a linked Klaviyo account using the method described in this article and connect your development environment with that account. We recommend including the word "Dev" or "Staging" in the company name you use when setting up the account, in order to better differentiate between accounts when logged in.
It is also recommended to add Klaviyo IPs to your firewall provider’s allow list to minimize authentication and configuration issues. For more details, please check out How to allowlist Klaviyo integration traffic IP addresses.
Set up the Klaviyo cartridges
Download the cartridges
You can find our app listing on the Salesforce AppExchange. On the AppExchange, you can learn more about Klaviyo and click Get It Now to be brought to Github, where our cartridges are available in a zip file for download. If you have a SFRA site, download the KlaviyoSFRA zip file, and if you have a Site Genesis site, download the KlaviyoSG zip file.
You will need to set up 2 cartridges, both of which are included in the zip file you downloaded. These cartridges include:
- int_klaviyo or int_klaviyo_sfra: A site-specific cartridge; int_klaviyo is for Site Genesis-based websites, and int_klaviyo_sfra is for SFRA-based websites.
- int_klaviyo_core: for both types of infrastructures, containing some basic, overlapping functionality.
Import the cartridges
The first step is to import the cartridges in Visual Studio Code or Eclipse so they're available to link with your SFCC instance.
In VS Code
- Copy and paste the int_klaviyo_core cartridge.
- Copy either the int_klaviyo (Site Genesis) or int_klaviyo_sfra (SFRA) folders into the codebase as siblings to your other cartridge folders.
In Eclipse
- Navigate to Administration > Import > General > Existing Projects into Workspace.
- Import the int_klaviyo_core directory using the import wizard.
- Select the SFCC instance with which to connect the cartridge.
- Select Properties.
- Select Project References.
- Check in the int_klaviyo_core cartridge.
- Repeat steps 2 through 6 for the other cartridge specific to your framework (either int_klaviyo or int_klaviyo_sfra).
Add the cartridges to the cartridge path
Once the cartridges are imported, they need to be added to the list of cartridges used by your site using SFCC's Business Manager.
- Navigate to Administration > Sites > Manage Sites.
- Select your site.
- Select the Settings tab.
- At the beginning of the cartridge path input labeled Cartridges, add the names of the imported Klaviyo cartridges with the core cartridge last (either, int_klaviyo:int_klaviyo_core or int_klaviyo_sfra:int_klaviyo_core).
- Click Apply.
Once you've clicked Apply, you should now see the 2 cartridges at the beginning of the field labeled Effective Cartridge Path.

Add services
After importing the cartridges and adding them to the site cartridge path, the Klaviyo service must be added to enable settings configuration for the cartridge. In the root directory of the Klaviyo cartridges zip file is another zip file called metadata.zip. The following directions will reference this zip file.
- Navigate to Administration > Site Development > Site Import & Export > Services.
- Upload, then import the metadata.zip file.
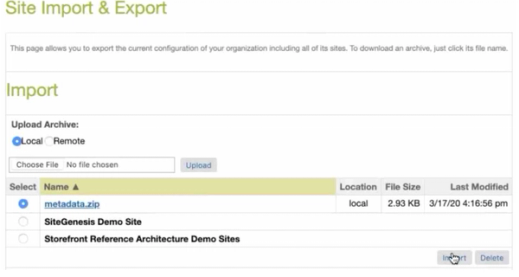
- When you're prompted to confirm whether you'd like to import the selected archive, select OK.
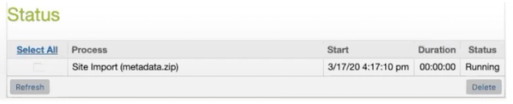
- You should now see the import running under the Status section near the bottom of the page.
- You will now have access to a preferences page at Merchant tools > Site Preferences > Custom Preferences > klaviyo.
From here, you can manage the following settings:
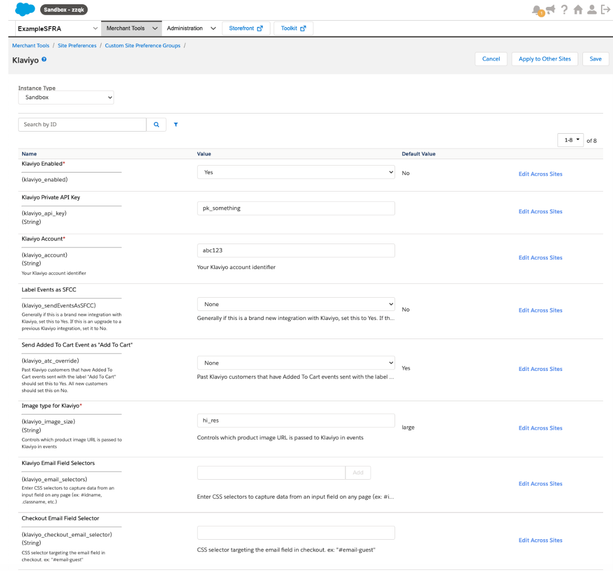
- Klaviyo Enabled
Must be set to "Yes" to enable the cartridge. - Klaviyo Private Key
A Klaviyo private API key. Make sure that the Klaviyo private API key you use for this integration has been granted full access. - Klaviyo Account
Your Klaviyo public API key, or Site ID. - Label Events as SFCC
If you choose to label events as SFCC, you will have access to pre-built flows in Klaviyo using SFCC data. A current drawback to labeling events is that if you choose to label them, you will not have access to Viewed Product or Added to Cart recommendations in Klaviyo product feeds.- If you previously installed a cartridge version older than 23.7.0, and are now upgrading to version 23.7.0 or higher, set to No. Integrations created before July 13, 2023 (i.e., cartridge versions prior to 23.7.0) generate metrics that are not labeled as SFCC. If you used a version prior to 23.7.0 in the past, this setting accounts for the old naming conventions to prevent a discontinuity of metric data in your account.
- Send Added To Cart Event as “Add To Cart”
If you previously installed a cartridge version older than 23.7.0, and are now upgrading to version 23.7.0 or higher, set to Yes. Otherwise, set to No. This setting prevents the discontinuity of metric data in your account. - Klaviyo Email Field Selectors and Checkout Email Field Selector
Please see the section below for detailed information on how to configure these 2 fields. - Image Type
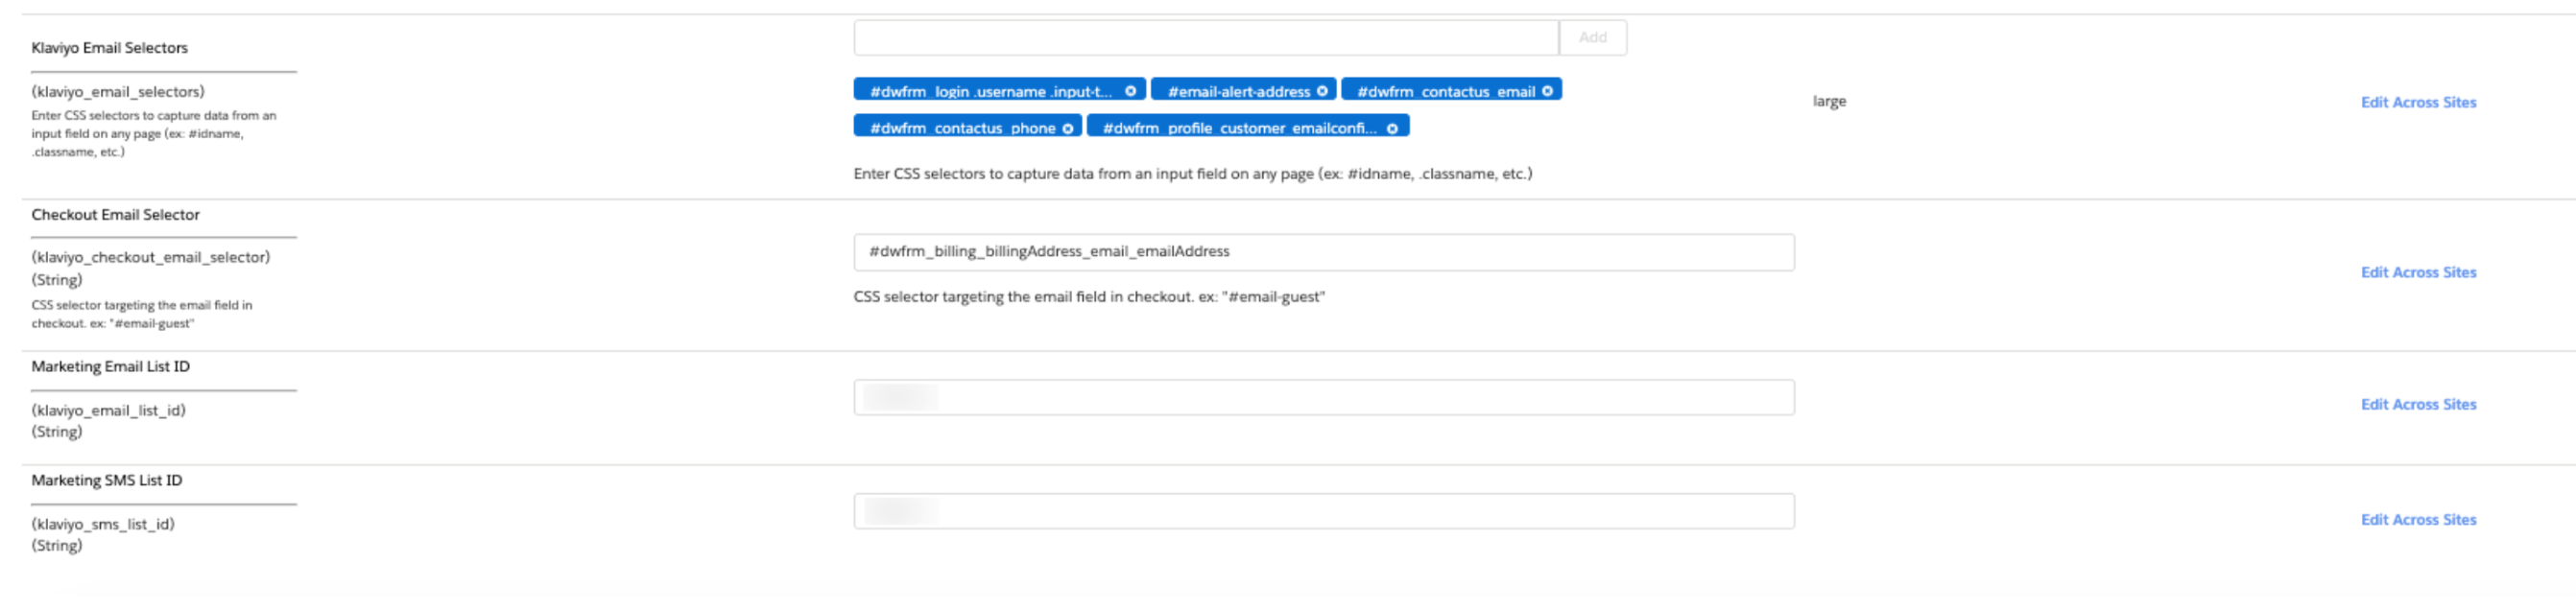
The product image type you would like used in event data sent to Klaviyo. If you're not sure which image type to set, navigate to Merchant tools > Products and Catalogs > Products, click on a product, and determine which view type you want to use based on what's available (eg. large, medium, small, hi-res). - Marketing Email List ID
You can collect email subscribers at checkout and sync them to a Klaviyo list. This setting is the ID of the list in Klaviyo that you wish to add email subscribers to. Learn how to find a list ID in Klaviyo. To collect email subscribers at checkout, you’ll also need to add a checkbox snippet which is described in a later section. - Marketing SMS List ID
You can collect SMS subscribers at checkout and sync them to a Klaviyo list. This setting is the ID Klaviyo list that you wish to add SMS subscribers to. Learn how to find a list ID in Klaviyo. If you gather both SMS and email subscribers, choose a different list for SMS than for email. This makes sure that consent will always be properly attributed to the correct channel. To collect SMS subscribers at checkout, you’ll need some other prerequisites, along with a checkbox snippet, which are described in a later section.
- The metadata.zip file will also create a new service in SFCC. Navigating to Administration > Operations > Services, you should now see 2 new entries under the Services tab called KlaviyoEventService and KlaviyoSubscribeProfilesService, each with respective profile and credentials entries.
Configuring Klaviyo Email Field Selectors and Checkout Email Field Selector
These preferences are integral to Klaviyo successfully identifying and tracking site visitors. If a visitor is not identified to Klaviyo, then no events will be tracked for that visitor. Once you are done integrating, you can learn how to test your Klaviyo email and checkout email field selector setup in the Test your SFCC setup section below.
Klaviyo Email Field Selectors
The Klaviyo Email Field Selectors site preference is used to target any and all email and phone number input fields on the site (with the exception of the email input located in checkout, which is dealt with below). We identify these fields via standard CSS selectors, with each being added individually to the site preference (which is a “Set of Strings,” allowing for multiple string values to be entered one by one). Any complex selector that could be used in a standard stylesheet to target a specific element can be used, e.g., #dwfrm_login div.username input.input-text is acceptable, as are selectors that can target multiple elements across the site based on shared attributes, e.g., input[type=email]. Be sure to avoid targeting inputs via any dynamically generated IDs — a very common case in SiteGen — as those IDs will change based on page load and thus fail (e.g., #dwfrm_login_username_d0fignzngiyq).
Note that fields added to the DOM post page load can still be targeted. Examples of this include an email address field that gets inserted into a modal after an AJAX call, or one that gets injected into the DOM by third-party JavaScripts.
Also note that phone number fields alone may not fully identify the user to Klaviyo, depending on your SMS settings within your Klaviyo account (if SMS is enabled and you have a sending number associated with the country of the input phone number, the browser will be identified). As such, adding CSS selectors to target phone number fields can be considered “nice to have,” or “as-needed,” whereas adding them for email fields should be considered essential.
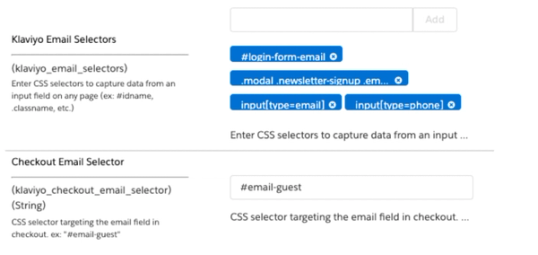
Checkout Email Field Selector
The email collection field in checkout is a special case, and as such has its own site preference for targeting. The principle works exactly the same as the Klaviyo Email Field Selectors site preference: simply enter a single CSS selector that targets the email address field in your site’s checkout flow, regardless of whether it appears at the start, end, or in the middle of checkout.
Successfully configuring this site preference to target the email collection field in checkout is essential to correctly track the Started Checkout event, and as such it is highly recommended that you test to ensure that Started Checkout events appear in Klaviyo after an email address is entered into the email collection field in checkout.
Also note that the checkout email field targeted by the Checkout Email Field Selector site preference will automatically get wired to identify the user, in addition to triggering the Started Checkout event (i.e., there is no need to include the CSS selector for the checkout email field in both the Klaviyo Email Field Selectors and Checkout Email Field Selector site preferences).
Add setup snippets
The last part of the cartridge setup is to add the snippets to your site template files in order to enable the cartridge to communicate with the site. These steps differ greatly for Site Genesis (SG) and Storefront Reference Architecture (SFRA) infrastructures, so make sure to follow the correct instructions for your setup.
Storefront Reference Architecture (SFRA) snippet setup
Add the following code to the bottom of your pageFooter.isml file:
<isinclude template="klaviyo/klaviyoFooter"/>You have now completed snippet setup for your SFRA store.
Site Genesis (SG) snippet setup
- To add the KlaviyoFooter.isml to the global footer: Add the following code to the bottom of your footer.isml file (or any similar template that is loaded near the bottom of every page).
<isinclude template="klaviyo/klaviyoFooter"/>- To Add snippets for server-side user identification: Add the following snippet to your Account-Show and Cart-Show controllers anywhere before the call to render their respective templates (i.e., app.getView(...)).
   // KLAVIYO
    var klaviyoUtils = require('*/cartridge/scripts/klaviyo/utils'), klid;
    if(klaviyoUtils.klaviyoEnabled &&
    !klaviyoUtils.getKlaviyoExchangeID()){
    klid = klaviyoUtils.getProfileInfo();
    }
// END KLAVIYO- Then, you’ll update the app.getView(...) call to include klid in as a pdict variable.
- In your Account-Show controller:
- In your Account-Show controller:
app.getView({downloadAvailable: true, klid: klid}).render('account/accountoverview');
// KLAVIYO: added 'klid: klid'- In your Cart-Show controller:
app.getView('Cart', {cart: app.getModel('Cart').get(),RegistrationStatus: false,klid: klid // KLAVIYO: added 'klid: klid'}).render('checkout/cart/cart');
- To add the Added To Cart snippet to the Cart-AddProduct controller: Add the following snippet to your Cart-AddProduct controller anywhere before the call to render the template (i.e., app.getView(...)).
 /* Klaviyo Added to Cart event tracking */
    var BasketMgr = require('dw/order/BasketMgr');
    var klaviyoUtils = require('*/cartridge/scripts/klaviyo/utils');
    var addedToCartData = require('*/cartridge/scripts/klaviyo/eventData/addedToCart');
    if(klaviyoUtils.klaviyoEnabled){
    var exchangeID = klaviyoUtils.getKlaviyoExchangeID();
    var dataObj, serviceCallResult, currentBasket;
    var isKlDebugOn = request.getHttpReferer().includes('kldebug=true') ? true
    : false;
    if (exchangeID) {
    currentBasket = BasketMgr.getCurrentBasket();
    if (currentBasket && currentBasket.getProductLineItems().toArray().length)
    {
    dataObj = addedToCartData.getData(currentBasket);
    serviceCallResult = klaviyoUtils.trackEvent(exchangeID, dataObj, klaviyoUtils.EVENT_NAMES.addedToCart,
    false);
    if (isKlDebugOn) {
    var klDebugData = klaviyoUtils.prepareDebugData(dataObj);
    var serviceCallData = klaviyoUtils.prepareDebugData(serviceCallResult);
    var siteGenKlDebutData = `<input type="hidden" name="siteGenKlDebutData"
    id="siteGenKlDebutData" value="${klDebugData}"/>`;
    var siteGenServiceCallData = `<input type="hidden" name="siteGenServiceCallData"
    id="siteGenServiceCallData" value="${serviceCallData}"/>`;
    response.writer.print(siteGenKlDebutData);
    response.writer.print(siteGenServiceCallData);
    }
    }
    }
    }
/* END Klaviyo Added to Cart event tracking */- Started Checkout snippets: When adding Klaviyo snippets to checkout controllers to track Started Checkout events, it’s important to keep the following in mind:
- The goal of adding these snippets is to check if an email address has been attached to the Basket object within the checkout flow, and when it’s attached, fire the Started Checkout event. It is important to catch the association of an email address with the Basket as early as possible in the checkout flow.
- Due to site-based checkout customization, it is not possible for Klaviyo to define exactly which controller will be the first to receive a Basket object with an email address attached to it.
- We recommend adding the code snippets to all major routes that are triggered within checkout. If you are capable of using the debugger to identify exactly when the email address gets attached to the basket in your checkout flow, feel free to add the snippets only to that route, but thoroughly test to ensure that all possible checkout paths (guest, logged in, logging in within checkout, etc.) trigger the code.
- The snippet for the first route hit in checkout (typically COCustomer-Start) follows. Insert it anywhere before the call to render the template (i.e., app.getView(...)). Note the key difference in this snippet — passing the first argument KLCheckoutHelpers.startedCheckoutHelper method as true instead of false — as compared to the other checkout snippets (highlighted below). Note that in the snippet below, the KLCheckoutHelpers.startedCheckoutHelper method is true instead of false (like in the other checkout snippets. This is essential to let the code know that we have a new Started Checkout event to track.
/* Klaviyo Started Checkout event tracking */
   var KLCheckoutHelpers = require('*/cartridge/scripts/klaviyo/checkoutHelpers');
   var customerEmail = KLCheckoutHelpers.getEmailFromBasket();
   var KLTplVars = KLCheckoutHelpers.startedCheckoutHelper(true, customerEmail);
   if (KLTplVars.klDebugData || KLTplVars.serviceCallData) {
       app.getView({
           klDebugData: KLTplVars.klDebugData,
           serviceCallData: KLTplVars.serviceCallData
       }).render('klaviyo/klaviyoDebug');
   }
/* END Klaviyo Started Checkout event tracking */- Then, update the app.getView(...) call to include klid in as a pdict variable:
app.getView({
  ContinueURL: URLUtils.https('COCustomer-LoginForm').append('scope', 'checkout'),
klid: KLTplVars.klid, // KLAVIYO: added 'klid: klid'
}).render('checkout/checkoutlogin');- The following snippets should be added to the first route that fires after an email address has been attached to the Basket object. If you are unsure, or simply want to cover your bases, we recommend adding this snippet to all of the following routes:As with the above snippets, add this snippet anywhere before the call to render the template, or before calls to subsequent controllers (example from COBilling-Save: app.getController(‘COSummary’).Start()).
- COShipping-Start
- COBilling-PublicStart
- COBilling-Save
- COPlaceOrder-Start
/* Klaviyo Started Checkout event tracking */
  var KLCheckoutHelpers = require('*/cartridge/scripts/klaviyo/checkoutHelpers');
var customerEmail = KLCheckoutHelpers.getEmailFromBasket();
  var KLTplVars = KLCheckoutHelpers.startedCheckoutHelper(false, customerEmail);
if (KLTplVars.klDebugData || KLTplVars.serviceCallData) {
app.getView({
klDebugData: KLTplVars.klDebugData,
serviceCallData: KLTplVars.serviceCallData
}).render('klaviyo/klaviyoDebug');
}
/* END Klaviyo Started Checkout event tracking */- For routes that do call templates directly (e.g., COShipping-Start), update the app.getView(...) call to include klid in as a pdict variable. Here is an example for the COShipping-Start route:
app.getView({
ContinueURL: URLUtils.https('COShipping-SingleShipping'),
Basket: cart.object,
HomeDeliveries: homeDeliveries,
klid: KLTplVars.klid, // KLAVIYO: added 'klid: klid'
}).render('checkout/shipping/singleshipping');- To add Order Confirmation snippet to the COSummary-ShowConfirmation controller: Add the following snippet to your COSummary-ShowConfirmation controller anywhere before the call to render the template.
/* Klaviyo Order Confirmation event tracking */
  var klaviyoUtils = require('*/cartridge/scripts/klaviyo/utils');
  var orderConfirmationData = require('*/cartridge/scripts/klaviyo/eventData/orderConfirmation');
var Logger = require('dw/system/Logger');
if (klaviyoUtils.klaviyoEnabled){
session.privacy.klaviyoCheckoutTracked = false;
var exchangeID = klaviyoUtils.getKlaviyoExchangeID();
var dataObj, serviceCallResult;
if (order && order.customerEmail) {
// check to see if the status is new or created
  if (order.status == dw.order.Order.ORDER_STATUS_NEW || order.status == dw.order.Order.ORDER_STATUS_OPEN)
  {
dataObj = orderConfirmationData.getData(order, exchangeID);
  serviceCallResult = klaviyoUtils.trackEvent(exchangeID, dataObj, klaviyoUtils.EVENT_NAMES.orderConfirmation,
  order.customerEmail);
}
  if('KLEmailSubscribe' in session.custom || 'KLSmsSubscribe' in session.custom)
  {
var email = order.customerEmail;
var phone = order.defaultShipment.shippingAddress.phone;
var e164PhoneRegex = new RegExp(/^\+[1-9]\d{1,14}$/);
if (phone) {
  // NOTE: Klaviyo only accepts phone numbers that include + and the country code
  at the start (ex for US: +16465551212)
  // in order to successfully get users subscribed to SMS list you must collect
  the country code in your order phone number field!
phone = '+' + phone.replace(/[^a-z0-9]/gi, '');
if(!e164PhoneRegex.test(phone)) {
if (session.custom.KLSmsSubscribe) {
  var logger = Logger.getLogger('Klaviyo', 'Klaviyo.core: Order-Confirm');
  logger.error(`SMS Subscription requested by user, but an invalid phone number
  was provided. Phone number: ${phone}`);
}
phone = null;
}
}
if (email || phone) {
klaviyoUtils.subscribeUser(email, phone);
}
}
}
}
/* END Klaviyo Order Confirmation event tracking */
You have now completed snippet setup for your Site Genesis store.
Add consent at checkout checkbox snippets (SG and SFRA)
Please note the following prerequisites for syncing SMS consent at checkout to Klaviyo:
- Enable SMS in Klaviyo and set up sending numbers.
- The phone number field on your checkout form must support a country code.
To collect consent at checkout for email and SMS, you’ll need to include code snippets for the consent checkboxes to appear where desired, in addition to configuring the List ID settings noted in the Add services section above.
For example, for these snippets to appear in checkout they can be placed in the shipmentCard.isml template (app_storefront_base) within SFRA or placed in the billing.isml template (app_storefront_core) within SiteGen.
Below are the ISML snippets for both Site Genesis and SFRA, and they can be placed anywhere in the checkout flow that best suits your specific site. Note that for consent at checkout to function correctly on Site Genesis, you must have included the Order Confirmation snippet referenced in the Add setup snippets section above.
The snippets below assume that your opt-in language for email and SMS is contained in a properties resource bundle called 'checkout'. You will need to replace `your.email.subscribe.resource.string.here` and `your.sms.subscribe.resource.string.here` with the keys corresponding to your email and SMS opt-in language, respectively. This language will appear next to the checkbox.
For instance, your opt-in language might look like this:
- Email
Subscribe to email updates - SMS
Subscribe to SMS updates. By checking this box and entering your phone number above, you consent to receive marketing text messages (such as [promotion codes] and [cart reminders]) from [company name] at the number provided, including messages sent by autodialer. Consent is not a condition of any purchase. Message and data rates may apply. Message frequency varies. You can unsubscribe at any time by replying STOP or clicking the unsubscribe link (where available) in one of our messages. View our Privacy Policy [link] and Terms of Service [link].
 <isset name="KLEmailSubscribed" value="${(session.custom.KLEmailSubscribe
  == true) ? 'checked' : ''}" scope="page" />
  <isset name="KLSmsSubscribed" value="${(session.custom.KLSmsSubscribe == true)
  ? 'checked' : ''}" scope="page" />
  <input type="checkbox" id="KLEmailSubscribe" ${KLEmailSubscribed} /> ${Resource.msg('your.email.subscribe.resource.string.here',
  'checkout', null)} <br />
  <input type="checkbox" id="KLSmsSubscribe" ${KLSmsSubscribed} /> ${Resource.msg('your.sms.subscribe.resource.string.here',
  'checkout', null)}
Enable the OCAPI integration in Klaviyo
Endpoints
In order to integrate with SFCC for product catalog and historic/ongoing order data, Klaviyo makes use of four OCAPI endpoints:
- /order_search
Syncs historical order data to Klaviyo syncs ongoing order events every 60 minutes. The Ordered Product and Placed Order events will sync additional data for segmentation and flow filtering, and are ideal for enhanced personalization not available from the Order Confirmation event. For real-time order confirmation emails, use the Order Confirmation event from the cartridge. - /sites
Allows you to select which site Klaviyo syncs data from during your integration setup. - /product_search
Connects your catalog to Klaviyo to enable functionality including product recommendations in emails. - /products/*/variations
Enables syncing variants to Klaviyo to enable functionality such as back in stock, low inventory, and price drop flows.
SFCC-side setup
Before we can communicate with SFCC's OCAPI, some permissions and settings must be set up in SFCC.
Please note that while the Klaviyo integration requires POST permissions for order_search and product_search, we are not actually posting data to SFCC; this is due to the design of SFCC's OCAPI.
- Navigate to https://account.demandware.com/dw/account/APIAdmin and add an API client for Klaviyo. The API Client ID and password will be required to generate the bearer token for OCAPI.
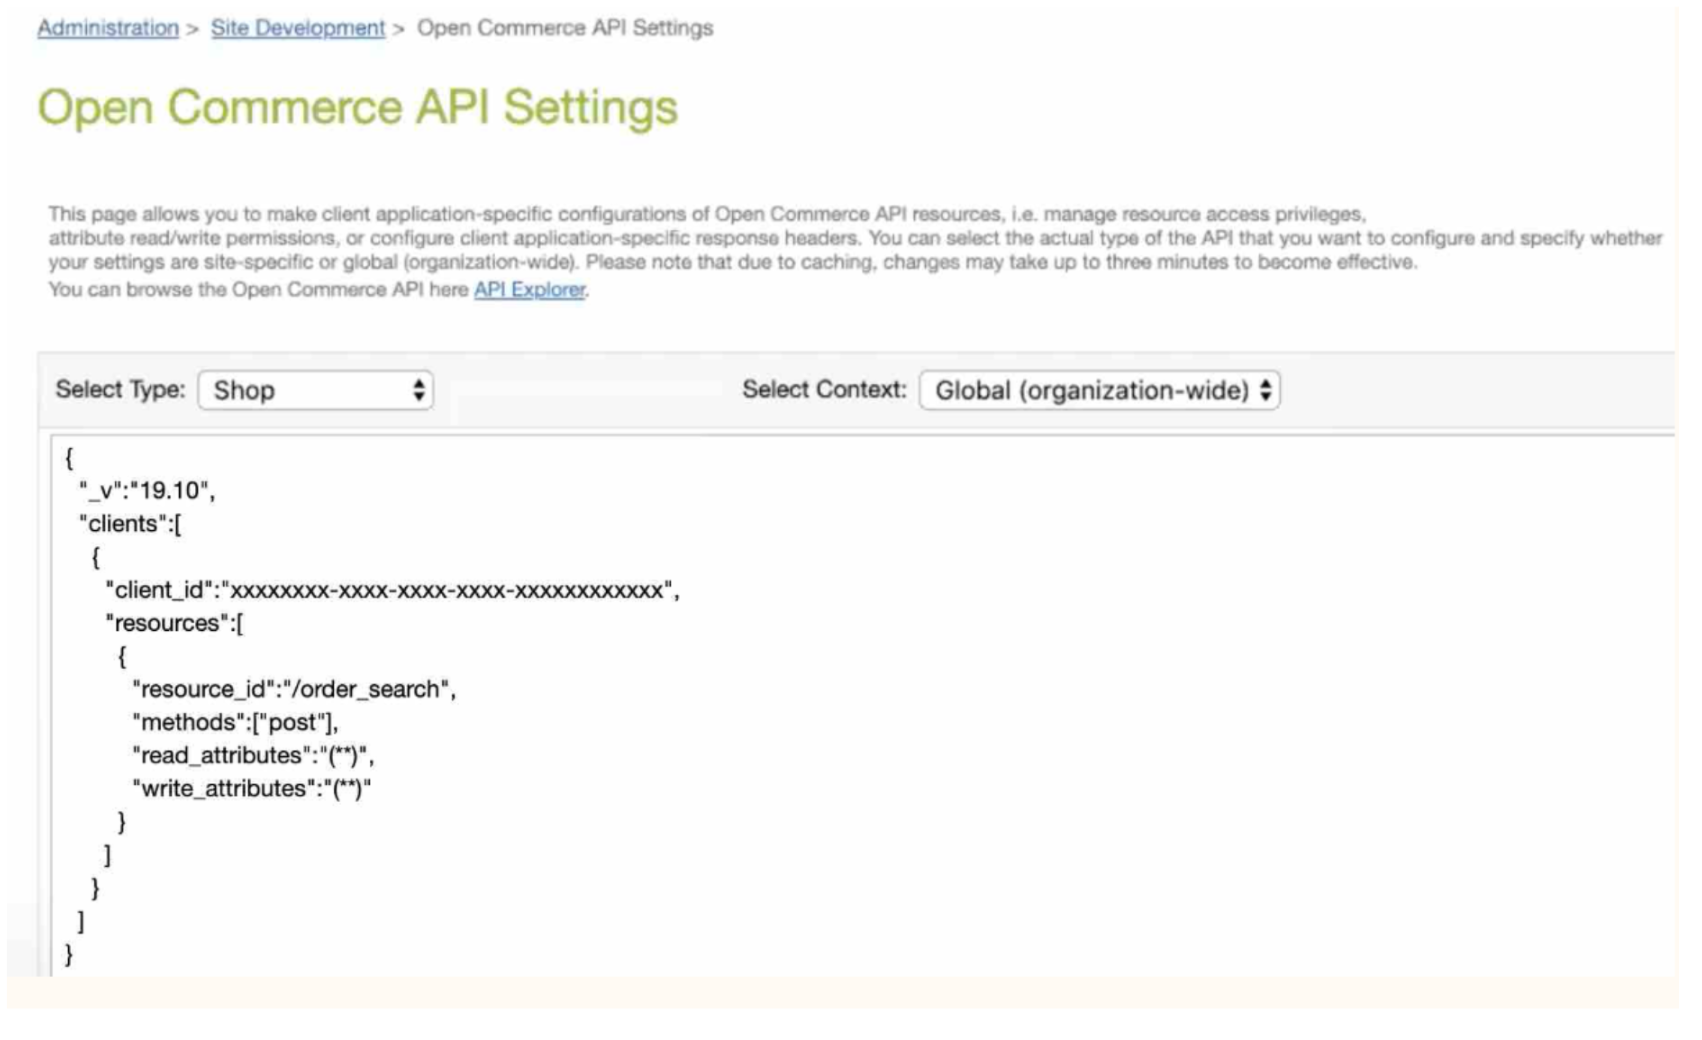
- Once the API client is added, navigate to Administration > Site Development > Open Commerce API Settings in the SFCC Business Manager.
- Add the following snippets, replacing the API version and Client ID. We support API versions 19.5 and above as well as 18.8. Replace CLIENT_ID with the API Client ID generated from the API client setup in the previous step (this should look something like "xxxxxxxx-xxxx-xxxx-xxxx-xxxxxxxxxxxx"). If the settings already exist for these APIs, you may only need to add the highlighted sections below to the existing clients JSON array.
- Add the following JSON under the type Shop and context Global (organization-wide), replacing SHOP_API_VERSION with your OCAPI Shop API version, then click Save.
Once added, the settings should appear similar to this:
- Add the following JSON under the type Shop and context Global (organization-wide), replacing SHOP_API_VERSION with your OCAPI Shop API version, then click Save.
{
 "_v":"SHOP_API_VERSION",
 "clients":[
 {
 "client_id":"CLIENT_ID",
 "resources":[
 {
 "resource_id":"/order_search",
 "methods":["post"],
 "read_attributes":"(**)",
 "write_attributes":"(**)"
 }
 ]
 }
 ]
}- Add the following JSON under the type Data and context Global (organization-wide), replacing DATA_API_VERSION with your OCAPI Data API version, then click Save.
Once added, the settings should appear similar to this:
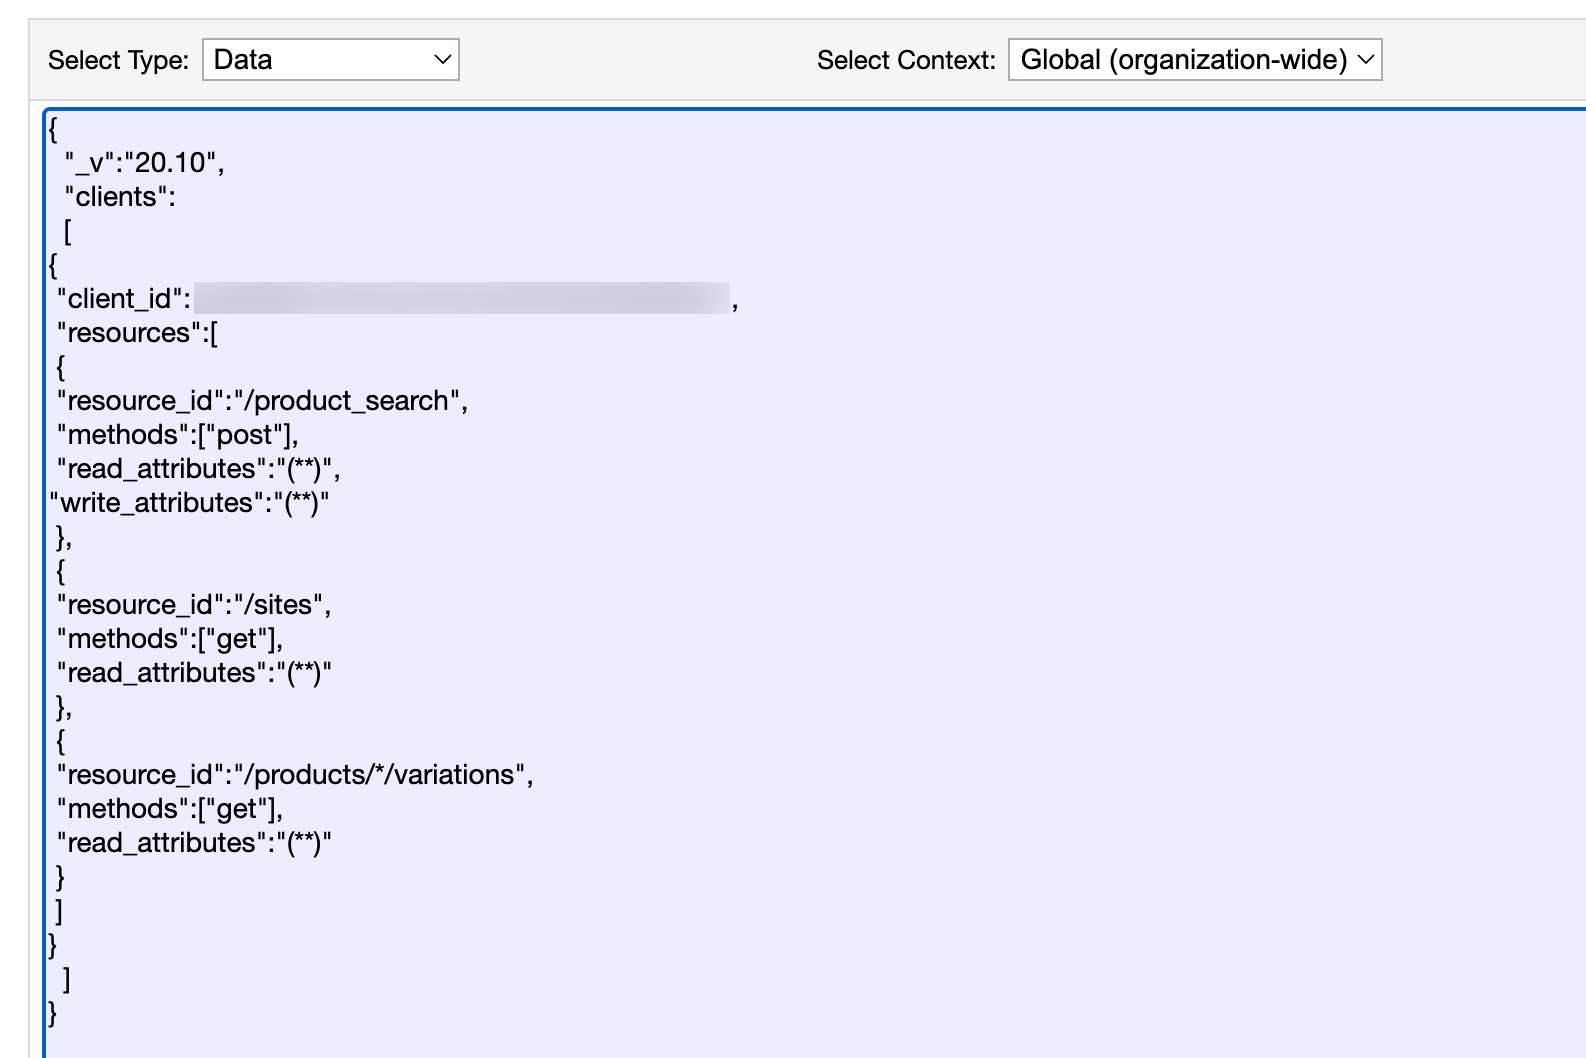
{
 "_v":"DATA_API_VERSION",
 "clients":[
 {
 "client_id":"CLIENT_ID",
 "resources":[
 {
 "resource_id":"/product_search",
 "methods":["post"],
 "read_attributes":"(**)",
 "write_attributes":"(**)"
 },
 {
 "resource_id":"/sites",
 "methods":["get"],
 "read_attributes":"(**)",
 },
 {
 "resource_id":"/products/*/variations",
 "methods":["get"],
 "read_attributes":"(**)",
 }
 ]
 }
 ]
}
Klaviyo-side setup
- In Klaviyo, select Integrations > Add integrations.
- Search for Salesforce Commerce Cloud and click the card, then click Install.
- Click Connect to Salesforce Commerce Cloud on the landing page.
- On the next page, fill out the following information:
- Store URL
Your website domain (e.g., example.com or dev03-na01-example.demandware.net). - Auth token
Create an auth token for this integration that will be used to request a bearer token. The auth token is generated by base-64 encoding the client ID and password joined by a colon (e.g., xxxxxxxx-xxxx-xxxx-xxxx-xxxxxxxxxxxx:password). - Data API Version
The version of your Data API for which you added access in the SFCC-side Setup step (e.g., v19_10). - Shop API Version
The version of your Shop API for which you added access in the SFCC-side Setup step (e.g. v19_10). - Catalog ID
The ID of the SFCC catalog to sync with Klaviyo (e.g., storefront-catalog-en). You can find your Catalog ID in Salesforce Business Manager under Merchant Tools > Products and Catalogs > Catalogs.
- Store URL
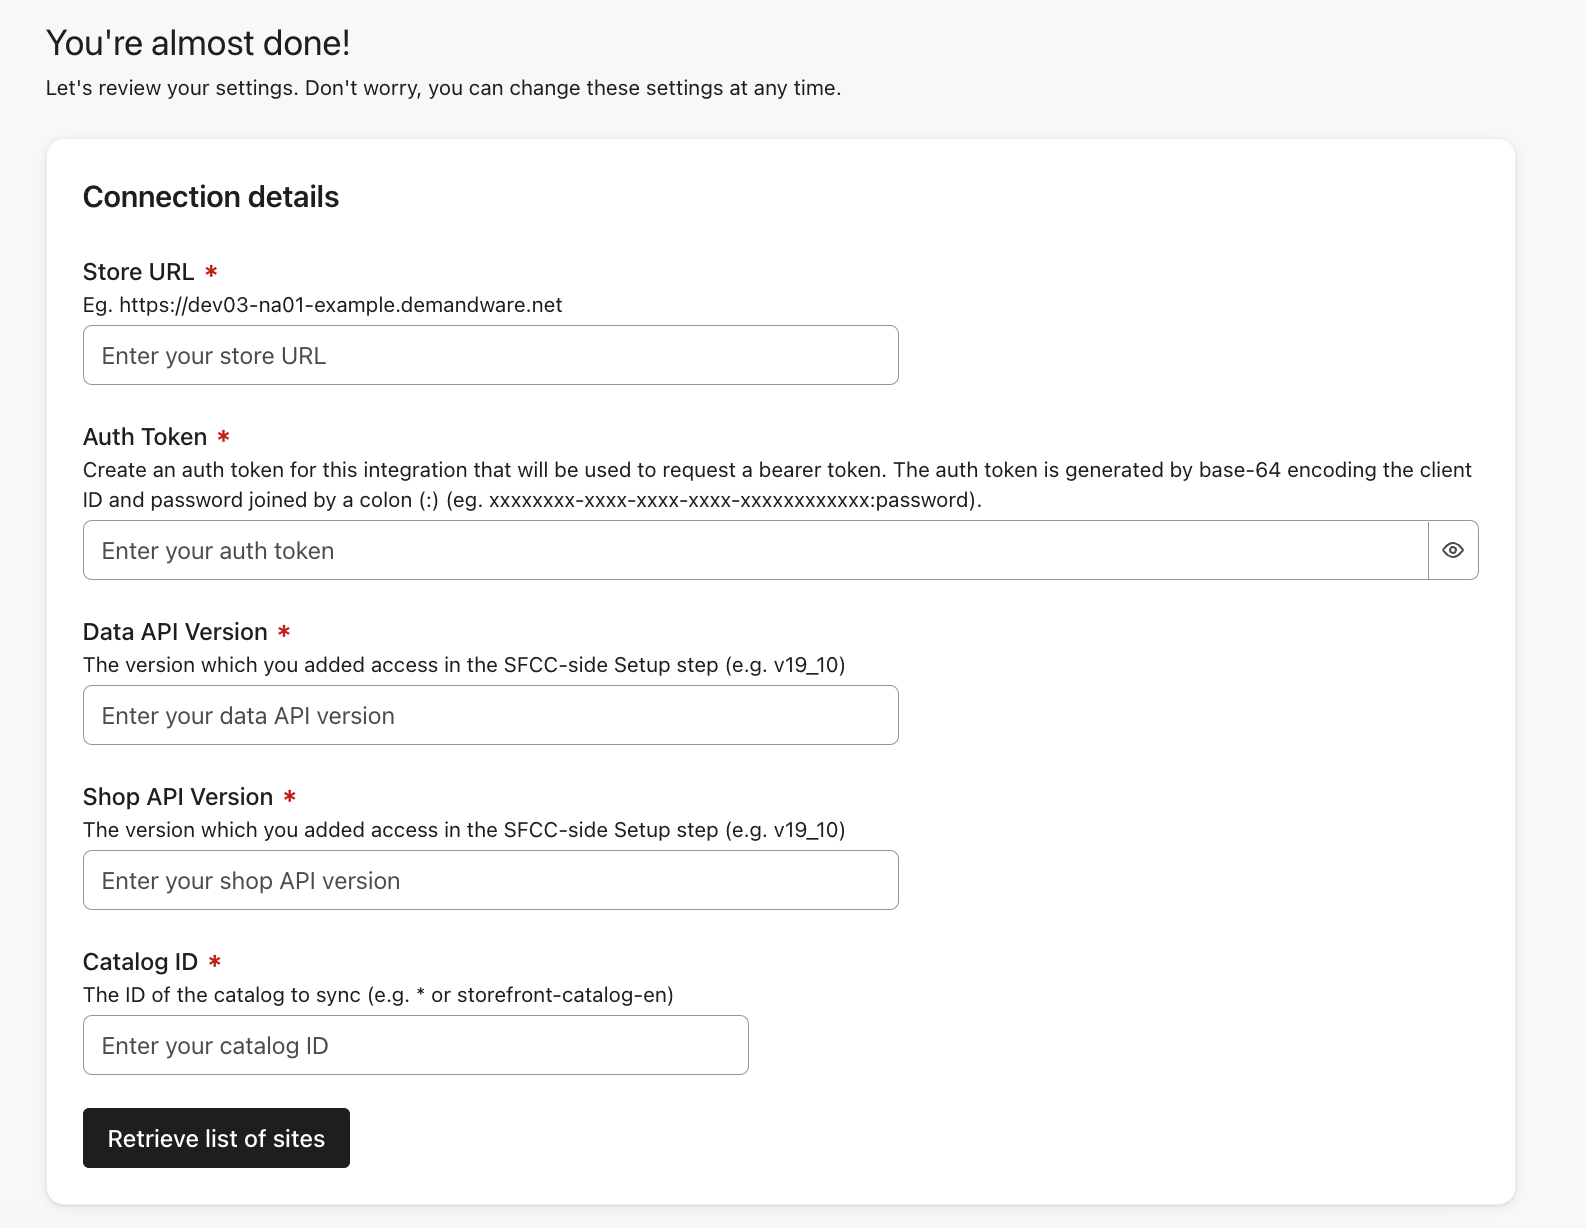
- Once you've entered these credentials, click the Retrieve list of sites link to retrieve a list of sites on your SFCC instance.
- After the sites are retrieved, select the site(s) to integrate with this account and click Complete setup. Your integration should now start syncing your order, catalog, and customer data.
Test your SFCC integration
To test out your cartridge setup, go to your site and follow these instructions:
- Cookie yourself by adding the url parameter utm_email as your email address to your address bar. For example: https://www.example.com/?utm_email=your@email.com.
- Search your catalog.
- View a category page.
- View a product page.
- Add an item to your cart.
- Place a test order.
- Navigate Analytics > Metrics in Klaviyo, then look for metrics coming from Salesforce Commerce Cloud.
Test Klaviyo Email Field Selectors
To test that a given email field has been properly targeted and is correctly identifying the user to Klaviyo:
- Open an incognito browser window.
- In the Developer Console enter the following command and hit enter:
klaviyo.isIdentified();
This should result in the following output:Promise {<fulfilled>: false} - Type an email address into the targeted field and click the tab key to change focus to any other element on the page.
- Return to the Developer Console and enter
klaviyo.isIdentified();again. This should result in the following output:Promise {<fulfilled>: true} - You can double check that Klaviyo is indeed receiving Identify calls by heading to Analytics > Metrics in Klaviyo and finding the activity feed of Active on Site events, where you should see the email address(es) that you have entered listed.
Test Checkout Email Field Selector
To test that the checkout email collection field is successfully triggering the Started Checkout event:
- Add one or more products to the cart, and then start checkout.
- Within checkout, type an email address into the targeted field and click the tab key to change focus to any other element on the page.
- You can double-check that Klaviyo is indeed receiving Identify calls by heading to Analytics > Metrics in Klaviyo and finding the activity feed of Started Checkout events, where you should see that your recent event was tracked.
Outcome
You've now integrated Salesforce Commerce Cloud with Klaviyo and tested your integration.
Additional resources
- Salesforce Commerce Cloud data reference
Learn what data syncs from Salesforce Commerce Cloud to Klaviyo after you enable Klaviyo's Salesforce Commerce Cloud integration, and how you can view it.
- How to upgrade your Salesforce Commerce Cloud cartridge
Learn how to upgrade your Klaviyo Salesforce Commerce Cloud cartridge.
- How often integrations sync reference
Learn what data syncs from a particular Klaviyo integration and how often the sync runs. We've organized these integrations by ecommerce platforms, email service providers, and other data integrations.