Getting started with WooCommerce
You will learn
Learn how to install the Klaviyo WooCommerce extension and enable the WooCommerce integration in your Klaviyo account.
The main steps to integrating with WooCommerce are:
- Install the Klaviyo extension (also known as the Klaviyo plugin) in WooCommerce.
- Enable the WooCommerce integration in Klaviyo.
This article also guides you through testing your WooCommerce integration.
The WooCommerce integration syncs data to Klaviyo in real time.
Before you begin
If you have active caching plugins or redirect plugins in WordPress, these can interfere with Klaviyo’s integration and cause connection issues. We recommend disabling these plugins during the integration setup process. Having other issues with setup? Check out Troubleshooting your WooCommerce Integration.
It is highly recommended to add Klaviyo IPs to your firewall provider’s allow list to minimize authentication and configuration issues. For more details, please check out How to allowlist Klaviyo integration traffic IP addresses.
Install the Klaviyo extension in WooCommerce
Klaviyo’s WooCommerce extension allows you to add a newsletter sign-up form to your website, enable website activity tracking, and get data about when people start checkouts and view products so you can send out abandoned cart emails. Our extension is also compatible with High Performance Order Storage (HPOS).
Before you begin, we recommend that you log in to your Klaviyo and WooCommerce accounts. If you have more than one Klaviyo account, log out of any accounts you don’t wish to integrate with WooCommerce.
- In WooCommerce, click the WooCommerce tab in the lefthand navigation, then select Extensions.
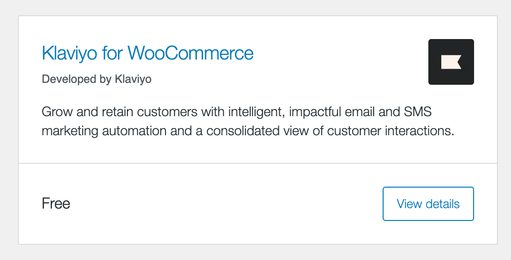
- Search for Klaviyo, then select Klaviyo for WooCommerce to be brought to the Klaviyo extension page in the WooCommerce Marketplace.
- Click Add to cart.
- Make sure you are logged in to your WooCommerce Marketplace account, then check out.
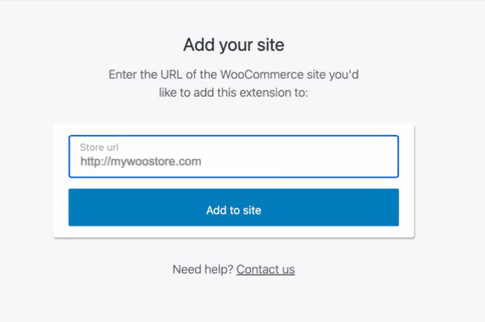
- Continue the checkout to be brought to an order confirmation page, then click Add to Site.
- If your WooCommerce Marketplace account isn't connected to your WooCommerce site, copy paste your Store URL in the box. If it's already connected, select your site from the dropdown. Then, click Add to site.
- Navigate back to your WooCommerce admin, then select Plugins. Scroll through the list of installed plugins to find Klaviyo, then click Activate.
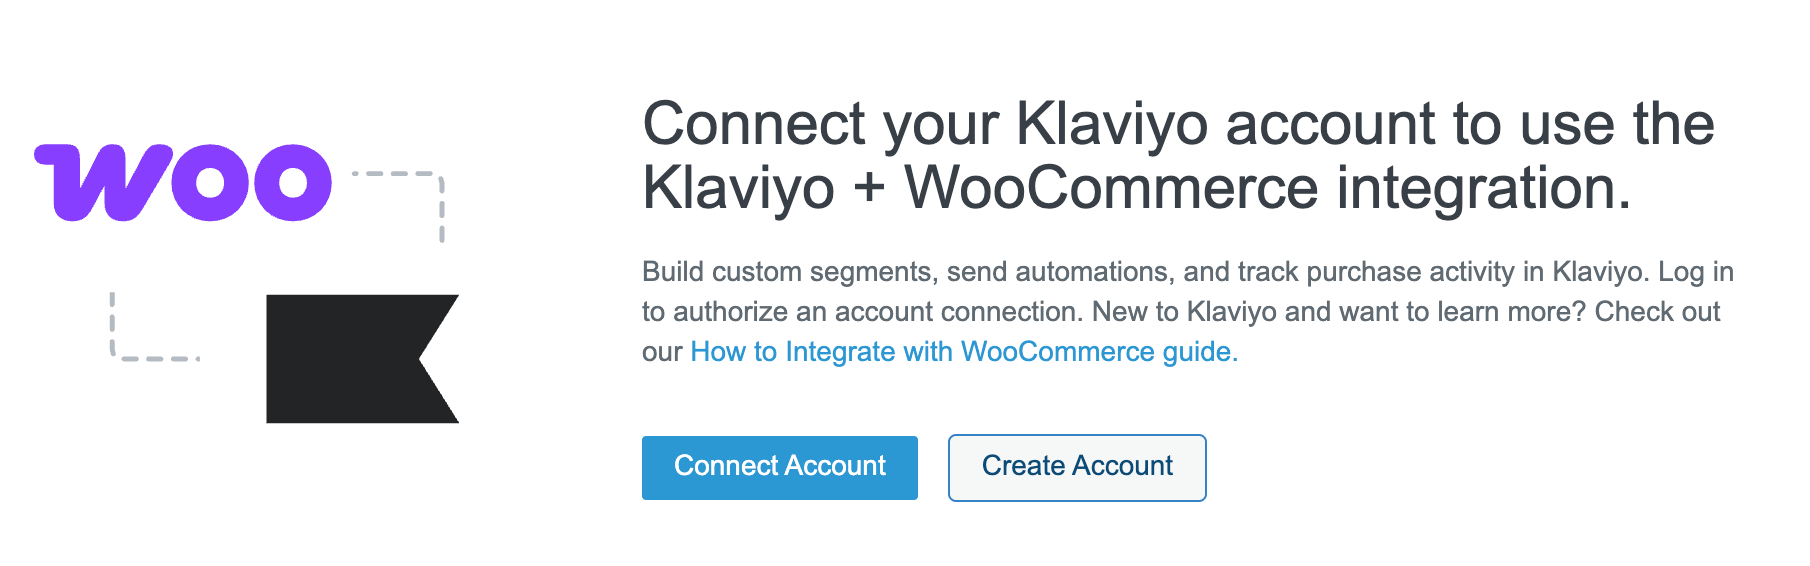
- Select Marketing from the lefthand navigation, then click Klaviyo.
- Click Connect Account to begin, then proceed to the next section.
Have issues with setup? Check out Troubleshooting your WooCommerce Integration.
Enable the WooCommerce integration in Klaviyo
- If prompted, log in to Klaviyo. You can make sure that you are logged in to the correct Klaviyo account by opening a new tab, navigating to your Klaviyo dashboard, and checking the account name. If you need to switch accounts, click Logout and then log in to the correct account before proceeding.
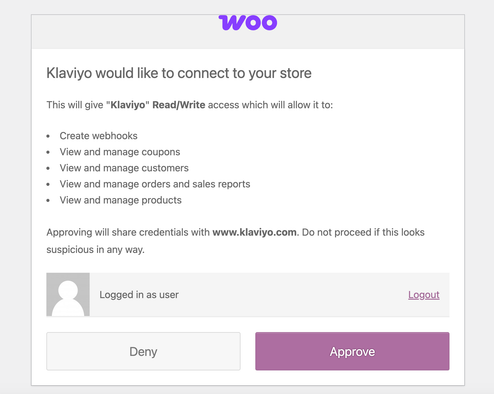
- Review the permissions, then grant them by clicking Approve.
- On the integration settings page, confirm the account name is correct.

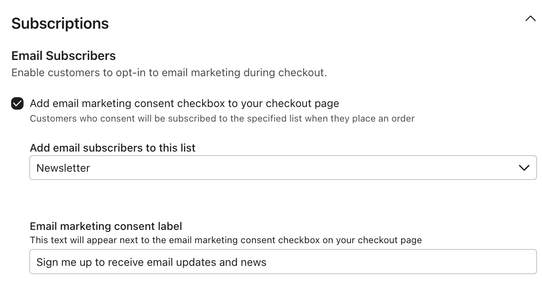
- Check the box next to Add email marketing consent checkbox to your checkout page to easily add this option to your WooCommerce site.
- Select a list from the dropdown under Add email subscribers to this list. If no lists are available in the drop down, head over to the Lists & Segments tab to create a new list.
Anyone who subscribes via the checkbox during checkout will be added to this list. Consent is sent to Klaviyo after the customer clicks the submit order button during checkout. - Under Email marketing consent label, enter the consent language you wish to appear next to the checkbox on your checkout page. The default language is Sign me up to receive Email updates and news.
- Select a list from the dropdown under Add email subscribers to this list. If no lists are available in the drop down, head over to the Lists & Segments tab to create a new list.
- In the Mobile section under Select Channels, choose which mobile marketing consent options to add to your WooCommerce checkout page. Check Text Message to collect SMS consent and/or WhatsApp to collect WhatsApp consent. You can select one or both channels, depending on the type of consent you want to collect. Please note that SMS consent will not sync to Klaviyo if your company is age-gated.
- Select a list from the Add subscribers to this list dropdown. Users who consent to SMS and/or WhatsApp marketing at checkout will be subscribed to the list you select. Consent is sent to Klaviyo after the customer clicks the submit order button during checkout and the order is created in WooCommerce.
- Under Consent checkbox label, enter the text you want to appear next to the consent checkbox on your checkout page.
- Under Consent disclosure text, add the disclosure language that should appear with the checkbox. You can use Klaviyo’s default consent language or add your own. Disclosure language is required for TCPA compliance.

- If you wish to convert all future Placed Order and Ordered Product events to a selected currency using the exchange rate at the time they are processed, check the box Convert all currencies to one standard currency, then select a currency. Changing this setting will not impact previously integrated data. This setting does not change the default currency on your account.
- When you are satisfied with these settings, click Complete setup. You can go back and edit these settings at any time by navigating to the Integrations tab and selecting WooCommerce.
Congratulations! Your WooCommerce account is now connected to Klaviyo.
Troubleshooting
If you received an error message "Unable to test API by fetching order count. Invalid count" this means that when Klaviyo tries to validate the WooCommerce integration and get a count of orders, their API doesn’t return a value Klaviyo expects or it returns nothing at all. Since the integration hasn't officially connected to Klaviyo yet, this means that it needs to be resolved within WooCommerce.
To get more information about this error, use an application like Postman to make an API call to the order count endpoint which will provide more insight into what is being passed to Klaviyo.
The endpoint you need is: {customers-url}/wc-api/v1/orders/count
Change {customers-url} to your WooCommerce store URL.
Test your WooCommerce integration
To test out your integration, go to your website and follow these instructions:
- Add an item to your cart.
- Proceed to the checkout page.
- Fill in your email address and phone number on the checkout page. If enabled, check the boxes to subscribe to email and SMS marketing.
- Submit your test order.
- Check for the following (these may take a minute or two to update):
- Started Checkout event logged under Recent Data.
- Profile created in the lists you selected for email and SMS marketing.
- Placed Order event logged under Recent Data.
Recent data
The Recent Data section displays the most recent instance of an event.
Historical data
The Historical Data Progress bar updates in real-time as your historical sync is processed.
Next steps
Congratulations on getting set up! With your account setup and integrated, it's time to start using Klaviyo's core features. After you are done with the items in this category you'll be all set to get the most out of Klaviyo's features. Check out our Getting started with Klaviyo course to ensure you're up and running to get the most from your Klaviyo account.
Rebuilding carts from an abandoned cart flow
You can use WooCommerce Data to Rebuild Carts from an Abandoned Cart Flow.
We will generate a key on the Started Checkout event that allows you to create a link that rebuilds the customer's cart in case they return to their cart via an email triggered by this event on another device. You can create this link using the following url parameter in an Abandoned Cart flow email triggered by a Started Checkout:
/cart?wck_rebuild_cart={{ event.extra.CartRebuildKey }}Assembled, the url should look like the following:
{{ organization.url|trim_slash }}/cart?wck_rebuild_cart={{ event.extra.CartRebuildKey }}The dynamically-generated product title link pulls directly from the URL you have inserted in your account settings. If needed, this URL can be updated in the email template editor.
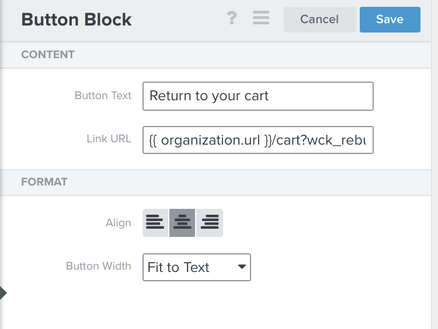
If you are using {{ organization.url }} to link to a non-secure HTTP URL, you will need to manually add your URL using HTTPS for the cart to rebuild correctly.
Extension reference information
Enable auto-updates
To enable auto-updates:
- Click on the Plugins tab. Scroll down to find the Klaviyo plugin.
- Click Enable auto-updates.
If you prefer, you can still download the Klaviyo WooCommerce extension manually from the WooCommerce Marketplace.
Find the changelog
Release notes are included in the changelog for each new extension update. You can view our extension's changelog on the Wordpress plugin directory.
How do I upgrade my WooCommerce integration to real-time, if I integrated using the Legacy API?
To start, install the latest WooCommerce extension by following the extension installation steps described above. Next, create a REST API key for the v3 integration with read/write permissions. This is different from the Legacy API key you created when you first installed the extension.
Update your integration in Klaviyo by selecting Save settings on the WooCommerce integrations settings page.
Please note that in order to use WooCommerce’s API v3 you must be on WC Version 3.5x or later and WP Version 4.4 or later.
Additional resources
- WooCommerce data reference
This article covers the data that is synced when you integrate your WooCommerce store with your Klaviyo account.
- How to use WooCommerce data in flows
Learn how to use data from Klaviyo's WooCommerce integration within your flow emails. When you integrate your WooCommerce account with Klaviyo, you'll have access to customer and purchase data that you can use to personalize your customers' experience.