How to add columns to an email
You will learn
Learn how to arrange content side by side in Klaviyo’s drag-and-drop email editor using split blocks, column layouts, or table blocks, and adjust how your design appears on desktop and mobile.
When to use a split block, columns, or a table
There are 3 ways to arrange content side-by-side using Klaviyo’s email editor: split block, columns, and table block. Each option offers certain advantages and tradeoffs.
Content layout | Number of columns | Width options | Allowed content types | Can columns stack on mobile view? |
Split block | 2 | Precise control (Use Styles > Layout) | Image or text only | Yes |
Columns | 1-4 | Limited selection | Any type of content block (e.g., text block, image block, review quote block) | Yes |
Table block | Any number | Precise control (Use Column width > Manual) | Image or text only | No |
Tables can be challenging for accessibility, as screen readers have a hard time parsing them.
To use mobile stacking and the Mobile preview, turn on Optimize for mobile under Mobile optimization in the template’s main Styles settings.
Add a split block to an email
To add a split block to an email:
- Drag a Split block into your template, then select it to open its settings.
- Open the block’s Styles tab and adjust the percentages under Layout to customize the width of the 2 columns.
- Open the Content tab and use Column selector to select a column.
- Under Column content, choose Text or Image for the selected column.
- Add your content: double-click text in the email canvas to edit it, or choose an image using the image controls. Repeat for the other column.
- Optional: open Styles > Mobile stacking to choose the stacking order or select No stacking to keep the columns side by side on mobile.
- Click the back arrow to return to the main content menu and save your block changes.
Add columns to an email
To add columns to an email:
- Drag Columns from the Layout section into your email.
- Choose the number of columns and your desired layout in the dialog, then click Add column layout.
- Drag blocks of any type into your columns.
Unlike the split block, you can use any block, have multiple blocks within the same column, and choose to have more than 2 columns. For example, this is an email with an image on one side and text and a button on the other.
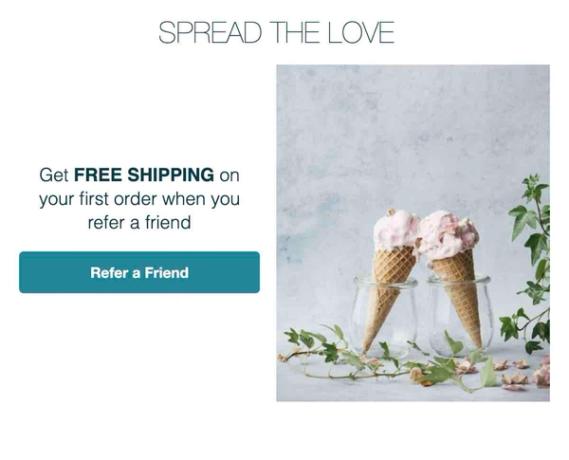
With mobile optimization enabled, columns stack from left to right by default. You can change the stacking order or keep columns side by side in the section’s settings. For text and images, you can also use a table block.
To change mobile stacking for the section containing your columns:
- Click the area to the left or right of the section’s content to open the section settings.
- Open Styles > Mobile stacking and choose a stacking order, or select No stacking to keep columns side by side.
- Click the back arrow to return to the main content menu and save your section changes.
Add a table block to an email
Use a table block to arrange text and images in columns that stay side by side on mobile. To add and populate a table:
- Drag a Table block into your email, then select it to open its settings.
- Open Styles and, under Columns, click Add column for each additional column you need. To set a column’s width, expand that column and select Column width > Manual, then enter the width.
- Open Content and use Cell selector to select a cell. Under Cell content, choose Text or Image. Double-click text in the email canvas to edit it, or choose an image using the image controls. Repeat for each cell.
- Click the back arrow to return to the main content menu and save your table changes.
To adjust the table’s padding (the spacing around its content), border colors, and fonts, select the table and open Styles.
Check your table in the Mobile preview. Tables with many columns can be difficult to read on a small screen. To hide a column on mobile, open the table’s Styles tab, expand the column under Columns, and set Show column on to Desktop only.
For more information on email design, check out our guide to the email template editor
Additional resources
- How to add a first name to an email, SMS, or push message
Learn how to add a variable that dynamically populates a recipient’s first name in an email, SMS, or push message. These are supported in campaigns and flows, the body of any message, and an email’s subject line.
- Accessibility in emails and forms best practice reference
Learn how to make your emails and sign-up forms more accessible. When designing your emails and signup forms, you’ll want to make sure your designs are accessible to all of your recipients.