How to embed a sign-up form on your BigCommerce order confirmation page
You will learn
Learn how to embed a sign-up form on your BigCommerce confirmation page to collect additional information from customers after they finish the checkout process. These recent customers are already interested in your brand, so the confirmation presents a great opportunity to further engage with them.
Before you begin
Make sure that you've integrated with BigCommerce and checked the setting Automatically add Klaviyo onsite JavaScript.
Build your form
You can create a sign-up form and embed it on your confirmation page to ask relevent questions of your customers after they checkout. For example, you could ask questions to learn more about how often a customer uses your products, or what potential new products they might be interested in buying.
To build your sign-up form:
- In Klaviyo, navigate to Sign-up forms > Create Sign-up form > Build from scratch.
- In the menu that appears, name your form and select a list for new subscribers to submit to.
- Select Embed as the form type.
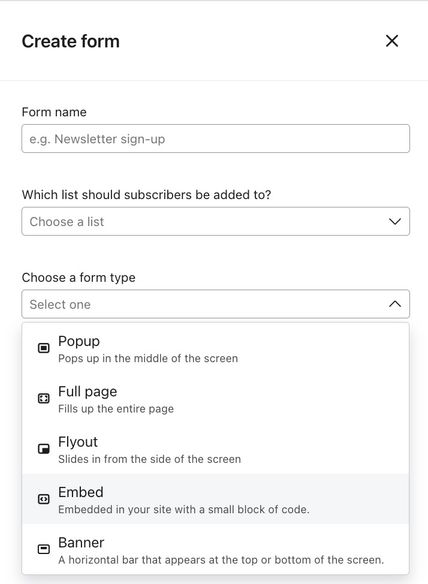
- Click Save and design.
- This will bring you into the form editor where you can edit the following styles:
- Styles: Edit the appearance of your form to match your brand, such as form or input field styles and font type. You can also edit any text by clicking on it and replacing the default language with your own.
- Add blocks: Here you can add content to your form in order to collect information, such as a text box for a question or a date field for a birthday. Make sure to set a profile property with each field you add, and to not overwhelm customers with too many questions.
- Targeting and behavior: Choose whether you want the form to appear on desktop, mobile, or both. Keep your form set to either Show to all visitors or Don't show to existing Klaviyo profiles.
- In the menu bar, select Success to edit the page that displays after someone submits your form.
- When you're satisfied with your form's design, click Publish.
- From the modal that appears, copy your embed code so that you have it ready to paste.
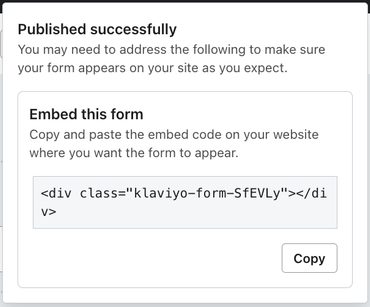
- Click Publish.
Your form will not appear on your site until you've pasted the embed code in your site code.
Verify the opt-in settings for that list so that the customer experience is seamless. If the list is double opt-in, you will want to edit the confirmation pages. All Klaviyo lists are set to double opt-in by default.
Add the embed to your BigCommerce site
- Navigate to your BigCommerce admin.
- Go to Storefront > Script Manager and click Create a Script.
- Name the script and configure it with the following:
- Location: Head
- Description (optional): Describe the purpose of the script
- Pages where the script will be added: Order confirmation
- Script type: Script

- Delete the script contents and instead paste the following code to add klaviyo.js to your confirmation page. Note that you need to do this even if you previously installed klaviyo.js on your website:
  <script src="https://static.klaviyo.com/onsite/js/PUBLIC_API_KEY/klaviyo.js" async=""></script>
  <script>
     document.addEventListener("DOMContentLoaded", function() {       var elem = document.createElement('div');
     elem.className = 'klaviyo-form-FORM_ID'
     document.body.appendChild(elem);
});</script>- In the snippet above, replace
PUBLIC_API_KEYwith your site's public API key. - In the snippet above, replace
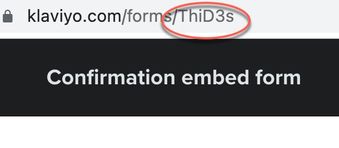
FORM_IDwith your form's ID. To find your form ID, navigate to the embedded form in your Klaviyo account. The form ID is the 6 letter code at the end of the URL.
- When you have filled in all the details for the script, click Save.
Your embed form will now display at the bottom of the page after someone places an order. Depending on your theme, you may want to edit the border, padding, or size of your form in the Styles section to ensure that it matches the look and feel of your order confirmation page; publish any changes you make to see them reflected.
Next steps
After you start collecting responses with your embedded form, each submission will be stored on the customer's profile as a custom property, available to use in segments, flows, and email templates.
Based on the responses, you can branch the post-purchase experience. You may also want to branch your welcome series based on this data or create relevant segments to send campaigns to. For example, let's say we decide to release a new mascara. Since we're collecting product interest data on this embedded form, we can notify anyone who told us they were interested in mascara in the product release.
Additional resources
- Getting started with sign-up forms
Learn how to create and customize sign-up forms in Klaviyo to publish on your website so you can engage shoppers, collect emails and phone numbers, and build long-lasting customer relationships.
- How to embed a sign-up form on your website
Learn how to add an embed sign-up form onto a specific page or location of your website (e.g., the footer), so shoppers looking to learn more about your brand can easily sign up. Embedding a sign-up form in the footer of your site to work in tandem with your other published forms is a Klaviyo best practice for optimizing list growth.