How to build dynamic blocks in a flow email
You will learn
Learn how to use dynamic table blocks to add product and other event information to your metric-triggered flows. In this article, you'll learn how to create a dynamic block using the example of an abandoned cart reminder showing the products that were left behind.
If you use one of Klaviyo’s prebuilt ecommerce integrations (e.g., Shopify, BigCommerce, Magento, or WooCommerce), you don’t need to build these blocks manually. Instead, use the flow library to find pre-built, fully functional flow emails to use as templates.
Within a metric-triggered flow, you can personalize the content of your emails based on the event that triggers the flow. For example, if someone starts a checkout, you can include product images and prices within an abandoned cart email to encourage recipients to return to their cart and finish their purchase. The dynamic table block will automatically repeat with the information specified for each item in the cart.
Before you begin
Before you can jump in, make sure that you have event data to use. Navigate to Analytics > Metrics to make sure the event exists in Klaviyo.
If you are unfamiliar with using event or profile data in emails, check out our message personalization reference as a first step.
It will also be helpful to understand data types in Klaviyo, particularly lists (i.e., arrays). An array is a way to store multiple pieces of data that are structured the same way. For example, a customer’s cart items are stored as an array within a Checkout Started event. The items array contains one entry per item ordered, and each entry contains the details for that item (e.g., item name, image URL, quantity, size, color, etc.).
What types of flows can use dynamic table blocks?
Dynamic table blocks contain information about one or more products that a customer interacted with in some way (e.g., purchased or left in their cart). These table blocks are useful for events that might contain different numbers of products, depending on a customer action. Dynamic table blocks are useful for flows triggered by these events:
- Placed order (order confirmation flow)
- Started checkout (abandoned checkout flow)
- Fulfilled order (shipping confirmation flow)
- Cancelled order (cancellation confirmation)
- Any other events that contain a list of one or more products
Dynamic table blocks are not useful if your event always contains a single product. The events below require static table blocks instead.
- Added to cart (abandoned checkout flow)
- Viewed product (browse abandonment flow)
Learn how to create a static table block for single-product events.
1. Create your flow
Start by creating your flow:
- Navigate to the Flows tab in Klaviyo.
- Click Create flow.
- Click Build your own.
- Name your flow and click Create flow.
- Under Select a trigger, click Your metrics.
- Select which integration your trigger metric is sent from (e.g., Shopify).
- Choose the event that should trigger your flow. In this example, we'll use the Checkout Started event. This ensures that we have access to the event data necessary to construct an abandoned cart block.
- Click Done.
- Drag and drop an Email action into the flow.
2. Add a dynamic table to your flow email
Next, add a dynamic table to your flow email:
- Click the email block you added to your flow in the last section.
- Next to Template, click Select template.
- Choose a template to use as your base.
- Drag a table block into your email.
- Click Styles > Dynamic to convert the table into a dynamic block. You’ll see 2 fields appear: Row Collection and Row alias, which you will fill in in step 3 and 4.
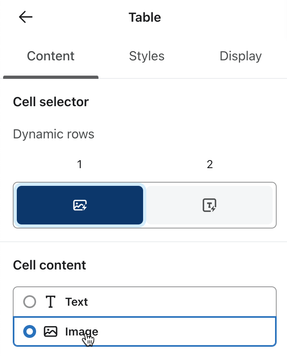
- Click back to the Content tab to adjust your column types.
- Generally, an abandoned cart message shows images of the abandoned items on the left and details about the item on the right. Click on the left or right row selector, then click Text or Image to change the cell type.
3. Identify your row collection
In this step, you'll add the name of the array you plan to iterate over to the Row collection field. To find the name of your array:
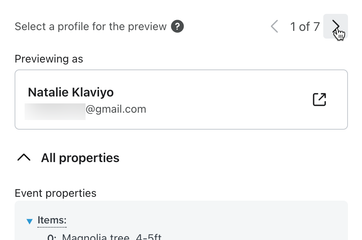
- Click Preview & test.
- Scroll through the preview data for your event until you find an array that contains the information you need.
- If no one has completed the flow’s trigger action yet, there will be no preview data available for the flow. You can navigate to your site to take the action (e.g., add items to your cart and start a checkout), and then your event will display within Klaviyo’s preview options.
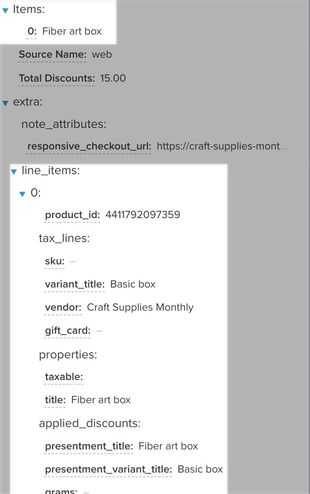
- In this example, there are 2 arrays that store item information:
- You’ll want to use the more detailed array, line_items, since it contains the detailed information needed to display in the repeating table block. To find the appropriate variable to set in the Row collection field, select two variables within the first section of the array and copy them. In this example, copy the tags for variant_price and title. Here are the two tags from this example:
{{ event.extra.line_items.0.variant_price }}{{ event.extra.line_items.0.title }}
- Items
A top-level array containing a simple list of each item’s name. - line_items,
An array nested within the extra array containing more detail, including each item’s title, price, SKU, and image URL.
- Ignore the curly brackets and look at the variables within them. Note that the beginning of both variables are the same:
event.extra.line_items.0. - Use everything up to (but excluding) the dot and the number at the end of this portion of the variable as your Row collection. In this example, the appropriate setting for the Row collection field is
event.extra.line_items.
Set fallback content (optional)
Fallback content will appear if there is no data in the row collection you select. This is only necessary when you build a table based on data that does not consistently appear within the trigger event. To add fallback content, toggle on the Fallback content option and add content (i.e., text or an image) to the field that appears.
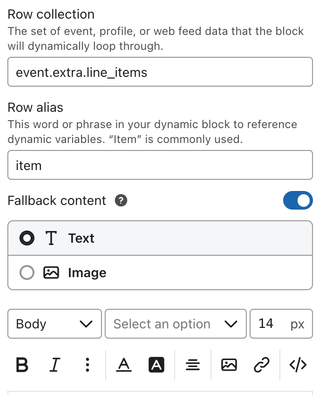
4. Choose a row alias
Your row alias can be any text you’d like to use (with no special characters or spaces). You’ll use this alias within your dynamic table block to identify variables that should be pulled from the array you selected above. It’s helpful to choose a simple but descriptive alias, so it’s easy to remember.
In this example, the dynamic table block repeats over a list of items in an abandoned cart, so item is a good alias to use. If your block repeats over a list of blog posts, then you could use post as your alias.
You can use any alias you’d like; just make sure to consistently use that alias in variables from your array (as outlined in the following steps).
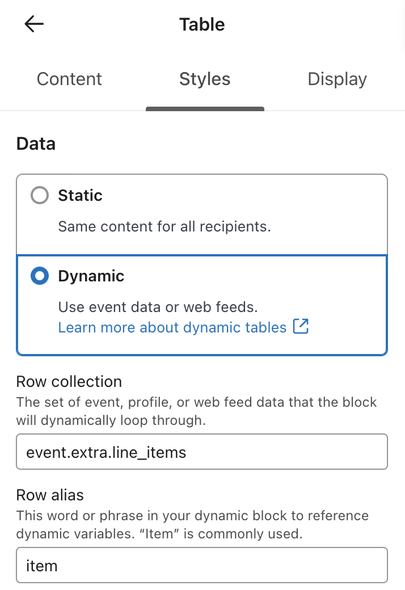
Once you’ve filled out the Row Collection and Row Alias fields, you’re ready to start building your table.
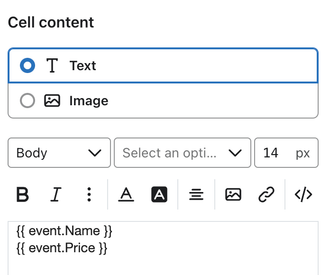
5. Add dynamic product details
After the data source is set up, you can use tags to add text in your email. Since this email is for an abandoned cart flow, it’s important to show the name of the product left behind, along with other details like a price and link to purchase.
To input the product title in your block:
- Navigate to one of the table's columns. If you want an image in the first column and the text in the second, click on the column selector on the right of the block’s Content section.
- Paste in the full event variable from the preview modal (e.g.,
{{ event.extra.line_items.0.title }}). - Replace the row collection within the variable (i.e., the text you used for the Row collection) and the following dot and number with the alias selected in the last step (e.g., item), keeping the surrounding brackets. For this example,
{{ event.extra.line_items.0.title }}becomes{{ item.title }}.

- Preview the email to ensure that the title shows up. If it doesn’t appear, double check the spelling, capitalization, and formatting of the text, as well as your settings in the Styles tab, to ensure there are no errors.
Repeat the same steps to add in additional item details.
Hyperlinking a product title
To add a hyperlink to the product title:
- Find the product URL variable in your event details.
- Replace the row collection and number with your row alias, as with the variable above (e.g., {{ event.extra.line_items.url }} becomes {{ item.url }}).
- Highlight the full variable for the item’s title (e.g.,
{{ item.title }}). - Click the link icon and paste your URL variable into the URL field.
Common product URL variables by integration
BigCommerce
Event variable: {{ event.extra.items.0.product.url }}
Final tag: {{ organization.url }}{{ item.product.url }}
Magento 1
Event variable: {{ event.extra.line_items.0.product.key }}
Final tag: {{ organization.url }}{{ item.product.key }}
Magento 2
Event variable: {{ event.Items.0.Product.FullURL }}
Final tag: {{ item.Product.FullURL }}
Shopify
Event variable: {{ event.extra.line_items.0.product.handle }}
Final tag: {{ organization.url }}products/{{ item.product.handle }}
WooCommerce
Event variable: {{ event.extra.Items.0.URL }}
Final tag: {{ item.URL }}
Considerations for currency variables
If your item price is passed as a number in your event details (with no currency symbol), use the currency_format tag to apply currency formatting. To apply this tag, replace variable_name in the code below with the full price variable, excluding curly brackets from the original variable:
{% currency_format variable_name %}
So, your final variable might look like this:
{% currency_format item.price %}
6. Add an image
To insert a dynamic image, find the event variable for the image in the preview modal. Often, this variable is listed under image, img, or src, but it depends on your integration. Here, it is under src: {{ event.extra.line_items.0.product.images.0.src }}. Apply the same adjustments to this variable as outlined in step five (replacing event.extra.line_items.0 with item). This is an event variable array within event.extra.line_items, which holds the images for this specific item.
- Once you have this variable, head to the column where you want to display the image (the left column, in this case).
- Click Image under Cell content if it’s currently set to Text.
- Click Select image.
- In the Dynamic Image tab, paste your image variable into the Dynamic variable or dynamic URL field.
- Input the customized image event variable,
{{ item.product.images.0.src }}. - Click Save.
- Add the product URL variable from step five in the Link address field so the image is clickable.
- Set a max width for the image, starting with 250-300 and adjusting as needed.
- Once you finish making changes, click Done and preview your email to make sure it appears as expected. If an image doesn’t appear, check the spelling of the variable against the one in the preview modal.
7. Preview your email
After completing the steps above, the email template should look similar to the one below when previewed.
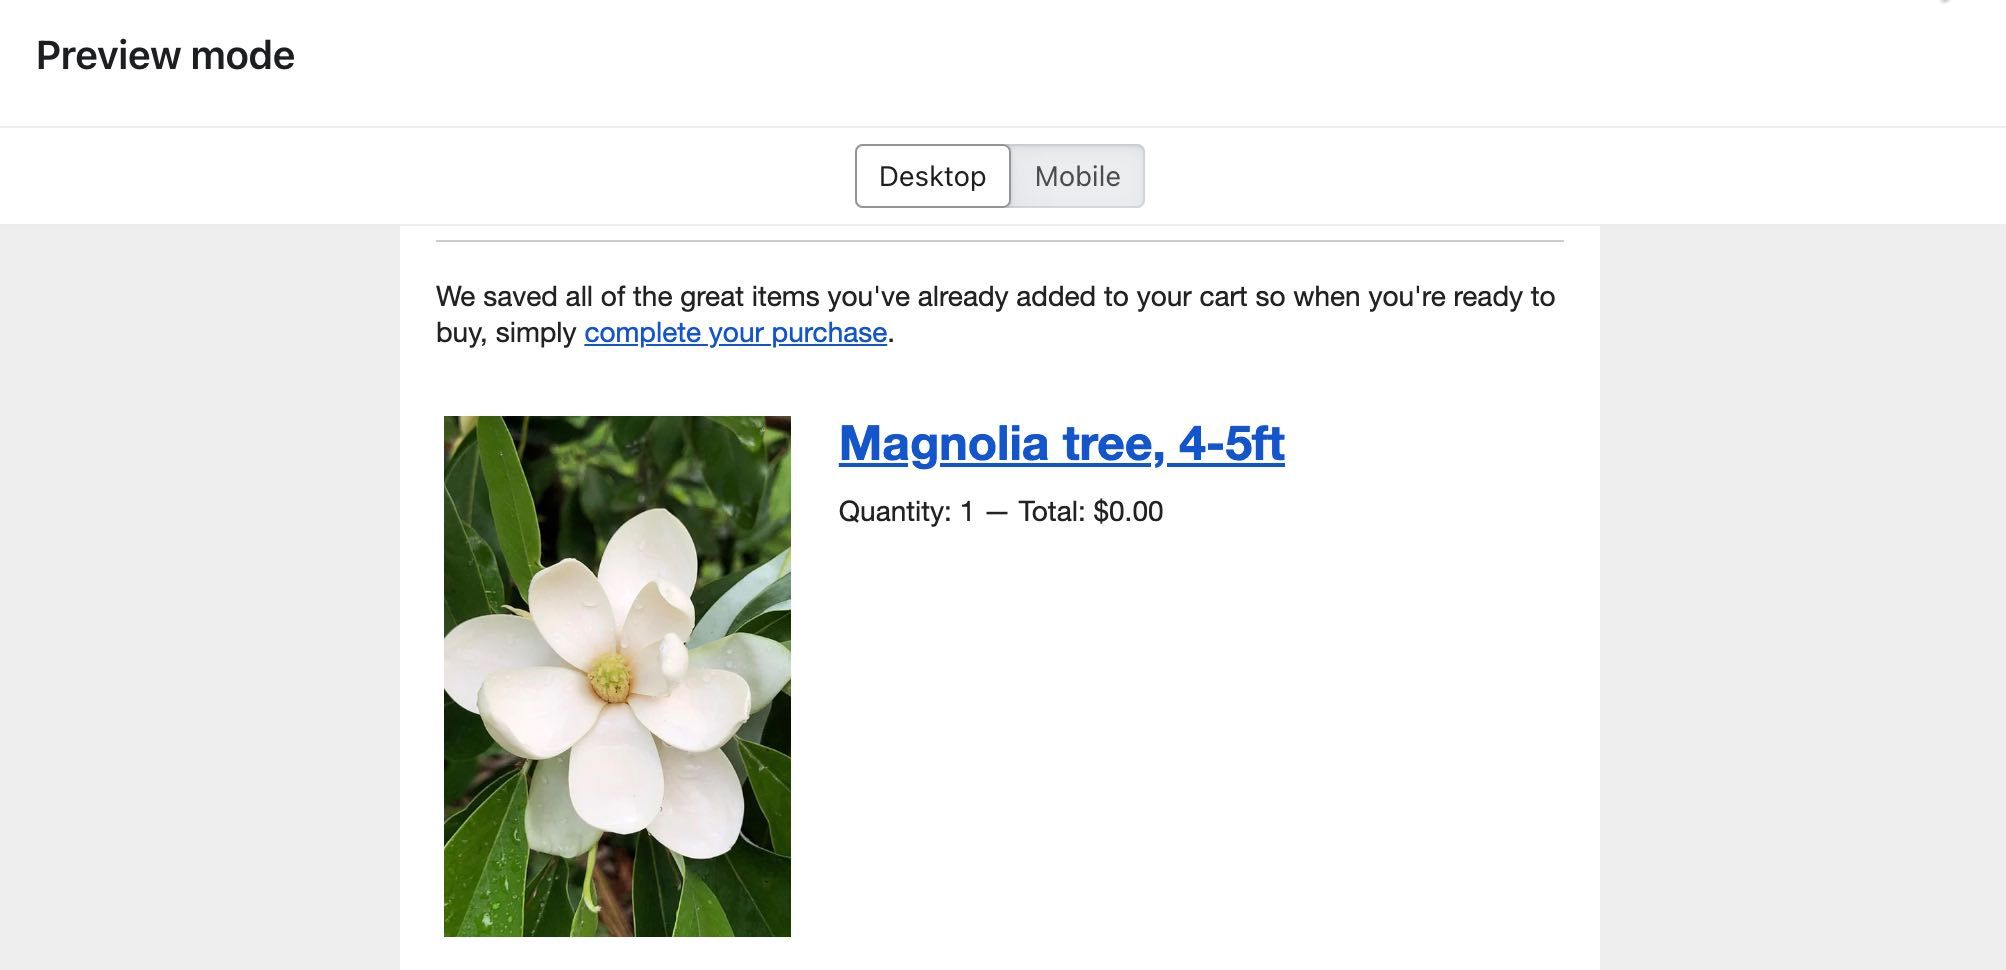
To see how this would look with dynamic content, and to make sure the links work properly, click Preview & test. If there are any errors, check the spelling and structure of your variables, as well as your block's Styles tab.
You can use these same concepts to build out additional dynamic blocks for flows triggered based on different metrics.
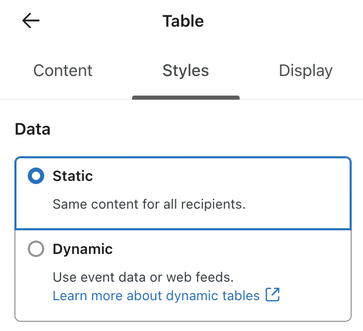
Create a static table block for single-product events
If an event can only ever contain a single product, use a static table block. For these events, there is no need to set a Row collection or Row alias, and you can use unedited variables directly from your event data.
- Navigate to the Flows tab in Klaviyo.
- Click Create flow.
- Click Build your own.
- Name your flow and click Create flow.
- Under Select a trigger, click Your metrics.
- Choose a single-product metric, like Viewed product or Added to cart.
- Click Done.
- Drag and drop an Email action into the flow.
- Next to Template, click Select template.
- Select a template to use as your base.
- Drag a table block into your email.
- By default, the Data field is set to Static under Styles; do not change this setting.
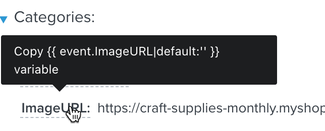
- Click Preview & test to see the variables available for your message. Click the image URL variable to copy it.
- Using the Cell selector and Cell Content fields, set the left cell to use the Image cell type.
- Click Select image.
- Select Dynamic Image.
- Paste the image URL variable you copied into the Dynamic variable or dynamic URL field.
- Click Save.
- Set the right cell to use the Text cell type.
- Copy any variables you’d like to display (e.g., product title, product price) and paste them into the text cell.
- Add additional blocks, like a CTA button to return to their cart, and style the email as desired.
- When you’re finished, click Exit.
Additional resources
- How to create an abandoned cart flow
Learn how to set up an abandoned cart flow in Klaviyo in order to increase your ecommerce revenue and personalize communication to your customers.
- Message personalization reference
Learn how to use Klaviyo’s personalization variables, or tags, to customize the experience for your customers.
- How to display products vertically in emails
Learn how to display products in your abandoned cart and order confirmation flows vertically (i.e., with an image above product information, rather than beside).
- Apply programming logic concepts to build more personalized messages