How to trigger a sign-up form to appear when a button is clicked
You will learn
Learn how to trigger a sign-up form to appear on your website when a visitor clicks on a certain button. This guide will walk you through adjusting your form to show on a custom trigger, creating and adding a new button to your site, and pasting a short code snippet into your site’s HTML so that clicking on the button triggers the sign-up form.
If you're a developer and want to custom-code a trigger for your sign-up form, head to our developer resource on how to custom trigger a popup or flyout form.
Because pasting this code requires access to your site's HTML and ecommerce platform, our support team is unable to offer hands-on assistance. If you don't have a developer on your team and are not comfortable adding the code yourself, consider reaching out to a Klaviyo Partner for assistance.
Create a new button
First, create a new button on your website that'll trigger the sign-up form to appear when it's clicked. You'll need to make sure your sign-up form is set up correctly in Klaviyo before adding the button to your site. To do so:
- Create a new sign-up form to appear when the button is clicked, or choose a form that you've already created.
- In the Styles tab, your Form Type should be set to either Popup, Flyout or Full Page. Embedded forms cannot be triggered when a button is clicked.
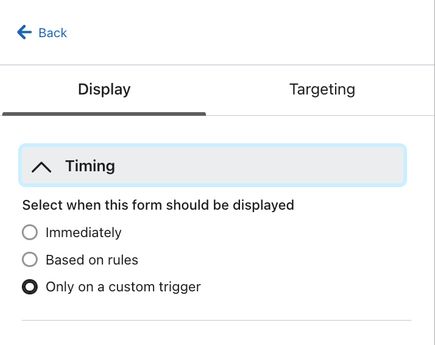
- In the Targeting & Behaviors tab, select Only show on custom trigger under Timing.
- When you're satisfied with your form's design and content, click Publish.
- Next, open the editor for your form and choose the following settings
- Copy the code below:
<button class="klaviyo_form_trigger">Click here</button>- Paste the code into the HTML of any page on your website that you'd like the button to appear on. This button will use the default styles from your site’s template. If you would like to customize the button's appearance further, consult your developer or a Klaviyo Partner.
Note that if you add multiple buttons to your site that each trigger different sign-up forms, you’ll need to use a unique name to classify each button (e.g., klaviyo_form_trigger1, klaviyo_form_trigger2).
Set the button to trigger your sign-up form
Now that you've added a new button to your website, you'll next need to set up the trigger so your sign-up form appears when it's clicked. Set up the trigger by adding a small, custom JavaScript snippet to your site:
- Copy the code snippet below:
<script type="text/javascript">
	document.querySelector('.klaviyo_form_trigger').addEventListener('click', function (){
		window._klOnsite = window._klOnsite || [];
		window._klOnsite.push(['openForm', 'FORM_ID']);
	});
</script>- Paste the code snippet directly below the button code that you added to your site in the last section.
- In the snippet you just pasted, replace FORM_ID with your sign-up form's ID.
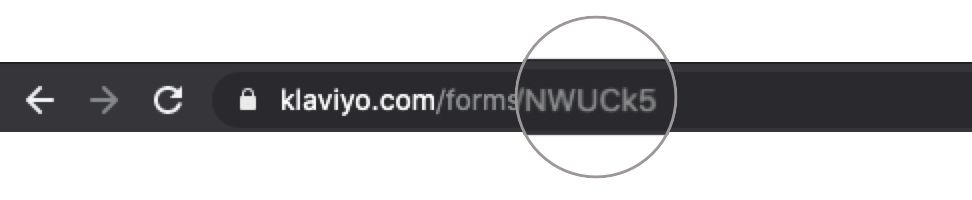
- To find form ID, navigate back to Klaviyo and open the form editor for your sign-up form. Copy the 6-digit code at the end of the URL to add in your code snippet; this is the Form ID.
- To find form ID, navigate back to Klaviyo and open the form editor for your sign-up form. Copy the 6-digit code at the end of the URL to add in your code snippet; this is the Form ID.
- The completed code should include the new button code, and the sign-up form trigger with your unique form ID. Make sure to paste this on every page where you added the button code.
- Here’s an example of the completed code in a Shopify page editor:
- Here’s an example of the completed code in a Shopify page editor:

If you adjusted the button’s class in the last step (i.e., you replaced klaviyo_form_trigger with some other text or added a number), make sure to update this code with the text you used.
- Save your changes.
Test your button
Once you’ve saved all the changes to your site’s code, visit your site and click your new button. When you do, the sign-up form will appear.
Having trouble? Head to Klaviyo’s Community Forum for guidance from other Klaviyo users.
Additional resources
- Getting started with sign-up forms
Learn how to create and customize sign-up forms in Klaviyo to publish on your website so you can engage shoppers, collect emails and phone numbers, and build long-lasting customer relationships.
- Understanding targeting and behavior settings for sign-up forms
Learn about the Targeting & behavior section of the sign-up form editor, where you can control and change when a form appears on your site, and who sees it. Open the form editor for an existing sign-up form, then select Targeting & behavior to adjust the display and targeting settings covered in this guide.
- How to custom trigger a popup or flyout form
- Klaviyo practitioner certificate