Getting started with Klaviyo APIs
You will learn
Get a foundational understanding of API calls and how the Klaviyo APIs can benefit your business. In this guide, you will learn about REST APIs, HTTP methods, and developer tools to prepare you for testing Klaviyo's APIs. Your first API calls can be accomplished in as little as 10 minutes from start to finish. If you are already familiar with API calls and are ready to test our APIs, follow our guide on how to use our Postman collections.
Throughout this guide, we will link out to a glossary when new technical terms are introduced. If you are uncertain about the meaning of a word at any point in the guide, check out the technical terms glossary.
What is a REST API?
REST API is a set of acronyms that stand for Representational State Transfer and Application Programming Interface. These terms can be more simply understood as structured requests that allow a piece of software to talk to another and pass information between them. When you make a Klaviyo API call, you send a request to a server and receive a response. The response includes a status code and, when the endpoint returns data, a body in JSON (JavaScript Object Notation) format. Some successful requests return no response body.
More simply, REST APIs allow you to request data stored in Klaviyo and have that data returned to you in a format that is readable by you and by computers.
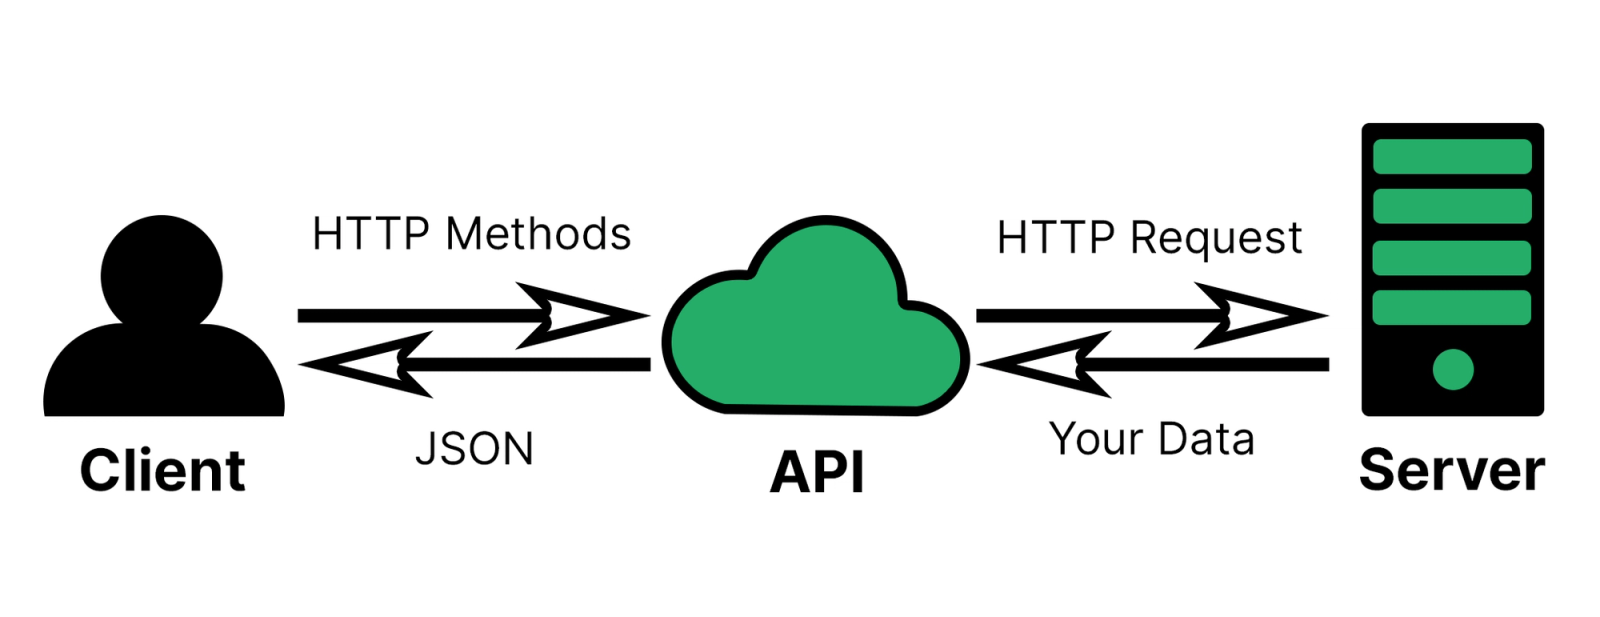
A GET request to retrieve data follows these steps:
- Send a structured request for data over the internet to the API. Requests are sent via HTTP, a basic network request type that the internet is largely built around.
- The API will receive the request, process it, and obtain the requested information from Klaviyo's databases.
- The API then responds to the client application using JSON structured format.
- You will receive the JSON response from your client application.
Although this knowledge is helpful to understand how data transfer works, it isn't necessary to start making API calls and getting value out of what Klaviyo APIs have to offer. The following sections explain the basics, and the linked Postman guide walks you through your first API call.
HTTP methods
HTTP methods are the “verbs” by which your requests are sent. There are 2 HTTP methods we will address in this guide: GET and POST.
Although we will not use them here, it is worth noting that most REST APIs support additional HTTP methods such as PUT, PATCH, and DELETE.
GET
A GET request can be most easily understood as a “read” request. GET requests retrieve information from the API endpoint and return it to you in a JSON-formatted response. These requests only allow you to read data, making them the safest type of request because your data cannot be modified or overwritten with this method.
POST
A POST request can be simply understood as a “write” request. POST allows you to create or add new resources. For example, a POST request to the Lists API can be used to create a new list in your account, while GET requests can retrieve your lists page by page. Follow the next-page link in each response until there are no more pages.
Check the endpoint’s reference documentation for its success response. Creating a list returns 201 (Created) with the new list’s data. Some POST requests, such as creating an event, return 202 (Accepted) with no response body. A 202 response means the request was accepted for processing. It does not confirm that processing is complete.
Necessary tools
APIs offer plenty of flexibility to your workflows and don't require you to use a specific client application or language library to achieve the desired results. Because API calls are made using HTTP requests, nearly every programming language has the ability to send this type of request natively or through a widely available language library. Additionally, depending on your machine and operating system, you can use native applications like Apple’s Terminal or Windows Terminal to make API calls from your computer. However, these applications require prior knowledge of command line interfaces.
We use a free web and desktop application called Postman. Postman has a variety of features that make it easier to set up and send an API request by inputting the endpoint, parameters, and authentication into a helpful user interface.
Test Klaviyo's APIs
Use a Klaviyo test account for experimentation. POST requests can change data in the account associated with your credentials, even when you send them from Postman.
For requests that use a private API key, create a key with the permissions required by the endpoints you plan to test. For example, retrieving lists requires lists:read, while creating a list requires lists:write. Keep private API keys secure and never expose them in browser code.
Klaviyo's APIs are useful for sending data from other platforms or servers to Klaviyo accounts or querying information within a Klaviyo account. Now that you have an understanding of how APIs work, you can get started testing our APIs for your business's use cases. For a full list of Klaviyo's available APIs, check out our API reference documentation. Follow our guide on how to use our Postman collections to make your first Klaviyo API call.
Additional resources
Developer portal resources
Klaviyo's developer portal contains API guides and reference documentation to help you make the most out of our APIs. Check out the resources below to get started:
- Klaviyo API reference documentation
- Getting started with the JavaScript API
- Setting up API-based transactional events
Klaviyo developer courses
Klaviyo Academy provides developer courses to help you get started building with Klaviyo APIs. Check out the courses below: