How to use Instagram content in emails
You will learn
Learn how to set up a custom web feed with your Instagram account using an RSS feed generator, and how to display the feed in your emails. With a custom web feed, you can connect your Instagram content to your emails and dynamically display your latest Instagram photos, captions, and more.
This process requires setting up an XML feed and inserting custom code into your email template. If you aren’t comfortable editing your email’s code, reach out to a Klaviyo Partner for help.
Set up an Instagram web feed
To set up an Instagram web feed without the help of a developer or Klaviyo Partner, use an RSS feed generator.
Note that this RSS feed generator app requires a paid plan in order to host an Instagram RSS feed. You can use any RSS feed generator, but if you use a different app, you may need to customize the sample code in the section below.
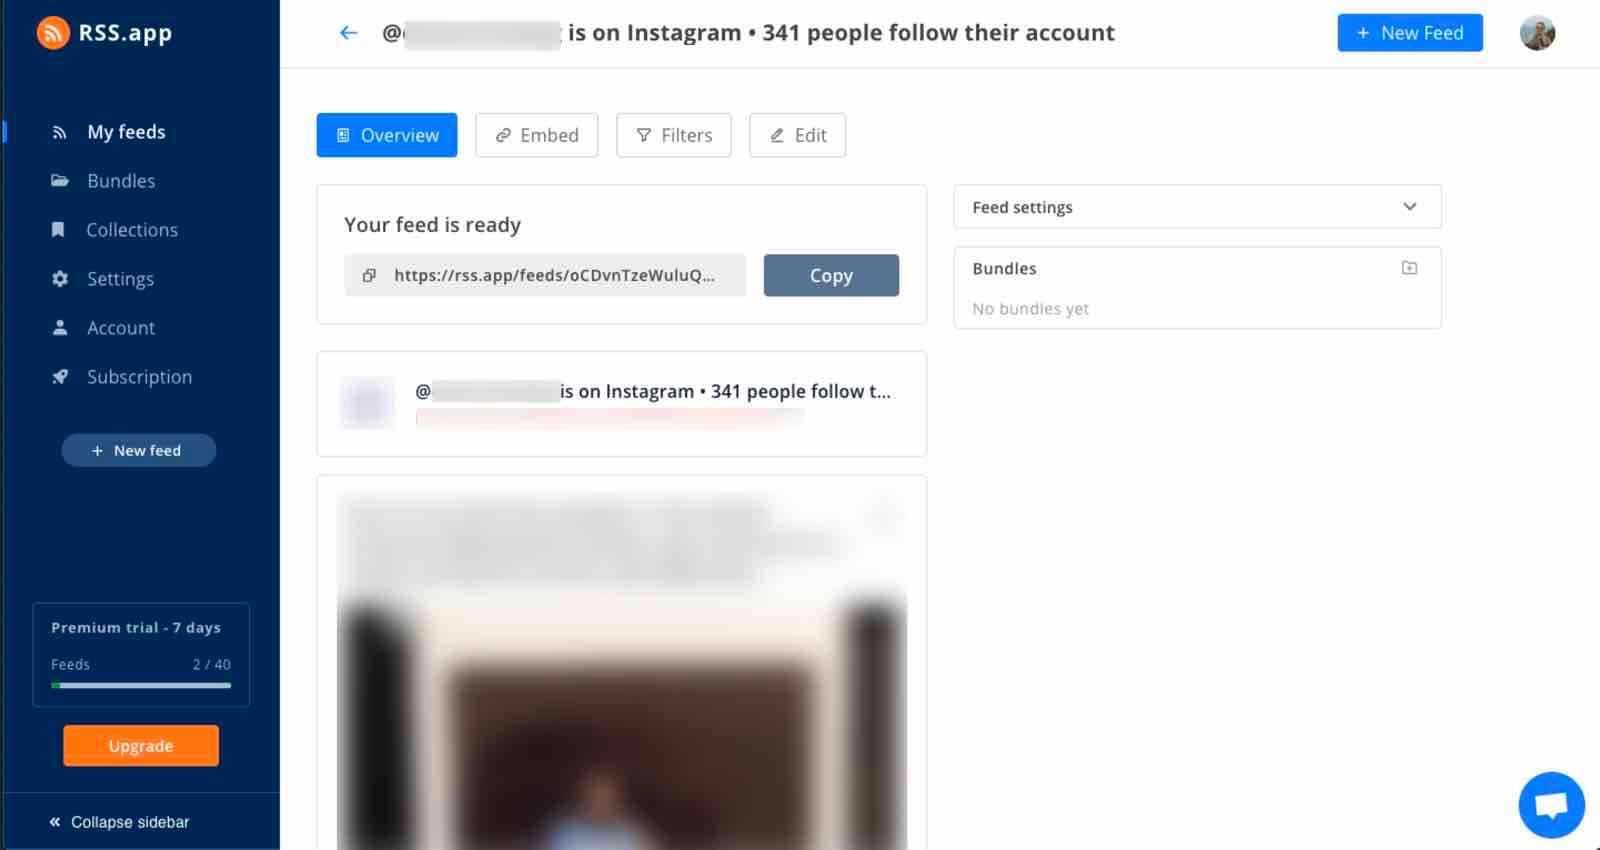
- Create an account with an RSS feed generator tool.
- Navigate to My Feeds.
- In the upper right, click New Feed.
- In the Enter Webpage URL field, add your Instagram URL, following the format https://www.instagram.com/YOUR_USERNAME.
- Click Generate.
- Click Save to My Feeds.
Once the feed is saved, navigate to the feed page and locate the feed URL. It should follow this format: https://rss.app/feeds/UNIQUE_FEED_ID.xml.
As an alternative to this method, you can set up an Instagram web feed using their Basic Display API, or by using a third-party app. Certain Klaviyo Partners offer this as a service, like FourSixty.
Set up your feed in Klaviyo
Once you’ve set up your RSS feed:
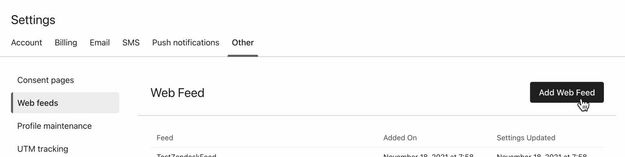
- Click your account name in the bottom left corner of Klaviyo.
- Select Settings.
- Select Other.
- Open the Web feeds tab.
- Click Add Web Feed.
- Name your feed and enter the RSS feed URL you just generated as the Feed URL in the section above.
- Set the Request Method to GET and the Content Type to XML.
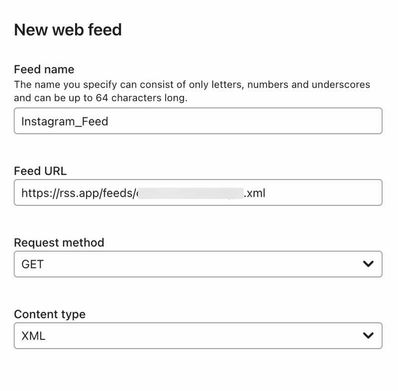
- Click Add web feed.
Pull Instagram content into your emails
If you are using a third-party platform or Instagram’s Basic Display API to generate your feed, follow our guide on adding a custom web feed to an email. If you’ve used the RSS feed app recommended above, use the code below to display the 3 most recent items from your Instagram feed in an email.
- Add a new HTML block to your template.
- Copy the following code into the HTML block, and make sure to replace FEED_NAME with your feed name (e.g., Instagram_Feed in the example above).
<div>{% for item in feeds.FEED_NAME.rss.channel.item|slice:":3" %}
    <table style="display:inline-block; margin-left:auto; margin-right:auto">
	<tbody>
	    <tr>
		<td style="width:150px; text-align: center;"><a href="{{ item.link }}">
		  <img style="max-width: 150px; height: auto;" src="{% if item|lookup:'media:content'|lookup:'0'|lookup:'@url' %}{{ item|lookup:'media:content'|lookup:'0'|lookup:'@url' }}{% else %}{{ item|lookup:'media:content'|lookup:'@url' }}{% endif %}" style="margin: 1px; max-width: 150px; height: auto;" /></a>
		</td>
	    </tr>
	</tbody>
    </table>
{% endfor %}</div>
Your Instagram feed will not load when previewing the message in Klaviyo. Send a preview email to your own inbox to make sure it appears correctly.
If you’d like to show more than 3 recent posts, adjust the filter, |slice:":3", to include the number of posts you’d like to display (e.g., |slice:":6" to show 6 posts).
If you’d like to add additional fields to your table (e.g., captions or the date an image was posted), follow our guides on adding custom web feeds to emails to adjust the code above as needed.
We only recommend using custom HTML for technically savvy marketers, or for anyone who has access to a developer. While our product does support custom HTML, our support team is unable to help you build out your custom templates beyond offering the general guidance covered in this documentation. To maintain the security of your data, Klaviyo's support team is not able to open your HTML files.
If you need developer assistance to set this up, reach out to one of Klaviyo’s Partners.
Additional resources
- How to add a custom web feed in an email
Learn how to add and use a custom web feed within an email. A custom web feed allows you to dynamically populate a feed of data from an external URL within a Klaviyo email. Before sending an email, Klaviyo makes an HTTP request to the URL and fetches the data. The content of the web feed is then available for use in your email.
- Troubleshooting your Instagram web feed in emails
Learn how to troubleshoot your Instagram web feed if it is not working in your emails, which is likely due to Klaviyo having an issue retrieving your feed content. To determine the cause, we recommend first trying to test your feed.
- How to create a base template
Learn how to create a base email template in Klaviyo. Once you create a base template, you can use it across your campaigns and flows to speed up your building process and ensure your branding is consistent across messages.