How to configure Google Analytics event tracking for a sign-up form
You will learn
Learn how to send activity from your Klaviyo sign-up forms to Google Analytics 4 (GA4), including form opens, submissions, and closes. You can also mark important interactions, such as form_submit, as key events in GA4. Follow this 2-step process:
- Add a code snippet to your website to send Klaviyo sign-up form data to Google Analytics.
- Mark the events that matter to your business as key events in Google Analytics.
This guide covers Google Analytics 4. Standard reports can take 24–48 hours to finish processing data. Use Realtime to test your tracking sooner.
Before you begin
Before adding the snippet, make sure a Klaviyo form is live on your website and your Google tag is set up for your GA4 property. The snippet uses gtag, which must be defined and configured on the page before form events occur. This snippet sends form events to GA4; it does not install Google Analytics.
Configuring event tracking for your sign-up forms in Google Analytics requires pasting a snippet of code on your site. If you are not comfortable with pasting code and do not have a developer to assist, Klaviyo has a vast network of partners in our Partner Directory.
Track Klaviyo form activity
You can track Klaviyo form activity in Google Analytics by adding a listener for the klaviyoForms event and sending a GA4 event for each interaction you want to measure. Install the listener once on each page where you want to track forms, and make sure it loads before the form activity you want to capture.
- If you're using Shopify, paste the snippet into your theme.liquid file on a new line above the closing </body> tag. Note that if you are using custom product pages, you may need to add this snippet to a different theme file, or to your individual custom product pages.
- Alternatively, if your Shopify 2.0 theme has a Custom Liquid section or block, add the snippet there on each template where your form appears. Choose one installation method per page to avoid sending duplicate events.
- If you're using a BigCommerce Stencil storefront, use Script Manager for that storefront to add the snippet to the footer on storefront pages.
Use the following listener with gtag.js to send form opens, submissions, step submissions, URL redirects, and closes to Google Analytics:
<script>
  window.addEventListener("klaviyoForms", function(e) {
    if (e.detail.type == 'open' || e.detail.type == 'embedOpen') {
      gtag('event', 'form_open', {'form': 'Klaviyo form', 'form_id': e.detail.formId});
    }
    if (e.detail.type == 'submit') {
      gtag('event', 'form_submit', {'form': 'Klaviyo form', 'form_id': e.detail.formId});
    }
    if (e.detail.type == 'stepSubmit') {
      gtag('event', 'form_step_submit', {'form': 'Klaviyo form', 'form_id': e.detail.formId, 'step_name': e.detail.metaData.$step_name});
    }
    if (e.detail.type == 'redirectedToUrl') {
      gtag('event', 'form_url_redirect', {'form': 'Klaviyo form', 'form_id': e.detail.formId});
    }
    if (e.detail.type == 'close') {
      gtag('event', 'form_close', {'form': 'Klaviyo form', 'form_id': e.detail.formId});
    }
  });
</script>
Save your website changes, then follow the testing steps below to confirm that the listener sends events to your GA4 property.
To track different form versions or A/B test variations, add form_version_id to the parameters of each gtag call you want to compare. For example, use this call in the form_open branch:
gtag('event', 'form_open', {'form': 'Klaviyo form', 'form_id': e.detail.formId, 'form_version_id': e.detail.formVersionId })Replace the following call rather than adding a second call. Keep form_id set to e.detail.formId so the listener uses the form that triggered the event:
gtag('event', 'form_open', {'form': 'Klaviyo form', 'form_id': e.detail.formId })To compare versions in GA4 reports or explorations, create an event-scoped custom dimension for form_version_id. Use the same process for other custom parameters you want to report on, such as step_name.
For a multi-step form, the browser can send more than 1 submit event during a single form interaction. With the snippet above, each of these events sends a form_submit event to GA4. The submit event fires in the following circumstances:
- For forms with email or SMS subscription actions, successfully submitting an email or phone number triggers a submit event.
- For forms that collect email and SMS subscriptions on separate steps, submitting each subscription step triggers a submit event. For example, submitting the email step and then the SMS step sends 2 form_submit events to GA4.
- For forms containing only profile fields, such as text fields, the first submitted step that collects those fields triggers a submit event. To submit the step, click a button with Action set to Submit form.
The stepSubmit event fires when each step is submitted. The snippet sends these interactions to GA4 as form_step_submit, with form_id and step_name so you can identify the form and step.
Test your tracking code
Once you’ve installed the tracking code on your site, you can test it to ensure data is being tracked. To test your code:
- Navigate to your website and interact with your form (e.g., submit or close it).
- Open Google Analytics, select the GA4 property configured for your website, and navigate to Reports > Realtime.
- In Event count by Event name, look for the event that matches your action. For example, closing the form sends
form_close. Select the event to check that theformparameter is Klaviyo form and that form_id matches the form you tested. For a multi-step form, check form_submit and form_step_submit as you submit each subscription step.
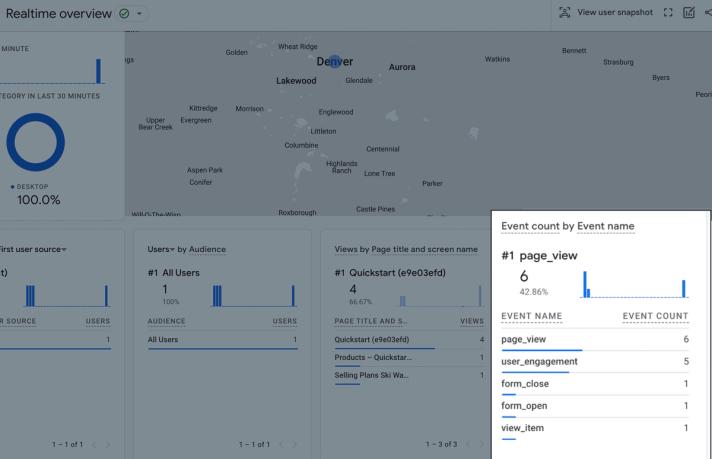
If you don’t see your events, make sure Google Analytics is set up correctly, and that the code snippet you used is correct. Also note that your events will only be visible in Realtime for 30 minutes. See [GA4] Realtime report for more details.
Mark important form events as key events
After you have confirmed that your form events reach GA4, choose which interactions are important enough to mark as key events. For example, choose form_submit to measure submissions. You need Editor or Administrator access to complete the setup below.
- In Google Analytics, navigate to Admin > Data display > Events. Open the Recent events tab and find the event you want to mark, such as
form_submit. - Click the star icon beside the event to mark it as a key event.
If your event has not appeared yet, you can mark a new event as a key event in advance. Use the exact name sent by the snippet, such as form_submit.
To count submissions from a specific form, create a separate event based on parameter values with matching conditions event_name equals form_submit and form_id equals that form’s ID. Give it a distinct event name, then mark that new event as a key event.
GA4 counts key events according to the event’s counting method: Once per event counts each occurrence, while Once per session counts it once within a session. Review your form key-event counts in Admin > Data display > Events on the Key events tab.
Marking an event as a key event applies to future events and does not change historical data. Allow up to 24 hours for key events to appear in standard reports. Realtime updates a few minutes after a key event is triggered.
Additional resources
- How to add Klaviyo onsite tracking using Google Tag Manager
Learn how to add Klaviyo's onsite tracking snippets to your site using Google Tag Manager. Some site owners use Google Tag Manager as a single point to manage all third-party web snippets they need to add to their site. Klaviyo's onsite tracking falls into this category and can be added and managed through Google Tag Manager.
- Understanding UTM tracking in Klaviyo
Learn what UTM tracking is, how it works, and how you can use it in your Klaviyo messages to gain a deeper understanding of your marketing performance.
- Track Klaviyo form activity using Javascript
- Capture new subscribers with strategic sign-up forms