학습 내용

Klaviyo의 호스팅 페이지 기능을 활성화하고 사용하는 방법을 알아보세요. 이 기능을 사용하면 환경설정 페이지, 구독 페이지, 구독 취소 페이지를 직접 커스텀 코드로 만들 수 있어요.

이 문서는 개발자용이며, Klaviyo는 현재 사용자 지정 코드를 구축하는 데 도움이 되는 서비스를 제공하지 않고 사용자 지정 코드 문제 해결에 대한 지원도 제공하지 않아요. 기본 제공되는 앱 동의 페이지에 대해 알아보려면 동의 페이지 시작하기 문서를 확인해 주세요.

시작하기 전에 알아야 할 것

호스팅 페이지를 구성하기 전에 다음 기능을 사용 설정해 주세요:

  1. 설정 > 기타로 이동합니다.
  2. 드롭다운에서 동의 페이지 를 선택해 주세요.
  3. 사용자 정의 호스팅 페이지에서 호스팅 페이지에 사용자 정의 전용 도메인 사용 스위치로 토글합니다.
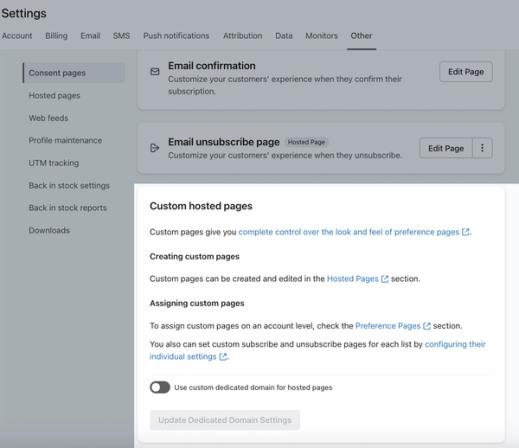
The Custom Hosted Pages section on the Consent Pages tab in Klaviyo showing the switch to enable hosted pages.

유료 요금제를 사용 중이며 계정 인증을 통과한 계정만 이 설정에 액세스할 수 있어요.

사용자 정의 동의 페이지 만들기

  1. 설정 > 기타로 이동해 주세요.
  2. 호스팅 페이지를 클릭해 주세요.
  3. 페이지 옆에서 + 기호를 클릭해 새 페이지를 추가해 주세요.
  4. 이 페이지의 이름을 지정하세요(예: 구독 취소.tmpl), 이 설정은 모든 동의 페이지에 사용할 수 있지만, 원하시면 1개 이상의 페이지를 만들 수도 있어요.

호스팅된 페이지 이름에는 공백을 포함할 수 없으며, 포함하면 오류가 발생해요. 제목에는 공백을 피하거나 언더스코어를 사용해 제목을 구분해 주세요.

  1. 원하는 필드와 기능을 포함하는 HTML 페이지를 디자인해 주세요. 맞춤 동의 페이지에 삽입할 수 있는 필드 예시는 다음과 같아요:
    • 이메일 빈도 선택 사항:
      • 구독 취소 옵션
      • 모든 이메일을 수신하는 옵션
      • 일간, 주간, 월간 등의 뉴스레터 빈도 옵션
    • 타겟팅 및 세그먼트에 사용할 수 있는 정보:
      • 사용자가 세일 공지 수신을 원하는지 여부를 위한 체크박스
      • 사용자가 제품 공지를 원하는지 여부를 선택하는 체크박스
      • 사용자가 블로그 업데이트 수신을 원하는지 여부를 위한 체크박스
      • 사용자가 가입하고 싶어 할 수 있는 다른 리스트
동의 페이지용 HTML 코드 예시

unsubscribe.tmpl에서 이 코드를 사용하면 이메일 유형과 빈도 환경설정이 포함된 완전히 작동하는 동의 페이지를 만들 수 있어요:

Email Preferences

{% if form.non_field_errors %}
{% for error in form.non_field_errors %} {{ error }}{% if not forloop.last %}
{% endif %} {% endfor %}
{% endif %}
{% if form.errors|lookup:'$email' %}

{% for error in form.errors|lookup:'$email' %}{{ error }}{% endfor %}

{% endif %}
" data-astro-cid-mnja5ucx style="--bg: #2d2d30;--headerBg: #1e1e1e;--border: #3e3e3e;--filenameText: #cccccc;">
text
<!DOCTYPE html>
<html lang="en">
   <head>
      <meta charset="utf-8">
      <meta http-equiv="X-UA-Compatible" content="IE=edge">
      <meta name="viewport" content="width=device-width, initial-scale=1">
      <!-- Latest compiled and minified CSS -->
      <link rel="stylesheet" href="https://maxcdn.bootstrapcdn.com/bootstrap/3.3.7/css/bootstrap.min.css">
      <style type="text/css">
        /* Space out content a bit */
        body {
            padding-top: 20px;
            padding-bottom: 20px;
        }

        form {
            margin-bottom: 18px;
        }

        /* Custom page header */
        .header {
            border-bottom: 1px solid #e5e5e5;
            margin-bottom: 10px;
        }

        .header h1 {
            margin: 10px 0;
        }

        .required-fields {
            text-align: right;
        }

        .required-fields span {
            color: #a94442;
            font-weight: bold;
        }

        .list-group-item label {
            font-weight: normal;
            margin-top: 17px;
        }

        .list-group-item label input[type="checkbox"] {
            margin-right: 4px;
        }

        .form-group span.required {
            position: absolute;
            top: 0;
            right: 0;
            font-size: 20px;
            color: #a94442;
            font-weight: bold;
            user-select: none;
        }

        label.error {
            color: #a94442;
            font-weight: bold;
            margin-top: 4px;
        }

        .form-actions {
            margin: 25px 0;
        }

        .form-control+.form-control {
            margin-top: 6px;
        }

        .panel-group .panel-title .closed-icon,
        .panel-group .panel-title .open-icon {
            margin-right: 0.5em;
            top: 2px;
        }

        .panel-group .panel-title a:hover,
        .panel-group .panel-title a:active {
            text-decoration: none;
        }

        .panel-group .panel-title a:hover .text,
        .panel-group .panel-title a:active .text {
            text-decoration: underline;
        }

        .panel-group .panel-title .closed-icon {
            display: none;
        }

        .panel-group.closed .panel-title .open-icon {
            display: none;
        }

        .panel-group.closed .panel-title .closed-icon {
            display: inline;
        }

        /* Custom page footer */
        .footer {
            padding-top: 18px;
            border-top: 1px solid #e5e5e5;
        }

        /* Customize container */
        @media (min-width: 768px) {
            .container {
                max-width: 730px;
            }
        }
    </style>
      <!-- HTML5 shim and Respond.js for IE8 support of HTML5 elements and media queries -->
      <!-- WARNING: Respond.js doesn't work if you view the page via file:// -->
      <!--[if lt IE 9]>
      <script src="https://oss.maxcdn.com/html5shiv/3.7.2/html5shiv.min.js"></script>
      <script src="https://oss.maxcdn.com/respond/1.4.2/respond.min.js"></script>
      <![endif]-->
   </head>
   <body>
      <div class="container">
         <div class="header">
            <img src="http://via.placeholder.com/300x75" />
            <h1>Email Preferences</h1>
         </div>
         <form action="" id="preferences_form" method="POST" role="form" class="form-horizontal">
            {% if form.non_field_errors %}
            <div class="alert alert-danger">
               {% for error in form.non_field_errors %}
               {{ error }}{% if not forloop.last %}<br />{% endif %}
               {% endfor %}
            </div>
            {% endif %}
            <input type="hidden" name="$fields" value="EmailInterests,EmailFrequency" />
            <input type="hidden" name="$list_fields" value="EmailInterests" />
            <!-- <input type="hidden" name="$unsubscribed_url" value="/p/preferences_updated" /> -->
            <!-- <input type="hidden" name="$updated_profile_url" value="/p/preferences_updated" /> -->
            <!--<p class="required-fields">
               <span>*</span> Required Information
               </p>-->
            <div class="form-group{% if form.errors|lookup:'$email' %} has-error{% endif %}">
               <label for="email" class="col-sm-3 control-label">Email Address<span class="required">*</span></label>
               <div class="col-sm-9">
                  <input type="email" class="form-control" id="email" name="$email" value="{% if request.POST|lookup:'$email' %}{{ request.POST|lookup:'$email' }}{% else %}{{ person.email|default:'' }}{% endif %}" />
                  {% if form.errors|lookup:'$email' %}
                  <p class="help-block">{% for error in form.errors|lookup:'$email' %}{{ error }}{% endfor %}</p>
                  {% endif %}
               </div>
            </div>
            <div class="form-group">
               <label for="first_name" class="col-sm-3 control-label">First Name</label>
               <div class="col-sm-9">
                  <input type="text" class="form-control" id="first_name" name="$first_name" value="{% if request.POST|lookup:'$email' %}{{ request.POST|lookup:'$first_name' }}{% else %}{{ person.first_name|default:'' }}{% endif %}" />
               </div>
            </div>
            <div class="form-group">
               <label for="last_name" class="col-sm-3 control-label">Last Name</label>
               <div class="col-sm-9">
                  <input type="text" class="form-control" id="last_name" name="$last_name" value="{% if request.POST|lookup:'$email' %}{{ request.POST|lookup:'$last_name' }}{% else %}{{ person.last_name|default:'' }}{% endif %}" />
               </div>
            </div>
            <div class="form-group">
               <label for="interests" class="col-sm-3 control-label">Interests</label>
               <div class="col-sm-9">
                  <div class="checkbox">
                     <label>
                     <input type="checkbox" name="EmailInterests" value="New Releases" {% if 'New Releases' in person.EmailInterests or 'New Releases' in request.POST.EmailInterests %}checked="checked"{% elif not person.EmailInterests and not request.POST.EmailInterests %}{% endif %} />
                     New Product Releases
                     </label>
                  </div>
                  <div class="checkbox">
                     <label>
                     <input type="checkbox" name="EmailInterests" value="Promotions" {% if 'Promotions' in person.EmailInterests or 'Promotions' in request.POST.EmailInterests %}checked="checked"{% elif not person.EmailInterests and not request.POST.EmailInterests %}{% endif %} />
                     Promotions & Sales
                     </label>
                  </div>
                  <div class="checkbox">
                     <label>
                     <input type="checkbox" name="EmailInterests" value="Blog" {% if 'Blog' in person.EmailInterests or 'Blog' in request.POST.EmailInterests %}{% elif not person.EmailInterests and not request.POST.EmailInterests %}{% endif %} />
                     Latest from the Blog
                     </label>
                  </div>
                  <div class="checkbox">
                     <label>
                     <input type="checkbox" name="EmailInterests" value="Events" {% if 'Events' in person.EmailInterests or 'Events' in request.POST.EmailInterests %}{% elif not person.EmailInterests and not request.POST.EmailInterests %}{% endif %} />
                     Events
                     </label>
                  </div>
               </div>
            </div>
            <div class="form-group">
               <label for="interests" class="col-sm-3 control-label">How often would you like to hear from us?</label>
               <div class="col-sm-9">
                  <div class="radio">
                     <label>
                        <!-- Default value. -->
                        <input type="radio" name="EmailFrequency" id="email_frequency_0" value="All" {% if person.EmailFrequency == 'All' or request.POST.EmailFrequency == 'All' %}checked="checked"{% elif not person.EmailFrequency and not request.POST.EmailFrequency %}checked="checked"{% endif %} />
                        Twice per Week
                     </label>
                  </div>
                  <div class="radio">
                     <label>
                     <input type="radio" name="EmailFrequency" id="email_frequency_1" value="Weekly" {% if person.EmailFrequency == 'Weekly' or request.POST.EmailFrequency == 'Weekly' %}checked="checked"{% endif %} />
                     Once per Week
                     </label>
                  </div>
                  <div class="radio">
                     <label>
                     <input type="radio" name="EmailFrequency" id="email_frequency_2" value="Monthly" {% if person.EmailFrequency == 'Monthly' or request.POST.EmailFrequency == 'Monthly' %}checked="checked"{% endif %} />
                     Once per Month
                     </label>
                  </div>
               </div>
            </div>
            <div class="checkbox">
               <label>
               <input type="checkbox" name="$unsubscribe" value="true" />
               <span class="text">Unsubscribe me from all emails.</span>
               </label>
            </div>
            <div class="clearfix form-actions">
               <div class="pull-right">
                  <button type="submit" class="btn btn-default btn-primary">Update Preferences</button>
               </div>
            </div>
         </form>
         <footer class="footer">
            <p>
               © 2017 Company Name — <a href="https://www.klaviyo.com" target="_blank">Privacy Policy</a>
            </p>
         </footer>
      </div>
      <!-- /container -->
      <!-- jQuery (necessary for Bootstrap's JavaScript plugins) -->
      <script src="https://ajax.googleapis.com/ajax/libs/jquery/1.11.1/jquery.min.js"></script>
      <!-- Latest compiled and minified JavaScript -->
      <script src="https://maxcdn.bootstrapcdn.com/bootstrap/3.3.7/js/bootstrap.min.js"></script>
      <script src="//cdnjs.cloudflare.com/ajax/libs/jquery-validate/1.13.1/jquery.validate.min.js"></script>
      <script>
        $(function() {
            $('#preferences_form').validate({
                rules: {
                    $email: {
                        required: true
                    }
                },
                messages: {
                    $email: 'Please enter your email address.',
                    $first_name: 'Please enter your first name.',
                    $last_name: 'Please enter your last name.'
                }
            });
            // Toggle validation based on selection.
            $('input[name="$unsubscribe"]').on('change', function() {
                $('form .form-actions button[type="submit"]').toggleClass('cancel', $(this).is(':checked'));
            });
        });
        $('input[name="$unsubscribe"]').on('change', function(){
          $('input[type=checkbox]').not(this).prop('checked', false);
        });
        $('input[type=checkbox]').not('input[name="$unsubscribe"]').on('change', function(){
          $('input[name="$unsubscribe"]').prop('checked', false);
        });
    </script>
   </body>
</html>

호스팅 페이지 제출 후 리디렉션을 설정하세요(선택 사항).

기본적으로 호스팅 페이지(예: 호스팅된 기본 설정 페이지)가 성공적으로 제출되면 사용자는 다음 2곳 중 1곳으로 리디렉션돼요:

  • 구독 취소를 요청한 경우 계정의 기본 구독 취소 확인 페이지로 이동해요.
  • 프로필을 업데이트했거나(또는 구독 취소 요청이 아닌 다른 작업을 한 경우), 사용자가 계정의 기본 환경설정 확인(성공) 페이지로 이동돼요.

위의 샘플 HTML을 사용했다면, 이는 <body>에 다음과 같이 반영돼요:

text
<!-- <input type="hidden" name="$unsubscribed_url" value="/p/preferences_updated" /> --><!-- <input type="hidden" name="$updated_profile_url" value="/p/preferences_updated" /> -->

호스팅된 페이지를 제출한 후 리디렉션되는 위치를 사용자 지정하려면 HTML에서 value="..." 줄을 원하는 URL로 조정하세요.

호스팅된 페이지에 맞춤 애셋 추가하기(선택 사항)

호스팅된 페이지에서 자체 CSS 파일, JS 파일 또는 이미지를 사용하려면 Assets 옆의 + 기호를 클릭해 업로드하고 페이지의 소스 코드에서 해당 항목을 참조하세요.

Klaviyo 계정에 업로드한 에셋을 참조하려면 다음 태그를 사용하세요: {% asset_url 'style.css' %}

source code of your consent page showing uploaded custom asset tag

맞춤 동의 페이지 사용하기

계정의 기본 동의 페이지를 각각 사용자 지정 코드 페이지로 대체하면, 모든 이메일에서 기본적으로 이 사용자 지정 페이지를 사용하도록 설정할 수 있어요. 또는 특정 1개 리스트만 사용자 지정 코드 페이지를 사용하도록 구성해, 해당 리스트로 발송되는 이메일만 사용자 지정 페이지를 사용하게 할 수도 있어요.

  • 특정 리스트에 대해 동의 페이지를 맞춤 설정한 경우, 해당 리스트로 전송되는 모든 이메일은 해당 고유 동의 페이지를 사용해요.
  • 고유한 동의 페이지를 맞춤 설정하지 않은 모든 리스트는 계정의 기본 동의 페이지를 사용해요. 또한 지표로 트리거되는 플로우 이메일, 세그먼트로 전송되는 캠페인 또는 개인 이메일을 포함해 특정 리스트로 전송되지 않는 모든 이메일도 기본 동의 페이지를 사용해요.

기본 동의 페이지를 호스팅된 페이지로 변경

계정의 기본 동의 페이지(예: 기본 설정 페이지, 구독 페이지 또는 이메일 구독 취소 페이지) 1개 이상을 사용자 지정 코드로 만든 페이지로 대체하려면 다음 단계를 따르세요:

  1. Klaviyo 왼쪽 하단에 있는 회사 이름을 클릭해 주세요.
  2. 설정을 선택합니다.
Account tab in the bottom left corner with settings selected from the navigation menu
  1. 상단에서 기타를 선택해 주세요.
  2. 교체하려는 동의 페이지에서 점 3개 드롭다운 메뉴를 클릭한 다음 호스팅 페이지 사용을 선택해 주세요.
The Consent Pages tab in Klaviyo showing an the additional options menu open on an example preference page.
  1. 표시되는 대화 상자 창에서 맞춤 페이지 파일을 선택하고 저장을 클릭해 주세요.

세그먼트에 전송되는 플로우 이메일 또는 캠페인에 맞춤 페이지를 사용하려면, 계정의 기본 동의 페이지가 맞춤 페이지를 사용하도록 전환해야 해요. 위와 동일한 절차를 따라 기본 동의 페이지를 맞춤 코딩된 페이지로 교체하세요.

목록에 사용자 정의 동의 페이지를 사용하세요.

기본 동의 페이지 대신 맞춤 페이지를 사용하려는 각 리스트를 개별적으로 설정해야 해요.

  1. 사용자 지정 페이지에 연결하려는 리스트로 이동해 주세요.
  2. 구독 및 환경 설정 페이지 탭을 클릭하여 해당 목록에 대해 편집 가능한 동의 페이지를 모두 확인합니다.
  3. 맞춤 페이지로 바꾸려는 동의 페이지 아래에서 점 3개 드롭다운 메뉴를 클릭하고 호스팅된 페이지 사용을 선택하세요.

The Subscribe & preferences pages tab for an example list in Klaviyo showing the additional actions menu open on the preferences page.

원하시면 모든 동의 페이지에 대해 호스팅된 페이지를 사용하도록 선택할 수도 있어요.

  1. 표시되는 대화 상자 창에서 맞춤 페이지 파일을 선택하고 저장을 클릭해 주세요.

이메일에서는 표준 Klaviyo 구독 취소 및 환경설정 관리 태그(즉, {% unsubscribe %} 및 {% manage_preferences %})를 계속 사용해야 해요. 이 태그는 실제 전송되는 이메일에서 링크로 채워지며, 수신자를 자동으로 맞춤 페이지로 이동시켜요.

호스팅 페이지 FAQ

이 양식이 제대로 제출되려면 페이지에 JavaScript를 추가해야 하나요?
커스텀 양식은 호스팅 페이지 안에 포함되므로, 제대로 제출되도록 하려면 <form>에 추가 JavaScript나 작업 URL을 따로 추가할 필요가 없어요. 호스팅 페이지가 Klaviyo를 통해 발송된 이메일에서 방문된 경우, 자동으로 올바른 연락처에 연결돼요.

이 페이지가 HTML이어야 하나요?
이 페이지는 HTML이어야 합니다. 이미지, 스타일시트 등에 연결하거나 포함된 파일 폴더를 추가하여 추가 이미지, 스타일시트 등을 포함할 수 있습니다.

Klaviyo에서 맞춤 페이지를 만드는 데 도움을 받을 수 있나요?
Klaviyo는 현재 맞춤 코드 구축을 지원하는 서비스를 제공하지 않으며, 맞춤 코드 문제 해결에 대한 지원도 제공하지 않아요. Hosted Pages 기능은 개발자 또는 코드에 능숙한 마케터를 위한 빈 캔버스를 제공하도록 설계되었어요.

동의 페이지 시작하기에서 Klaviyo의 기본 제공 동의 페이지로 할 수 있는 사용자 지정 기능을 자세히 알아보세요.

이 도움말 문서가 유용했나요?
이 형식은 도움말 문서 피드백 용도로만 사용하세요. 지원 팀에 문의하는 방법.

Klaviyo에서 자세히 살펴보기

커뮤니티
동료, 파트너, Klaviyo 전문가와 연결되어 영감을 받고 인사이트를 공유하며, 모든 궁금한 사항에 대해 답을 얻으세요.
파트너
특정 작업을 도와주거나 지속적인 마케팅 관리를 위해 Klaviyo 인증 전문가를 고용하세요.
지원

계정을 통해 지원에 액세스하세요.

이메일 지원 (무료 체험 및 유료 계정) 연중무휴 24시간 사용 가능

채팅/가상 비서
사용 가능 여부는 위치 및 요금제 유형에 따라 다름