このページで学べること

Klaviyo のホストページ機能を有効にして使用する方法を確認します。この機能を使うと、独自のカスタムコードで独自の設定ページ、購読ページ、購読解除ページを作成できます。

この記事は開発者向けです。Klaviyo では現在、カスタムコードの構築を支援するサービスは提供しておらず、カスタムコードのトラブルシューティングに関するサポートも提供していません。組み込みのアプリ同意ページについては、同意ページのスタートガイドに関する記事をご覧ください。

始める前に

ホストページを設定する前に、次の機能を有効にしてください:

  1. [設定] > その他に進みます。
  2. ドロップダウンから [同意ページ] を選択します。
  3. カスタム ホスト ページで、ホスト ページにカスタム専用ドメインを使用するのスイッチをオンに切り替えます。
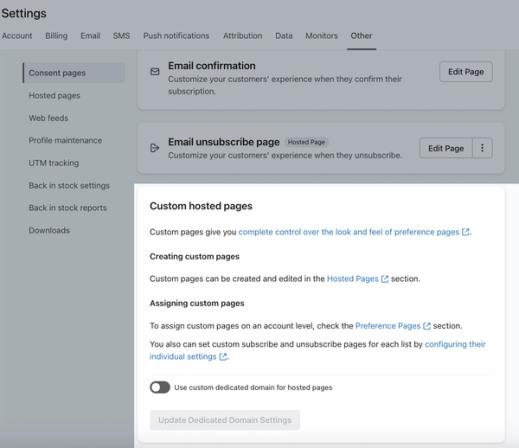
The Custom Hosted Pages section on the Consent Pages tab in Klaviyo showing the switch to enable hosted pages.

この設定にアクセスできるのは、アカウント検証を完了している有料プランのアカウントのみである点にご注意ください。

カスタムの同意ページを作成

  1. [設定] > その他に進みます。
  2. [ホストされたページ] をクリックします。
  3. Pages の横にある + 記号をクリックして、新しいページを追加します。
  4. このページに名前を付けてください(例: unsubscribe.tmpl);これはどの同意ページにも使用できますが、必要であれば 2 ページ以上作成することもできます。

ホスト ページ名にスペースを含めることはできません。含めるとエラーになります。スペースを避けるか、タイトルを区切るためにアンダースコアを使用してください。

  1. 任意のフィールドと機能を含む HTML ページをデザインします。カスタム同意ページに挿入できるフィールドの例は次のとおりです:
    • メール配信頻度の選択肢:
      • 購読解除するオプション
      • すべてのメールを受信するオプション
      • 日次、週次、月次などのニュースレターの配信頻度オプション
    • ターゲティングとセグメント化に使用できる情報:
      • ユーザーがセール告知を希望するかどうかを指定するチェックボックス
      • ユーザーが商品のお知らせを希望するかどうかのチェックボックス
      • ユーザーがブログの更新情報を希望するかどうかのチェックボックス
      • ユーザーが参加したいと思う可能性がある他のリスト
同意ページ用の HTML コードの例

メールタイプと頻度の設定を含む、完全に機能する同意ページを取得するために、このコードを unsubscribe.tmpl で使用できます。

Email Preferences

{% if form.non_field_errors %}
{% for error in form.non_field_errors %} {{ error }}{% if not forloop.last %}
{% endif %} {% endfor %}
{% endif %}
{% if form.errors|lookup:'$email' %}

{% for error in form.errors|lookup:'$email' %}{{ error }}{% endfor %}

{% endif %}
" style="--bg: #2d2d30;--headerBg: #1e1e1e;--border: #3e3e3e;--filenameText: #cccccc;" data-astro-cid-pyzdmkoo>
text
<!DOCTYPE html>
<html lang="en">
   <head>
      <meta charset="utf-8">
      <meta http-equiv="X-UA-Compatible" content="IE=edge">
      <meta name="viewport" content="width=device-width, initial-scale=1">
      <!-- Latest compiled and minified CSS -->
      <link rel="stylesheet" href="https://maxcdn.bootstrapcdn.com/bootstrap/3.3.7/css/bootstrap.min.css">
      <style type="text/css">
        /* Space out content a bit */
        body {
            padding-top: 20px;
            padding-bottom: 20px;
        }

        form {
            margin-bottom: 18px;
        }

        /* Custom page header */
        .header {
            border-bottom: 1px solid #e5e5e5;
            margin-bottom: 10px;
        }

        .header h1 {
            margin: 10px 0;
        }

        .required-fields {
            text-align: right;
        }

        .required-fields span {
            color: #a94442;
            font-weight: bold;
        }

        .list-group-item label {
            font-weight: normal;
            margin-top: 17px;
        }

        .list-group-item label input[type="checkbox"] {
            margin-right: 4px;
        }

        .form-group span.required {
            position: absolute;
            top: 0;
            right: 0;
            font-size: 20px;
            color: #a94442;
            font-weight: bold;
            user-select: none;
        }

        label.error {
            color: #a94442;
            font-weight: bold;
            margin-top: 4px;
        }

        .form-actions {
            margin: 25px 0;
        }

        .form-control+.form-control {
            margin-top: 6px;
        }

        .panel-group .panel-title .closed-icon,
        .panel-group .panel-title .open-icon {
            margin-right: 0.5em;
            top: 2px;
        }

        .panel-group .panel-title a:hover,
        .panel-group .panel-title a:active {
            text-decoration: none;
        }

        .panel-group .panel-title a:hover .text,
        .panel-group .panel-title a:active .text {
            text-decoration: underline;
        }

        .panel-group .panel-title .closed-icon {
            display: none;
        }

        .panel-group.closed .panel-title .open-icon {
            display: none;
        }

        .panel-group.closed .panel-title .closed-icon {
            display: inline;
        }

        /* Custom page footer */
        .footer {
            padding-top: 18px;
            border-top: 1px solid #e5e5e5;
        }

        /* Customize container */
        @media (min-width: 768px) {
            .container {
                max-width: 730px;
            }
        }
    </style>
      <!-- HTML5 shim and Respond.js for IE8 support of HTML5 elements and media queries -->
      <!-- WARNING: Respond.js doesn't work if you view the page via file:// -->
      <!--[if lt IE 9]>
      <script src="https://oss.maxcdn.com/html5shiv/3.7.2/html5shiv.min.js"></script>
      <script src="https://oss.maxcdn.com/respond/1.4.2/respond.min.js"></script>
      <![endif]-->
   </head>
   <body>
      <div class="container">
         <div class="header">
            <img src="http://via.placeholder.com/300x75" />
            <h1>Email Preferences</h1>
         </div>
         <form action="" id="preferences_form" method="POST" role="form" class="form-horizontal">
            {% if form.non_field_errors %}
            <div class="alert alert-danger">
               {% for error in form.non_field_errors %}
               {{ error }}{% if not forloop.last %}<br />{% endif %}
               {% endfor %}
            </div>
            {% endif %}
            <input type="hidden" name="$fields" value="EmailInterests,EmailFrequency" />
            <input type="hidden" name="$list_fields" value="EmailInterests" />
            <!-- <input type="hidden" name="$unsubscribed_url" value="/p/preferences_updated" /> -->
            <!-- <input type="hidden" name="$updated_profile_url" value="/p/preferences_updated" /> -->
            <!--<p class="required-fields">
               <span>*</span> Required Information
               </p>-->
            <div class="form-group{% if form.errors|lookup:'$email' %} has-error{% endif %}">
               <label for="email" class="col-sm-3 control-label">Email Address<span class="required">*</span></label>
               <div class="col-sm-9">
                  <input type="email" class="form-control" id="email" name="$email" value="{% if request.POST|lookup:'$email' %}{{ request.POST|lookup:'$email' }}{% else %}{{ person.email|default:'' }}{% endif %}" />
                  {% if form.errors|lookup:'$email' %}
                  <p class="help-block">{% for error in form.errors|lookup:'$email' %}{{ error }}{% endfor %}</p>
                  {% endif %}
               </div>
            </div>
            <div class="form-group">
               <label for="first_name" class="col-sm-3 control-label">First Name</label>
               <div class="col-sm-9">
                  <input type="text" class="form-control" id="first_name" name="$first_name" value="{% if request.POST|lookup:'$email' %}{{ request.POST|lookup:'$first_name' }}{% else %}{{ person.first_name|default:'' }}{% endif %}" />
               </div>
            </div>
            <div class="form-group">
               <label for="last_name" class="col-sm-3 control-label">Last Name</label>
               <div class="col-sm-9">
                  <input type="text" class="form-control" id="last_name" name="$last_name" value="{% if request.POST|lookup:'$email' %}{{ request.POST|lookup:'$last_name' }}{% else %}{{ person.last_name|default:'' }}{% endif %}" />
               </div>
            </div>
            <div class="form-group">
               <label for="interests" class="col-sm-3 control-label">Interests</label>
               <div class="col-sm-9">
                  <div class="checkbox">
                     <label>
                     <input type="checkbox" name="EmailInterests" value="New Releases" {% if 'New Releases' in person.EmailInterests or 'New Releases' in request.POST.EmailInterests %}checked="checked"{% elif not person.EmailInterests and not request.POST.EmailInterests %}{% endif %} />
                     New Product Releases
                     </label>
                  </div>
                  <div class="checkbox">
                     <label>
                     <input type="checkbox" name="EmailInterests" value="Promotions" {% if 'Promotions' in person.EmailInterests or 'Promotions' in request.POST.EmailInterests %}checked="checked"{% elif not person.EmailInterests and not request.POST.EmailInterests %}{% endif %} />
                     Promotions & Sales
                     </label>
                  </div>
                  <div class="checkbox">
                     <label>
                     <input type="checkbox" name="EmailInterests" value="Blog" {% if 'Blog' in person.EmailInterests or 'Blog' in request.POST.EmailInterests %}{% elif not person.EmailInterests and not request.POST.EmailInterests %}{% endif %} />
                     Latest from the Blog
                     </label>
                  </div>
                  <div class="checkbox">
                     <label>
                     <input type="checkbox" name="EmailInterests" value="Events" {% if 'Events' in person.EmailInterests or 'Events' in request.POST.EmailInterests %}{% elif not person.EmailInterests and not request.POST.EmailInterests %}{% endif %} />
                     Events
                     </label>
                  </div>
               </div>
            </div>
            <div class="form-group">
               <label for="interests" class="col-sm-3 control-label">How often would you like to hear from us?</label>
               <div class="col-sm-9">
                  <div class="radio">
                     <label>
                        <!-- Default value. -->
                        <input type="radio" name="EmailFrequency" id="email_frequency_0" value="All" {% if person.EmailFrequency == 'All' or request.POST.EmailFrequency == 'All' %}checked="checked"{% elif not person.EmailFrequency and not request.POST.EmailFrequency %}checked="checked"{% endif %} />
                        Twice per Week
                     </label>
                  </div>
                  <div class="radio">
                     <label>
                     <input type="radio" name="EmailFrequency" id="email_frequency_1" value="Weekly" {% if person.EmailFrequency == 'Weekly' or request.POST.EmailFrequency == 'Weekly' %}checked="checked"{% endif %} />
                     Once per Week
                     </label>
                  </div>
                  <div class="radio">
                     <label>
                     <input type="radio" name="EmailFrequency" id="email_frequency_2" value="Monthly" {% if person.EmailFrequency == 'Monthly' or request.POST.EmailFrequency == 'Monthly' %}checked="checked"{% endif %} />
                     Once per Month
                     </label>
                  </div>
               </div>
            </div>
            <div class="checkbox">
               <label>
               <input type="checkbox" name="$unsubscribe" value="true" />
               <span class="text">Unsubscribe me from all emails.</span>
               </label>
            </div>
            <div class="clearfix form-actions">
               <div class="pull-right">
                  <button type="submit" class="btn btn-default btn-primary">Update Preferences</button>
               </div>
            </div>
         </form>
         <footer class="footer">
            <p>
               © 2017 Company Name — <a href="https://www.klaviyo.com" target="_blank">Privacy Policy</a>
            </p>
         </footer>
      </div>
      <!-- /container -->
      <!-- jQuery (necessary for Bootstrap's JavaScript plugins) -->
      <script src="https://ajax.googleapis.com/ajax/libs/jquery/1.11.1/jquery.min.js"></script>
      <!-- Latest compiled and minified JavaScript -->
      <script src="https://maxcdn.bootstrapcdn.com/bootstrap/3.3.7/js/bootstrap.min.js"></script>
      <script src="//cdnjs.cloudflare.com/ajax/libs/jquery-validate/1.13.1/jquery.validate.min.js"></script>
      <script>
        $(function() {
            $('#preferences_form').validate({
                rules: {
                    $email: {
                        required: true
                    }
                },
                messages: {
                    $email: 'Please enter your email address.',
                    $first_name: 'Please enter your first name.',
                    $last_name: 'Please enter your last name.'
                }
            });
            // Toggle validation based on selection.
            $('input[name="$unsubscribe"]').on('change', function() {
                $('form .form-actions button[type="submit"]').toggleClass('cancel', $(this).is(':checked'));
            });
        });
        $('input[name="$unsubscribe"]').on('change', function(){
          $('input[type=checkbox]').not(this).prop('checked', false);
        });
        $('input[type=checkbox]').not('input[name="$unsubscribe"]').on('change', function(){
          $('input[name="$unsubscribe"]').prop('checked', false);
        });
    </script>
   </body>
</html>

送信後のホスト済みページのリダイレクトを設定します(任意)。

デフォルトでは、ホストページ(例:ホストされた設定ページ)が正常に送信されると、ユーザーは 2 か所のうち 1 つにリダイレクトされます。

  • 購読解除をリクエストした場合は、アカウントのデフォルトの購読解除確認ページに送信されます。
  • プロファイルを更新した場合(または購読解除リクエスト以外の操作を行った場合)、ユーザーはアカウントのデフォルトの設定確認(成功)ページに送信されます。

上のサンプル HTML を使用した場合、これは <body> で次のように反映されます:

text
<!-- <input type="hidden" name="$unsubscribed_url" value="/p/preferences_updated" /> --><!-- <input type="hidden" name="$updated_profile_url" value="/p/preferences_updated" /> -->

ホストページを送信した後にリダイレクトされる場所をカスタマイズするには、HTML 内の value="..." 行を、希望する URL に調整してください。

ホストされているページにカスタム アセットを追加する(任意)

ホスト型ページで独自の CSS ファイル、JS ファイル、または画像を使用する場合は、 アセット の横にある + 記号をクリックしてアップロードし、ページのソースコードで参照してください。

Klaviyo アカウントにアップロードしたアセットを参照するには、次のタグを使用します。 {% asset_url 'style.css' %}

source code of your consent page showing uploaded custom asset tag

カスタム同意ページの使用

アカウントのデフォルト同意ページは、各ページをカスタムコードのページに置き換えることができ、すべてのメールでデフォルトでこれらのカスタムページが使用されます。または、特定の 1 つのリストのみがカスタムコードのページを使用するように設定することもでき、その場合、そのリストに送信されるメールのみがカスタムページを使用します。

  • 特定のリスト用に同意ページをカスタマイズしている場合、そのリストに送信されるすべてのメールでは、それらの固有の同意ページが使用されます。
  • 固有の同意ページをカスタマイズしていないリストは、アカウントのデフォルトの同意ページを使用します。さらに、メトリック トリガーのフロー メール、セグメントに送信されるキャンペーン、または パーソナルメール を含め、特定のリストに送信されないメールも、デフォルトの同意ページを使用します。

デフォルトの同意ページをホスト型ページに変更

アカウントのデフォルトの同意ページ(例:設定ページ、購読ページ、またはメールの購読解除ページ)を 1 つ以上カスタム コードのページに置き換えたい場合は、次の手順に従ってください:

  1. Klaviyo の左下隅にある会社名をクリックします。
  2. [設定] を選択します。
Account tab in the bottom left corner with settings selected from the navigation menu
  1. 上部から [その他] を選択します。
  2. 置き換える予定の同意ページで 3 点リーダーのドロップダウンメニューをクリックし、[ホストページを使用] を選択します。
The Consent Pages tab in Klaviyo showing an the additional options menu open on an example preference page.
  1. 表示されるダイアログ ウィンドウで、カスタム ページ ファイルを選択し、[保存] をクリックします。

セグメントに送信するフロー メールやキャンペーンでカスタムページを使用する場合は、アカウントのデフォルトの同意ページを、カスタムページを使用する設定に切り替える必要があります。上記と同じ手順に従って、デフォルトの同意ページをカスタムコードのページに置き換えてください。

リストにカスタム同意ページを使用する

デフォルトの同意ページではなくカスタムページを使用するには、対象の各リストを個別に設定する必要があります。

  1. カスタム ページに接続するリストに移動します。
  2. [購読 & 設定ページ] タブをクリックして、そのリストの編集可能な同意ページをすべて表示します。
  3. カスタムページに置き換えたい同意ページの下で、3 点のドロップダウンメニューをクリックし、ホストページを使用 を選択してください。

The Subscribe & preferences pages tab for an example list in Klaviyo showing the additional actions menu open on the preferences page.

必要に応じて、すべての同意ページにホスト型ページを使用するよう選択できます。

  1. 表示されるダイアログ ウィンドウで、カスタム ページ ファイルを選択し、[保存] をクリックします。

メールでは、標準の Klaviyo の購読解除および配信設定を管理するタグ(例:{% unsubscribe %} と {% manage_preferences %})を引き続き使用する必要があります。これらのタグはライブメール内でリンクとして表示され、受信者は自動的にカスタムページに移動します。

ホストされたページ FAQ

このフォームを正しく送信するには、ページに JavaScript を追加する必要がありますか?
カスタム フォームはホストされたページ内に含まれるため、正しく送信できるようにするために追加の JavaScript や <form> のアクション URL を追加する必要はありません。ホストされたページが Klaviyo 経由で送信されたメールからアクセスされた場合、正しい連絡先に自動的に紐づきます。

このページは HTML である必要がありますか?
このページは HTML である必要があります。リンクで追加するか、含まれるファイルのフォルダを追加することで、追加の画像やスタイルシートなどを含めることができます。

Klaviyo はカスタムページの作成を支援できますか?
Klaviyo は現在、カスタムコードの構築を支援するサービスを提供しておらず、カスタムコードのトラブルシューティングに関するサポートも提供していません。ホストページ 機能は、開発者やコードに精通したマーケター向けに、白紙の状態を提供することを目的としています。

同意ページのスタートガイドで、Klaviyo の組み込み同意ページに関するカスタマイズ機能の詳細をご覧ください。

その他のリソース

この記事は役に立ちましたか?
この記事へのフィードバックには、このフォームのみを使用してください。 サポートへの連絡方法.

Klaviyo の詳細を見る

コミュニティ
同業者、パートナー、Klaviyo のエキスパートとつながり、インスピレーションを得たり、インサイトを共有したり、あらゆる質問への回答を得たりできます。
パートナー
特定のタスクのサポートや継続的なマーケティング管理のために、Klaviyo 認定エキスパートを雇いましょう。
サポート

アカウントからサポートにアクセスしてください。

メールサポート (無料トライアルと有料アカウント) 24 時間 365 日利用可能

チャット/バーチャル アシスタント
利用可否は地域およびプランタイプによって異なります